Easy Cream Puff Cake Delightful and Simple Recipe
![To make the Easy Cream Puff Cake, gather these key ingredients: - 1 cup water - 1/2 cup unsalted butter - 1 cup all-purpose flour - 1/4 teaspoon salt - 1 teaspoon vanilla extract (for the dough) - 4 large eggs - 1 cup heavy cream - 1/2 cup powdered sugar - 1 teaspoon vanilla extract (for the cream filling) These ingredients work together to create a light and airy cream puff. The water and butter form the base, while the flour and eggs give it structure. The cream and sugar make the filling sweet and fluffy. For a touch of flair, consider these optional garnishes: - Fresh berries - Chocolate shavings These add color and a burst of flavor. They make your Easy Cream Puff Cake look even more inviting. You can use any berries you like. Strawberries, blueberries, or raspberries work well. You will need a few tools to create this dessert: - Medium saucepan - Mixing bowl - Whisk or electric mixer - Pastry bag with a large round tip (or a spoon) - Baking sheet - Parchment paper - Wire rack Having the right tools makes the process smooth. Prepare everything before you start to keep things organized. This will help you enjoy making your Easy Cream Puff Cake even more. For the full recipe, check the details above. Start by preheating your oven to 400°F (200°C). This step is key for baking the cream puffs. While the oven heats, line a baking sheet with parchment paper. This makes it easy to remove the puffs later. In a medium saucepan, mix 1 cup of water and 1/2 cup of unsalted butter. Heat this over medium-high until it boils. Once boiling, remove the saucepan from heat. Quickly mix in 1 cup of all-purpose flour and 1/4 teaspoon of salt. Stir until the dough forms a ball. Let it cool for about 5 minutes. This is important so the eggs don't cook when you add them. Stir in 1 teaspoon of vanilla extract, then mix in the eggs one by one, until smooth and glossy. Using a pastry bag or spoon, drop tablespoon-sized mounds of dough onto the baking sheet. Space them about 2 inches apart. Bake for 25-30 minutes. You want them golden brown and puffed. After baking, let them cool completely on a wire rack. While the puffs cool, prepare the filling. In a mixing bowl, combine 1 cup of heavy cream, 1/2 cup of powdered sugar, and 1 teaspoon of vanilla extract. Whip this mixture until you see soft peaks. This will create a light and fluffy filling. When the cream puffs are cool, slice off the tops. Fill each puff with the whipped cream mixture. Replace the tops gently. For a nice touch, dust with powdered sugar and add fresh berries or chocolate shavings if you like. You can find the full recipe in the earlier section. When making your cream puff cake, watch out for a few key errors: - Overmixing the dough: This can lead to tough puffs. Mix just until smooth. - Underbaking: If you take them out too soon, they won’t rise well. Make sure they are golden brown. - Not spacing the dough: If you place the dough too close, they will stick together. Keep 2 inches between mounds. For light and airy cream puffs, follow these simple tips: - Use room temperature eggs: This helps them mix better into the dough. - Allow dough to cool: Let it cool for 5 minutes before adding eggs. This keeps the puffs from collapsing. - Don’t open the oven door: Opening it can cause the puffs to deflate. Wait until baking time is up. When serving your cream puff cake, consider these fun ideas: - Add fresh berries: They add color and a burst of flavor. - Drizzle chocolate sauce: A sweet touch that makes the cake even more special. - Dust with powdered sugar: This gives a nice finish and enhances the look. For the full recipe and more tips, check the [Full Recipe]. {{image_4}} You can change the filling to match your taste. Here are some ideas: - Chocolate: Use cocoa powder in the cream mix. - Coffee: Add espresso powder for a rich flavor. - Fruit: Mix in pureed fruits like strawberries or mango. - Citrus: Incorporate lemon or orange zest for a fresh kick. Each option makes the cream puffs unique and fun. Feel free to mix flavors too! If you need a gluten-free treat, you can use gluten-free flour. Choose a blend that works well for baking. Here’s how: - Substitute all-purpose flour with a gluten-free blend in equal parts. - Ensure that your other ingredients are also gluten-free, like vanilla extract. These small changes let everyone enjoy this dessert, regardless of dietary needs. Toppings can make your cream puffs even more special. Here are some great ideas: - Caramel Sauce: Drizzle over the top for a sweet finish. - Whipped Cream: Add more whipped cream for extra fluffiness. - Nuts: Sprinkle chopped nuts for a crunchy texture. - Sprinkles: Use colorful sprinkles for a festive look. Each topping can change the feel of the cake and surprise your guests. Enjoy experimenting with your favorites! To keep your cream puff cake fresh, store it in the fridge. Place it in an airtight container. It will stay good for about 2 to 3 days. The whipped cream filling may soften, but the flavors will still shine. If you stack the puffs, use parchment paper to separate them. This prevents sticking. You can freeze cream puffs if you have leftovers. Start by freezing the unfilled puffs. Place them on a baking sheet and freeze until solid. Then, transfer them to a freezer bag. They will last for up to 3 months. When ready to enjoy, just thaw them in the fridge. Then fill them with fresh whipped cream. When reheating, keep it simple. Preheat your oven to 350°F (175°C). Place the cream puffs on a baking sheet. Heat them for about 10 minutes. This method keeps them crisp. Avoid microwaving, as this can make them soggy. Serve warm for the best taste, and add fresh whipped cream just before serving for a delightful treat. For the full recipe, check out the Heavenly Cream Puff Cake! Cream puffs rise due to steam. When you heat the dough, the water turns to steam. This steam pushes against the dough, making it puff up. The eggs in the dough also help create structure. They add strength and keep the puffs airy. For best results, bake them at the right temperature. If they bake too low, they won’t rise well. Yes, you can! Feel free to get creative with fillings. You can use pastry cream, custard, or even ice cream. Try adding fruits or chocolate for extra flavor. Each filling brings a unique taste. Just ensure the filling is light to keep the puff's texture. To avoid soggy cream puffs, cool them well. Let them sit in the oven after baking. This step helps any steam escape. Make sure to fill them right before serving. If you fill them too early, they may get soggy. Storing them in a cool, dry place also helps. Serve your Easy Cream Puff Cake chilled or at room temperature. Stack the filled puffs on a nice plate. Dust them with powdered sugar for a touch of elegance. You can also add berries or chocolate shavings on top. This makes it look appealing and tasty. Enjoy with coffee or tea for a perfect treat! This article covered everything you need for Easy Cream Puff Cake. We discussed the key ingredients, tools, and step-by-step instructions to create the perfect puffs. I shared tips to avoid common mistakes and ideas for fun variations. Remember to store leftovers properly to keep them fresh. With these tips, you can impress everyone with your baking skills. Enjoy making and sharing your Easy Cream Puff Cake!](https://tossedflavors.com/wp-content/uploads/2025/06/9e48d48a-3759-4535-a45f-d0dcd856cc72.webp)
Are you ready to impress your friends and family with a delicious dessert that’s simple to make? Look no further! My Easy Cream Puff Cake recipe combines fluffy cream puffs …
Are you ready to impress your friends and family with a delicious dessert that’s simple to make? Look no further! My Easy Cream Puff Cake recipe combines fluffy cream puffs …

Are you ready to elevate your summer cookouts? Classic Mexican Street Corn Off the Cob Delight transforms this favorite street food into an easy, delicious dish you can enjoy at …
![- Fresh, frozen, or canned corn (2 cups) - Fritos corn chips (1 cup) - Cherry tomatoes, halved (1 cup) - Red bell pepper, diced (1/2 cup) - Green onions, sliced (1/2 cup) - Shredded cheddar cheese (1/2 cup) - Mayonnaise (1/2 cup) - Lime juice (1 tablespoon) - Chili powder (1 teaspoon) - Salt and pepper to taste These ingredients work together to make a crunchy and flavorful salad. Fresh corn adds sweetness, while Fritos bring the perfect crunch. Cherry tomatoes and red bell peppers add color and taste. Green onions give a fresh bite, and cheddar cheese adds richness. The mayonnaise and lime juice create a creamy dressing that ties it all together. - Avocado, diced - Black beans, rinsed and drained - Jalapeños, minced For those wanting to boost flavor, consider adding diced avocado for creaminess. Black beans add protein and texture, while minced jalapeños bring heat. These extras can make the salad even more delicious and satisfying. You can find the Full Recipe for this delightful dish included above. 1. Preparing the corn: If you use fresh corn, boil it. Bring water to a boil and add corn. Cook for 3-5 minutes until tender. Drain and let it cool. For frozen corn, just follow package instructions. Canned corn needs to be drained before using. 2. Mixing the vegetables: In a large bowl, add the cooled corn, halved cherry tomatoes, diced red pepper, sliced green onions, and shredded cheddar cheese. Toss gently to mix. 1. In a small bowl, whisk together mayonnaise, lime juice, chili powder, salt, and pepper. Mix until smooth. This dressing adds creaminess and a kick to the salad. 1. Pour the dressing over the vegetable mix. Fold gently to coat everything without smashing the Fritos. 2. Just before serving, add the Fritos corn chips. This keeps them crunchy. If you want extra crunch, sprinkle them on top instead of mixing. For the full recipe, check the complete instructions above! To make the best Fritos Corn Salad, you need to mix gently. When you combine the veggies and dressing, be careful not to crush the Fritos. Use a spatula and fold the mixture. This keeps your chips crunchy! For flavor boost, chill the salad for at least 30 minutes. This step lets all the tastes mix well. The cold salad feels fresh and ready to serve. Fritos Corn Salad is perfect for summer barbecues and picnics. It's also great for potlucks or game day snacks. People love the crunch and flavor! Pair this salad with grilled meats like chicken or burgers. It also goes well with spicy dishes or tacos. Try it as a side with your favorite main course! For the full recipe, check out the [Full Recipe]. {{image_4}} You can make Fritos Corn Salad your own. Adding protein can boost its flavor and nutrition. Grilled chicken or shrimp works great. Just chop the cooked meat and mix it in. This adds a tasty twist and makes it more filling. If you want a vegetarian option, try tofu. Use firm tofu, cut into cubes. Cook it in a pan until golden. Then, add it to the salad. This makes the dish hearty and satisfying for everyone. You can also change the flavor of your salad. For a Mexican-inspired taste, add taco seasoning. This gives the dish a bold kick. Just mix in about one tablespoon of seasoning with the dressing for a fun twist. If you want a Southwest vibe, try corn salsa. Mix in a scoop of your favorite corn salsa just before serving. This adds freshness and extra crunch. These variations make Fritos Corn Salad versatile and exciting. You can enjoy it in many ways! For more ideas, check out the Full Recipe. To keep your Fritos corn salad fresh, put it in the fridge right away. Use an airtight container. This helps keep the flavors intact. You can use glass or plastic containers. Just make sure they seal well. If you have leftovers, try to eat them within a few days. Fritos corn salad will stay fresh for about 3 to 5 days in the fridge. After that, the flavors fade. You may also notice some signs of spoilage. Watch for changes in smell or color. If it smells off or looks slimy, it’s best to throw it away. Keeping an eye on these signs helps ensure your meal stays safe and tasty. Enjoy your cooking and savor the crunch of those Fritos! Can I make this salad ahead of time? Yes, you can make Fritos corn salad ahead of time. Making it a few hours before serving lets the flavors mix well. Just wait to add the Fritos until you serve it. This keeps them crunchy. What can I use instead of mayonnaise for a healthier option? Greek yogurt works great instead of mayonnaise. It adds creaminess and has less fat. You can also try avocado for a rich taste. Both options keep your salad tasty and healthy. How do I make a vegan version of this salad? To make a vegan version, swap mayonnaise with vegan mayo or cashew cream. You can also use plant-based cheese. This keeps it creamy and delicious without animal products. Can I add different vegetables to the recipe? Absolutely! You can add vegetables like diced cucumbers, shredded carrots, or bell peppers. Feel free to mix in your favorites. This makes the salad more colorful and packed with nutrients. This blog post showed you how to make a tasty Fritos Corn Salad. We covered the needed ingredients, step-by-step instructions, and helpful tips. You learned about options for flavor, serving ideas, and proper storage. Remember, you can customize the salad to fit your taste. Enjoy making this fun dish for any gathering. With fresh veggies and crunchy Fritos, it will surely please everyone. Happy cooking!](https://tossedflavors.com/wp-content/uploads/2025/06/6201c401-377b-4701-9d27-7cb112bc64b4.webp)
Are you ready to dive into a dish that combines crunch, color, and flavor? Fritos Corn Salad is your go-to recipe for any gathering! It’s easy to make and packed …
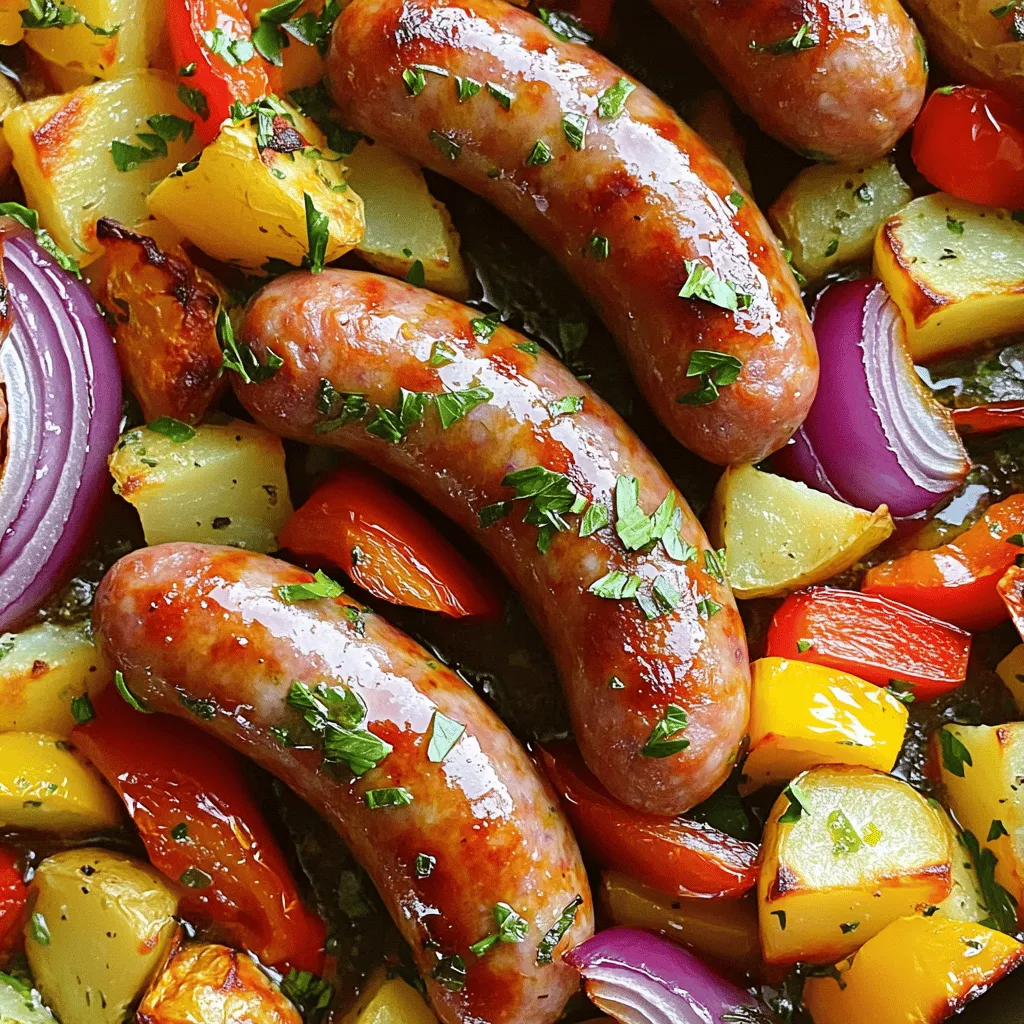
Are you ready for a meal that’s tasty and easy to make? One-Pan Roasted Sausage, Peppers, and Potatoes Delight is the perfect dish for busy nights. In just a few …
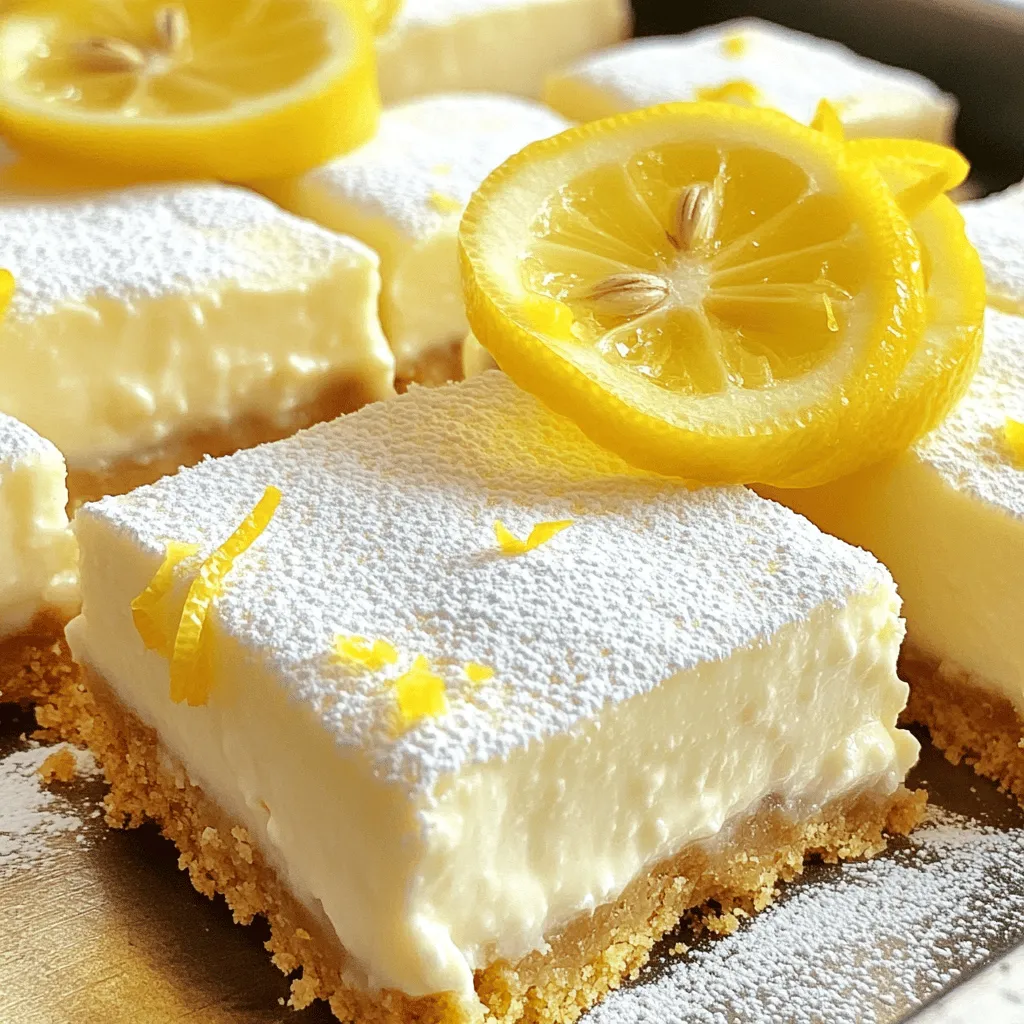
If you love fresh flavors and easy desserts, you’ll adore my Lemon Cheesecake Squares. This delightful recipe guarantees a creamy filling, a crumbly crust, and a zesty kick. It’s perfect …

Are you ready to indulge in a delightful treat? These Coconut Raspberry Macaroons are a sweet escape you can make at home. With just a few simple ingredients, you can …

Looking for a quick and tasty dinner idea? You’re in for a treat! My Sheet Pan Teriyaki Salmon uses fresh salmon and colorful veggies, all baked together for easy cleanup. …
![To make a delicious Apple Crisp Coffee Cake, you'll need a mix of simple ingredients. Here’s what you'll gather: - 2 cups all-purpose flour - 1 cup granulated sugar - 1 tablespoon baking powder - 1/2 teaspoon salt - 1 teaspoon ground cinnamon - 1/2 cup unsalted butter, softened to room temperature - 2 large eggs, at room temperature - 1 cup milk, preferably whole - 2 cups diced apples (Granny Smith or Honeycrisp work best) - 1 tablespoon fresh lemon juice - 1/2 cup packed brown sugar - 1/2 cup rolled oats - 1/4 cup chopped nuts (walnuts or pecans are tasty) - 1 teaspoon pure vanilla extract These ingredients come together to create a cake that is sweet and comforting. The apples add a nice, juicy texture. The oats and nuts in the topping give it that crisp finish. I love using Granny Smith apples for their tartness, which balances the sweetness. You can find the full recipe [here]. - Set oven temperature to 350°F (175°C) - Grease a 9x13-inch baking dish First, we need to get our oven ready. Preheat it to 350°F (175°C). This step is key for even baking. Next, grab a 9x13-inch baking dish. Grease it lightly with butter or non-stick spray. This helps the cake come out easily later. - Whisk together flour, sugar, baking powder, salt, and cinnamon In a large bowl, gather your dry ingredients. Whisk together 2 cups of all-purpose flour, 1 cup of granulated sugar, 1 tablespoon of baking powder, 1/2 teaspoon of salt, and 1 teaspoon of cinnamon. Mix them well until there are no lumps. This ensures a nice, even texture in the cake. - Cream softened butter until fluffy - Add eggs, milk, and vanilla; mix until combined In another bowl, take 1/2 cup of softened butter. Cream it with a mixer until it’s light and fluffy. This should take just a few minutes. Next, add in 2 large eggs, 1 cup of milk, and 1 teaspoon of pure vanilla extract. Mix this together until well combined. The batter should be smooth and creamy. - Gradually add wet mixture to dry ingredients; stir gently Now, it’s time to bring everything together. Gradually add your wet mixture to the dry ingredients. Use a spatula to stir gently. Be careful not to overmix; it's okay if there are a few lumps. This keeps the cake soft and tender. - Toss diced apples with lemon juice - Layer half of the batter, sprinkle topping, and add remaining batter Take 2 cups of diced apples and toss them with 1 tablespoon of fresh lemon juice. This stops the apples from browning. Gently fold the apple mixture into your batter. Now, pour half of the batter into the greased baking dish. Spread it evenly. Next, sprinkle half of your topping. This is made of brown sugar, rolled oats, and chopped nuts. Then, pour the remaining batter over the topping and smooth it out. - Bake for 40-45 minutes and cool before serving Place the baking dish in your preheated oven. Bake for 40-45 minutes. The cake will be ready when a toothpick inserted in the center comes out clean or with a few moist crumbs. Once baked, let it cool in the dish for at least 15 minutes before slicing. This cooling time helps the cake set and makes it easier to cut. For the full recipe, check out the complete instructions. - Avoid overmixing to ensure a tender crumb. - Use fresh, tart apples for the best flavor. When you mix your ingredients, do it gently. Overmixing can make the cake tough. You want a light and fluffy texture. Choose apples that are crisp and tart. Granny Smith and Honeycrisp are my favorites. Their flavor really shines in this cake. - Dust with powdered sugar before serving. - Drizzle with a simple glaze for added sweetness. When you are ready to serve, dust the top with powdered sugar. This adds a nice touch. You can also make a glaze. Just mix powdered sugar with a little milk. Drizzle it over the warm cake for extra sweetness. - Pair with coffee or tea. - Serve alongside vanilla ice cream for dessert. Enjoy this cake with a cup of coffee or tea. The flavors blend perfectly. For a dessert twist, serve it with a scoop of vanilla ice cream. The warm cake and cold ice cream make a great combo. For the complete recipe, check out the [Full Recipe]. {{image_4}} You can make your apple crisp coffee cake even more exciting! Try adding spices like nutmeg or cloves. These spices bring warmth and depth to each bite. You can also switch up the nuts. Instead of walnuts or pecans, use almonds or hazelnuts for a different crunch. If you need a gluten-free option, just substitute gluten-free flour in the recipe. This change keeps the cake tasty while meeting dietary needs. For those who want a dairy-free version, use dairy-free butter and milk. This way, everyone can enjoy a slice of this delightful cake. You can change the flavors with the seasons. In the fall, add pumpkin puree to the batter. This gives a lovely autumn twist that warms the soul. In summer, swap the apples for fresh berries. The berries add a burst of sweetness and color, making it a perfect treat for warm days. For the full recipe, check out the details above! Keep your apple crisp coffee cake in an airtight container. It stays fresh at room temperature for up to 3 days. This way, you can enjoy a slice whenever you want. Just make sure the lid is on tight to keep it soft. Want to save some for later? Freeze slices in a freezer-safe bag. They will last for up to 3 months. Make sure to label the bag with the date. This helps you track how long it has been frozen. When you’re ready to eat, just take out a slice. To enjoy your coffee cake again, reheat it in the oven or microwave. For the best texture, warm it slowly. In the oven, set it to a low temperature, around 300°F (150°C), for about 10-15 minutes. If you use the microwave, heat it in short 15-second bursts. This keeps it moist and tasty. For the best flavor, I recommend using Granny Smith or Honeycrisp apples. Granny Smith apples give a nice tartness, while Honeycrisp adds sweetness. This balance makes every bite tasty. Yes, you can make this coffee cake a day before you serve it. Just bake and let it cool. When you’re ready, slice and serve. It tastes great even after a night in the fridge! You can check if the coffee cake is done by inserting a toothpick in the center. If it comes out clean or with a few moist crumbs, it’s ready to enjoy! Absolutely! You can add berries or peaches for a fruity twist. Mixing fruits can create new flavors and make your coffee cake even more delicious! Coffee cake is usually sweeter and often has a crumb topping. It pairs well with coffee, making it a perfect treat for brunch or an afternoon snack. Enjoy it with your favorite brew! For the complete recipe, check out the Full Recipe. This blog post covered how to make a delicious apple crisp coffee cake step by step. We explored the key ingredients, baking tips, and serving ideas. Don’t forget to try different flavors, like adding nuts or spices, to make it your own. Store leftovers properly so you can enjoy this treat later. This cake is more than a dessert; it's a way to share joy with friends. Bake it, taste it, and make it part of your favorite moments. Enjoy every bite!](https://tossedflavors.com/wp-content/uploads/2025/06/8fe2f938-7e59-4199-b38e-70980a3a9d08.webp)
Are you ready to delight your taste buds? This Apple Crisp Coffee Cake is a perfect blend of sweet apples, warm spices, and a crumbly topping, making it ideal for …

Get ready to impress your taste buds with my Savory Slow Cooker Birria Tacos! This easy recipe guide will show you how to make tender, mouthwatering tacos packed with flavor. …
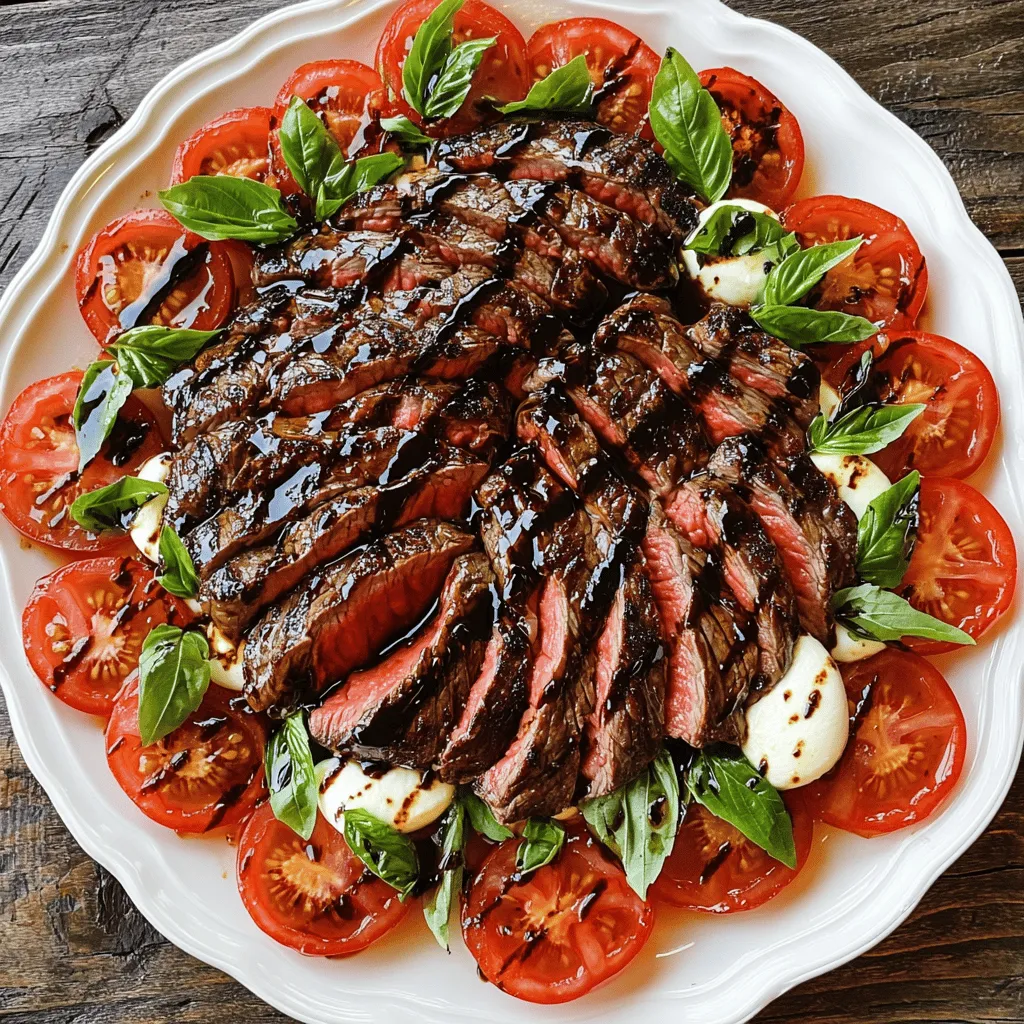
Looking for a fresh, savory dish that impresses? Meet your new favorite: Balsamic Grilled Flank Steak Caprese. This recipe blends juicy flank steak with ripe tomatoes, creamy mozzarella, and fragrant …