Skip to content
tossedflavors.com
  • Home
  • Appetizers
  • Desserts
  • Salads
  • Breakfast
  • Dinner
  • Privacy Policy
  • Contact
  • About

Chef Evan

Easy Chicken Enchilada Casserole Tasty and Fast Meal

November 15, 2025June 7, 2025 by Chef Evan
- 2 cups cooked chicken, shredded - 1 can (15 oz) black beans, drained and rinsed - 1 can (10 oz) enchilada sauce - 1 can (4.5 oz) chopped green chilies, drained - 2 cups corn tortillas, cut into strips - 2 cups shredded cheddar cheese These main ingredients create the base of your chicken enchilada casserole. First, the cooked chicken gives it a hearty feel. The black beans add protein and texture, while the enchilada sauce brings spice and flavor. Chopped green chilies offer a little kick. The tortilla strips add crunch, and the cheddar cheese melts beautifully on top. - 1 teaspoon ground cumin - 1 teaspoon garlic powder - 1/2 teaspoon onion powder - Salt and pepper to taste The spices and seasonings enhance the flavors. Ground cumin adds warmth and depth. Garlic powder gives a savory touch. Onion powder adds sweetness. Don’t forget to season with salt and pepper for balance. - 1 cup sour cream - Fresh cilantro, chopped Garnishes make your dish pop. Sour cream adds creaminess and cools down the spice. Fresh cilantro gives a bright, fresh flavor and looks nice on top. Use these garnishes to make your casserole visually appealing and tasty. {{ingredient_image_1}} - Preheat your oven to 350°F (175°C). - In a large bowl, mix 2 cups of shredded chicken with: - 1 can (15 oz) black beans, drained and rinsed - 1 can (10 oz) enchilada sauce - 1 can (4.5 oz) chopped green chilies, drained - 1 teaspoon ground cumin - 1 teaspoon garlic powder - 1/2 teaspoon onion powder - 1 cup sour cream Add salt and pepper to taste. Stir well until combined. - In a 9x13 inch baking dish, start by spreading a thin layer of the chicken mixture on the bottom. - Next, layer half of the tortilla strips over the chicken mixture. Then, add half of the shredded cheddar cheese on top. - Repeat these layers. Start with the remaining chicken mixture, add the rest of the tortilla strips, and finish with the remaining cheese on top. - Cover the dish tightly with aluminum foil. - Bake the casserole in the oven for 20-25 minutes. - After that time, remove the foil. Bake for an additional 10-15 minutes to allow the cheese to bubble and turn golden. - Once done, let it cool for a few minutes. Top with fresh cilantro before serving. To make a great chicken enchilada casserole, layer the ingredients evenly. This helps all parts cook well. Start with a thin layer of the chicken mix at the bottom. Then, add your tortilla strips and cheese in layers. This method ensures every bite is tasty. To check for doneness, look for bubbly cheese on top. You want a nice golden color. If the cheese is still pale after baking, give it a few more minutes. It should be hot all the way through. When serving your casserole, you can use the baking dish or plate it in servings. Add a sprinkle of fresh cilantro on top for color. You can also add a dollop of sour cream next to each serving. This adds creaminess and a nice touch to the meal. For sides, consider fresh salad or Mexican rice. A side of guacamole or salsa pairs nicely too. These options bring extra flavor and balance to the meal. To adjust spice levels, try adding jalapeños to the chicken mix. This adds heat without changing the dish too much. You can also use spicier enchilada sauce if you prefer more kick. If you want to swap ingredients, consider using ground turkey or beef instead of chicken. You can also add bell peppers or corn for more veggies. These changes make the dish your own while keeping it simple and delicious. Pro Tips Use Rotisserie Chicken: For an even quicker preparation, use store-bought rotisserie chicken to save time on cooking and shredding. Layer for Flavor: Make sure to completely cover each layer with sauce and cheese to ensure maximum flavor and moisture throughout the casserole. Customize Your Heat: Adjust the spice level by choosing mild, medium, or hot enchilada sauce based on your preference. Make-Ahead Option: Assemble the casserole ahead of time, cover tightly, and refrigerate. Bake it fresh when you're ready to serve! {{image_2}} You can swap chicken for turkey or beef. This change gives a new taste. You can also add vegetables like bell peppers and corn. They add color and nutrients. Try using a mix of red and green bell peppers for a vibrant look. Need gluten-free options? Use corn tortillas instead of flour ones. If you want vegan substitutes, try using jackfruit or tofu instead of chicken. You can also replace cheese with a plant-based option. Switch up the cheese for a new flavor. You can use pepper jack for a spicy kick. Adding different sauces or salsas can enhance taste too. A green salsa can bring freshness, while a red salsa adds depth. After you enjoy your meal, let the casserole cool down. This helps keep the texture nice. Once cool, cover it tightly with plastic wrap or foil. You can store it in the fridge for up to three days. Always make sure to check for any signs of spoilage before eating leftovers. To freeze, cut the casserole into portions. Place each portion in airtight containers or freezer bags. This makes it easy to heat just what you need. The casserole can last up to three months in the freezer. When ready to eat, thaw it overnight in the fridge. This keeps the flavor fresh and tasty. For the best results, reheat the casserole in the oven. Preheat it to 350°F (175°C). Cover the dish with foil to avoid drying it out. Heat for about 20 minutes or until warm. You can also use the microwave if you’re in a hurry. Just be sure to cover it to keep moisture in. Enjoy your tasty meal just like the first time! The casserole lasts about 3 to 4 days in the fridge. Make sure it's in an airtight container. This keeps it fresh and tasty for your next meal. Yes, you can prepare the casserole a day before. Just follow the steps, then cover it and store it in the fridge. When you're ready, bake it straight from the fridge. This saves time on busy days. You can serve it with a side salad, rice, or tortilla chips. These add a nice crunch and balance to the meal. You might also enjoy some guacamole or salsa for extra flavor. Absolutely! To spice it up, add jalapeños or use spicy enchilada sauce. You can also sprinkle red pepper flakes on top before baking for some heat. Adjust the spice to your taste. The casserole is done when the cheese is bubbly and golden. You can also check that it's hot all the way through. If you have a food thermometer, it should read 165°F (74°C) in the center. This blog post covered a tasty chicken enchilada casserole. We explored the main ingredients, spices, garnishes, and step-by-step instructions. Tips on cooking, serving, and modifying the dish enhanced your experience. You learned how to store leftovers and variations for dietary needs. In closing, cooking should be fun and easy. Enjoy making this dish your own!

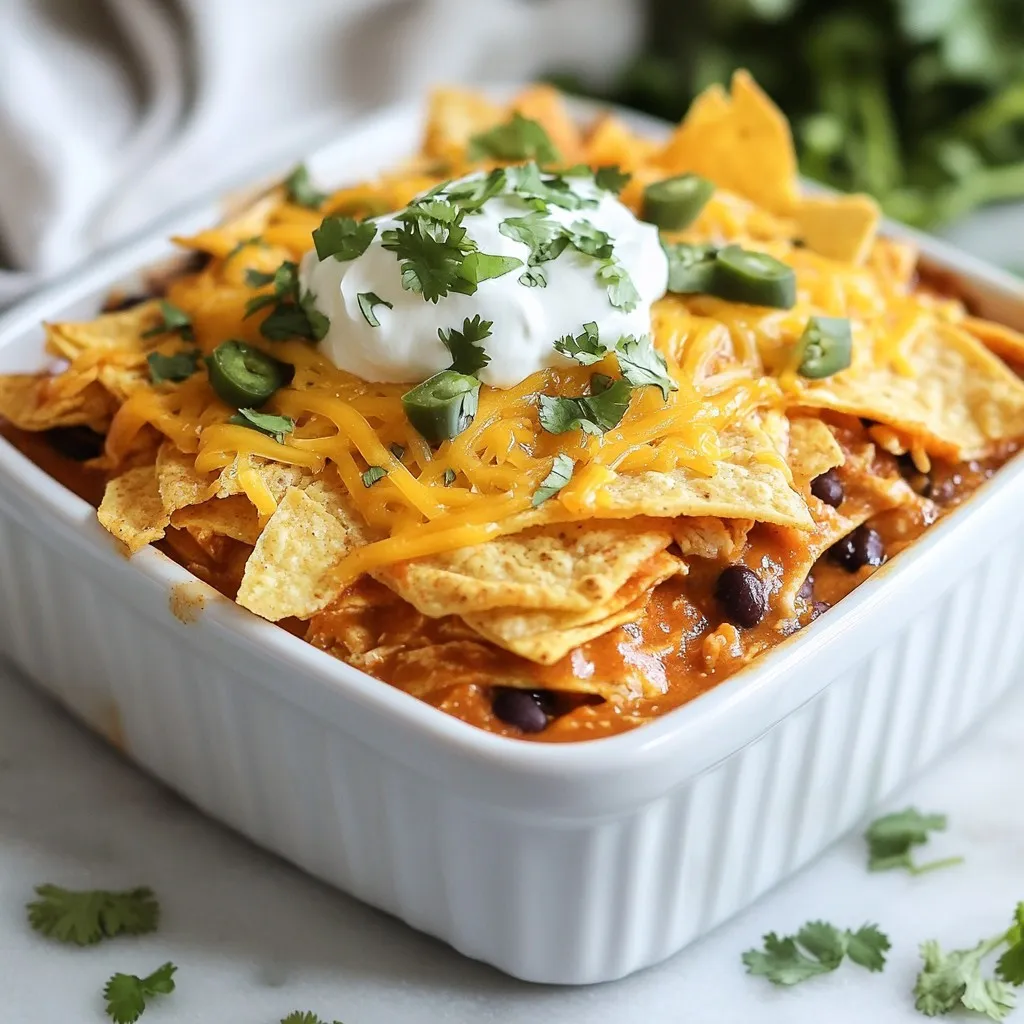
Are you looking for a quick and tasty dinner? This Easy Chicken Enchilada Casserole is your answer! With simple ingredients like cooked chicken, black beans, and a zesty enchilada sauce, …

Read more

Categories Dinner Leave a comment

Crispy Sea Salt Chopped Potatoes Tasty and Simple Recipe

June 7, 2025 by Chef Evan
To make crispy sea salt chopped potatoes, you need a few key ingredients. Here’s what you’ll need: - 4 medium-sized russet potatoes, thoroughly scrubbed and dried - 2 tablespoons extra virgin olive oil - 1 teaspoon flaky sea salt, plus more for finishing - 1 teaspoon garlic powder - 1 teaspoon smoked paprika - Freshly ground black pepper, to taste - 2 tablespoons fresh parsley, finely chopped (for garnish) These ingredients create a perfect blend of flavors, making each bite delicious. Choosing the right olive oil is key. I recommend using extra virgin olive oil. This oil has a rich taste and adds depth to your potatoes. It helps them crisp up nicely in the oven. Look for one that is cold-pressed and has a fruity flavor. This ensures you get the best taste in your dish. You can customize your crispy potatoes with some optional add-ins. Here are a few ideas to make them even tastier: - Chili powder for a spicy kick - Fresh herbs like rosemary or thyme for an earthy flavor - Grated cheese like parmesan for a savory touch Feel free to experiment with these options. They can elevate your dish and make it even more enjoyable. For the full recipe, check the detailed instructions above. First, you need to preheat your oven. Set it to 425°F (220°C). This step is key for getting your potatoes crispy. While the oven heats up, scrub and dry the russet potatoes. Clean potatoes will have better flavor. Next, cut each potato into 1-inch cubes. Try to make them all the same size. This helps them cook evenly. Now, let’s add some flavor. In a large mixing bowl, mix the potato cubes with olive oil, sea salt, garlic powder, smoked paprika, and black pepper. Toss everything together with your hands or a spatula. You want all the cubes to be well coated. This step is where the magic happens. The mix of spices will make your potatoes taste amazing. It’s time to bake! Line a large baking sheet with parchment paper. This keeps the potatoes from sticking. Spread the seasoned cubes in a single layer. Make sure they are not crowded. Now, place the baking sheet in the oven. Bake for 25-30 minutes, turning the potatoes halfway through. This helps them brown evenly. When they are golden and crispy, take them out. Let them cool for a few minutes. Finish with a sprinkle of sea salt and chopped parsley for a fresh touch. For more detailed steps, check the Full Recipe. To get your potatoes nice and crispy, start by cutting them evenly. Uniform pieces cook well together and crisp up nicely. Use enough olive oil to coat them evenly but don’t drown them. When you spread them out on the baking sheet, make sure they have space. Crowding the pan will lead to steaming instead of crisping. Turn them halfway through baking to help them brown all over. To save time, wash and chop your potatoes ahead of time. You can do this a few hours before cooking. Soak the chopped potatoes in cold water for about 30 minutes. This helps remove extra starch and will make them crispier. Drain and dry them well before adding oil and seasonings. Serve your crispy potatoes hot from the oven for the best flavor. A rustic bowl or a platter works great for presentation. You can sprinkle extra sea salt on top for a burst of flavor. Fresh parsley adds a nice touch. Pair them with a dipping sauce, like garlic aioli or spicy ketchup, for an extra kick. For the full recipe, check out the details above. {{image_4}} If you love heat, add chili powder to your potatoes. Mix in one or two teaspoons of chili powder when you season your potato cubes. This gives a nice kick. You can also use cayenne pepper for more spice. Adjust the amount based on your taste. For a fresh flavor, try rosemary. Chop a tablespoon of fresh rosemary and mix it in with the other seasonings. This adds a lovely herbal aroma. It pairs well with garlic and smoky paprika. You can use dried rosemary if fresh is not available. Cheese lovers will enjoy this twist. Sprinkle shredded cheese on the potatoes during the last five minutes of baking. Cheddar or Parmesan works great. The cheese melts and gets crispy, making each bite even more delicious. These variations make your crispy sea salt chopped potatoes exciting for any meal. For full details, check the Full Recipe. To store leftover crispy potatoes, let them cool completely. Place them in an airtight container. Use parchment paper to separate layers if you stack them. Store the container in the fridge. They will stay fresh for up to 3 days. To reheat your potatoes and keep them crispy, preheat your oven to 400°F (200°C). Spread the potatoes on a baking sheet in a single layer. Bake them for about 10-15 minutes. This method helps regain their crunch. You can also use an air fryer for even quicker results. You can freeze crispy potatoes, but they may lose some crunch. To freeze, let them cool completely. Spread them on a baking sheet, then freeze for 1-2 hours. Once frozen, transfer them to a freezer bag. They will keep for about a month. When you’re ready to eat, bake them directly from the freezer. This will help them crisp up again. For the best results, try to eat them fresh whenever you can. Enjoy your delicious creations! I recommend using russet potatoes. They are great because they are starchy and fluffy. This gives them a light and crisp texture, which I love. You can also use Yukon Gold potatoes. They have a creamy texture, but russet potatoes are my top choice! Yes, you can use an air fryer for these potatoes! To do this, cut your potatoes as you would for the oven. Toss them with olive oil and spices. Then, place them in the air fryer basket in a single layer. Cook at 400°F (200°C) for about 15-20 minutes. Shake the basket halfway through for even cooking! There are many tasty sauces you can try! Here are a few of my favorites: - Garlic aioli for a creamy touch - Spicy ketchup for a kick - Ranch dressing for a cool flavor - Honey mustard for a sweet twist These sauces will take your crispy sea salt chopped potatoes to the next level! Enjoy experimenting with different flavors. In this post, we covered how to make crispy sea salt chopped potatoes. We detailed the key ingredients, step-by-step instructions, and smart tips for perfecting your dish. Don’t forget about tasty variations and storage methods. These potatoes can be a hit at any meal. With a little practice, you’ll master the art of crispiness. Enjoy experimenting and impressing friends with your new skills. Trust me, your taste buds will thank you!

Craving a snack that’s crunchy, salty, and oh-so-satisfying? You’ve come to the right place! In this post, I’ll share my simple, tasty recipe for Crispy Sea Salt Chopped Potatoes. With …

Read more

Categories Appetizers Leave a comment

Fried Sliced Mushrooms with Ranch Crispy Delight

June 7, 2025 by Chef Evan
To create the perfect fried sliced mushrooms with ranch, gather these fresh and simple ingredients: - 16 oz fresh white mushrooms, cleaned and sliced - 1 cup breadcrumbs (using panko for extra crunch) - 1/2 cup all-purpose flour, seasoned with salt and pepper - 2 large eggs, beaten - 1 teaspoon garlic powder - 1 teaspoon onion powder - 1 teaspoon paprika - Salt and pepper to taste - Oil for frying (vegetable or canola) - 1/2 cup ranch dressing (for dipping) - Fresh parsley, chopped (for garnish) These ingredients form a tasty base for your crispy delight. The mushrooms deliver a nice texture, while the panko breadcrumbs add a satisfying crunch. I love using fresh parsley to brighten up the dish. It also adds a touch of color when serving. Don't forget the ranch dressing! It complements the mushrooms perfectly. You can find the full recipe for these crispy ranch-mushroom bites earlier in the article. Now, let’s go fry some mushrooms! - Prepare the coatings by mixing breadcrumbs with garlic powder, onion powder, paprika, salt, and pepper. - Set up dredging stations: one for flour, one for beaten eggs, and one for breadcrumbs. - Bread the mushrooms thoroughly in three steps: flour, egg, then breadcrumbs. First, I mix the breadcrumbs and spices in a bowl. This adds flavor to the mushrooms. Next, I set up my dredging station. I place seasoned flour in one bowl, beaten eggs in another, and the breadcrumb mix in the last bowl. This makes it easy to coat the mushrooms. Now, for the fun part! I take each mushroom slice and dip it in the seasoned flour. I make sure it is fully coated. Then, I shake off any extra flour. Next, it's time for the egg bath. I dip the floured mushroom into the beaten eggs. I want it fully covered to help the breadcrumbs stick. Finally, I roll the egg-coated mushroom in the breadcrumb mix. I press lightly to ensure a good coating. I repeat this with all the mushroom slices until they are all breaded. - Heat the oil to the right temperature for frying. - Fry the breaded mushrooms in batches until golden brown. - Drain excess oil using a slotted spoon. To fry, I pour enough oil into a large skillet to cover the bottom by about half an inch. I heat the oil over medium-high heat until it shimmers. This tells me it is hot enough. I carefully place the breaded mushrooms in the hot oil in batches. I avoid overcrowding the pan. Each mushroom fries for about 2-3 minutes on each side. I look for a golden brown color to know they are done. After frying, I use a slotted spoon to transfer the crispy mushrooms to a plate lined with paper towels. This helps absorb any extra oil. - Serve warm with ranch dressing for dipping. - Garnish with freshly chopped parsley. Once the mushrooms are crispy and golden, I serve them warm. I put a small bowl of ranch dressing next to the mushrooms for dipping. It adds a tasty touch! To make the dish look pretty, I garnish it with freshly chopped parsley. This adds color and freshness to the plate. Enjoy these crispy ranch-mushroom bites as a fun snack or appetizer! For the full recipe, check out the details provided above. Frying mushrooms right means keeping the oil hot. This helps them cook evenly. Don't crowd the pan; this keeps them crispy. Fry in small batches for the best texture. After frying, use a slotted spoon. This helps drain away extra oil. Get creative with your breadcrumbs. Try adding different seasoning blends for a twist. If you want more flavor, make your own ranch dressing. This gives a fresh taste. Always preheat the oil before adding the mushrooms. This gives them a better crunch. Use panko breadcrumbs instead of regular ones. They create a maximum crunch factor. For the full recipe, check the section above. Enjoy your crispy delight! {{image_4}} You can change up your dipping game with different sauces. Try blue cheese dressing for a creamy twist. Spicy mayo adds a kick that pairs well too. You can also use fresh salsa or guacamole for a fun twist. Each dip offers a new flavor to enjoy with your crispy mushrooms. Not all mushrooms are the same. Swap white mushrooms for portobello or shiitake for a richer taste. Both bring unique flavors that can elevate your dish. You can also mix in cheese or fresh herbs in the breadcrumb mix. This simple change adds depth to the flavor of your mushrooms. Want a lighter option? Try baking instead of frying your mushrooms. This method keeps them crispy while cutting down on oil. You can also switch to whole wheat breadcrumbs for added health benefits. These changes make your delicious snack a bit better for you without losing flavor. For the full recipe, check out Crispy Ranch-Mushroom Bites. Enjoy! Keep fried mushroom bites in an airtight container in the fridge. This helps them stay fresh. Consume within 2-3 days for best flavor and texture. The mushrooms taste best when you eat them soon after frying. Reheat in an oven or air fryer to retain crispiness. This method keeps the bites crunchy. Avoid the microwave as it can make them soggy and less tasty. Freeze uncooked breaded mushrooms for later frying. They can last up to 2 months in the freezer. There is no need to thaw them before frying. Just fry them straight from the freezer for a quick treat. Fresh mushrooms are recommended for best results, but frozen can work in a pinch. They may not have the same texture as fresh mushrooms, but they will still taste good. Just make sure to thaw and drain them well before using. Vegetable or canola oil works best for frying due to high smoke points. These oils heat well and ensure even cooking. Avoid oils with strong flavors, as they can change the taste of your dish. Ensure proper oil temperature and drain well after frying to maintain crispiness. If the oil is too cool, the mushrooms will absorb it and become soggy. After frying, let them rest on paper towels to absorb excess oil. Yes! Mix in garlic powder, herbs, or hot sauce to customize the ranch flavor. This adds a personal touch and makes the dip even more delicious. Get creative and find your favorite blend! This article shared a simple and tasty method for frying mushrooms. You learned about the key ingredients, preparation steps, and cooking tips. I highlighted ways to enhance flavor and offered suggestions for healthier options and variations. Fried mushrooms are a fun and crunchy treat, perfect for snack time or parties. With a few tweaks, you can make them your own. Enjoy your cooking and the delicious results!

Get ready for a crunchy snack that will change your mushroom game! Fried sliced mushrooms with ranch dressing is not just a treat; it’s a crispy delight you won’t forget. …

Read more

Categories Appetizers Leave a comment

Vanilla Cupcakes with Berry Decoration Delight

June 7, 2025 by Chef Evan
To make these delightful vanilla cupcakes, gather the following ingredients: - 1 ½ cups all-purpose flour - 1 cup granulated sugar - ½ cup unsalted butter, softened at room temperature - 2 large eggs, at room temperature - 1 cup whole milk, at room temperature - 2 teaspoons baking powder - 1 teaspoon pure vanilla extract - ½ teaspoon salt - 1 cup mixed fresh berries (including strawberries, blueberries, and raspberries) - 1 cup whipped cream (store-bought or homemade) - Fresh mint leaves for garnish (optional) You can swap some ingredients to suit your needs. Here are options: - Use gluten-free flour for a gluten-free version. Almond flour or coconut flour works well. - For dairy-free options, try coconut oil instead of butter and almond milk instead of whole milk. - If you want less sugar, consider using honey or maple syrup as a sweetener. Choosing the best berries is key for decoration. Look for these tips: - Strawberries, blueberries, and raspberries are great choices for cupcakes. - When selecting berries, look for bright colors and firm textures. - To wash berries, rinse them gently under cold water. Pat them dry with a clean cloth before using. These steps ensure you make beautiful cupcakes that taste amazing, too! For the full recipe, refer to the delightful vanilla berry bliss cupcakes above. To make great vanilla cupcakes, start by creaming butter and sugar. Use an electric mixer and mix until fluffy and light. This step takes about 3 to 4 minutes. The air you mix in makes the cupcakes soft. Always use room temperature ingredients. Cold butter or eggs will not blend well. Room temperature helps create a smooth batter. It also helps the cupcakes rise better when baked. When mixing dry and wet ingredients, do it right. First, whisk flour, baking powder, and salt in a bowl. Then, add this mix to the butter-sugar mixture. Alternate with whole milk. Start with a bit of flour, mix, and then add milk. Repeat until everything is combined. Be careful not to overmix, as this can make cupcakes tough. Preheat your oven to 350°F (175°C) before baking. Line your cupcake tin with paper liners. This helps with easy removal after baking. Bake the cupcakes for 18 to 20 minutes. To check for doneness, insert a toothpick into the center. If it comes out clean, your cupcakes are ready. Once baked, cool the cupcakes in the tin for about 5 minutes. Then, carefully transfer them to a wire rack. Let them cool completely before frosting. This step is key for a smooth frosting layer. Frosting cupcakes can be fun and easy. Use a spatula or a piping bag for a nice finish. Start from the center and work your way out. For berry decoration, place mixed berries on top of the whipped cream. Use strawberries, blueberries, and raspberries for a colorful look. Cluster them together for a beautiful effect. You can also use fresh mint leaves as a garnish. They add color and a fresh taste. Sprinkle a few around the berries to make your cupcakes shine. For the full recipe, refer to Delightful Vanilla Berry Bliss Cupcakes. - Overmixing the batter: Mixing too much leads to dense cupcakes. Once the dry and wet ingredients combine, stop mixing. A few lumps are okay; they will bake out. - Not cooling cupcakes properly: After baking, let your cupcakes rest in the tin for five minutes. Then, transfer them to a wire rack. Cooling completely helps avoid sogginess when you frost them. - How to store leftover cupcakes: Store your cupcakes in an airtight container. Keep them at room temperature for up to three days. For longer storage, refrigerate them for up to a week. - Best serving methods and platters: Arrange your cupcakes on a colorful platter. For a fancy touch, place them on a cake stand. This adds height and makes your dessert look more appealing. - Adding extracts or essences: To boost flavor, try adding almond or lemon extract to the batter. Just a half teaspoon can make a big difference in taste. - Creative topping ideas beyond berries: Besides berries, consider using chocolate shavings, crushed nuts, or edible flowers. These options add texture and visual interest to your cupcakes. {{image_4}} You can easily change the flavor of your vanilla cupcakes. To add a bright twist, try lemon or almond flavor. Just replace some vanilla extract with lemon zest or a few drops of almond extract. This small change makes a big impact on taste. For a rich dessert, consider adding chocolate or caramel swirls. You can do this by drizzling melted chocolate or caramel into the batter before baking. Swirl it gently with a toothpick for a beautiful marbled effect. This will surprise your guests with every bite. While berries are fantastic, you can mix it up with other fun toppings. Chocolate ganache or buttercream frosting makes a rich base for your cupcakes. Simply pour the ganache over the top or pipe the frosting on for a beautiful look. Seasonal fruit decorations are another great option. In summer, use peaches or cherries. In fall, try using apples or pears. This not only looks nice but also adds fresh flavors that match the season. Cupcakes come in many sizes. For a fun twist, try making mini cupcakes. They are perfect for parties and let guests sample different flavors without too much commitment. Just reduce the baking time to about 10-12 minutes. If you want to impress, make a layered cake version of your vanilla cupcakes. Use the same recipe but bake in round cake pans. Layer them with whipped cream and berries for a showstopper dessert. This keeps the same delightful taste while offering a new presentation. For the full recipe, check the Delightful Vanilla Berry Bliss Cupcakes. To keep your vanilla cupcakes fresh, store them in an airtight container. This method stops air from drying them out. You can refrigerate your cupcakes for up to five days. If you want to keep them longer, freezing is a great option. Wrap each cupcake well in plastic wrap and place them in a freezer bag. They can last up to three months in the freezer. When you're ready to enjoy them, let them thaw in the fridge overnight. If you want to gift these lovely cupcakes, you can make them look nice. Use clear cellophane bags or decorative boxes. Tie them with pretty ribbons for a special touch. Include a note about ingredients and any allergens. This way, the recipient knows what's inside and can enjoy them safely. If you stored your cupcakes and want to refresh them, here’s how. Preheat your oven to 350°F (175°C). Place the cupcakes on a baking sheet and cover them with foil. Heat for about 5-10 minutes. This method helps keep the moisture in. You can also use the microwave. Heat each cupcake for about 10-15 seconds. This keeps them soft and tasty. Enjoy your delightful vanilla berry bliss cupcakes fresh from storage! To make the best vanilla cupcakes, you need a few key secrets. First, use room temperature butter and eggs. This helps create a smooth batter. Second, cream the butter and sugar well. This adds air and makes the cupcakes fluffy. Lastly, do not overmix the batter. Mix just until combined to keep the texture light. These tips ensure moist, fluffy cupcakes that taste amazing. Decorating cupcakes like a pro is all about the right tools and techniques. Start with a good piping bag and a few tips for frosting. A star tip gives beautiful swirls. You can also use a spatula to spread frosting smoothly. For decorations, choose fresh berries and mint leaves. Arrange them nicely on top for a stunning look. Practice makes perfect, so keep trying different styles! Yes, you can use frozen berries for decoration. They are convenient and often less expensive. However, they may release juice when thawed, which can make the cupcakes messy. Fresh berries look better and add vibrant color. If you use frozen, let them thaw and dry before using. Both options have their pros and cons. Choose what works best for you. To tell if your cupcakes are done baking, look for a few signs. First, the tops should look set and slightly golden. Second, a toothpick inserted in the center should come out clean or with a few crumbs. Cupcakes should spring back when lightly pressed. If they are still wet or sink when touched, give them a few more minutes. Keeping an eye on these signs helps you bake perfect cupcakes every time. In this post, I shared the key ingredients and steps for perfect vanilla cupcakes. We explored substitutions and tips for selecting the best berries. I also detailed mistakes to avoid and ways to enhance flavor for unique variations. These insights can help you bake impressive cupcakes with ease. Remember to have fun and enjoy the process. With practice, your baking skills will shine!

If you crave a sweet treat that’s simple and beautiful, you’ve come to the right place! In this article, I’ll show you how to make delightful vanilla cupcakes topped with …

Read more

Categories Desserts Leave a comment

White Cheddar and Spinach Chicken Burgers Recipe

June 7, 2025 by Chef Evan
For these tasty white cheddar and spinach chicken burgers, you will need: - 1 lb ground chicken - 1 cup fresh spinach, finely chopped - 1 cup shredded white cheddar cheese - 1/2 cup seasoned breadcrumbs - 1/4 cup grated Parmesan cheese - 1 clove garlic, minced - 1 tablespoon Dijon mustard - 1 teaspoon onion powder - 1 teaspoon garlic powder - Salt and freshly ground black pepper to taste - Olive oil (for cooking) - Burger buns (for serving) - Fresh lettuce, ripe tomato slices, and your favorite toppings (e.g., avocado, pickles, or special sauce) You can easily swap some ingredients to fit your needs: - Use ground turkey instead of chicken for a leaner option. - Try gluten-free breadcrumbs for a gluten-free version. - For a dairy-free burger, use dairy-free cheese or skip the cheese altogether. - Add chopped mushrooms for added flavor and moisture. - Use whole grain buns or lettuce wraps for a healthier choice. These burgers offer a balanced meal with protein, veggies, and flavor. Here’s a quick look at the nutrition per serving: - Calories: Approximately 350 - Protein: 30g - Carbohydrates: 20g - Fat: 18g - Fiber: 2g - Sugars: 2g These burgers are not just yummy; they also pack a punch of nutrients! For the full recipe, check out the detailed instructions included in this article. Start by gathering all your ingredients. In a large bowl, mix the ground chicken with chopped spinach. Next, add the white cheddar cheese, breadcrumbs, and Parmesan cheese. Don't forget the minced garlic and Dijon mustard. Sprinkle in onion powder and garlic powder for extra flavor. Season with salt and black pepper to taste. Use your hands or a spatula to blend everything well. You want a nice, even mixture. Now, divide the chicken mixture into four equal parts. Shape each part gently into a burger patty, about 3/4 inch thick. This size helps them cook evenly. Heat a grill or skillet over medium heat. Add a little olive oil to prevent sticking. Cook the patties for 5 to 6 minutes on one side. Flip them over and cook for another 5 to 6 minutes. They should reach 165°F to be safe to eat. While the patties cook, you can toast your burger buns if you like. When the patties are done, place one on the bottom half of each bun. Add fresh lettuce and tomato slices. Feel free to add any other toppings you love, like avocado or pickles. Finally, put the top half of the bun on. Serve these tasty burgers right away for the best flavor! You can find the full recipe included above. To cook your chicken burgers just right, follow these tips: - Use fresh ingredients. Fresh spinach and cheese give more flavor. - Don’t overmix. Mix until just combined to keep the burgers tender. - Form even patties. Make them the same size for even cooking. - Check the temp. Use a meat thermometer to ensure they reach 165°F. - Let them rest. After cooking, let the patties sit for a few minutes. This keeps them juicy. For the best results, use these tools: - Grill or skillet. Both work well; choose based on your preference. - Meat thermometer. It ensures your patties are cooked safely. - Spatula. A sturdy spatula helps flip the burgers without breaking them. - Mixing bowl. Use a large bowl to easily combine ingredients. These burgers shine when served with tasty sides: - Crispy fries. Sweet potato fries or classic fries add crunch. - Salad. A fresh side salad balances the meal. - Condiments. Try spicy mayo or tangy barbecue sauce for extra flavor. - Toppings. Add avocado, pickles, or sliced jalapeños for a kick. For the full recipe, check the detailed preparation steps above. Enjoy your cooking! {{image_4}} You can change the cheese for fun. Try mozzarella for a milder taste. Feta adds a salty kick. Goat cheese gives a creamy, tangy flavor. Parmesan brings depth and richness. Each cheese will give your burger a new twist. Want to boost taste? Add sautéed onions or bell peppers. Fresh herbs like basil or cilantro can brighten the flavors. Jalapeños give a nice heat. Chopped sun-dried tomatoes add a sweet, tangy bite. Each add-in makes your burger unique. Grilling gives a smoky flavor and nice grill marks. Use a medium heat and oil for a non-stick effect. Skillets are great for even cooking indoors. Both methods work well. Choose based on your mood or weather. Each way will yield delicious results. After enjoying your White Cheddar and Spinach Chicken Burgers, let them cool first. Place the burgers in an airtight container. You can keep them in the fridge for about 3 days. Make sure to separate each burger with parchment paper to prevent sticking. To reheat, preheat your oven to 350°F (175°C). Place the burgers on a baking sheet. Heat them for about 10-12 minutes or until warm. You can also use a microwave, but it may make the burgers a bit soggy. If you prefer a crispier texture, stick with the oven. If you want to save burgers for later, freezing is a great option. Wrap each burger tightly in plastic wrap. Then place them in a freezer bag. They will keep well for up to 3 months. When you’re ready to eat, thaw in the fridge overnight. Reheat as mentioned above for the best flavor. For the full recipe, check out the complete guide. To make your White Cheddar and Spinach Chicken Burgers gluten-free, simply swap out the seasoned breadcrumbs. Use gluten-free breadcrumbs or crushed gluten-free crackers instead. You can also use almond flour or ground oats for a healthy option. Always check labels to ensure all ingredients are gluten-free. Yes, you can use turkey instead of chicken in this recipe. Ground turkey provides a leaner option. It keeps the burgers moist and flavorful. The cooking time may vary slightly, so check the internal temperature. It should still reach 165°F (75°C) for safety. Toppings can enhance your burger experience. I recommend fresh lettuce and ripe tomato slices. Avocado adds creaminess, while pickles bring a tangy crunch. You can also try adding a special sauce or a dollop of Greek yogurt for extra flavor. Feel free to mix and match based on your taste! For the full recipe, check out the detailed instructions provided earlier. You now have a clear guide to making delicious chicken burgers. We covered essential ingredients and how to alter them for different diets. You learned step-by-step instructions for preparing and cooking. I shared tips for perfect burgers and different serving ideas. We even explored variations to keep things fresh. Remember, proper storage helps you enjoy leftovers later. With this knowledge, you can make great chicken burgers that please everyone. Enjoy your cooking!

Are you ready to spice up your dinner routine? This White Cheddar and Spinach Chicken Burgers recipe combines juicy chicken with creamy cheese and healthy greens. Not only are these …

Read more

Categories Dinner Leave a comment

Burger Bowls Packed with Flavorful Ingredients

June 7, 2025 by Chef Evan
- Ground beef or turkey - Mixed greens - Cherry tomatoes - Cucumber - Pickles The main ingredients for burger bowls create a fresh and satisfying meal. Ground beef or turkey serves as the protein base. You can choose turkey for a lighter option. Mixed greens add crunch and nutrition, while cherry tomatoes bring sweetness. Cucumber adds a refreshing bite, and pickles give a tangy kick. - Shredded sharp cheddar cheese - Ketchup and mustard - Avocado - Optional spicy toppings Toppings and dressings elevate your burger bowl. Shredded sharp cheddar cheese adds creaminess. Ketchup and mustard bring classic burger flavors. Sliced avocado offers richness, while spicy toppings like jalapeños can add heat. You can mix and match toppings to suit your taste. - Garlic powder - Onion powder - Smoked paprika - Salt and pepper Seasonings and flavors make all the difference. Garlic powder and onion powder enhance the meat’s taste. Smoked paprika adds depth and a hint of smokiness. Salt and pepper are key for balance. Together, these seasonings create a delicious base for your burger bowls. For the full recipe, be sure to check out the complete guide! To start, I mix the ground meat with spices. For this, I use garlic powder, onion powder, and smoked paprika. I also add salt and pepper. Place the ground beef or turkey in a bowl. Then, sprinkle the spices over the meat. Use your hands or a spoon to mix everything well. Make sure the spices spread evenly throughout the meat. This step makes your patties flavorful. Next, heat a skillet over medium-high heat. You want it hot but not smoking. While it heats, shape the meat into small patties. Each should be about 2-3 inches wide. Place the patties in the hot skillet. Cook each side for about 3-4 minutes. You can check doneness with a meat thermometer. The center should reach 160°F for beef. For turkey, check it’s 165°F. This ensures your patties are safe to eat. Now it’s time to build your burger bowl. Start with a generous base of mixed greens. I like a blend of romaine, spinach, and arugula for texture. Lay the greens in a large dish or individual bowls. Next, carefully place the cooked burger patties on top. This adds height and flavor. Then, arrange your toppings for a colorful look. I like to use cherry tomatoes, diced cucumber, sliced pickles, and shredded cheddar cheese. Finally, add avocado slices for creaminess. Drizzle the salad with ketchup and mustard. You can use your favorite dressing too. For a spicy kick, add sliced jalapeños on top. All these steps come together to create a beautiful and tasty meal. For the complete guide, check the Full Recipe. To cook your burger patties perfectly, use a non-stick skillet. Heat it to medium-high. This helps create a nice sear. Form your meat into 2-3 inch circles. Cook them for about 3-4 minutes per side. Check their color for browning. Use a meat thermometer; it should read 160°F for beef. To avoid overcooking, keep an eye on the time. Flip the patty only once for a nice crust. Let the patties rest for a few minutes after cooking. This keeps them juicy inside. You can easily switch proteins in your burger bowl. Try ground turkey for a leaner taste. For a vegetarian option, use black beans or lentils. They provide great flavor and texture. Adding seasonal vegetables can enhance your bowl. In the summer, throw in some corn and zucchini. In the fall, roasted butternut squash works well. This keeps your meal fresh and exciting. For a stunning bowl, layer your ingredients. Start with a generous base of mixed greens. Place the patties on top, then add toppings around them. This creates a colorful display. When serving at parties, use larger bowls for sharing. Arrange toppings separately to let guests customize their bowls. This makes it fun and interactive. Everyone can mix flavors to their taste. For more details on how to make a burger bowl, check out the Full Recipe. {{image_4}} For a tasty vegetarian burger bowl, you can use plant-based proteins. Options like black beans or lentils work well. They add protein and fiber. You can also try quinoa or chickpeas. These grains and legumes will fill you up while keeping it meat-free. To enhance flavors, load up on fresh vegetables. Roasted bell peppers, zucchini, and corn give a sweet touch. You can add colorful cherry tomatoes for freshness. Don't forget greens like spinach or kale for crunch. If you prefer a keto-friendly burger bowl, focus on low-carb toppings. Instead of traditional buns, use leafy greens as a base. Spinach or romaine lettuce makes a great foundation. For toppings, think cheese, avocado, and olives. These add healthy fats and flavor without the carbs. You can even add sautéed mushrooms for extra taste. When it comes to dressings, choose options without sugars. Olive oil and vinegar work great. You can also try a homemade ranch with yogurt, dill, and garlic powder. Exploring international flavors can spice up your burger bowl. For a Mexican twist, add black beans, corn, and avocado. Top with salsa for a kick. For an Italian flair, use pesto and fresh mozzarella. Cherry tomatoes and basil will bring a fresh taste. You can also sprinkle some balsamic glaze for sweetness. Asian-inspired bowls can include teriyaki sauce and sesame seeds. Add shredded carrots and edamame for color. Unique toppings can elevate your dish and keep it exciting. With these variations, you can enjoy burger bowls packed with flavor and creativity. Don't forget to check the Full Recipe for a delicious base to start from! To keep your Burger Bowls fresh, use airtight containers. Glass or plastic containers work well. Store all parts separately if you can. This prevents soggy toppings. Keep the patties, greens, and toppings in their own spots. You can safely refrigerate leftovers for about three days. Make sure to eat them within this time for the best taste. When reheating patties, use a skillet or microwave. A skillet gives the best flavor. Heat it on medium until warm, about 3-4 minutes. For the microwave, use short bursts of heat, around 30 seconds at a time. To keep toppings fresh, add them after reheating. This way, your greens and avocado stay crisp and tasty. If you want to freeze Burger Bowls, wrap the patties well. Use freezer-safe bags or wrap them in foil. You can freeze them for up to three months. When you’re ready to eat, thaw them overnight in the fridge. Reheat as mentioned above. Avoid freezing toppings like greens or avocado, as they won’t taste good after thawing. A burger bowl is a fun twist on a classic burger. It has all the tasty parts of a burger but served in a bowl. Instead of a bun, you use mixed greens as the base. You add cooked burger patties and top it with veggies and sauces. It’s a fresh and healthy meal. Yes, you can use many types of meat. Ground turkey is a leaner choice. You can also try ground chicken or even lamb for a unique flavor. If you prefer plant-based options, use black beans or veggie patties. Each option brings a different taste. Meal prep is easy with burger bowls. Cook the meat ahead and store it in the fridge. You can also chop veggies early. Keep the greens separate from the meat and toppings until you serve. This keeps everything fresh and tasty. There are many fun toppings to explore. Some popular choices include: - Sliced avocado - Shredded cheese - Pickles - Cherry tomatoes - Diced cucumbers - Sliced jalapeños for heat Feel free to mix and match. You can make it unique each time. To get gourmet flavors, start with high-quality meat. Use fresh herbs and spices. Cook the patties carefully to keep them juicy. Arrange your toppings beautifully. Drizzle your favorite sauces for extra flavor. This will give you that restaurant feel at home. Many eateries offer burger bowls on their menus. Look for local burger joints or salad places. They often have creative versions with unique toppings. Check online reviews to find the best spots near you. You can also find a full recipe to try at home! From fresh ingredients to cooking tips, burger bowls are fun to make. Start with your choice of meat, layers of greens, and tasty toppings. Remember to season well for great flavor. Customize your bowl however you like, even try international styles! Store leftovers properly and use reheating tips to enjoy later. Burger bowls are easy, delicious, and perfect for any meal. Dive into this dish and enjoy every bite!

Are you craving a dish that brings all the joy of a burger without the bun? Burger bowls are here to save the day! Packed with juicy ground beef or …

Read more

Categories Salads Leave a comment

Addictive Dan Dan Noodles That You’ll Crave

June 7, 2025 by Chef Evan
For Dan Dan Noodles, you need simple yet tasty ingredients. Here are the main ones: - 8 ounces fresh or dried noodles (preferably egg noodles) - 3 tablespoons creamy peanut butter - 2 tablespoons soy sauce - 1 tablespoon sesame oil - 2 tablespoons chili oil (adjust to taste for spice preference) - 1 tablespoon rice vinegar - 2 teaspoons granulated sugar - 1 garlic clove, finely minced - 1 inch piece of fresh ginger, grated - 4 green onions, finely chopped (reserve white parts for cooking and green parts for garnish) - 1/4 cup ground beef or turkey (optional, for added protein) - Chopped roasted peanuts for garnish - Fresh cilantro leaves for garnish These ingredients blend together to create a rich, savory dish. The peanut butter gives a creamy texture, while the chili oil adds heat. You can make your Dan Dan Noodles even better with these extras: - Sliced cucumbers for crunch - Shredded carrots for color - Additional chili flakes for spice - Sesame seeds for a nutty flavor - A squeeze of lime for freshness Feel free to mix and match what you like. It makes each bowl unique! While you can use various noodles, I suggest these: - Fresh egg noodles for a chewy texture - Dried wheat noodles for easy storage - Rice noodles for a gluten-free option Choose the noodle that sounds best to you. Each type offers a different taste and feel to the dish. For the full recipe, check the details above! Start by boiling a large pot of salted water. Bring it to a strong boil. Add the noodles gently. Fresh noodles cook in 3-5 minutes. Dried noodles need 8-10 minutes. Check for al dente texture. Drain the noodles well and rinse them with cold water. This stops the cooking. Set the noodles aside while you prepare the sauce. In a medium bowl, mix creamy peanut butter, soy sauce, sesame oil, and chili oil. Add rice vinegar, sugar, minced garlic, and grated ginger. Whisk these ingredients until smooth. Taste it and adjust the chili oil for spice. This sauce is the heart of your Dan Dan noodles. Heat a small amount of oil in a skillet over medium heat. Once hot, add ground beef or turkey. Cook it for 5-7 minutes. Stir often until the meat turns brown. Break it into small pieces as it cooks. If there's too much fat, drain it out. Add the white parts of the green onions and sauté for one more minute. This adds great flavor. In a large bowl, mix the drained noodles with the sauce. If you cooked meat, add that too. Use tongs or chopsticks to toss everything gently. Make sure the noodles are fully coated with the sauce. This step is key for flavor! Spoon the coated noodles into bowls. Top with chopped roasted peanuts and fresh cilantro. Add the green parts of the green onions for color. For a pop of heat, drizzle more chili oil on top. Serve in wide bowls to show off your work. Enjoy every bite of these addictive Dan Dan noodles! For a full guide on making this dish, check the Full Recipe. To make the sauce just right, use creamy peanut butter. It blends well and adds great flavor. Mix the sauce ingredients in a bowl. Whisk them until smooth. Taste the sauce and adjust the chili oil. If you want more heat, add a bit more. For a nutty taste, you can add sesame oil. This helps balance the flavors. Add fresh ginger and garlic for a strong flavor boost. They make every bite more exciting. Use good quality soy sauce; it can change the taste. If you like crunch, add chopped roasted peanuts on top. They add texture and a nice nutty flavor. Fresh cilantro brings brightness to the dish. Don't forget to sprinkle some on before serving! One common mistake is overcooking the noodles. They should be al dente, not mushy. Rinse them under cold water after cooking. This stops the cooking process. Another mistake is not balancing the sauce. Always taste it first. Adjust with sugar or vinegar if it’s too salty or spicy. Lastly, don’t skip the toppings. They make the dish look and taste better. A good presentation makes it even more appealing. For a full recipe, you can check the detailed preparation steps to create these addictive Dan Dan noodles. {{image_4}} You can make Addictive Dan Dan Noodles meat-free. Use tofu or tempeh instead of meat. Just cube them and sauté until golden. You can find great flavors with mushrooms, too. Shiitake mushrooms add depth and texture. For the sauce, swap the creamy peanut butter for almond butter. This gives a nice twist while keeping it rich. Use vegetable broth instead of water to cook the noodles for extra flavor. To make this dish gluten-free, choose rice noodles or gluten-free pasta. These options work well and still taste great. Check the sauce ingredients, especially the soy sauce. Use tamari or coconut aminos to keep it gluten-free. This way, you can enjoy the same delicious taste without the gluten. Feel free to switch up the protein in your dish. Chicken, shrimp, or even crumbled sausage work well. Cook the protein in the skillet just like the ground beef or turkey. For a plant-based option, try lentils or chickpeas. They add protein and fiber, making the dish hearty and filling. You can also mix proteins for a fun twist. Each variation gives a unique flavor while keeping the essence of Addictive Dan Dan Noodles. For the full recipe, follow the steps to create your own bowl of joy! To keep your leftover Dan Dan noodles fresh, place them in an airtight container. Make sure to store them in the fridge. These noodles stay good for about 3 to 4 days. If you have extra sauce, store it separately for the best taste. This way, the noodles won’t get too soggy. When you're ready to enjoy leftovers, heat them gently. You can use a microwave or a skillet. If using a microwave, add a splash of water to keep them moist. Heat in short bursts, stirring in between. If using a skillet, add a little oil and warm over medium heat. Stir until hot. This helps keep the flavor intact. If you want to save Dan Dan noodles for later, freezing works well. Place the cooled noodles in a freezer-safe container. Make sure to separate them from the sauce. They can last for up to 2 months in the freezer. When you're ready to eat, thaw them overnight in the fridge. Reheat as mentioned above for the best taste. Try not to freeze the sauce for too long, as it may lose its texture. For the full recipe, check out the detailed cooking guide above. Addictive Dan Dan Noodles are a spicy, savory dish from Sichuan, China. They feature noodles topped with a rich sauce made from peanut butter, soy sauce, and chili oil. The dish often includes ground meat and is garnished with peanuts and green onions. Each bite is a burst of flavor, making you want more. You can control the heat in your Dan Dan Noodles by adjusting the chili oil. Start with a small amount and taste the sauce. If you like more heat, add more chili oil. You can also use fresh chili or crushed red pepper for extra kick. Yes! While egg noodles are traditional, you can use other types. Rice noodles, udon, or even spaghetti work well. Just adjust the cooking time based on the noodle type you choose. Dan Dan Noodles date back to the 19th century in Sichuan. Street vendors sold them from baskets, or "dan dan," which they carried on a pole. The dish became popular due to its bold flavors and quick preparation. To find the best Dan Dan Noodles, check local Chinese restaurants or noodle shops. Look for places that focus on Sichuan cuisine. Reading reviews online can help you find hidden gems that serve this delightful dish. Addictive Dan Dan Noodles are easy to make and customize. You’ve learned key ingredients, step-by-step cooking, and tips for great flavor. Remember to mix in your favorite toppings and sauces. Make it vegetarian, vegan, or gluten-free with simple swaps. Store leftovers well for tasty meals later. I hope you feel inspired to create your own bowl of Dan Dan Noodles. Enjoy the delicious flavors and surprising twists this dish brings to your table!

Are you ready to discover a dish that will have you coming back for more? Addictive Dan Dan Noodles are bursting with flavor and spice. This simple recipe mixes savory …

Read more

Categories Dinner Leave a comment

Homemade Hamburger Helper Simple and Flavorful Meal

June 7, 2025 by Chef Evan
To make delicious homemade Hamburger Helper, gather these simple ingredients: - 1 lb ground beef - 2 cups elbow macaroni - 3 cups fresh broccoli florets - 1 small onion, finely chopped - 2 cloves garlic, minced - 3 cups beef broth - 1 cup shredded sharp cheddar cheese - 1/2 cup whole milk - 1 tablespoon Worcestershire sauce - 1 teaspoon onion powder - 1 teaspoon garlic powder - Salt and pepper to taste - Fresh parsley, chopped, for garnish Each ingredient plays a key role in the final dish. The ground beef gives it heartiness. The elbow macaroni provides a nice texture. Fresh broccoli adds color and nutrition. The cheese brings creamy goodness, while the spices deepen the flavor. This dish serves four people and is quite balanced. Each serving contains about: - Calories: 450 - Protein: 28g - Carbohydrates: 40g - Fat: 20g - Fiber: 3g These numbers may vary based on specific brands and ingredients you use. The beef offers plenty of protein, while the broccoli adds fiber and vitamins. If you need to swap out ingredients, here are some easy options: - Ground turkey or chicken for ground beef - Whole grain elbow pasta instead of regular - Cauliflower or green beans instead of broccoli - Low-sodium beef broth for less salt - Plant-based cheese for a dairy-free version These substitutions can help you customize the recipe to fit your taste or dietary needs. Feel free to get creative! You can find the full recipe for this dish by following the link provided earlier. To start, you need to brown the beef. Take a large skillet and set it over medium heat. Add 1 pound of ground beef to the pan. Use a wooden spoon to break the beef apart as it cooks. This helps it brown evenly. Cook until the beef is no longer pink, which takes about 5 to 7 minutes. Once browned, drain any extra grease from the skillet. This step keeps your dish from being too oily. Next, it’s time for aromatics. Add 1 small finely chopped onion and 2 minced garlic cloves to the skillet with the beef. Stir them in and sauté for about 2 to 3 minutes. Watch the onion turn translucent and smell its sweet aroma. This step adds a deep flavor to your meal. Now, let’s combine the main ingredients. Stir in 2 cups of elbow macaroni and 3 cups of beef broth. Don’t forget to add 1 tablespoon of Worcestershire sauce, 1 teaspoon of onion powder, and 1 teaspoon of garlic powder. Season with salt and pepper to taste. Bring the mixture to a rapid boil over high heat. Once boiling, reduce the heat to low. Cover the skillet and let it simmer for 10 to 12 minutes. Stir occasionally to keep it from sticking. After that, gently fold in 3 cups of fresh broccoli florets. Cover again and cook for another 5 minutes. Now your broccoli should be tender but still bright green. Finish by pouring in 1/2 cup of whole milk and adding 1 cup of shredded sharp cheddar cheese. Stir until the cheese melts and everything combines well. Taste and adjust the seasoning if needed. Your homemade Hamburger Helper is ready to serve hot! For a fun touch, garnish with fresh parsley. This simple and flavorful meal is perfect for busy nights. For the full recipe, check out the details above. To make great macaroni, start with a large pot of water. Use enough water to let the pasta float freely. Add a good amount of salt to the water. This salt helps the pasta taste better. Stir the macaroni often while it cooks. This keeps it from sticking together. Cook it until it's al dente, or firm to the bite. This will keep the macaroni from getting mushy later. For a creamy texture, you need to add cheese and milk at the right time. After the macaroni is done, lower the heat. Pour in the whole milk slowly. Then, add the shredded cheddar cheese. Stir well until the cheese melts and blends in. If you want it creamier, you can add more milk or cheese. This will make your dish rich and smooth. Spice up your dish with simple add-ins. Worcestershire sauce gives a nice kick. Don't skip the onion and garlic powder; they bring depth. You can also add fresh herbs like parsley. For a bit of heat, try a pinch of red pepper flakes. These small changes can elevate your homemade Hamburger Helper. You’ll love how each bite bursts with flavor! {{image_4}} You can easily make a vegetarian version of this meal. Instead of ground beef, use a mix of lentils and mushrooms. Cook the lentils until soft, and add sautéed mushrooms for a rich flavor. Use vegetable broth instead of beef broth. You can also add more veggies, like bell peppers and carrots, for extra nutrition. This option is still simple and full of taste. If you prefer other proteins, there are great options. Ground turkey is a lean choice. It gives a lighter taste while still being filling. For a spicy kick, try chorizo. It adds great flavor to the dish. You can also use shredded chicken or beef if you have leftovers. Each protein changes the dish's taste while keeping it hearty. There are many ways to change the flavor of this meal. Adding spices can make it unique. For a smoky taste, add smoked paprika. If you like heat, try cayenne pepper or red pepper flakes. You can also mix in herbs like thyme or oregano for a fresh twist. Swap cheddar cheese for pepper jack for a spicy kick. These simple changes keep the meal exciting every time you make it. For the full recipe, check out the detailed instructions above. To keep your homemade Hamburger Helper fresh, store it in an airtight container. Let it cool to room temperature first. Then, refrigerate it within two hours of cooking. This helps prevent bacteria growth. Use it within three to four days for the best taste. When you’re ready to eat leftovers, reheat them in a skillet over medium heat. Add a splash of milk or broth to keep it creamy. Stir often until it heats through. You can also use the microwave. Heat it in short bursts, stirring in between, to avoid hot spots. If you want to save some for later, freezing works well. Allow the dish to cool completely before packing it in a freezer-safe container. Label it with the date so you remember when you made it. It can last for up to three months in the freezer. To reheat, thaw it overnight in the fridge. Then, use the skillet or microwave method to warm it up. For the best flavor, you’ll want to eat it soon after you thaw it. For the full recipe, check out the Cheesy Beef and Broccoli Skillet Delight section! Yes, you can use whole wheat pasta. Whole wheat adds fiber and a nutty taste. It also holds up well in the skillet. Just keep an eye on the cooking time, as it may differ. Whole wheat pasta typically takes a little longer to cook. To make this dish gluten-free, use gluten-free pasta. There are many options available, like rice or corn pasta. Also, check your beef broth to ensure it is gluten-free. You can even make your own broth at home for more control. You can serve homemade Hamburger Helper with a side salad for freshness. Garlic bread is also a great choice for added flavor. For a veggie boost, consider steamed green beans or a mix of roasted vegetables. These sides balance the meal and add color to your plate. This blog post covered key ingredients and step-by-step cooking instructions for Hamburger Helper. I shared tips to make your dish creamy and flavorful. You also learned about variations and storage options to keep meals fresh. Embrace the chance to customize your dish. Cooking is fun, so experiment with flavors and ingredients. Enjoy your time in the kitchen and make it your own!

If you’re looking for a simple and tasty meal, you’ve found it! Homemade Hamburger Helper is easy to make and packed with flavor. You can customize it to suit your …

Read more

Categories Dinner Leave a comment

Cajun Potato Soup Rich and Comforting Recipe Guide

June 7, 2025 by Chef Evan
To make Cajun Potato Soup, gather these ingredients: - 4 large russet potatoes, peeled and cut into ½-inch dice - 1 medium onion, finely chopped - 2 cloves of garlic, minced - 1 green bell pepper, diced - 1 red bell pepper, diced - 4 cups vegetable or chicken broth (low-sodium for healthier option) - 1 cup heavy cream (or a dairy-free alternative) - 2 tablespoons Cajun seasoning (or to taste) - 1 teaspoon smoked paprika - 1 tablespoon olive oil - Salt and freshly ground black pepper, to taste - 1 cup corn kernels (fresh off the cob, or frozen) - ½ cup green onions, chopped (for garnish) - ½ cup shredded cheddar cheese (for garnish) You can switch some ingredients if needed: - Use Yukon Gold potatoes for a creamier texture. - Swap heavy cream with coconut milk for a dairy-free option. - If you don't have Cajun seasoning, mix paprika, cayenne, and oregano. - Use vegetable broth for a vegan version instead of chicken broth. Make sure you have the right tools: - A large, heavy-bottomed pot for even cooking. - An immersion blender for easy mixing. - A cutting board and sharp knife for chopping veggies. - Measuring cups and spoons for accuracy. - Serving bowls for a beautiful presentation. For the full recipe, check out the sections above. Enjoy making this flavorful dish! Start by washing and peeling the potatoes. Cut them into ½-inch dice. Next, chop the onion finely. Dice the green and red bell peppers. Mince the garlic cloves. This mix of fresh veggies will add great flavor! Heat the olive oil in a large pot over medium heat. Add the chopped onion, green bell pepper, and red bell pepper. Sauté for about 5 minutes. You want them soft and a bit see-through. Now, add the minced garlic and cook for one more minute. It should smell amazing! Add the diced potatoes to the pot. Pour in the vegetable or chicken broth. Sprinkle in the Cajun seasoning, smoked paprika, and a pinch of salt and pepper. Turn up the heat to bring it to a gentle boil. Once it’s boiling, reduce the heat and let it simmer uncovered for 20 to 25 minutes. The potatoes should be tender and easy to pierce with a fork. Once the potatoes are soft, grab an immersion blender. Blend the soup right in the pot until it’s smooth. If you like it chunky, blend less. If you don’t have an immersion blender, use a regular blender. Just be careful when transferring the hot soup. After blending, stir in the heavy cream and corn kernels. Simmer for another 5 minutes to warm everything through. Taste the soup to check the seasoning. You may want to add more salt, pepper, or Cajun seasoning. Serve your soup hot. Garnish it with chopped green onions and shredded cheddar cheese. This adds a lovely touch to your bowl! For the full recipe, check out the detailed instructions we provided. To boost the flavor of your Cajun potato soup, use fresh herbs. Adding thyme or bay leaves while cooking gives your soup depth. You can also try using smoked sausage or bacon for a heartier taste. Lastly, a squeeze of lemon juice just before serving brightens the dish. One common mistake is overcooking the potatoes. This can make them mushy and lose their texture. Make sure to cut potatoes into even pieces for consistent cooking. Another mistake is not seasoning enough. Taste your soup as you go and adjust the salt and Cajun seasoning. You can make this soup ahead of time. Prepare it up to the blending step, then cool it down. Store it in the fridge for up to three days. When ready to serve, simply reheat and add the cream and corn. This method saves time and enhances the flavors! For the full recipe, check out the complete guide for Cajun potato soup! {{image_4}} To make this soup vegetarian, use vegetable broth. Swap heavy cream for coconut milk or cashew cream. These options keep the soup rich and creamy without using dairy. For a vegan version, ensure the Cajun seasoning has no animal products. Want to boost the protein? You can add cooked sausage, chicken, or shrimp. If you prefer plant-based, try adding chickpeas or lentils. This will make the soup more filling and add extra flavor. Just cook the protein separately, then stir it in at the end. If you like heat, add more Cajun seasoning or diced jalapeños. You can also use hot sauce for a kick. For less spice, reduce the seasoning or use mild paprika. Always taste as you go to find your perfect balance. For the full recipe, check out the Cajun Delight Potato Soup. It has all the details you need. After you enjoy your Cajun potato soup, let it cool first. Pour any leftovers into an airtight container. This will keep the soup fresh for up to three days in the fridge. Always label your container with the date. This way, you know when to use it. If you want to keep your soup longer, freezing is a great option. Use a freezer-safe container or a heavy-duty freezer bag. Make sure to leave some space at the top for expansion. The soup can last for up to three months in the freezer. When you’re ready to eat, thaw it in the fridge overnight for best results. To reheat, pour the soup into a pot over medium heat. Stir often until it’s hot. If the soup is too thick, add a splash of broth or water. You can also microwave it in a bowl. Just cover the bowl with a paper towel to avoid splatters. Heat in short intervals, stirring between, until warmed through. Enjoy your delicious soup again! For the full recipe, check the recipe section above. Cajun potato soup is a creamy dish with strong, bold flavors. It mixes diced potatoes, veggies, and Cajun spices. You get a warm, hearty meal perfect for chilly days. The soup is rich and filling, often topped with cheese and green onions. Each bite gives you a taste of Louisiana, bringing comfort to your table. Yes, you can easily make this soup gluten-free! Use gluten-free broth instead of regular broth. Most Cajun seasonings are gluten-free, but check the label to be sure. Heavy cream is naturally gluten-free, so there are no worries there. This way, you can enjoy this flavorful soup without any gluten! To make your Cajun potato soup thicker, try these tips. First, blend a portion of the soup to create a creamy texture. If you want it even thicker, add more potatoes. You can also mix in a bit of cornstarch or flour. Just make a slurry with cold water first, then stir it in and cook until thickened. Enjoy a soup that warms both your heart and stomach! You’ve explored the ingredients, tools, and cooking steps for Cajun Potato Soup. I shared tips to boost flavor and avoid common mistakes. You can adapt the recipe for different diets and spice levels, too. Remember how to store, freeze, and reheat leftovers. With these insights, you can make a delicious soup that fits your taste and needs. Enjoy cooking and sharing this dish with others!

Warm, rich, and full of flavor, Cajun Potato Soup is comfort in a bowl. In this guide, I’ll share my favorite recipe and tips to help you create this tasty …

Read more

Categories Dinner Leave a comment

Spicy Mexican Corn Bites Crispy and Flavorful Treat

June 7, 2025 by Chef Evan
To make these spicy Mexican corn bites, you need the following ingredients: - 1 cup corn kernels (fresh or frozen) - 1/2 cup all-purpose flour - 1/4 cup cornmeal - 2 large eggs, beaten - 1/2 teaspoon baking powder - 1 teaspoon chili powder - 1/2 teaspoon ground cumin - 1/4 teaspoon smoked paprika - 1/4 teaspoon sea salt - 1/4 teaspoon freshly ground black pepper - 1/3 cup diced jalapeños (fresh or pickled) - 1/4 cup fresh cilantro, chopped - Oil for frying You can add some extra flavors to your corn bites with these options: - 1/4 cup crumbled feta cheese - A squeeze of lime juice - Additional herbs like parsley or green onions When choosing fresh corn, look for these signs: - Bright green husks that are tightly wrapped. - Plump kernels that feel full and firm. - Silks that are golden and slightly sticky. - Avoid corn with brown or dry husks. Fresh corn gives your bites a sweet and crisp flavor. If using frozen corn, ensure it is thawed and drained well before mixing. For the full recipe, follow the steps outlined earlier! To make your spicy Mexican corn bites, start by gathering all your ingredients. In a large bowl, mix together the corn kernels, flour, cornmeal, baking powder, chili powder, cumin, smoked paprika, sea salt, and black pepper. Make sure to stir well, so everything combines nicely. Next, pour in the beaten eggs. Stir gently until everything just comes together. Don’t overmix; a few lumps are okay! Now, fold in the jalapeños and cilantro. If you want, add crumbled feta cheese for extra flavor. Heat about one inch of oil in a deep pan over medium heat. To check if the oil is ready, look for a shimmering surface. When the oil is hot, use a spoon to drop small amounts of the batter into the oil. Fry them in small batches to keep them from sticking together. Cook each side for about 3-4 minutes until they are golden brown. Once done, use a slotted spoon to take out the bites. Place them on a plate with paper towels to soak up any extra oil. One key to these bites is the oil temperature. If it's too hot, the outside cooks fast, leaving the inside raw. If it's too cool, they soak up too much oil and get greasy. Use a cooking thermometer if you have one. It should be around 350°F (175°C) for frying. Also, work in batches. This gives each bite room to cook evenly. For crispy bites, ensure you do not overcrowd the pan. This keeps the oil hot enough. Also, let the fried bites rest on paper towels. This helps them stay crisp by removing excess oil. Serve them warm with dips like spicy aioli or guacamole for the best experience. For the full recipe, check back at the top! When making spicy Mexican corn bites, avoid overmixing the batter. This can make your bites tough. Another mistake is frying too many at once. If you crowd the pan, they won’t cook evenly. Always check the oil temperature. If it's too hot, the bites can burn quickly. Serve these corn bites warm for the best taste. I love pairing them with spicy aioli, salsa, or guacamole. Each dip adds a unique flavor. You can also sprinkle some lime juice on top for a fresh twist. Arrange the bites on a platter. Garnish with fresh cilantro and jalapeño slices for a colorful look. To control the heat, you can modify the jalapeños. If you want it milder, use fewer jalapeños or remove the seeds. For more spice, add some cayenne pepper or use hotter peppers. Taste the batter before frying to find your perfect heat level. This way, you can enjoy your spicy Mexican corn bites just right! For the full experience, check out the Full Recipe. {{image_4}} You can easily make these bites vegetarian. Just skip the feta cheese. Swap in some diced bell peppers or zucchini for extra texture. They add a nice crunch and flavor. Try using black beans instead of corn for a twist. This keeps the recipe hearty without meat. You can switch up the spices to change the flavor. Add cayenne pepper for more heat. If you prefer a smoky taste, use chipotle powder instead of chili powder. Experiment with garlic powder or onion powder for a deeper flavor. Each mix can lead to a new taste adventure! Serve these corn bites with a twist. Try a mango salsa for a sweet touch. You can also pair them with a creamy avocado dip. This adds a rich flavor that balances the spice. For a fun presentation, serve them in lettuce wraps. It makes for a fresh, crunchy bite! For the full recipe, check the details above. Store your leftover corn bites in an airtight container. This helps keep them fresh. Let them cool to room temperature first. Place a paper towel at the bottom to absorb moisture. You can keep them in the fridge for about three days. To reheat, use an oven or an air fryer. Preheat your oven to 350°F (175°C). Place the corn bites on a baking sheet. Heat them for about 10-12 minutes. This helps regain their crispiness. If using an air fryer, set it to 350°F and heat for 5-7 minutes. For long-term storage, you can freeze the corn bites. Let them cool completely, then place them in a single layer on a baking sheet. Freeze them for about an hour. Once frozen, transfer them to a freezer bag. They can last up to three months. When ready to eat, cook them straight from frozen. Adjust the cooking time by a few extra minutes. For the full recipe, refer to the earlier sections. You can use breadcrumbs or ground oats instead of cornmeal. Both options give a nice crunch. If you want a gluten-free choice, use almond flour. Each substitute will change the texture a bit, but they still work well. Yes, you can bake them! Preheat your oven to 400°F (200°C). Line a baking sheet with parchment paper. Shape the corn mixture into small balls and place them on the sheet. Bake for about 20-25 minutes, flipping halfway through. They will be less crispy, but still tasty. The oil is ready when it shimmers and small bubbles form around a wooden spoon dipped in it. You can also drop a small bit of batter into the oil. If it sizzles and rises to the top, the oil is hot enough. These corn bites last about 3-4 days in the fridge. Store them in an airtight container for best results. Reheat them in an oven or air fryer to keep them crispy. If you want to keep them longer, consider freezing for up to three months. For a complete guide, check out the Full Recipe for Zesty Mexican Corn Bites. You learned the key ingredients and steps to make great corn bites. We explored tips for freshness and cooking techniques to achieve perfect texture. I shared common mistakes to avoid and ways to spice things up. Additionally, we discussed storage options for leftovers. Remember, practice makes perfect. With a little creativity, you can make delicious corn bites for any meal. Don't hesitate to try the variations and serving ideas!

Craving a tasty snack with bold flavors? Look no further! These Spicy Mexican Corn Bites are crispy, savory, and sure to please your taste buds. I’ll guide you through each …

Read more

Categories Appetizers Leave a comment
Older posts
Newer posts
← Previous Page1 … Page67 Page68 Page69 … Page124 Next →

TOSSED FLAVORS

Where flavors are fresh, vibrant, and ready to toss! 🥗

PAGES

Home About Contact Privacy Policy Terms & Conditions Cookie Policy GDPR Policy Copyright Policy Disclaimer

CATEGORIES

Appetizers Desserts Salads Breakfast Dinner

Contact

  • Pinterest
  • Mail
Copyright © 2026 Tossed Flavors. All rights reserved.