Savory Ground Beef Orzo Hearty and Flavorful Dish

Welcome to your next favorite comfort dish: Savory Ground Beef Orzo! With hearty beef, tender orzo, and fresh veggies, this meal is packed with flavor. It’s easy to make, perfect …
Welcome to your next favorite comfort dish: Savory Ground Beef Orzo! With hearty beef, tender orzo, and fresh veggies, this meal is packed with flavor. It’s easy to make, perfect …
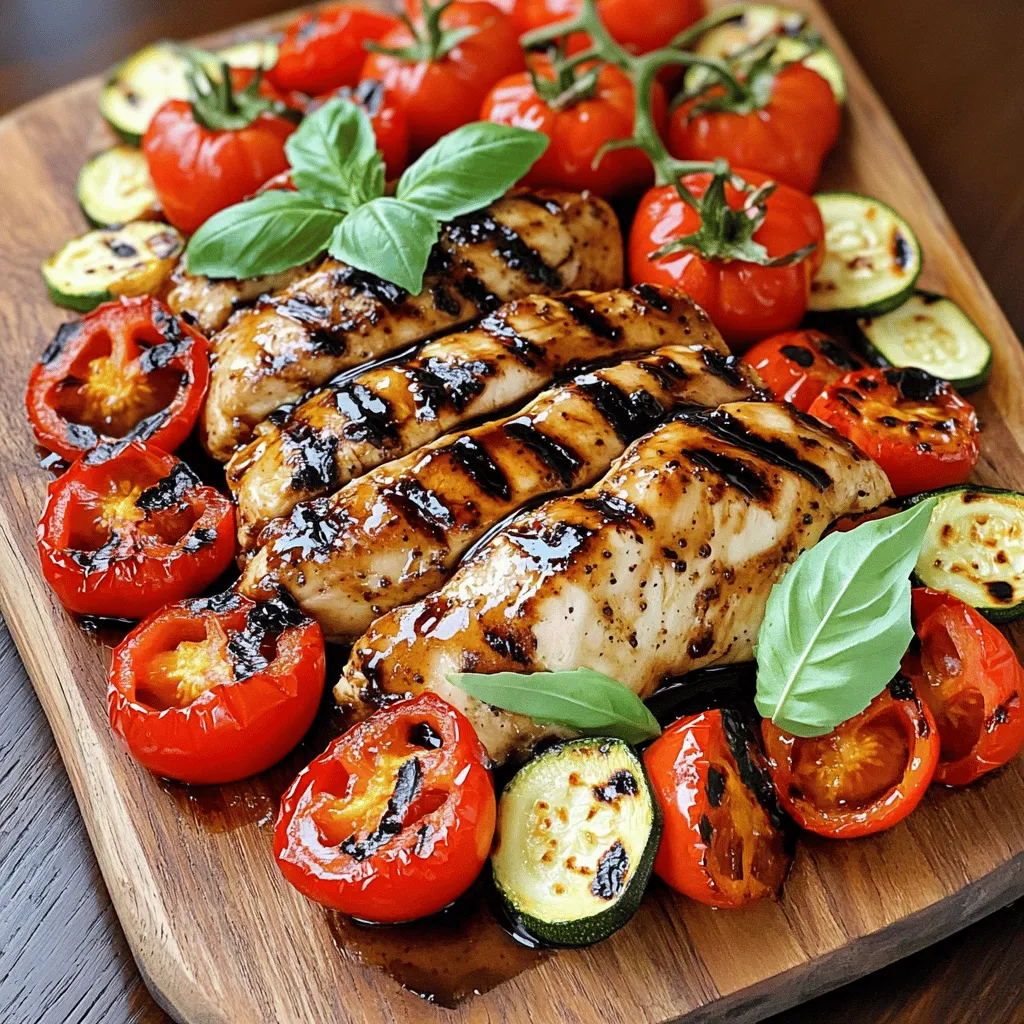
Looking for a quick, tasty meal? My Balsamic Glazed Chicken and Veggies recipe is just what you need! This dish is packed with flavor, thanks to the sweet balsamic vinegar …
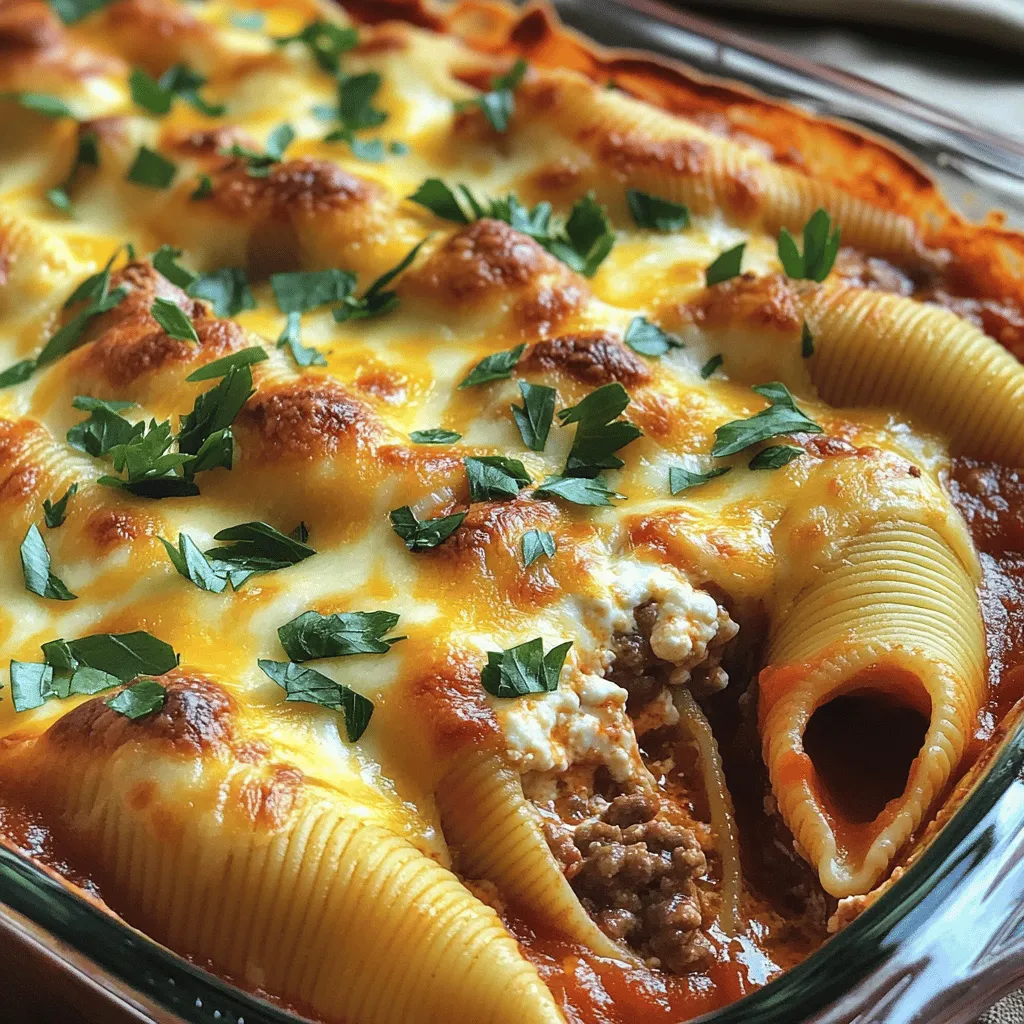
Welcome to a cozy world of flavor with my Rich and Comforting Creamy Beef Shells Casserole! If you’re craving a hearty dish that warms your heart and fills your belly, …

Welcome to a burst of flavor with my One-Pan Chicken and Pineapple Tacos! In just a few steps, you can create a fun meal that combines sweet pineapple and savory …

Are you ready to make the best beef empanadas? These savory treats are packed with flavor and are surprisingly easy to prepare. With a hearty filling of ground beef, fresh …

Craving a tropical escape? Dive into the savory world of grilled jerk shrimp and pineapple skewers! This dish combines the bold flavors of jerk seasoning with the sweetness of pineapple …
![- 4 large russet potatoes - 1 cup broccoli florets, steamed until tender - 1 cup sharp cheddar cheese, freshly grated - 1/2 cup sour cream - 1/4 cup milk (whole or 2%) - 2 tablespoons unsalted butter - 1 teaspoon garlic powder - Salt and freshly ground black pepper to taste - 2 tablespoons green onions, finely chopped (for garnish) To make Broccoli and Cheddar Twice-Baked Potatoes, focus on quality ingredients. The russet potatoes should be large and firm. This makes for a better texture when baked. Fresh broccoli florets add a bright color and a nutritious touch. I always choose sharp cheddar cheese for its strong flavor. It really makes the dish pop. When it comes to the additional ingredients, sour cream adds creaminess. Milk helps to keep the filling smooth. Butter gives richness and flavor. Garlic powder provides a warm taste without being overpowering. Don't forget the salt and pepper; they enhance all the flavors in this dish. Finally, green onions bring a fresh crunch as a garnish. Using these ingredients will ensure your potatoes are a tasty delight. For the complete cooking method, check the Full Recipe. 1. Preheat your oven to 400°F (200°C). 2. Wash the large russet potatoes well. Use a fork to pierce them several times. This lets steam escape. 3. Place the potatoes on a baking sheet and bake for 45-60 minutes. They should be fork-tender when done. 1. While the potatoes bake, get ready to steam the broccoli florets. 2. Steam the florets until they are tender, which takes about 5-7 minutes. 3. Once done, chop the broccoli into small pieces and set them aside. 1. After the potatoes are baked, let them cool for about 10 minutes. This makes them easier to handle. 2. Cut each potato in half lengthwise. Scoop out the insides into a bowl, leaving about 1/4 inch of potato in the skin. 3. In the bowl, mix the scooped potatoes with sour cream, butter, milk, garlic powder, and half of the grated cheddar cheese. 4. Use a potato masher or fork to blend everything. The mix should be smooth and creamy. 5. Gently fold in the chopped broccoli. Season with salt and freshly ground pepper to taste. 1. Spoon the creamy filling back into the potato skins. Mound it generously. 2. Sprinkle the remaining cheddar cheese on top of each filled potato. 1. Put the filled potatoes back in the oven. Bake for an additional 15-20 minutes. 2. The cheese should be melted, bubbly, and lightly golden. 3. When done, sprinkle with chopped green onions before serving. For the full recipe, check out the main article. - Use freshly grated cheese for better melting. Pre-grated cheese often has anti-caking agents, which can affect how it melts. - Avoid over-steaming the broccoli. Steaming for 5-7 minutes keeps the broccoli tender but firm. Overcooking makes it mushy and less flavorful. - Serve with a side salad or grilled protein. This adds balance and makes the meal more filling. - Pair with a creamy dressing or sour cream. A drizzle of sour cream enhances the dish's richness and adds creaminess. - Experiment with different cheese varieties or spices. Try gouda, pepper jack, or even feta for a fun twist. - Add crispy bacon bits or cooked sausage to the filling. This boosts flavor and adds texture, making each bite more exciting. For more details on how to craft these delightful potatoes, check the Full Recipe. {{image_4}} You can easily make this dish vegetarian. Just swap the cheddar for vegan cheese or use nutritional yeast. Nutritional yeast adds a cheesy flavor without dairy. You still get that creamy feel while keeping it plant-based. This change makes the dish friendly for everyone. Looking for healthier choices? Replace sour cream with Greek yogurt. Greek yogurt adds creaminess and protein. It also cuts down on fat. You can also switch out russet potatoes for sweet potatoes. Sweet potatoes bring a sweet taste and more nutrients. They add a unique flavor twist that surprises your taste buds. Want to take the flavor up a notch? Add sautéed onions, peppers, or mushrooms to your filling. These veggies bring extra taste and texture. You can also mix in some herbs like thyme or chives. Fresh herbs brighten the dish and enhance the overall flavor. Each bite will be a tasty delight! For the complete recipe, check out the [Full Recipe]. Store any leftovers in an airtight container. They will stay fresh in the fridge for up to 3 days. This helps maintain flavor and texture, so you enjoy every bite later. For the best results, reheat in the oven at 350°F (175°C). This method warms your potatoes evenly, keeping them soft and cheesy. Avoid using the microwave, as it can make them soggy. You can freeze prepared filled potatoes for up to 2 months. To do this, wrap each potato in plastic wrap and then place them in a freezer bag. Thaw in the fridge before reheating to keep them tasty. Yes, other vegetables like spinach, carrots, or cauliflower work well too. You can mix and match based on your taste. For a fun twist, try adding some sautéed bell peppers or even kale. Each veggie brings its own flavor and texture, making the dish unique. The initial baking takes 45-60 minutes, plus an additional 15-20 minutes after filling. Make sure to check the potatoes by piercing them with a fork. They should feel soft. This ensures a fluffy texture for the filling. Greek yogurt or cottage cheese can be good substitutes for a lighter option. Both add creaminess without the extra fat. Greek yogurt gives a nice tang, while cottage cheese adds a rich texture. You can even mix them for a unique taste. Ensure all ingredients, including cheese and sour cream, are gluten-free. Check labels carefully, as some brands may include gluten. Using gluten-free cheese and sour cream keeps the dish safe for those with gluten sensitivities. Enjoying this tasty delight without worry is key! In this article, we explored how to make delicious stuffed baked potatoes. We covered the key ingredients, from russet potatoes and broccoli to sharp cheddar cheese. The step-by-step instructions made it easy to prepare, fill, and bake your potatoes perfectly. You also learned helpful tips for texture and serving ideas. Lastly, we looked at tasty variations and storage options. Now, you have the tools to create satisfying meals that delight. Enjoy cooking and experimenting with your favorite flavors!](https://tossedflavors.com/wp-content/uploads/2025/06/2df16bc8-7e8e-4a31-8f78-c3663dee0ca7.webp)
Craving a comforting dish that’s both tasty and healthy? Look no further! Broccoli and Cheddar Twice-Baked Potatoes are your perfect choice. Packed with tender broccoli and cheesy goodness, this recipe …
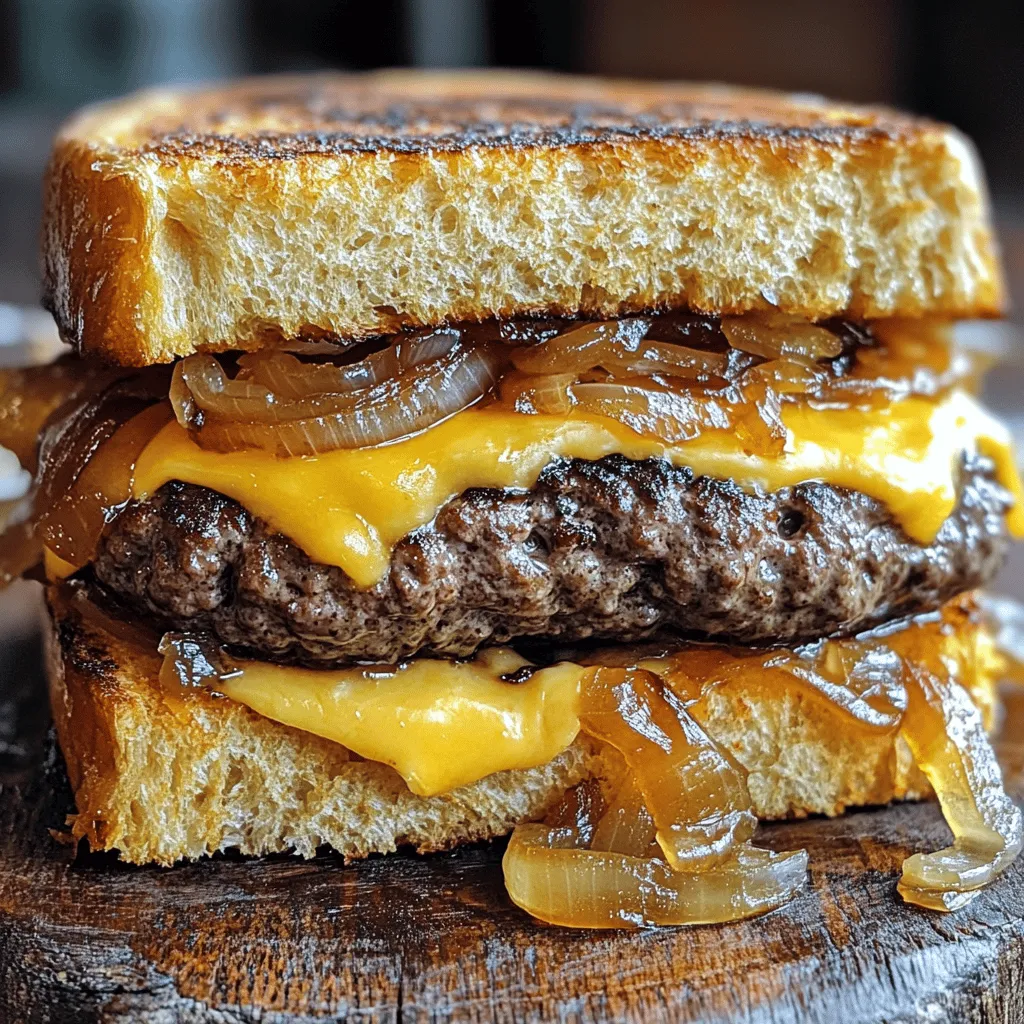
Looking for the ultimate comfort food? You’ve found it! This blog post will guide you through my best patty melt recipe. With juicy beef, melty cheese, and perfectly grilled bread, …
![- 2 boneless, skinless chicken breasts - 1 tablespoon extra virgin olive oil - 1 teaspoon garlic powder - 1 teaspoon onion powder - Salt and freshly ground pepper to taste To make the Smash Chicken Caesar tacos, start with the chicken. I love using boneless, skinless chicken breasts. They cook quickly and are easy to shred. Coat the chicken with olive oil, garlic powder, onion powder, salt, and pepper. This simple blend gives the chicken great flavor. - 1 cup romaine lettuce, finely chopped - ½ cup cherry tomatoes, halved - ½ cup creamy Caesar dressing - ½ cup freshly grated Parmesan cheese - Fresh parsley, finely chopped (for garnish) Fresh toppings make this dish shine. I use romaine lettuce for crunch and cherry tomatoes for sweetness. The creamy Caesar dressing adds richness. Don’t forget the Parmesan cheese; it brings a salty bite. Finish with fresh parsley for color and taste. - 8 small corn tortillas - Alternatives for tortillas For the tortillas, I recommend small corn ones. They hold the fillings well. You can warm them on the grill or in a pan. If you want alternatives, try flour tortillas or lettuce wraps for a low-carb option. Check the [Full Recipe] for all the details. First, preheat your grill or stovetop grill pan to medium-high heat. This step is key to getting a nice sear on the chicken. Next, take your chicken breasts and place them in a mixing bowl. Drizzle one tablespoon of extra virgin olive oil over the chicken. Then, season the chicken with one teaspoon each of garlic powder and onion powder. Finally, add salt and freshly ground pepper to taste. Make sure every piece is evenly coated. Now it’s time to cook the chicken. Place the seasoned chicken on the grill. Cook each side for about 6 to 7 minutes. You want the chicken to reach an internal temperature of 165°F (75°C). Once it’s done, transfer the chicken to a plate and let it rest for about 5 minutes. Resting helps the chicken retain its juices, making it tender and juicy. After resting, use two forks to shred the chicken into bite-sized pieces. This is where the fun begins! Give the chicken a good smash to create those perfect shreds. In a separate bowl, mix the shredded chicken with half a cup of creamy Caesar dressing. Make sure every piece is coated well. Next, warm eight small corn tortillas on the grill or in a skillet for about 30 seconds on each side. They should be soft and pliable, not crisp. To assemble your tacos, place a warm tortilla on a plate. Add a generous scoop of the chicken mixture. Top it with chopped romaine lettuce, halved cherry tomatoes, and a sprinkle of freshly grated Parmesan cheese. Garnish with finely chopped parsley for a lovely touch. Enjoy your Smash Chicken Caesar Tacos! For the complete recipe, check the Full Recipe. To cook chicken breasts evenly, start by using a flat surface. Pound them to an even thickness. This helps the chicken cook at the same rate. I like to use a meat mallet for this step. To check if the chicken is done, you need a meat thermometer. The internal temperature should reach 165°F (75°C). If you don’t have a thermometer, cut into the thickest part. The meat should be white, not pink. For soft tortillas, warm them on the grill or in a pan. Heat them for about 30 seconds on each side. This method keeps them soft and tasty. You can also wrap them in foil and heat them in the oven. If you want alternatives, consider flour tortillas or lettuce wraps. These options can change the flavor and texture of your tacos. You can adjust the Caesar dressing to fit your taste. Add more or less to make it creamier or tangier. I love adding a splash of lemon juice for extra brightness. For toppings, think beyond the basics! Try sliced avocado, jalapeños, or crumbled bacon. These extras can make your tacos even more delicious. You can find the Full Recipe for more ideas. {{image_4}} You can mix up the protein in your Smash Chicken Caesar Tacos. Grilled shrimp or tofu work well if you want something different. They add a unique taste while remaining light and fresh. If you enjoy pulled pork, use it as a substitute. Just ensure the pork is tender and shredded. This creates a rich, savory flavor that pairs nicely with Caesar dressing. If you need gluten-free options, corn tortillas are great. They hold the filling well while adding a nice crunch. For vegans, try plant-based chicken or chickpeas. You can make a creamy dressing using cashews or tahini, which tastes amazing. These options help everyone enjoy the deliciousness of tacos! Want to add some kick? Toss in jalapeños or sliced chili peppers. They bring a fun heat that contrasts with the creamy dressing. You can also experiment with different dressings. Try ranch or a spicy chipotle sauce. This lets you customize flavors to suit your taste. The options are truly endless! For the full recipe, check the link and dive into making your own Smash Chicken Caesar Tacos! To store your leftover tacos, wrap them in foil or place them in an airtight container. Keep them in the fridge. This helps keep the tortillas soft. For the chicken, remove it from the tacos. Place it in a separate container. This keeps the chicken fresh and prevents sogginess. When ready to eat, reheat your tacos on low heat. Use a skillet to warm them gently. This keeps the tortillas soft and tasty. If the chicken seems dry, add a bit of water or extra dressing. This will help rehydrate the chicken and keep it juicy. You can freeze the chicken and toppings for later. Place the chicken in a freezer-safe bag. Make sure to remove excess air. For toppings, freeze them separately in small bags. When you’re ready to use them, thaw everything in the fridge overnight. This way, your ingredients stay fresh and full of flavor. To grill chicken for tacos, start with boneless, skinless breasts. Rub them with olive oil, garlic powder, onion powder, salt, and pepper. Preheat your grill to medium-high heat. Grill the chicken for 6-7 minutes on each side. It should reach 165°F (75°C). Let it rest for 5 minutes before shredding. This method keeps the chicken juicy and flavorful. Yes, you can prepare many ingredients ahead of time. You can grill the chicken a day in advance and store it in the fridge. Chop the romaine and tomatoes earlier too. Keep the Caesar dressing separate until you are ready to serve. This will save time and help keep everything fresh. To spice up your tacos, add sliced jalapeños or hot sauce to the chicken mix. You can also use a spicy Caesar dressing if you prefer. Another option is to sprinkle crushed red pepper flakes over the tacos before serving. This will add a nice kick without overwhelming the dish. These tacos pair well with simple sides. Consider serving them with a fresh salad or corn on the cob. You can also offer tortilla chips and salsa for a crunchy side. For drinks, cold lemonade or iced tea complements the flavors nicely. Yes, there are many non-dairy options for Caesar dressing. Look for brands that use cashews or tofu as a base. You can also make your own using vegan mayo, lemon juice, and nutritional yeast. These alternatives taste great and will keep your tacos creamy and delicious. In this post, we explored how to make Smash Chicken Caesar Tacos. You learned about essential ingredients, step-by-step cooking, and tasty variations. These tacos are simple yet satisfying. Remember, you can easily customize them to fit your taste. Use different proteins or sauces for unique twists. Store leftovers properly for future enjoyment. With these tips, you can enjoy fantastic tacos every time. Get ready to impress your friends and family with delicious flavors!](https://tossedflavors.com/wp-content/uploads/2025/06/fe2e54a4-5de1-4ded-a430-d8a075b37d55.webp)
Are you ready to spice up your dinner routine? Smash Chicken Caesar Tacos are the perfect blend of tasty and simple. With juicy chicken, crisp veggies, and creamy dressing, you’ll …
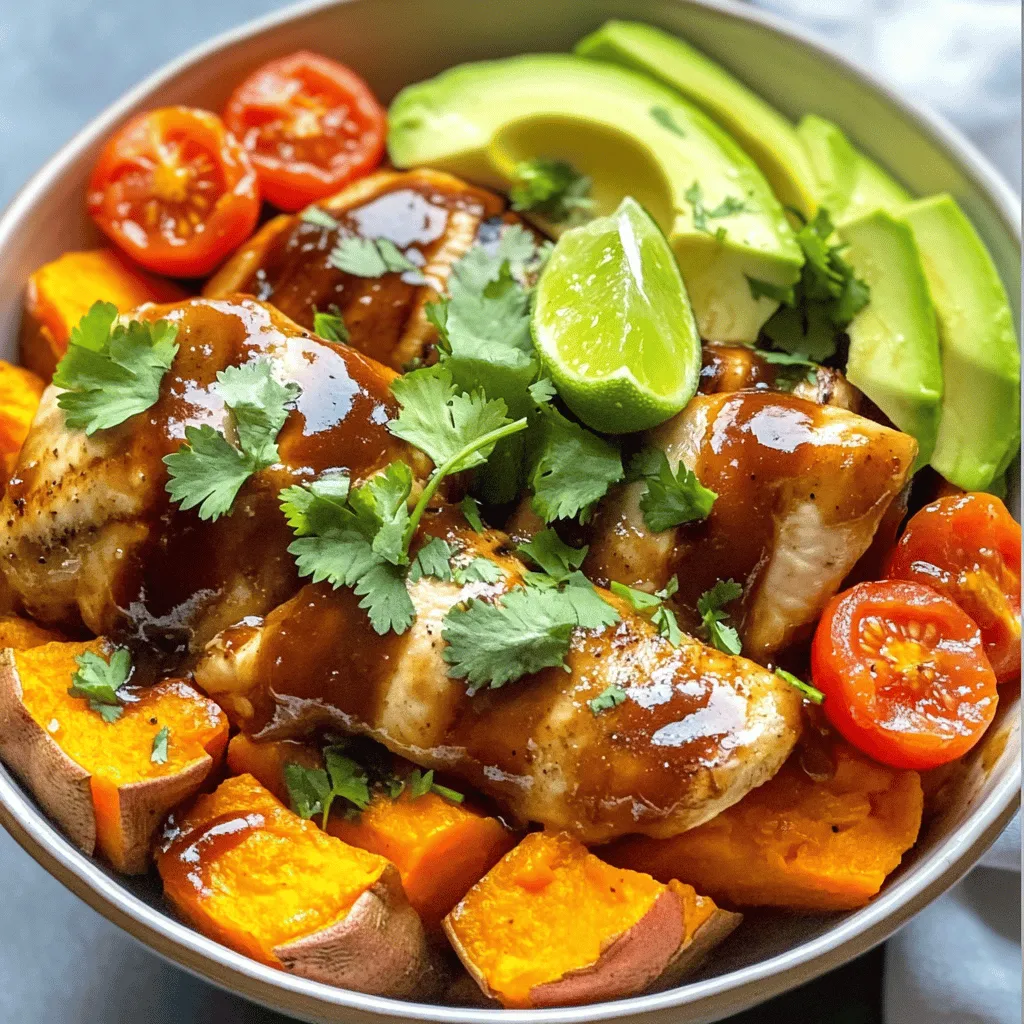
Looking for a tasty and filling meal? Try BBQ Chicken & Roasted Sweet Potato Bowls! This recipe combines juicy chicken, sweet potatoes, and fresh toppings for a delicious and healthy …