Bang Bang Chicken Bowl Flavorful and Easy Meal Guide
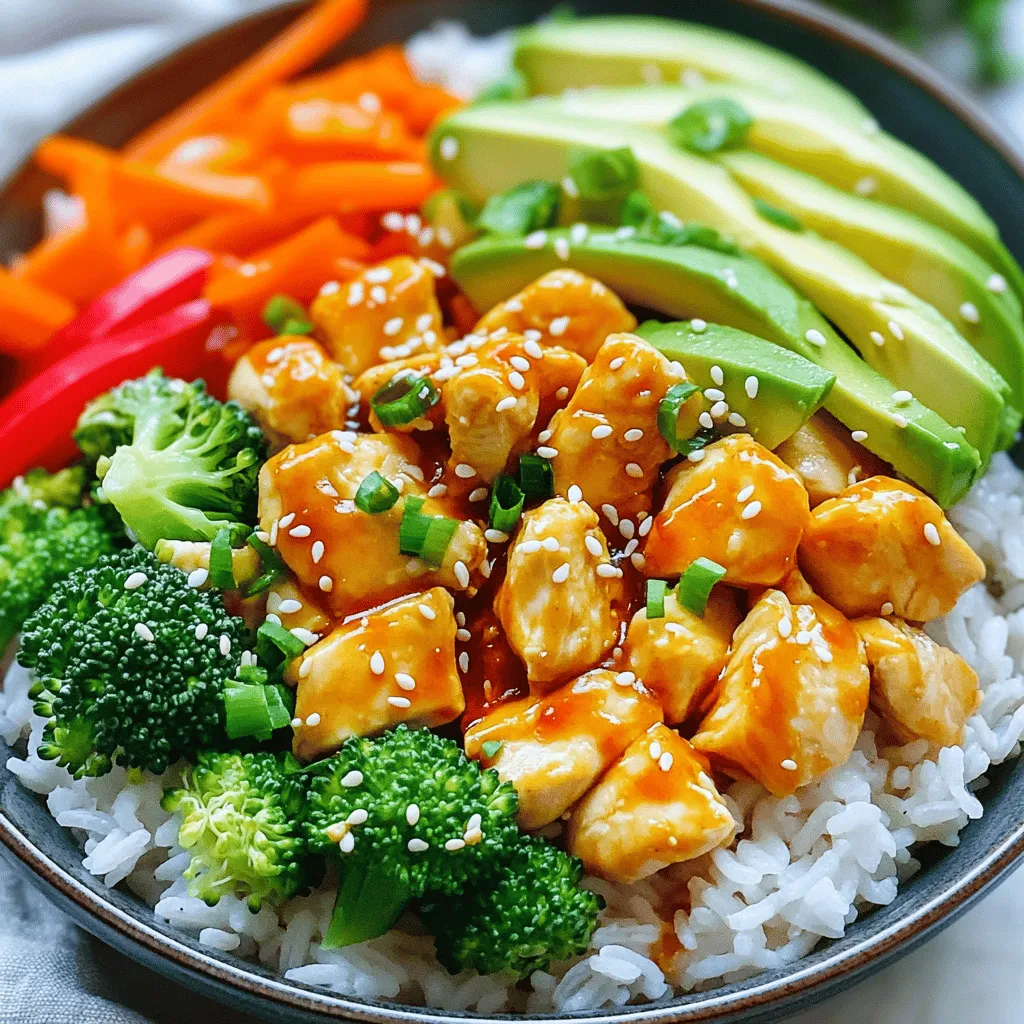
If you’re craving a meal that’s both tasty and simple to make, I’ve got the perfect solution for you: the Bang Bang Chicken Bowl. This dish combines juicy chicken, vibrant …
If you’re craving a meal that’s both tasty and simple to make, I’ve got the perfect solution for you: the Bang Bang Chicken Bowl. This dish combines juicy chicken, vibrant …

If you’ve been searching for a delicious yet healthy treat, look no further! This Protein Oreo Fluff Dessert combines creamy yogurt, protein powder, and crunchy Oreos for a mouthwatering treat. …
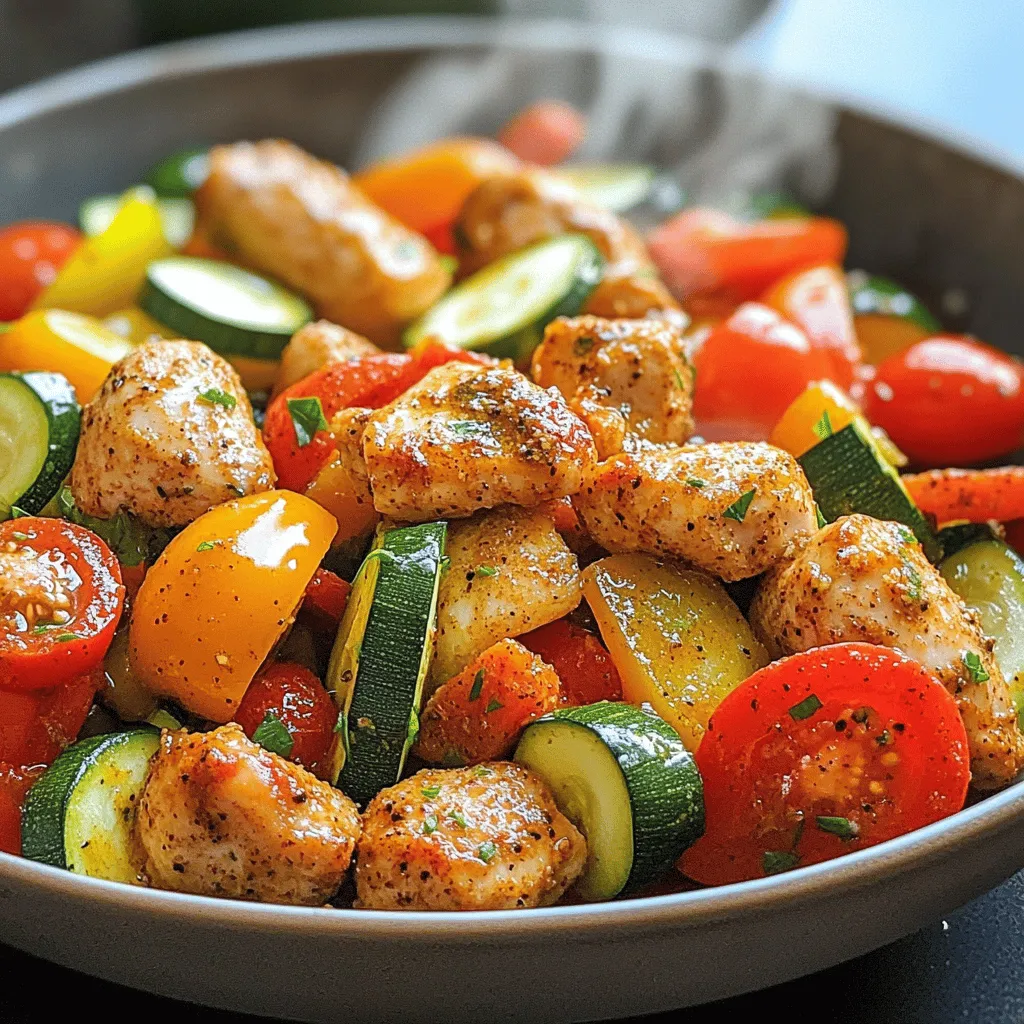
Are you ready to whip up a tasty meal in just 15 minutes? This Air Fryer Chicken and Vegetables recipe is perfect for busy days when you want something healthy …
![To make air fryer honey mustard salmon, gather these key items: - 4 salmon fillets (approximately 1.5 lbs) - 3 tablespoons of honey - 2 tablespoons of Dijon mustard - 1 tablespoon of olive oil - 2 cloves of garlic, minced - 1 teaspoon of fresh lemon juice - Salt and freshly cracked black pepper to taste These ingredients come together to create a sweet and tangy flavor that pairs perfectly with salmon. The honey adds a nice glaze, while Dijon mustard gives it a kick. You can boost the flavor of your salmon with some extra ingredients: - A dash of smoked paprika for warmth - A pinch of red pepper flakes for heat - Fresh herbs like dill or thyme for an herbal touch These additions can help you customize the dish to your taste. Feel free to experiment and find what you love. Garnishing your dish makes it look inviting. Here are some great options: - Fresh parsley, chopped - Lemon wedges for a citrus burst - Sesame seeds for a crunchy finish These garnishes not only add color but also enhance the overall flavor. They make your air fryer honey mustard salmon stand out. For the full recipe, check out the details provided above. Start by gathering all your ingredients. You need four salmon fillets, honey, Dijon mustard, olive oil, garlic, lemon juice, salt, and black pepper. In a medium bowl, mix the honey, Dijon mustard, olive oil, minced garlic, lemon juice, salt, and pepper. Whisk it all together until smooth. This mixture is your tasty marinade. Next, take the salmon fillets and place them in a shallow dish or a resealable plastic bag. Pour the honey mustard marinade over the salmon. Make sure each fillet gets a good coat. Cover the dish or seal the bag. Let it marinate for at least 20 minutes. This helps the flavors soak in. While the salmon marinates, preheat your air fryer to 390°F (200°C). Preheating is key for even cooking. Lightly spray the air fryer basket with cooking spray or brush it with olive oil. This stops the salmon from sticking. After marinating, take the salmon out of the marinade and place it in the air fryer basket. Make sure the skin-side is down. Save the leftover marinade for later. Cook the salmon for 10 minutes. At the halfway mark, carefully baste the salmon with the reserved marinade. This adds extra flavor and keeps it moist. Check the salmon after 10 minutes. It should be flaky and fully cooked. If it needs more time, add a minute. Once the salmon is done, carefully remove it from the air fryer. Let it rest for about 2 minutes. This lets the juices settle for a tender bite. Before serving, sprinkle chopped fresh parsley on top. This adds color and a fresh taste. Now, enjoy your air fryer honey mustard salmon! For the full recipe, check the section above. To pick the best salmon, look for bright, clear skin. The flesh should be firm and moist. Avoid fish with dull skin or a strong fishy smell. Fresh salmon should have a mild scent, like the sea. If you can, ask for wild-caught salmon. It often tastes better and has a richer flavor. Cook your salmon fillets at 390°F (200°C) for about 10 minutes. This gives a nice, flaky texture. If your fillets are thicker, add a minute or two. Always check for doneness at the thickest part. The salmon should easily flake apart with a fork. If it looks opaque and breaks apart, it’s ready. One common mistake is overcooking. Salmon can turn dry if cooked too long. Another mistake is skipping the marinade. Letting the salmon soak in the honey mustard mix helps it absorb flavor. Also, make sure not to overcrowd the air fryer. Each piece should have space for hot air to circulate. This ensures even cooking and crispy skin. For more details, check out the Full Recipe. {{image_4}} You can change the honey mustard marinade to keep things fresh. Try using maple syrup instead of honey for a sweeter touch. Soy sauce can add a savory twist, giving your salmon a rich flavor. You can also mix in a bit of ginger or chili paste for a kick. Each change gives a new taste that makes the meal exciting. Salmon is great, but you can use other fish, too. Trout works well with the same marinade. Its mild flavor pairs nicely with the sweet and tangy sauce. Cod is another option; it cooks quickly and stays tender. Just remember to adjust the cooking time. Thinner fish might need less time in the air fryer, so keep an eye on it. You can easily add veggies for a full meal. Broccoli, asparagus, or bell peppers cook great in the air fryer. Cut them into bite-sized pieces and toss them with olive oil, salt, and pepper. Place them in the air fryer with the salmon. This way, you get a tasty side dish that cooks at the same time. It's a simple way to make a balanced dinner. For the complete dish, check the [Full Recipe]. To store your leftover salmon, let it cool first. Place it in an airtight container. This keeps the salmon fresh for up to three days. Make sure to store it in the fridge. If you have the honey mustard sauce left, store it separately. When you are ready to eat, reheating is easy. Preheat your air fryer to 350°F (175°C). Place the salmon in the basket and heat for about 5 minutes. This method keeps the salmon moist and tasty. You can also use a microwave, but this may dry it out. If using a microwave, heat it for 30 seconds at a time. If you want to save salmon for later, freezing works well. Wrap the salmon tightly in plastic wrap. Then, place it in a freezer bag. Make sure to remove excess air. This keeps it good for up to three months. When ready to use, thaw it overnight in the fridge before reheating. For more details, check the Full Recipe. You can tell if salmon is cooked by checking its color and texture. Cooked salmon should be opaque and flaky. When you insert a fork, the fish should easily break apart. If it still looks shiny and raw in the middle, it needs more time. In the air fryer, cook for about ten minutes at 390°F. If unsure, add one extra minute to the cooking time to ensure it cooks through. Yes, you can use other types of mustard. Honey mustard works well, but whole grain mustard adds a nice texture. Spicy brown mustard gives a kick, while yellow mustard keeps it classic. Each type brings its own unique flavor. You can even mix different mustards for a fun twist on the recipe. Air fryer honey mustard salmon pairs well with many sides. Here are some tasty options: - Steamed broccoli - Roasted sweet potatoes - Quinoa salad - Garlic mashed potatoes - A fresh green salad These sides balance the rich flavors of the salmon and make for a complete meal. You can find the full recipe for the salmon above, which makes dinner prep easy and fun! This blog post covered essential ingredients, simple steps, and useful tips for air fryer honey mustard salmon. We explored the best salmon choices, cooking times, and popular variations. Remember to try different marinades and veggies to make the dish your own. Store leftovers properly and use my reheating tips for the best taste. Cooking salmon is easy and fun when you have the right knowledge. Enjoy your delicious meal and share it with friends!](https://tossedflavors.com/wp-content/uploads/2025/06/49767129-e1c3-41dc-ab51-d58cf141d59a.webp)
Are you ready to make dinner simple and delicious? This Air Fryer Honey Mustard Salmon recipe is perfect for a quick weeknight meal. It’s packed with flavor and takes just …

Dive into the delicious world of the Grilled Shrimp Bowl with Avocado Corn Salsa Delight! This vibrant dish combines juicy shrimp with fresh flavors, creating a perfect meal for any …
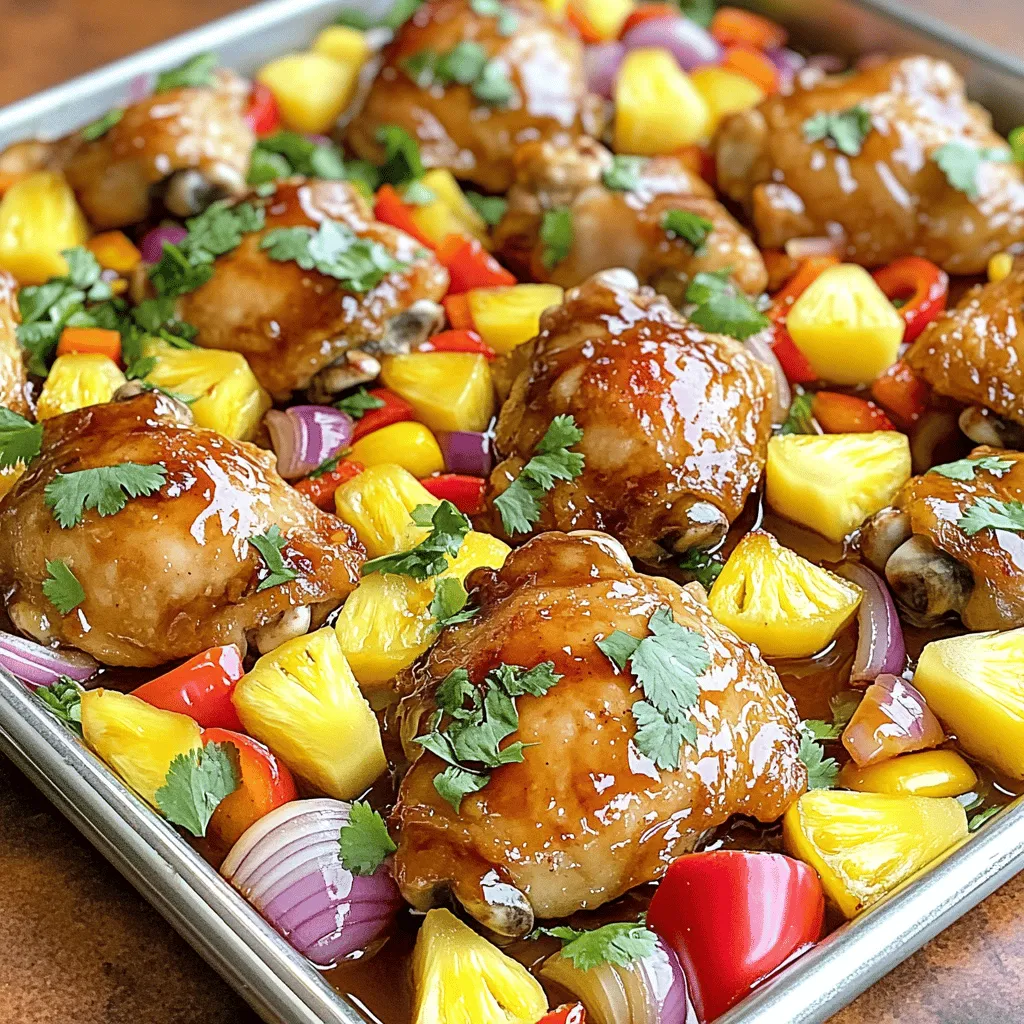
Get ready to bring the taste of Hawaii to your kitchen with this Hawaiian Chicken Sheet Pan recipe! You’ll enjoy tender chicken thighs baked with bright vegetables and sweet pineapple, …
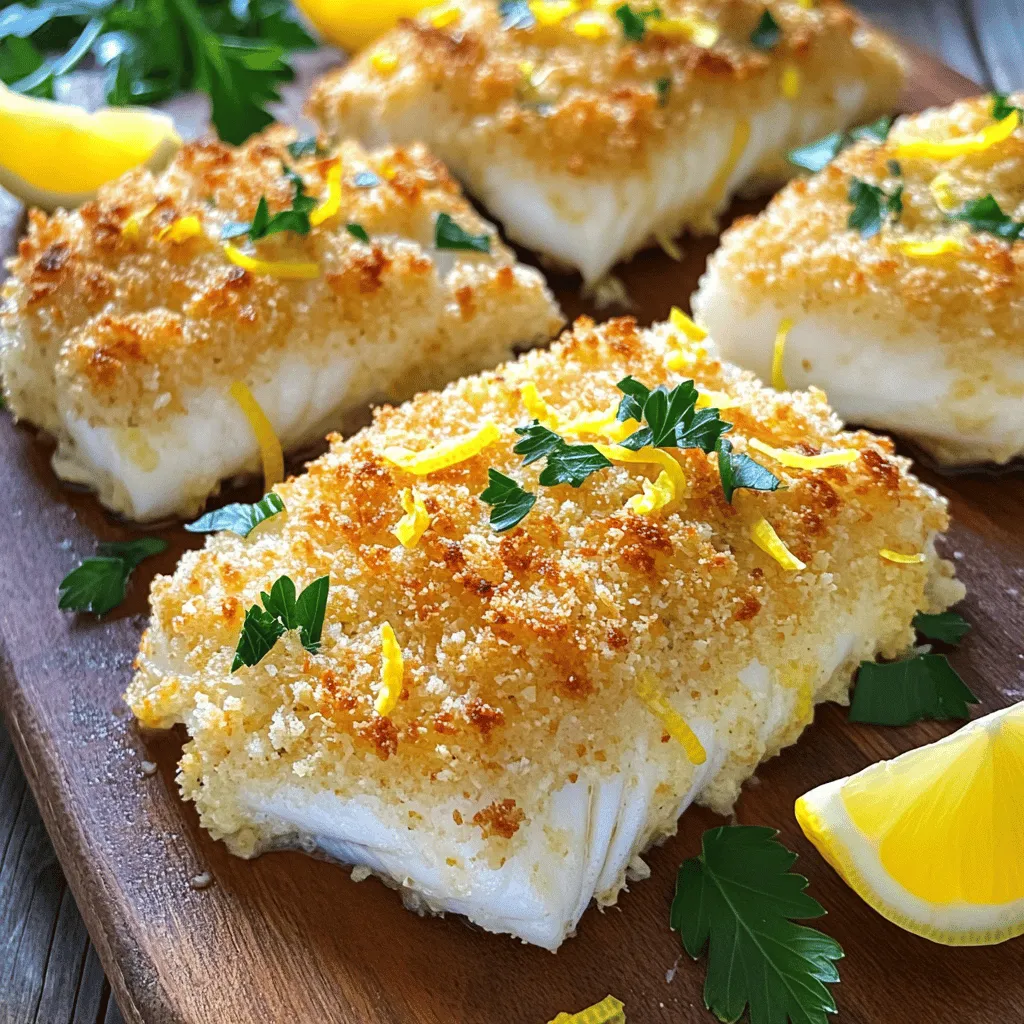
Welcome to your next favorite dinner recipe! In this post, I share how to make a mouthwatering Parmesan Crusted Baked Cod. With a crispy, cheesy topping and tender fish, this …

If you’re craving a warm, cheesy dish that delights at any meal, stuffed shells are a must-try! In this post, I’ll take you through a delightful recipe packed with creamy …
![- 2 cups cooked brown rice - 1 lb boneless, skinless chicken breasts, diced - 1/4 cup honey - 2 tablespoons chipotle peppers in adobo sauce, finely minced - 1 tablespoon olive oil - 1 teaspoon garlic powder - 1 teaspoon onion powder - 1/2 teaspoon ground cumin - Salt and pepper to taste To make these honey chipotle chicken rice bowls shine, you need a few key items. Start with cooked brown rice as the base. It adds a nutty flavor and is healthy. Next, use boneless, skinless chicken breasts. Dice them into bite-sized pieces for even cooking. Honey and chipotle peppers bring sweet and spicy notes to the dish. Add olive oil to help cook the chicken. The spices, like garlic powder, onion powder, and ground cumin, add depth. Don’t forget salt and pepper for taste! - 1 cup black beans, rinsed and drained - 1 cup corn (fresh or frozen) - 1 bell pepper, diced (any color) - 1 avocado, sliced - Fresh cilantro leaves, for garnish To elevate your bowls, add black beans and corn for extra protein and sweetness. Diced bell pepper adds crunch and color. Sliced avocado brings creaminess, while cilantro adds freshness. Each topping enhances the dish and makes it visually appealing. - Lime wedges for squeezing - Colorful presentation tips Serve lime wedges on the side. A squeeze of lime brightens flavors and adds zest. For a colorful look, use different colored bell peppers. Arrange the toppings artfully to catch the eye. Bright plates make the meal pop! For the full recipe, check out [Full Recipe]. To start, grab a medium bowl. In this bowl, whisk together: - 1/4 cup honey - 2 tablespoons chipotle peppers in adobo sauce, finely minced - 1 teaspoon garlic powder - 1 teaspoon onion powder - 1/2 teaspoon ground cumin - Salt and pepper to taste This mixture creates a rich and sweet marinade. The chipotle adds a nice smoky kick. Next, take 1 pound of diced chicken. Pour half of your honey chipotle marinade over it. Toss the chicken well to coat. Make sure every piece is covered. Cover the bowl and refrigerate. Let it marinate for at least 30 minutes. For more flavor, you can leave it for up to 2 hours. Now it’s time to cook the chicken. Heat 1 tablespoon of olive oil in a large skillet over medium-high heat. Once the oil is hot, add the marinated chicken. Sauté the chicken for about 6-8 minutes. Stir occasionally. Cook until the chicken is fully cooked and no longer pink. You want a slight caramelization on the outside for great flavor. While the chicken cooks, prepare your toppings. In a small saucepan, heat 1 cup of black beans and 1 cup of corn until warmed through. This should take about 3-4 minutes. To build each bowl, start with a generous base of 2 cups of cooked brown rice. Place the honey chipotle chicken right in the center. Add the warmed black beans and corn beside the chicken. Next, top with diced bell peppers and slices of avocado. For an extra flavor boost, drizzle any remaining honey chipotle marinade over the top. Finally, garnish with fresh cilantro leaves. Serve with lime wedges on the side. You can squeeze the lime over the bowls right before enjoying. To get the best flavor, marinate the chicken well. Here are my top tips: - Use half of the marinade for the chicken. - Cover the chicken and chill it for at least 30 minutes. - For deeper flavor, let it marinate up to 2 hours. - This helps the chicken soak up the sweet and spicy taste. Cooking the chicken right is key. Here’s how to ensure it’s fully cooked: - Heat olive oil in a skillet on medium-high heat. - Add the marinated chicken once the oil is hot. - Cook for 6-8 minutes, stirring often. - Look for no pink inside and a nice caramel color outside. - This way, you’ll get tender and juicy chicken in every bite. A beautiful dish makes eating more fun. Here are my tips for a great look: - Use colorful bell peppers for a vibrant look. - Place avocado slices around the chicken for contrast. - Serve with lime wedges for a pop of color. - A sprinkle of cilantro on top adds freshness and flair. - Bright plates will really enhance the meal's appeal. For the full recipe, check out the complete details. {{image_4}} You can switch up the protein in this dish. If you don’t have chicken, try turkey or shrimp. For a lighter meal, use tofu or tempeh. These options add different textures and flavors. Grains can also change the dish. Quinoa or cauliflower rice work well in place of brown rice. These swaps keep your meal fresh and exciting. Adjusting the spice level is easy. If you want more heat, add extra chipotle peppers. You can also use a dash of cayenne or chili powder. For less spice, try smoked paprika instead. Want a sweet twist? Add pineapple or mango pieces. These fruits pair well with the honey chipotle sauce. They bring a bright flavor to the bowls. To make this dish vegan, use chickpeas or lentils instead of chicken. They provide protein and a hearty texture. For the sauce, mix agave nectar with chipotle peppers. This keeps the sweet and smoky flavor. Use brown rice or quinoa for your base. Add plenty of veggies like roasted sweet potatoes or bell peppers. These options create a similar taste and make the bowl filling. To store leftovers of your honey chipotle chicken rice bowls, let them cool. Place them in an airtight container. You can keep them in the fridge for up to three days. Make sure to separate the rice and toppings to keep them fresh. For freezing, pack the rice bowls in freezer-safe containers. Leave some space at the top for expansion. They can last in the freezer for up to three months. When you are ready to eat, thaw them in the fridge overnight. To reheat, you can use the microwave or stovetop. If using the microwave, cover the bowl with a lid or a damp paper towel. Heat in short bursts, stirring in between, until hot. On the stovetop, add a splash of water and heat over medium heat until warmed through. This keeps the rice from drying out. You can prep much of this meal in advance. Start by cooking the brown rice. Store it in the fridge for up to four days. You can marinate the chicken the night before. This allows the flavors to soak in. When ready to cook, simply sauté the marinated chicken. Warm the beans and corn while the chicken cooks. Assemble your bowls right before serving for fresh taste. Yes, you can use other grains. Quinoa is a great choice for a protein boost. White rice offers a milder flavor. Cauliflower rice is a low-carb option. Barley adds a chewy texture. Pick what you enjoy or have on hand. The spice level can vary. Chipotle peppers in adobo sauce bring a smoky heat. If you're sensitive to spice, use less chipotle. You can also balance the heat with creamy avocado. Lime juice adds brightness without extra heat. Adjust to your taste! These rice bowls are great on their own, but sides add variety. Consider a fresh salad with lime dressing. Grilled veggies bring color and flavor. Cornbread offers a sweet touch. Serve with tortilla chips and salsa for crunch. This article covered how to make delicious Honey Chipotle Chicken Rice Bowls. We explored the main ingredients, like brown rice, chicken, and honey chipotle sauce. I shared step-by-step cooking instructions and offered tips for marinating and presenting your dish. In summary, these bowls are easy to adjust for your taste. Try various toppings or use different proteins. Enjoy the vibrant flavors and colorful presentation for any meal. Happy cooking!](https://tossedflavors.com/wp-content/uploads/2025/06/88e83907-e76a-4452-9e48-337dc9ba6e02.webp)
Are you craving a meal that’s both tasty and simple? Look no further! These Honey Chipotle Chicken Rice Bowls pack a flavor punch that satisfies any hunger. With just a …
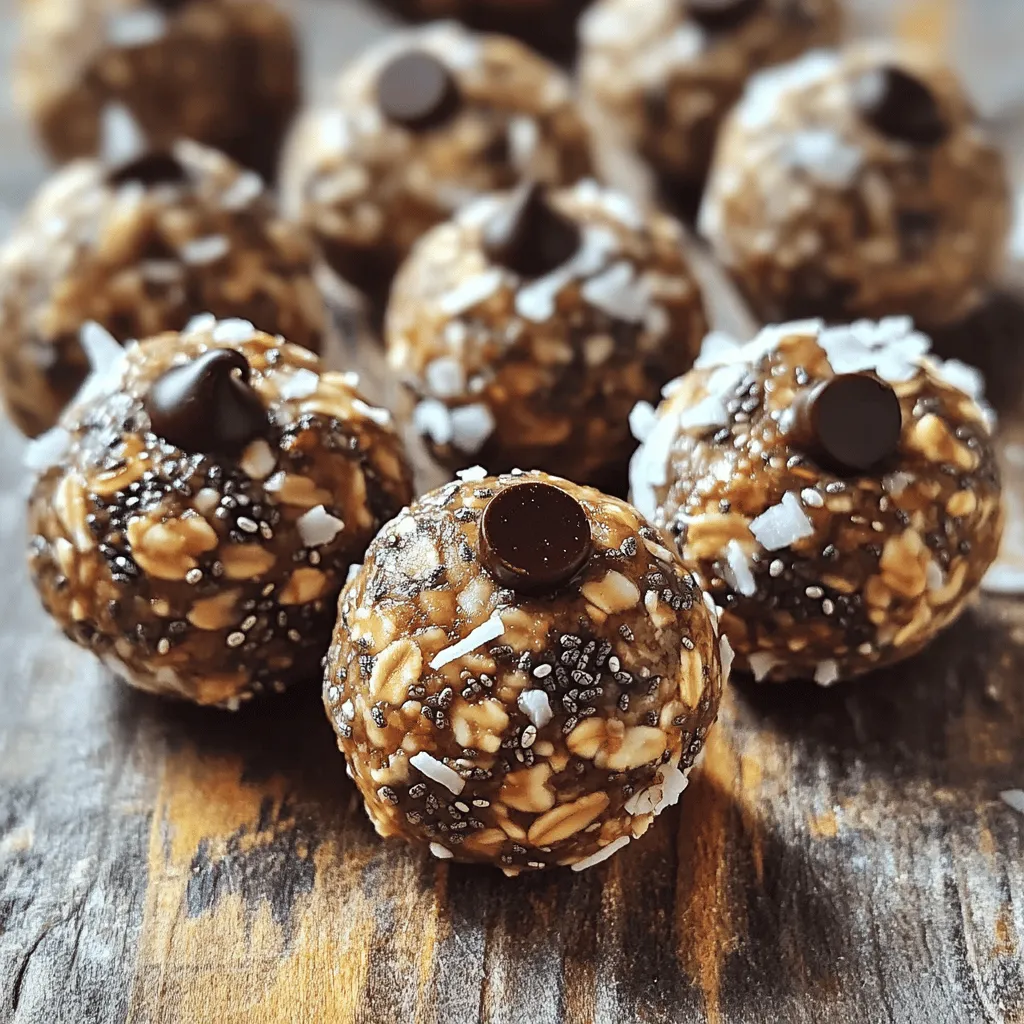
Are you looking for a quick and easy treat packed with energy? No-bake energy balls are the perfect solution! These fun snacks are not only simple to make, but you …