Perfectly Crispy Honey Garlic Salmon Recipe Delight
![- 4 salmon fillets (skin-on) - 2 tablespoons olive oil - Salt and pepper, to taste - 1/4 cup honey - 3 cloves garlic, minced - 2 tablespoons soy sauce - 1 tablespoon fresh ginger, grated - 1 tablespoon apple cider vinegar - 1 teaspoon sesame oil (optional) - Chopped green onions and sesame seeds for garnish - Non-stick skillet - Whisk - Measuring cups and spoons - Spatula - Mixing bowl Gathering the right ingredients is key to a great meal. First, you need fresh salmon fillets. I prefer skin-on fillets for added flavor and crispiness. The skin helps hold moisture in while cooking. Next, you’ll need olive oil for frying. It gives a nice golden color and flavor. Don’t forget salt and pepper. They enhance every dish. Honey is the star of this recipe. It adds sweetness and caramelizes beautifully. Fresh garlic and ginger bring warmth and depth to the marinade. Soy sauce contributes a savory note that balances the honey’s sweetness. Apple cider vinegar adds a little tang, brightening the dish. Finally, sesame oil is optional but can add a rich, nutty flavor. For garnish, I like to sprinkle chopped green onions and sesame seeds. They add color and a nice crunch. Make sure you have a non-stick skillet. It helps prevent the salmon from sticking. A whisk, measuring cups, and spoons make prep easy. You’ll also need a spatula to flip the salmon without breaking it. Now you have all the ingredients and tools you need. Get ready to make Perfectly Crispy Honey Garlic Salmon! For the complete recipe, check out the [Full Recipe]. - Combine honey, minced garlic, soy sauce, grated ginger, apple cider vinegar, and sesame oil in a bowl. - Whisk until well-blended and let it set. Making the marinade is quick and simple. The honey gives sweetness, while garlic adds depth. Soy sauce brings saltiness, and ginger gives a nice kick. Apple cider vinegar adds some tang. If you want, sesame oil adds a bit of nuttiness. Mixing these flavors creates a tasty sauce. - Pat salmon fillets dry with paper towels. - Season both sides generously with salt and pepper. Drying the salmon is key for crispy skin. If it’s wet, it won’t crisp up. Salt and pepper are must-haves. They enhance the natural flavor of the fish. You want that balance of savory and sweet when you cook it. - Heat olive oil in a skillet over medium-high heat. - Place salmon skin-side down and cook until golden brown (5-6 minutes). - Flip the salmon and pour the marinade over it; continue cooking (4-5 minutes). - Ensure salmon reaches 145°F for doneness. Start by heating olive oil in a non-stick skillet. The oil should shimmer but not smoke. When ready, place the salmon skin-side down. This helps it cook evenly. After 5-6 minutes, the skin should be golden and crispy. Carefully flip the salmon over and pour the marinade on top. Cook it for another 4-5 minutes. This keeps it moist and adds flavor. Always check that it reaches 145°F to be safe to eat. Once cooked, you can drizzle any leftover marinade on top. It adds extra flavor and makes it look great on the plate. If you follow these steps, you’ll have perfectly crispy honey garlic salmon that everyone will love. For the complete recipe, check [Full Recipe]. To get that perfect crispy skin, start by drying your salmon. Use paper towels to pat it dry. Dry skin helps the fish crisp up when cooked. Next, heat your skillet until it’s hot. A hot skillet gives the salmon a nice sear. Cook the salmon skin-side down for the best results. Want to add more flavor? Squeeze some lemon juice over the salmon before cooking. The acidity from the lemon brightens the dish. You can also add spices like red pepper flakes. This gives the salmon a nice kick. Try these little tricks to enhance the honey garlic flavor. Serve your salmon with steamed rice and fresh vegetables. This makes a well-rounded meal. You can also add roasted veggies for extra flavor. Consider pairing with a simple salad to balance the richness of the salmon. These sides complement the sweet and savory notes of the honey garlic glaze. For the full recipe, check out [Full Recipe]. {{image_4}} You can switch things up by using chicken breast or thighs instead of salmon. Chicken absorbs flavors well and cooks nicely with the honey garlic glaze. If you want a vegetarian option, try using tofu. Press the tofu to remove excess water. Then, marinate it just like the salmon. It will soak up that honey garlic goodness, making it tasty! Feel free to experiment with different flavors in your marinade. Adding citrus like orange or lime can give a bright twist. The fresh juice adds zing and pairs well with the honey. You can also try different types of vinegar. Rice vinegar offers a milder taste, while balsamic adds a sweet note. Mix and match until you find your favorite! For a fun change, serve the honey garlic salmon over a fresh salad instead of rice. Use greens like spinach or arugula and top with the salmon. You can even make tacos! Flake the salmon and pile it into warm corn tortillas. Add fresh toppings like avocado, cilantro, or slaw. These serving ideas keep the meal fresh and exciting. Get the full recipe for a delightful cooking experience. To keep your cooked salmon fresh, store it in an airtight container. This helps prevent odors and keeps the fish moist. Make sure the salmon is cool before sealing it. I recommend refrigerating it within two hours of cooking. Properly stored, your salmon stays good for up to three days. You can enjoy it cold in salads or reheat it gently in a skillet. If you want to save salmon for later, freezing is a great option. Wrap each fillet tightly in plastic wrap, then place them in a freezer bag. This method helps avoid freezer burn. Your salmon will stay fresh for up to three months. When it's time to cook, thaw the salmon in the fridge overnight. You can also thaw it quickly under cold water. For cooking from frozen, just add a few extra minutes to the cook time. This way, you still get that nice crispy finish! To place the salmon skin-side down, look for the shiny side of the fillet; that’s the skin. The skin will feel rougher than the flesh. When you place it in the skillet, hold it gently with your spatula. This keeps the skin flat against the pan for a crispy finish. You can use both fresh and frozen salmon. Fresh salmon has a softer texture and cooks quicker. Frozen salmon needs a few extra minutes to cook through. Be sure to thaw frozen salmon in the fridge overnight for best results. Serve honey garlic salmon with fluffy rice and roasted veggies for balance. Steamed broccoli or green beans also work well. A light salad with a citrus dressing can add a nice crunch. Check the salmon for a slightly firm texture and an opaque color. It should flake easily with a fork. Aim for an internal temperature of 145°F (63°C). This ensures your salmon is safe and delicious. Yes, you can prepare the marinade and season the salmon a few hours ahead. Marinating salmon adds flavor and helps keep it moist. Just cover it in the fridge until you're ready to cook. If you don’t have sesame oil, you can use olive oil or avocado oil. These oils have a milder flavor but still work well. You can also try peanut oil for a nutty touch. In this post, we explored a delicious honey garlic salmon recipe. We reviewed the key ingredients, essential cooking tools, and simple steps to prepare this dish. I shared tips for achieving crispy skin and flavor enhancements, plus variations for proteins and marinades. Storing leftovers was also covered, ensuring you can enjoy salmon later. Overall, cooking salmon can be easy and fun. With these guidelines, you can create a tasty meal everyone will love. Enjoy experimenting with flavors and making this dish your own!](https://tossedflavors.com/wp-content/uploads/2025/06/a435c21f-f453-4f94-9bac-42e2cc08f652.webp)
Are you ready to impress your taste buds with a simple yet delicious dish? This Perfectly Crispy Honey Garlic Salmon recipe will be your new go-to for an easy weeknight …
Are you ready to impress your taste buds with a simple yet delicious dish? This Perfectly Crispy Honey Garlic Salmon recipe will be your new go-to for an easy weeknight …
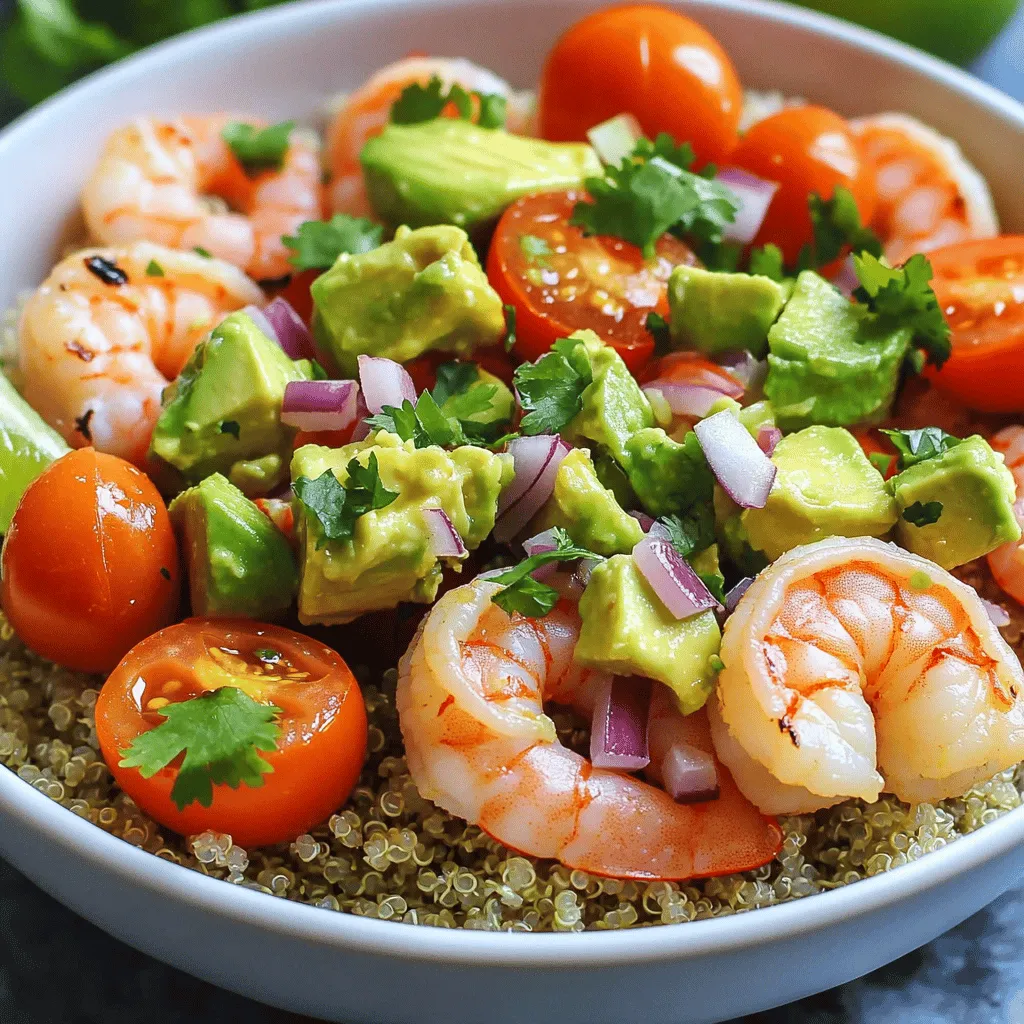
Welcome to my Grilled Shrimp Bowl with Avocado Salsa Delight! If you crave a tasty and healthy meal, this dish is for you. Juicy shrimp meets fresh avocado salsa for …

Are you ready to whip up a quick meal that’s both tasty and satisfying? Today, I’ll share my easy recipe for California Turkey Club Wraps. This guide covers all the …

Crustless Cottage Cheese Quiche is a simple and tasty dish that you’ll love. Packed with protein and fresh veggies, it’s perfect for breakfast, lunch, or dinner. You can customize it …
![- Chicken breast - Unsalted butter - Garlic - Dried thyme - Smoked paprika - Salt and pepper - Fresh parsley - Lemon wedges The ingredients for garlic butter chicken bites are simple but full of flavor. You can find these items at any grocery store. Fresh chicken breast will give you the best taste. Use unsalted butter to control the salt levels in the dish. Fresh garlic adds a strong, rich flavor, while dried thyme and smoked paprika bring warmth and depth. Don’t forget salt and pepper to enhance all the flavors. Fresh parsley adds a nice touch of color and freshness, and lemon wedges give a zesty kick. - Alternatives for chicken: If you want to try something different, use turkey or firm tofu for a vegan option. - Vegan butter options: You can use olive oil or a plant-based butter if you prefer to avoid dairy. - Variations of herbs and spices: Feel free to mix in other herbs like rosemary or basil. For more heat, add cayenne pepper or chili flakes. These substitutions can change the dish while keeping it delicious. You can still enjoy the garlic butter flavor with these options. For the full recipe, you can refer back to the main article. Preparing the chicken Start with 1 pound of chicken breast. Cut it into bite-sized pieces. Make sure each piece is even. This helps them cook at the same rate. Mince garlic correctly Use fresh garlic for the best flavor. Take 6 cloves and peel them. Then, chop them finely. A sharp knife helps with this. You want the garlic to be small, so it cooks well. Melting butter and sautéing garlic Place a large skillet over medium heat. Add 4 tablespoons of unsalted butter. Let it melt until it bubbles. Once it sizzles, add the minced garlic. Stir it for about 30 seconds. Watch it closely so it doesn’t burn. Cooking chicken to perfection Raise the heat to medium-high. Add the chicken pieces to the skillet. Sprinkle salt, pepper, dried thyme, and smoked paprika over them. Cook the chicken for 6-8 minutes. Stir occasionally to avoid sticking. Checking for doneness The chicken should turn golden brown. Use a meat thermometer to check the temperature. It should reach 165°F (75°C). This means it is safe to eat. Presentation tips Serve your garlic butter chicken bites on a rustic wooden board. Garnish with extra parsley for color. Add lemon wedges around the edge for a pop of freshness. Ideal serving suggestions Pair the chicken bites with a side salad or rice. The lemon adds a nice zing. Enjoy them warm for the best taste. Check the full recipe for more ways to enjoy this dish. To avoid burnt garlic, watch it closely. Garlic cooks fast and can burn in seconds. When you add minced garlic to the hot butter, stir it. This keeps it moving and prevents it from getting too dark. For even cooking, cut your chicken into uniform pieces. This helps each piece cook at the same rate. Use a large skillet so the chicken has space. Crowding the pan can lead to steaming instead of browning. You can add more spices to your garlic butter chicken bites. Try adding cayenne pepper for heat or oregano for depth. These spices mix well with garlic and butter. When using fresh herbs, chop them finely for better flavor. Fresh parsley adds a bright note. Dried herbs are great too, but use less since they are more potent. If you use larger pieces of chicken, adjust your cook time. Larger pieces need more time to reach 165°F (75°C). Always use a meat thermometer for best results. For reheating leftovers, the oven works best. Place the chicken bites on a baking sheet and cover with foil. Heat them at 350°F (175°C) for 10-15 minutes. This keeps them juicy and tasty. You can also microwave them, but they may dry out. {{image_4}} You can easily switch up the flavor of garlic butter chicken bites. Here are two fun ideas: - Spicy garlic butter chicken bites: Add one teaspoon of cayenne pepper or red pepper flakes. This will give the dish a nice kick. The heat balances well with the rich butter and garlic. - Asian-inspired garlic chicken bites: Mix in soy sauce and sesame oil. Add a sprinkle of green onions for a fresh touch. This twist will take your taste buds on an exciting journey. If you have special dietary needs, don't worry! There are options for you: - Gluten-free and keto options: Use gluten-free soy sauce or coconut aminos in place of regular soy sauce. This keeps the dish gluten-free. The chicken and flavors remain keto-friendly, too. - Low-carb alternatives: Serve the chicken bites with zoodles (zucchini noodles) instead of pasta. This keeps your meal light and low in carbs. Pair your garlic butter chicken bites with tasty sides and drinks: - Side dish recommendations: Serve them with a fresh salad or roasted vegetables. These sides complement the rich chicken well and add color to your plate. - Best drinks to complement the meal: A light white wine, like Sauvignon Blanc, works great. If you prefer non-alcoholic, try sparkling water with a slice of lemon. This will enhance the flavors of your meal. For the full recipe, check out the [Full Recipe] section! To keep your garlic butter chicken bites fresh, store them properly. After cooking, let the bites cool to room temperature. Then, place them in an airtight container. Store the container in the fridge for up to four days. If you want to save them longer, consider freezing. Place the chicken bites in a freezer bag. Press out any air before sealing. They can stay in the freezer for up to three months. When you're ready to enjoy your leftovers, reheat them carefully. The best method is to use a skillet. Heat it over medium heat. Add a little butter or oil to the pan. This keeps the chicken juicy and flavorful. Stir the bites for about five minutes until they are warm. You can also use a microwave. Place the chicken on a microwave-safe plate. Cover it with a damp paper towel. Heat in short bursts of 30 seconds to avoid losing moisture. Garlic butter chicken bites last up to four days in the fridge. Keep an eye out for signs of spoilage. If the chicken has a sour smell or changes color, it’s time to toss it. Always check for any mold as well. Proper storage helps you enjoy your garlic butter chicken bites safely and deliciously. For more tips and recipes, check out the Full Recipe for garlic butter chicken bites. Garlic butter chicken bites are small pieces of chicken cooked in garlic and butter. They are juicy and packed with flavor. The main ingredients include: - Chicken breast - Unsalted butter - Garlic - Dried thyme - Smoked paprika - Salt and pepper - Fresh parsley - Lemon wedges These bites are quick to make and perfect for any meal or snack. Yes, you can prepare garlic butter chicken bites in advance. Here’s how: - Cook the chicken bites as per the Full Recipe. - Allow them to cool. - Store them in an air-tight container in the fridge. This meal prep saves time. Just reheat when you are ready to eat! You can pair garlic butter chicken bites with many side dishes. Here are some great options: - Steamed vegetables like broccoli or green beans - Rice or quinoa for a filling meal - A fresh salad for a light touch - Garlic bread to soak up the delicious butter sauce Add lemon wedges for a zesty garnish! To check if your chicken is cooked right, use a meat thermometer. The internal temperature should be 165°F (75°C). Other signs include: - The chicken should be golden brown. - Juices should run clear, not pink. - The texture should be firm but not dry. Following these steps will help you serve safe and tasty chicken bites! In this blog post, we explored how to make delicious Garlic Butter Chicken Bites. We covered key ingredients, smart substitutions, and step-by-step cooking instructions. I shared tips for perfecting your dish and ideas for flavor variations. Storing and reheating methods ensure you enjoy leftovers without losing taste. Now, it’s time to get cooking. With these steps, you can create a tasty meal everyone will love.](https://tossedflavors.com/wp-content/uploads/2025/06/201917fd-c6ba-4ff7-8957-950db0bde7e2.webp)
Ready for a dish that bursts with flavor and is simple to make? My Garlic Butter Chicken Bites are your next go-to recipe for any occasion. With just a few …
![To make 10-Minute Peanut Butter Chocolate Bark, gather these simple ingredients: - 1 cup dark chocolate chips - 1/2 cup creamy peanut butter - 1/4 cup chopped nuts (almonds, walnuts, etc.) - 1/4 cup dried cranberries or raisins - Sea salt flakes - Optional: 1/4 teaspoon vanilla extract or a light sprinkle of cinnamon These ingredients blend perfectly to create a rich, sweet treat. Dark chocolate gives a deep flavor, while creamy peanut butter adds smoothness. The nuts provide crunch, and dried fruit adds a touch of sweetness. You can also use other ingredients to boost the taste. Adding vanilla or cinnamon can elevate the bark nicely. This easy recipe is all about balance. The sea salt flakes finish the bark with a delightful contrast to the sweetness. Each bite offers a mix of flavors and textures that keeps you coming back for more. Check the [Full Recipe] for detailed steps to bring these ingredients together! 1. Start by lining a baking sheet with parchment paper. Let the paper hang over the edges. This will help with easy lifting later. 2. Next, take a microwave-safe bowl and add your dark chocolate chips. Heat them in the microwave on high power. Use 30-second bursts and stir well between each burst. This should take about 1-2 minutes until the chocolate is smooth. 3. After melting, add the creamy peanut butter to the bowl. Stir the two until they blend fully. If you want extra flavor, mix in vanilla extract or cinnamon. 1. Pour the chocolate-peanut butter mixture onto the lined baking sheet. Use a spatula to spread it evenly to your liking. 2. Now, it’s time to add texture! Sprinkle chopped nuts and dried fruit over the chocolate layer. Make sure they are evenly spread to enjoy every bite. 1. Place the baking sheet in the refrigerator. Let it chill for about 10 minutes. This will help it solidify. 2. Once set, lift the bark out using the parchment edges. Break or cut it into bite-sized pieces, and it’s ready to serve! Check out the full recipe to ensure you don’t miss any details. To make the best peanut butter chocolate bark, you need a smooth finish. Start with quality dark chocolate chips. Melt them slowly in the microwave. Use 30-second bursts for even melting. Stir well to avoid burning. Next, when you spread the mixture, aim for even thickness. This gives your bark a nice texture. If it's too thick, it may not set well. If it's too thin, it may break apart easily. Use a spatula to help spread it evenly across the baking sheet. You can change the nuts and dried fruits for your bark. Try almonds, walnuts, or pecans. For fruits, consider dried cranberries or raisins. Each choice adds a unique flavor and crunch. Want to make it vegan or dairy-free? Use dairy-free chocolate chips and a nut butter like almond or cashew. This way, everyone can enjoy this easy treat. Check the [Full Recipe] for more tips! {{image_4}} You can make this bark even more fun by adding flavors. Try mixing in spices like cinnamon. Just a pinch can bring warmth and depth. A splash of vanilla is another great choice. It adds a sweet note and enhances the chocolate taste. You can also play with different types of chocolate. Use milk chocolate for a creamier bark. White chocolate gives a sweet and smooth texture. Dark chocolate offers a rich and slightly bitter flavor. Each choice changes the taste and feel of your treat. If you need gluten-free bark, you are in luck! All the ingredients I list work well for gluten-free diets. Just check that your chocolate chips are gluten-free. For a nut-free option, you can swap the peanut butter with sun butter. This nut-free alternative still gives a creamy texture. You can also skip the nuts altogether or use seeds like pumpkin or sunflower seeds. To make a healthier bark, consider using a lower-sugar chocolate. You can also reduce the amount of peanut butter if you want. This makes the bark lighter but still tasty. You can enjoy this treat without feeling guilty! For the full recipe, check out the instructions above. To keep your peanut butter chocolate bark fresh, store it in an airtight container. Use parchment paper between layers to prevent sticking. This way, every piece stays intact and tasty. The best temperature to store the bark is in a cool place, like a pantry or cupboard. Avoid sunlight and heat, as they can cause the chocolate to melt. A temperature below 75°F (24°C) works well. Peanut butter chocolate bark lasts up to two weeks in the fridge. Just make sure it stays in an airtight container. If you notice any changes in smell or texture, it’s best to toss it. For long-term storage, you can freeze the bark. Wrap each piece in plastic wrap, then put them in a freezer-safe bag. This way, the bark stays fresh for up to three months. To enjoy, simply thaw it in the fridge overnight before serving. If you want the full recipe, check out the details above! Can I use other types of nut butter? Yes, you can use other nut butters. Almond butter or cashew butter works well. Each nut butter adds its own unique flavor to the bark. How long does it take for the bark to set? The bark takes about 10 minutes to set in the fridge. If you want it firmer, leave it longer. Just make sure it is solid before you break it. What can I substitute for chocolate chips? You can use chocolate bars, cocoa powder, or even white chocolate. Each choice changes the taste and look of your bark. How to make the bark crunchy? To make it crunchy, add more chopped nuts. You can also mix in crispy rice cereal for extra texture. Can I add additional toppings? Yes, you can add toppings! Try mini marshmallows, coconut flakes, or even crushed pretzels. Be creative and make it your own! In this post, we explored how to make 10-minute peanut butter chocolate bark. We covered the key ingredients, quick preparation steps, and helpful tips. You now have ideas for flavor swaps and storage advice too. This simple treat is great for anyone. Enjoy customizing it to your taste. Make a batch today and share it with friends! It’s easy, fun, and delicious.](https://tossedflavors.com/wp-content/uploads/2025/06/b48eb1a2-c38a-4394-92d0-255820f7cbda.webp)
Craving a quick and tasty treat? You’ll love this easy 10-Minute Peanut Butter Chocolate Bark! With just a few simple ingredients, you can whip up a delicious snack that satisfies …

Are you craving a quick and satisfying meal? Look no further than this Easy Buffalo Chicken Flatbread! With just a few ingredients and simple steps, you can create a dish …

Craving a sweet yet healthy snack? Chocolate Strawberry Yogurt Clusters are your answer! Made with creamy Greek yogurt, fresh strawberries, and rich dark chocolate, these delightful treats are simple to …
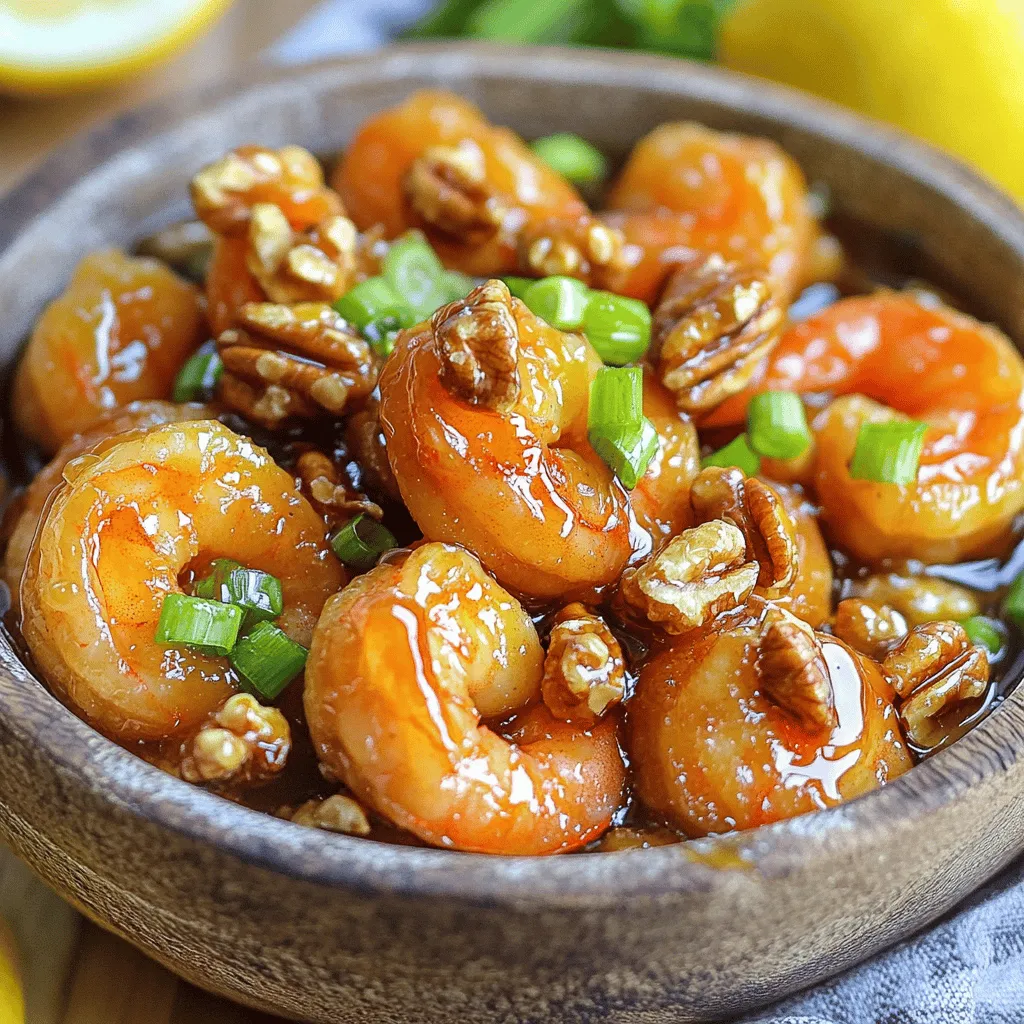
Are you ready to whip up a delicious Honey Walnut Shrimp right at home? This dish delights your taste buds with sweet, crispy shrimp and crunchy candied walnuts. I’ll guide …
![- 4 salmon fillets (approximately 6 ounces each) - 1/4 cup Dijon mustard - 1/4 cup honey - 2 tablespoons extra-virgin olive oil - 2 cloves garlic, finely minced - 1 tablespoon freshly squeezed lemon juice - Salt and freshly ground black pepper, to taste - 1 tablespoon fresh dill or parsley (for garnish) - Lemon wedges (for serving) Gathering these ingredients is quick and easy. Salmon is the star of this dish. Each fillet should weigh around 6 ounces. This ensures they cook evenly. Dijon mustard and honey form a great glaze. The mustard adds a nice tang, while honey brings sweetness. These flavors blend well and make the salmon shine. Don't forget the olive oil! It adds richness and helps the glaze stick. Fresh garlic gives a nice kick. The lemon juice brightens the dish and adds freshness. Use salt and black pepper to season the salmon well. They enhance the flavors of the fish and the glaze. For garnish, fresh dill or parsley makes the dish look pretty. Lemon wedges on the side add extra zest. You can use these to squeeze on top before eating. This mix of flavors makes every bite a delight. For the full recipe, check out the detailed instructions. This will guide you step-by-step to make a fantastic meal. - Preheat your oven to 375°F (190°C). - Prepare a baking dish with parchment paper. This helps with easy cleanup. - Combine Dijon mustard, honey, olive oil, garlic, and lemon juice in a bowl. - Whisk until smooth and well blended. This mix brings sweet and tangy flavors. - Pat the salmon fillets dry with paper towels. - Season both sides with salt and pepper. This step boosts the taste. - Arrange the fillets in the baking dish, skin-side down. - Generously apply the honey mustard mixture over each fillet. - Make sure each piece is well coated. This adds great flavor. - Bake in the preheated oven for 15-20 minutes. - Check for doneness: the salmon should be opaque and flake easily. - Allow the salmon to rest before serving. - Garnish with fresh dill or parsley for color. Serve with lemon wedges for a zesty touch. For the full recipe, check out the [Full Recipe]. For a tasty salmon, start with the right seasoning. Use salt and black pepper generously. This simple step enhances the salmon's natural flavor. You can also add garlic powder or paprika for more taste. Cooking times vary with salmon thickness. Bake thinner fillets for about 15 minutes. For thicker pieces, aim for 20 minutes or a bit more. Always check with a fork; it should flake easily when done. Marinades boost flavor and tenderness. A mix of soy sauce, garlic, and ginger works well. You can prepare this ahead of time. Marinate the salmon for at least 30 minutes. For stronger flavor, let it sit for up to 2 hours. If you want a lighter dish, consider using maple syrup instead of honey. You can use whole grain mustard instead of Dijon for a different taste. Pair your salmon with low-calorie sides like steamed broccoli or a fresh salad. Think about serving it with quinoa or brown rice for added nutrients. For the full recipe, check the link above! {{image_4}} You can enhance your salmon by adding fresh herbs. Thyme and rosemary work great. Just chop a tablespoon of either and mix it into the honey mustard glaze. This will give your dish a fresh twist. You can also swap the honey or mustard for different flavors. Try using maple syrup or spicy mustard for a unique taste. If you like heat, add spices to your glaze. Cayenne or chili flakes can give your dish a kick. Start with a pinch and taste as you go. You can also serve your salmon with spicy sides, like a jalapeño corn salad or spicy roasted potatoes. This can make your meal exciting and bold. For those with dietary restrictions, swaps are easy! Use tamari instead of soy sauce for a gluten-free option. You can also make your glaze dairy-free by skipping any butter. If you prefer baking without oil, try using vegetable broth instead. Cooking methods like grilling or broiling can also work well. This keeps your meal healthy and safe for all diets. For more details, check the Full Recipe. After enjoying your Baked Honey Mustard Salmon, store any leftovers properly. First, let the salmon cool down to room temperature. Then, place it in an airtight container. This helps keep it fresh. Store it in the refrigerator for up to three days. If you want to keep it longer, you can freeze it. Wrap each portion tightly in plastic wrap or foil. Then, put it in a freezer-safe bag. This method prevents freezer burn and keeps the flavor intact. When you are ready to enjoy the leftovers, reheating is key. One great method is to use the oven. Preheat your oven to 300°F (150°C). Place the salmon on a baking sheet lined with parchment paper. Cover it loosely with foil to keep moisture in. Heat for about 10-15 minutes. This way, it stays flaky and juicy. Another option is using the microwave. Place the salmon on a microwave-safe plate. Cover it with a damp paper towel to avoid drying out. Heat in 30-second intervals until warm. Be careful not to overcook it, as that can make it tough. Baked Honey Mustard Salmon lasts a few days in the fridge. It is best within three days after cooking. Look for signs of spoilage. If the salmon has a sour smell or changes color, do not eat it. Texture is also important; it should feel firm and not slimy. If you notice these signs, it’s time to discard the salmon. Keeping an eye on freshness ensures a safe and delicious meal every time. For a tasty meal, I love serving Baked Honey Mustard Salmon with simple sides. Here are some great options: - Steamed broccoli - Roasted asparagus - Quinoa salad - Garlic mashed potatoes - Mixed green salad These sides balance the sweet glaze of the salmon. Each adds texture and flavor, making your meal more enjoyable. Yes, you can use fresh salmon! Fresh salmon has a better texture and flavor. It cooks evenly and stays moist. Look for bright, shiny fillets with no strong fish smell. Both fresh and frozen salmon work well, but fresh gives you a richer taste. To check if your salmon is done, look for these signs: - The salmon should be opaque. - It should flake easily with a fork. - The internal temperature should reach 145°F (63°C). If you see these signs, your salmon is ready! Let it rest for a few minutes before serving. Yes, you can prepare the salmon ahead of time. Marinate the salmon in the honey mustard glaze for up to 2 hours. After marinating, cover it and store it in the fridge. When you're ready, bake it according to the recipe. To reheat, place it in the oven at 350°F (175°C) until warmed. You can easily switch up the glaze for more flavor. Here are some ideas: - Add a splash of soy sauce for umami. - Mix in some sriracha for heat. - Use maple syrup instead of honey for a new twist. - Try adding fresh herbs like thyme or rosemary. These variations can create unique flavors for your salmon. Experiment and find your favorite! For the full recipe, check the link above. In this post, we explored a simple yet delicious baked honey mustard salmon recipe. You learned about the key ingredients like salmon, Dijon mustard, and honey. We walked through each step, from preheating the oven to serving the dish perfectly. Remember, you can enhance this recipe by adding spices or fresh herbs. Feel free to adjust ingredients to fit your taste. Whether you’re enjoying a family dinner or meal prepping, this dish offers flavor and ease. Give it a try, and savor the delicious results!](https://tossedflavors.com/wp-content/uploads/2025/06/42587a19-3f74-405a-97e8-f334a3af9066.webp)
Are you ready to impress your taste buds with a simple yet delicious dinner? Baked Honey Mustard Salmon is a dish that brings zesty flavor and tender fish together in …