Garlic Parmesan Cheeseburger Bombs Savory and Tasty Treat
![- 1 lb ground beef - 1 cup shredded cheddar cheese - 1 cup shredded mozzarella cheese - 1/2 cup grated Parmesan cheese - 1 package (16 oz) refrigerated pizza dough - 1 tsp garlic powder - 1 tsp onion powder - 1/2 tsp salt - 1/4 tsp black pepper - 1 tbsp minced garlic - Fresh parsley for garnish When making Garlic Parmesan Cheeseburger Bombs, the ingredients you choose are key. The ground beef brings rich flavor and juiciness. I prefer using an 80/20 ratio for the best texture and taste. The blend of cheeses adds creaminess and depth. Cheddar gives sharpness, mozzarella adds stretch, and Parmesan brings a nutty finish. For the dough, I always opt for refrigerated pizza dough. It’s easy to work with and puffs up nicely in the oven. The seasonings are simple but powerful. Garlic powder and onion powder infuse great flavor. Salt and black pepper enhance everything and bring balance. If you want an extra punch, add minced garlic. This will elevate the taste even more. Fresh parsley not only adds color but also a fresh note. It’s a nice touch when you serve the bombs warm. For the full recipe, check out the complete guide. This will help you get everything just right and make your cooking experience enjoyable! - Preheat the oven to 375°F (190°C). - Prepare the baking sheet with parchment paper to avoid sticking. - In a large bowl, combine 1 lb of ground beef with cheeses and seasonings. - Mix until everything blends well. This ensures each bite is tasty. - Roll out the pizza dough on a floured surface. Cut it into squares, about 3-4 inches. - Take a dough square and place about 2 tablespoons of filling in the center. - Fold the dough over and pinch the seams to seal it tightly. - Arrange the stuffed bombs on the baking sheet seam side down. - Lightly brush the tops with olive oil to help them brown. - Bake for 15-20 minutes until golden brown. Ensure the filling reaches 160°F (71°C). Follow these steps for a delicious treat! For the complete recipe, check the Full Recipe. To make your Garlic Parmesan Cheeseburger Bombs pop with flavor, use freshly grated cheeses. They melt better and give a creamy texture. I also suggest seasoning your beef mix well. This extra salt and pepper really bring out the taste of the meat. You want every bite to burst with flavor! Roll your pizza dough a bit thinner. This helps the bombs get that nice, crispy outside while keeping the filling juicy. When you seal the dough, make sure to pinch it tightly. This prevents any filling from leaking while baking, keeping all that flavor inside. Watch your bake time closely. You want the dough to turn a lovely golden brown. A food thermometer can be your best friend here. Check that the internal temperature reaches 160°F (71°C) to ensure your beef is fully cooked. This will keep your bombs safe and tasty! {{image_4}} You can easily switch things up with different meats. Try using ground turkey or chicken instead of beef. This swap can make your bombs lighter, yet still delicious. You can also play with cheese combinations. Substitute some cheddar with pepper jack for a spicy kick or use gouda for a rich, smoky taste. To add a twist to your filling, incorporate hot sauce or BBQ sauce. This can elevate the flavor and give your bombs a unique touch. You can also include diced vegetables like bell peppers or onions. These add crunch and extra flavor, making your bombs even tastier. If you want a different texture, consider using biscuit dough or crescent rolls. These options can create a fluffy, buttery experience. For those with dietary needs, use gluten-free pizza dough. This way, everyone can enjoy these savory treats! For the complete recipe, check out the [Full Recipe]. After enjoying your Garlic Parmesan Cheeseburger Bombs, let them cool down. This step keeps them firm and tasty. Once they cool, place them in airtight containers. Keeping them sealed helps maintain their flavor and texture in the fridge. If you want to save some bombs for later, freeze them before baking. Wrap each bomb tightly in plastic wrap. Place them in a freezer-safe bag. When you're ready to bake, you can take them out and cook them straight from the freezer. Just add a few extra minutes to the baking time for best results. To reheat your bombs, the oven works best. It keeps the outside crispy while warming the inside. Preheat the oven to 350°F (175°C). Place the bombs on a baking sheet. Bake for about 10 minutes. If you're in a hurry, you can use the microwave. Just heat them for about 30 seconds to 1 minute. This method is quick but may not keep them as crispy. The total time is about 40 minutes. You spend 20 minutes for prep and about 15-20 minutes baking. This makes it easy to fit into a busy evening. Yes, you can prepare the filling ahead of time. Store it in an airtight container in the fridge for up to two days. When ready to use, just let it sit at room temperature for a bit. Mixing it while cold can make it hard to stuff. These tasty bombs pair well with many sides. Try serving them with: - A fresh salad - Crispy fries - Sweet potato wedges - Marinara or spicy ketchup for dipping You can easily modify this recipe. For a gluten-free option, use gluten-free pizza dough. If you're low-carb, use cauliflower dough. For vegan bombs, swap meat with plant-based ground and use vegan cheese. Yes, you can air fry these bombs! Preheat your air fryer to 375°F (190°C). Place the stuffed bombs in a single layer. Cook for about 10-12 minutes. Check them halfway through and flip if needed for even cooking. Check the internal temperature of the bombs. They should reach at least 160°F (71°C) to be safe. Visually, the dough should be golden brown. If you see this, it’s time to dig in! You now have everything you need to make tasty Garlic Parmesan Cheeseburger Bombs. We covered key ingredients, step-by-step instructions, and helpful tips. You can even customize these bombs with your favorite flavors. Whether you’re baking for a crowd or enjoying a snack, these bombs are sure to impress. Get creative with fillings and enjoy the tasty results. Happy cooking!](https://tossedflavors.com/wp-content/uploads/2025/06/4766eb7b-d2d7-47c2-bb55-b4f21c764bdb.webp)
Craving a snack that packs a savory punch? Look no further! These Garlic Parmesan Cheeseburger Bombs are the perfect blend of cheesy goodness and juicy beef, all wrapped in soft …

. Enjoy your cooking! - How to achieve the perfect al dente spaghetti: Start by boiling a large pot of salted water. Add the spaghetti and cook it for about 8-10 minutes. Test it a minute or two before the time is up. It should be firm to the bite, not mushy. When it's perfect, drain it but remember to save some pasta water. - Importance of reserving pasta water: This starchy water is key for your sauce. It helps thicken the sauce and makes it cling to the spaghetti. Just add a little at a time until you reach your desired creaminess. - Adding extra spices for a kick: If you like heat, feel free to add more red pepper flakes. You could also try adding garlic powder or Italian herbs like oregano and thyme. They bring extra flavor depth without much effort. - Suggestion for alternative cheeses: If Parmesan isn't your favorite, try pecorino for a sharper taste. Or go for a creamy goat cheese that melts well. Each choice gives a unique twist to your dish. {{image_4}} You can easily make this dish vegan or dairy-free. Just swap the heavy cream with coconut cream or a nut-based cream. Use nutritional yeast instead of Parmesan for that cheesy taste. For gluten-free options, choose gluten-free spaghetti. There are many great brands available that taste just as good. If you want to change things up, you can replace spinach with kale or swiss chard. Both greens add a nice twist and are packed with nutrients. Sun-dried tomatoes can also be swapped for roasted red peppers or fresh cherry tomatoes. These options will shift the flavor and color while keeping the dish vibrant. For the full recipe, check out the details above and enjoy cooking! To store your spaghetti and spinach with sun-dried tomato cream sauce, follow these easy steps: - Cool Down: Let the dish cool to room temperature. - Use Airtight Containers: Place the pasta in an airtight container. - Label and Date: Mark the container with the date for tracking. In the fridge, your leftovers can last about 3 to 4 days. Make sure to check for freshness before eating! When you reheat your delicious dish, keep it creamy and tasty. Here’s how: - Stovetop Method: Heat in a skillet over low heat, adding a splash of water or cream. - Microwave Method: Use a microwave-safe dish, cover it, and heat in 30-second intervals. Stir often to prevent uneven heating. You can freeze this dish, but the cream sauce may change texture. If you choose to freeze it, store it in an airtight container. Use it within 2 months for the best flavor and quality. Yes, you can use dried sun-dried tomatoes. To rehydrate them, soak the dried tomatoes in warm water for about 20 minutes. Afterward, drain and chop them before adding to your sauce. This method brings back their rich flavor, making them a great addition to the dish. You can serve this dish with several sides. Here are some ideas: - Garlic bread for a crunchy bite - A light arugula salad with balsamic vinaigrette - Steamed broccoli for a healthy touch - A simple tomato salad to add freshness These sides will complement the creamy sauce and enhance your meal. To spice up the sauce, add more red pepper flakes. Start with a little and taste as you go. You can also add diced jalapeños or a dash of hot sauce. These additions will give your dish a nice kick without overpowering the flavors. Yes, this recipe works well for meal prep. To modify it, cook the spaghetti and sauce separately. Store them in airtight containers in the fridge. When ready to eat, reheat them together. This way, your meal stays fresh and delicious. To wrap up, we explored a delicious spaghetti dish with fresh spinach and sun-dried tomato cream sauce. The main ingredients create a rich flavor, while seasoning adds a tasty kick. We also discussed cooking tips and storage for leftovers. You can make simple swaps for dietary needs or enhance the flavor. This recipe is not only easy but also versatile. Enjoy making this dish and delight your taste buds!](https://tossedflavors.com/wp-content/uploads/2025/06/67d72ddb-6d44-4ca6-a865-9f2455d00f68.webp)


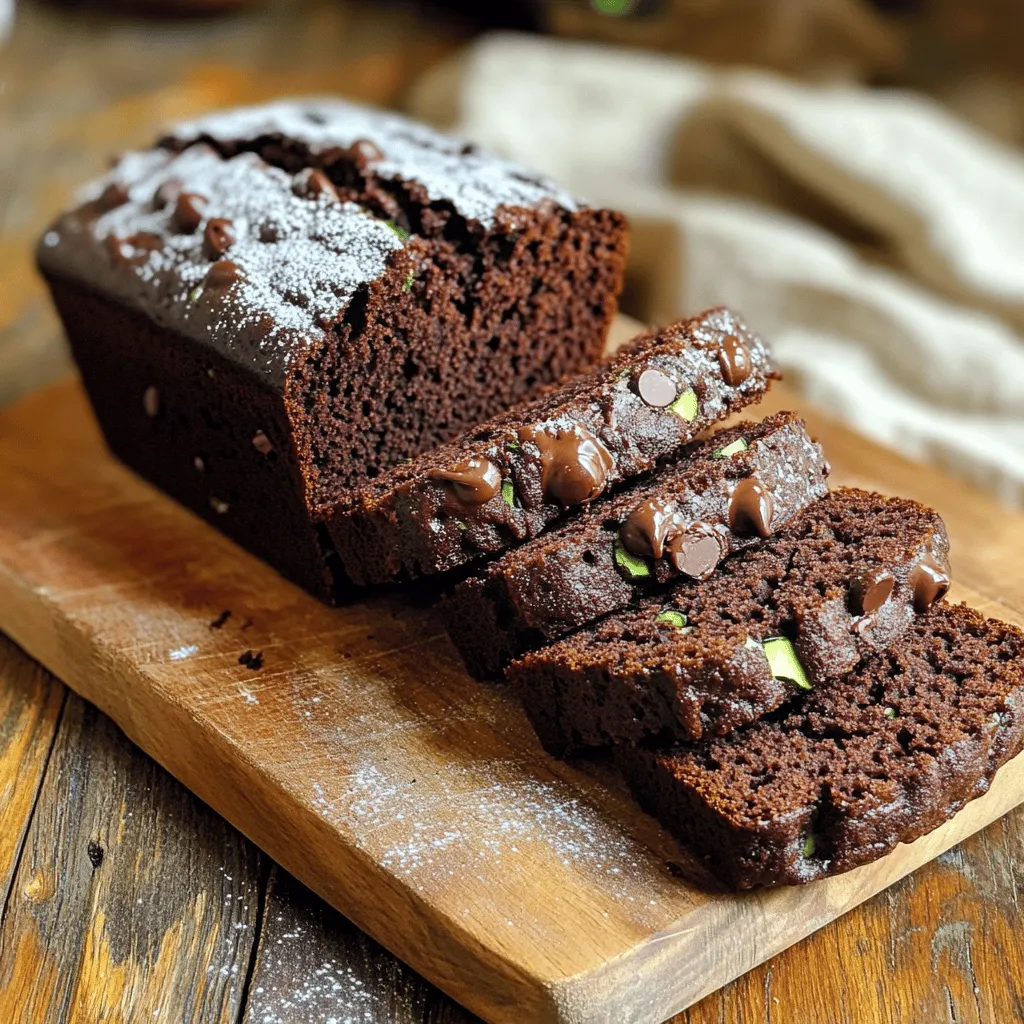
![To make lemon zucchini bread, you need fresh and simple ingredients. Here’s what you will need: - 1 cup finely grated zucchini - 1 teaspoon salt - 1 cup granulated sugar - 1/2 cup vegetable oil - 2 large eggs - 1 teaspoon vanilla extract - 1 tablespoon lemon zest - 1/4 cup fresh lemon juice - 2 cups all-purpose flour - 1 teaspoon baking powder - 1/2 teaspoon baking soda - 1/2 teaspoon ground cinnamon - 1/4 teaspoon ground nutmeg - 1/2 cup chopped walnuts or pecans (optional) - Powdered sugar for dusting (optional) The zucchini adds moisture and a subtle flavor. The lemon zest and juice bring brightness. This combination gives the bread a fresh taste. If you prefer, you can add nuts for crunch. You can find the full recipe linked above for more details and tips. - Preheat the oven to 350°F (175°C). - Grease or line a 9x5-inch loaf pan. Start by getting your oven ready. This step helps the bread bake evenly. While the oven heats, prepare your loaf pan. Greasing it ensures easy removal later. You can also line it with parchment paper for added convenience. - Mix grated zucchini with salt and let it sit. - Drain excess moisture from zucchini. Next, take your grated zucchini and mix it with salt. Let it rest for about 10 minutes. This draws out extra moisture, making the bread less soggy. After resting, squeeze out any remaining water using a clean towel or paper towels. This step is key for a great texture in your bread. - Whisk together sugars and oils. - Incorporate lemon zest and juice. - Sift and combine dry ingredients. In a large bowl, whisk together the granulated sugar and vegetable oil. Add the eggs and vanilla extract, mixing until smooth. Now, it's time to brighten things up! Stir in the lemon zest and juice. In another bowl, sift together the flour, baking powder, baking soda, cinnamon, and nutmeg. This helps make the bread light and fluffy. - Combine wet and dry ingredients. - Add zucchini and optional nuts. Now, slowly add your dry mix to the wet mixture. Stir gently until just combined. Be careful not to overmix! Fold in your zucchini and nuts if you want. This adds flavor and texture to the bread. - Pour batter into the loaf pan. - Bake for 55-65 minutes. Pour the batter into the prepared loaf pan. Use a spatula to smooth the top. Place it in the oven and bake for 55-65 minutes. Check for doneness by inserting a toothpick into the center. It should come out clean or with a few crumbs. - Cool in pan, then on a wire rack. - Optional: Dust with powdered sugar. Once baked, take the pan out of the oven. Let the bread cool in the pan for about 10 minutes. Then, transfer it to a wire rack to cool completely. If you like, dust it with powdered sugar before serving. This adds a nice touch to the presentation. Enjoy your delicious Lemon Zucchini Bread! For the full recipe, refer back to the provided instructions. When making lemon zucchini bread, you want to avoid overmixing the batter. Overmixing can make the bread dense and tough. Mix until ingredients are just combined. Another key tip is to ensure proper drainage of the zucchini. If the zucchini has too much water, it will make the bread soggy. After grating, let it sit with salt for about 10 minutes. Then, squeeze out the extra moisture with a towel. This step is vital for the best texture in your bread. To make your lemon zucchini bread even tastier, try adding spices. Nutmeg and cardamom can add warmth and depth. Just a pinch can elevate the overall flavor. Using fresh ingredients is crucial for the best flavor. Fresh lemon zest and juice will give your bread a bright, zesty taste. They make a noticeable difference compared to bottled juices. For a lovely presentation, serve the bread with lemon slices or mint leaves as garnish. This adds a pop of color and freshness to the plate. When slicing the bread, aim for even pieces. A neat display not only looks good but also makes it easy for guests to enjoy. A well-presented dish can make your lemon zucchini bread even more inviting. For the [Full Recipe], be sure to follow the steps carefully for the best results. {{image_4}} You can make this lemon zucchini bread gluten-free. Just swap all-purpose flour with a gluten-free flour blend. This change keeps the bread soft and tasty while avoiding gluten. Feel free to get creative with your add-ins! You can add chocolate chips or dried cranberries for a sweet touch. If you like nuts, consider using walnuts, pecans, or even almonds. Each adds a nice crunch and flavor boost. Want to switch things up? Try using oranges instead of lemons for a different zest. This gives the bread a sweet and citrusy twist. You can also add poppy seeds for extra texture and a fun look. These small changes can make your lemon zucchini bread truly unique. Store your lemon zucchini bread at room temperature. Use an airtight container to keep it fresh. This way, it stays moist and tasty for up to three days. If you want to enjoy it longer, consider freezing the bread. You can freeze lemon zucchini bread for up to three months. First, wrap the bread tightly in plastic wrap. Then, place it in a freezer bag or container. When you're ready to enjoy it, thaw the bread in the fridge overnight. You can also reheat slices in a toaster or microwave for a quick treat. If you have leftover bread, don't let it go to waste! You can make French toast by soaking slices in a mix of eggs and milk. Cook them on a skillet until golden brown. Another fun idea is to turn leftover bread into bread pudding. Just cube the bread and mix it with a custard base, then bake it until set. Both options will give you a delicious twist on your lemon zucchini bread! Yes, but make sure to drain excess water before adding. Frozen zucchini can work well. Just thaw it and squeeze out the water. This helps keep your bread from getting too soggy. Use a toothpick; it should come out clean or with a few crumbs. If the toothpick has wet batter, bake it longer. Checking the bread helps get a perfect loaf every time. Use flaxseed meal or applesauce as an egg substitute. For flaxseed, mix one tablespoon with three tablespoons of water. Let it sit for a few minutes to thicken. Applesauce adds moisture and a hint of sweetness. Store in an airtight container at room temperature for up to 3 days. This keeps the bread fresh and moist. You can also wrap it in plastic wrap for extra protection. Yes, increase the lemon juice or zest for a more intense flavor. More zest gives a bright taste, while extra juice adds moisture. Both options make your bread even more tasty. Reheat slices in a toaster or microwave for quick warming. If using a toaster, keep an eye on it so it does not get too crispy. Warm bread tastes great and feels fresh. In this post, we explored how to make Lemon Zucchini Bread from start to finish. You learned about the required ingredients, simple steps to create the batter, and tips for enhanced flavor. We also covered variations, storage options, and answered common questions. Now, you can enjoy this moist and zesty bread anytime! Try different add-ins and flavors to make it your own. Happy baking!](https://tossedflavors.com/wp-content/uploads/2025/06/d133ea0f-6895-407b-820c-f9588ac2c372.webp)