Peach Cobbler Delight Irresistible Dessert Recipe
. Start by peeling and slicing 4 cups of fresh peaches. Then, place them in a large bowl. Add 1/2 cup of granulated sugar, 1 tablespoon of lemon juice, 1 teaspoon of cinnamon, and 1 teaspoon of vanilla extract. Mix gently so the peaches get coated well. Let the mixture sit for about 10 minutes. This step helps the peaches release their juices, making the filling extra tasty. If you want a thicker filling, add 1 tablespoon of cornstarch and stir it in. In a separate bowl, combine 1 cup of all-purpose flour, the remaining 1/2 cup of sugar, 2 teaspoons of baking powder, and 1/2 teaspoon of salt. Whisk these dry ingredients until they blend well. Next, slowly pour in 1/2 cup of milk and 1/4 cup of melted butter. Mix until just combined. It’s fine if the batter is a bit lumpy. Overmixing can make your cobbler tough, and we want it light and fluffy. Now, take your greased 9x13 inch baking dish and pour the peach mixture evenly across the bottom. Then, use a spoon to drop dollops of the batter over the peaches, leaving some gaps for the fruit to show. Place the dish in your preheated oven at 350°F (175°C) and bake for 40-45 minutes. You know it’s done when the top turns golden brown and a toothpick comes out clean. After baking, let it cool for about 10 minutes. This cooling time helps it set, making it easier to serve. Enjoy your Peach Cobbler Delight with whipped cream or ice cream for a real treat! For the full recipe, check out the details above. Choosing ripe peaches is key. Look for peaches that are firm but slightly soft to the touch. The skin should have a warm golden hue. A sweet aroma at the stem end means they are ripe. Avoid peaches with dark spots or wrinkles; they may be overripe. If you can't find ripe peaches, let them sit on your counter for a few days. To get the best texture in your cobbler, avoid overmixing the batter. Mix until just combined; lumps are okay. This keeps the cobbler light and fluffy. Also, let the peach mixture sit for about 10 minutes. This allows the juices to release, creating a juicy filling that balances the batter. Serve your peach cobbler warm for the best experience. Top it with a generous scoop of vanilla ice cream or whipped cream. The cold creaminess pairs perfectly with the warm cobbler. For a fun twist, sprinkle some cinnamon or add fresh mint leaves on top for a pop of color. You can also try drizzling honey for extra sweetness. For the full recipe, check out the detailed instructions provided earlier. {{image_4}} You can change the flavor of your peach cobbler by adding other fruits. Try blueberries, raspberries, or even apples. Mixing fruits gives your dessert a new twist. Use about 2 cups of mixed fruits for the best results. Each fruit adds its own taste and texture. For example, blueberries bring sweetness, while tart raspberries add a zing. If you want a gluten-free version, swap the all-purpose flour for a gluten-free blend. Many blends work well in baking. You can also use almond flour or coconut flour. Just remember to adjust the liquid since these flours often absorb more moisture. This way, you can enjoy peach cobbler without gluten. Toppings can change the game for your cobbler. Instead of whipped cream, try vanilla yogurt or a scoop of ice cream. For a crunch, sprinkle nuts like pecans or almonds on top before baking. You can also add oats to the batter for a hearty touch. Mix and match to find your favorite combinations. Each swap can make your dessert even more delightful. For the full recipe, check out the recipe section. To keep your peach cobbler fresh, let it cool completely. Cover it tightly with plastic wrap or foil. You can also use an airtight container. Store it in the fridge for up to four days. This keeps it moist and tasty. Avoid leaving it at room temperature for too long, as this can spoil the dessert. When you're ready to enjoy leftovers, preheat your oven to 350°F (175°C). Place the cobbler in an oven-safe dish. Cover it with foil to keep it from drying out. Warm it for about 15-20 minutes. This helps revive the flavors and give your cobbler a nice, warm texture. If you're in a hurry, you can use a microwave. Heat in short bursts, checking often. You can freeze peach cobbler for later. First, let it cool completely. Cut it into serving sizes for easy thawing. Wrap each piece in plastic wrap. Then place them in a freezer-safe bag or container. Label it with the date. You can freeze it for up to three months. When you're ready to eat, thaw it in the fridge overnight, then reheat as mentioned above. This way, you always have a sweet treat ready to go! Yes, you can use canned peaches. They save time and are easy to find. Drain the syrup well before using. This helps keep the cobbler from becoming too watery. Canned peaches can taste sweet, so you might want to adjust the sugar in the recipe. To make the cobbler crust flaky, use cold butter. Cut the butter into small pieces and mix it in with the flour. You can also use a pastry cutter or your fingers to blend the butter. Some people like to add a bit of ice water to the mix. This helps keep the dough light and flaky. Peach Cobbler Delight tastes amazing with whipped cream or vanilla ice cream. You can also serve it with a scoop of yogurt for a tangy twist. Fresh mint leaves on top can add a nice touch. For more ideas, check out the Full Recipe for serving suggestions. Peach cobbler is a delightful dish you can make with fresh peaches and simple ingredients. In this guide, we covered how to prepare the filling, create the batter, and bake your cobbler. I shared tips for choosing the best peaches and suggested fun variations, like adding different fruits. Lastly, I explained how to store leftovers for later enjoyment. Enjoy your peach cobbler, and remember, the best part is sharing it with others!](https://tossedflavors.com/wp-content/uploads/2025/06/11474bb0-d928-4050-a94e-658e78079954.webp)
Peach Cobbler Delight is a dessert that will make your taste buds sing. This easy recipe uses fresh peaches and simple ingredients to create a warm, sweet treat. Whether you …
Peach Cobbler Delight is a dessert that will make your taste buds sing. This easy recipe uses fresh peaches and simple ingredients to create a warm, sweet treat. Whether you …

Craving comfort food that bursts with flavor? Look no further than a cheesy tomato pie! This dish combines fresh tomatoes, creamy cheeses, and herbs for a delightful meal that’s simple …
![To make a Healthy Garden Veggie Frittata, gather these fresh ingredients: - 6 large eggs - 1/4 cup milk (or almond milk for a dairy-free option) - 1 cup fresh spinach, roughly chopped - 1/2 cup bell peppers (mix of red, yellow, and green), diced - 1/2 cup cherry tomatoes, halved - 1/2 cup zucchini, finely grated - 1 small red onion, finely chopped - 1/2 cup feta cheese, crumbled - 2 tablespoons extra virgin olive oil - Salt and freshly ground black pepper to taste - Fresh herbs (such as basil or parsley) for garnish These ingredients create a colorful and tasty dish. Each one offers its own unique flavor and texture. You can easily switch out some ingredients. If you want a lower-fat option, use low-fat milk or skip the cheese. For a vegan frittata, replace the eggs with a mix of chickpea flour and water. You can also change the vegetables. Try using mushrooms, kale, or broccoli based on what you have on hand. Using fresh vegetables boosts the flavor and nutrition of your frittata. They add vitamins, minerals, and fiber, which are essential for good health. Fresh veggies also taste better than canned or frozen ones. Plus, they give a vibrant look to your dish. Eating a variety of vegetables can help you feel full and satisfied. This dish is not only delicious but also a great choice for a healthy meal. First, gather all your ingredients. You will need six large eggs, milk, spinach, bell peppers, cherry tomatoes, zucchini, red onion, feta cheese, olive oil, salt, and pepper. Start by preheating your oven to 350°F (175°C). This makes sure the oven is hot when you bake the frittata. In a large bowl, whisk the eggs and milk together until mixed well. Season with salt and pepper to taste. Next, chop the vegetables. Dice the bell peppers and onion, halve the cherry tomatoes, and grate the zucchini. Roughly chop the spinach. This step makes sure all the pieces cook evenly. In an oven-safe skillet, heat olive oil over medium heat. Once the oil is hot, add the chopped onion. Sauté for about three minutes until the onion is soft and clear. Then, add the diced bell peppers, grated zucchini, and spinach. Cook for another three to four minutes. Stir occasionally until the veggies are tender and the spinach wilts nicely. After that, gently fold in the halved cherry tomatoes. Remove the skillet from the heat. Pour the egg mixture over the cooked vegetables. Stir lightly to mix the veggies evenly. Finally, sprinkle the crumbled feta cheese on top. Carefully transfer the skillet to your preheated oven. Bake for 20 to 25 minutes. Watch for the frittata to set in the center and turn golden on top. This step is key for a soft and fluffy texture. Once baked, take the skillet out and let it cool for a few minutes. This makes slicing easier. For serving, add some fresh herbs on top for color and flavor. Enjoy your delicious Healthy Garden Veggie Frittata! For the complete recipe, check [Full Recipe]. To boost flavor in your frittata, use fresh veggies. I love using bright bell peppers, fresh spinach, and juicy cherry tomatoes. You can also add seasonings like garlic powder or a pinch of red pepper flakes. These small touches make a big difference. Remember to season your egg mixture well with salt and pepper. Tasting as you go is key for great results. For a lovely meal, serve your frittata with a side salad. A mix of greens adds freshness and crunch. You can pair it with whole grain toast for a hearty breakfast. If you want a bit of zing, drizzle some balsamic glaze on your frittata. This adds a sweet and tangy touch that brightens each bite. Avoid overcooking your frittata. It should be set but still soft in the center. If you bake it too long, it may become dry. Another mistake is not using enough oil in the skillet. This can lead to sticking. Always preheat your oven and skillet for even cooking. Lastly, don’t skip the fresh herbs at the end—they add color and flavor that elevate your dish. For more details, check the Full Recipe. {{image_4}} You can enhance your frittata with protein and cheese. Some great choices include: - Cooked bacon or sausage - Diced ham - Shredded chicken - Tofu for a vegan option - Cheddar or goat cheese for different flavors Adding these ingredients boosts flavor and makes the dish more filling. Feel free to mix and match to suit your taste. A frittata is very flexible. You can use many vegetables based on what you like or have. Some options are: - Asparagus for a fresh crunch - Mushrooms for an earthy taste - Broccoli for extra fiber - Kale for added nutrients Try different combinations to keep it exciting. Each blend brings a new taste and texture. You can easily adapt the frittata for special diets. To make it vegan, replace the eggs with a chickpea flour mixture. This gives you a similar texture and flavor. For a gluten-free option, ensure all ingredients, like cheese and seasonings, are gluten-free. You can enjoy this dish without worry, no matter your dietary needs. For the full recipe, click [Full Recipe]. To store leftover frittata, let it cool completely first. Then, slice it into portions. Place the slices in an airtight container. You can keep it in the fridge for up to 4 days. This way, you can enjoy it later without losing flavor. When you are ready to eat your frittata, reheating is easy. Preheat your oven to 350°F (175°C). Place the slices on a baking sheet. Heat them for about 10-15 minutes until warm. This keeps the texture nice and fluffy. You can also use the microwave if you’re in a hurry. Heat each slice for about 30 seconds to 1 minute. If you want to save frittata for later, freezing is a great option. Wrap each slice tightly in plastic wrap. Then, place the wrapped slices in a freezer-safe bag. This helps prevent freezer burn. You can store them for up to 3 months. When you’re ready to eat, thaw overnight in the fridge. Reheat as mentioned above for the best taste. Feel free to check out the Full Recipe to make your own delicious veggie frittata! Yes, you can use egg substitutes for the frittata. Popular choices include silken tofu and chickpea flour. Both options can mimic the texture of eggs well. If you want a dairy-free choice, almond milk works great. For each egg, use about 1/4 cup of your chosen substitute. A variety of vegetables shine in a frittata. I love using spinach, bell peppers, and zucchini. You can also try mushrooms, kale, or even asparagus. The key is to use fresh, seasonal veggies. This adds color and boosts flavor. Mix and match based on what you have at home. Your frittata can last up to 4 days in the fridge. Make sure to store it in an airtight container. This keeps it fresh and tasty. I suggest slicing it before storing for easy access. Just reheat slices as needed for a quick meal. Yes, you can bake the frittata in advance. This dish holds up well for a few days. Bake it, let it cool, and store it in the fridge. When you’re ready to enjoy, simply reheat it. This makes for a convenient breakfast or lunch. For the full recipe, check out the [Full Recipe]. A veggie frittata is easy to make and great for meals. You learned about key ingredients, simple steps, and tasty tips. Using fresh veggies gives extra flavor and health benefits. You can also swap ingredients or try different diets. Storing leftovers is a breeze. Now, you can whip up a delicious frittata whenever you want. Enjoy exploring flavors and combinations for a dish that fits your taste!](https://tossedflavors.com/wp-content/uploads/2025/06/34e5e2c7-c53b-4e92-b18a-deb0d4d66b7f.webp)
Looking for a simple, healthy meal that shines with fresh garden flavors? A Healthy Garden Veggie Frittata is just what you need! Packed with vibrant veggies and easy to make, …
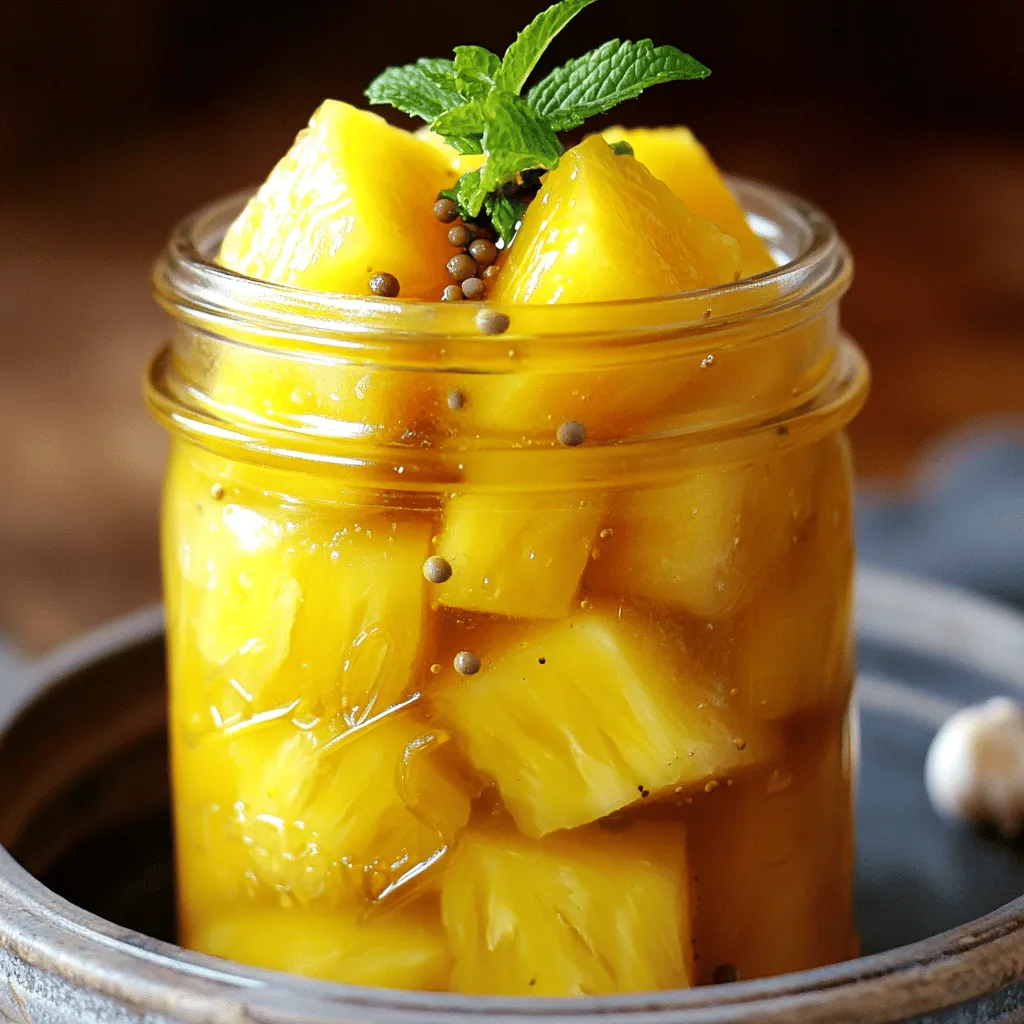
Do you want an easy way to spice up your meals? Try my Easy Pickled Pineapple recipe! With just a few simple ingredients, you can create a tasty treat that …
. To get that creamy sauce, start with the right amount of liquid. Use the full cup of heavy cream. This will give your sauce a rich, thick feel. If you like it thinner, add more chicken broth. For a thicker sauce, reduce the broth by half a cup. Stir well when mixing in the cheese. This helps it melt smoothly into the sauce. Boost the flavor with extra spices. Try adding a pinch of red pepper flakes for some heat. Fresh herbs like basil or thyme can add freshness. For a richer taste, consider adding a tablespoon of butter to the sauce. You can even add a splash of white wine for depth. Cooking times may change depending on your slow cooker. If it runs hot, check the chicken after 4 hours. For cooler cookers, it may need the full 6 hours. Always ensure the chicken reaches 165°F. You can test this by cutting into the thickest part. If the chicken shreds easily, it's done! For the full recipe, please refer to the earlier section. {{image_4}} You can switch up the protein in this dish. Turkey works great if you want leaner meat. Just use the same amount as chicken. Shrimp is another tasty option. Add it during the last hour of cooking. This way, it stays juicy. If you're plant-based, try tofu. Use firm tofu for the best texture. Simply cube it and add it with the pasta. Want a low-carb option? Use zucchini noodles or spaghetti squash instead of pasta. These choices keep it light. For those avoiding gluten, choose gluten-free pasta. Many brands offer great options. You can also make a dairy-free Alfredo sauce. Use cashews or coconut milk for creaminess without dairy. Just blend until smooth for the sauce. Adding fresh vegetables can boost flavor and nutrition. Spinach or broccoli are great choices. Toss them in the slow cooker during the last hour. This helps them stay bright and crisp. Sun-dried tomatoes add a sweet, tangy taste. They can really enhance the dish. Mushrooms also add a nice earthiness. Just slice them and mix them in before serving. For the full recipe, check out the detailed instructions above. After enjoying your Crock Pot Chicken Alfredo, store any leftovers quickly. Use airtight containers to keep your meal fresh. I recommend glass containers since they don’t stain and seal well. Let the dish cool to room temperature before sealing. This helps prevent moisture buildup. Store it in the fridge for up to three days for best quality. You can freeze Chicken Alfredo for later enjoyment. To do this, cool the dish completely first. Then, place it in freezer-safe containers or bags. Remove as much air as possible to avoid freezer burn. Label the containers with the date. You can freeze it for up to three months. When you’re ready to eat, thaw it in the fridge overnight. Reheat it gently on the stove. Add a splash of cream to revive the sauce. Chicken Alfredo stays good in the fridge for about three days. After that, it may not be safe to eat. Look for signs of spoilage like an off smell or mold. If the sauce separates or changes color, it’s best to toss it. Always use your best judgment when it comes to food safety. To make Chicken Alfredo creamy, focus on using rich ingredients. Start with heavy cream. It makes the sauce thick and smooth. Adding grated Parmesan cheese enhances the flavor and texture. Stir these into the slow cooker after shredding the chicken. This method ensures a creamy base that sticks to the pasta well. Yes, you can prep ingredients ahead of time. Chop the garlic and mix the spices early. You can also slice the chicken breasts. Store these in the fridge until you're ready to cook. This saves time when you want to make the dish later. Several sides pair nicely with this dish. Garlic bread is a classic choice. A fresh garden salad adds crunch and balance. Roasted vegetables also complement the creamy pasta well. Try steamed broccoli, zucchini, or asparagus for extra flavor. You can cook this recipe on high heat. Set your slow cooker to high and cook for about 2 to 3 hours. Keep an eye on the chicken to ensure it doesn’t dry out. Adding a little more broth can help keep it moist. Fettuccine is the traditional choice for Alfredo sauce. Its flat shape holds the creamy sauce well. However, you can use other pasta types too. Penne, rotini, or even gluten-free options work great. Choose what you like best for a tasty meal. For the Full Recipe, check the earlier sections for all the details! In this post, we explored a tasty Chicken Alfredo recipe using a slow cooker. We listed essential ingredients, step-by-step instructions, and helpful tips. I shared ways to make it creamy and adjustments you can try. You can even spice it up with alternative proteins or seasonal veggies. Lastly, I highlighted storage tips to keep leftovers fresh. With this guide, you can create a delicious meal that’s easy and fun to make. Enjoy your cooking!](https://tossedflavors.com/wp-content/uploads/2025/06/a3ab8028-a561-474f-86d6-4553a3d4fc86.webp)
Are you ready to impress with a creamy and comforting Crock Pot Chicken Alfredo? This dish is simple and perfect for busy days when you still crave something delicious. With …

If you love peaches and pie, this recipe is for you! I’ll show you how to make the best peach pie ever. With simple ingredients and easy steps, you can …

Looking for a delicious and easy breakfast that packs a punch? A zucchini frittata is your answer! This simple dish combines eggs, fresh veggies, and feta cheese for a flavorful …

Get ready to master the art of Ultimate Southern Fried Chicken! In this post, I’ll guide you through each step, from choosing fresh ingredients to perfecting your frying technique. With …
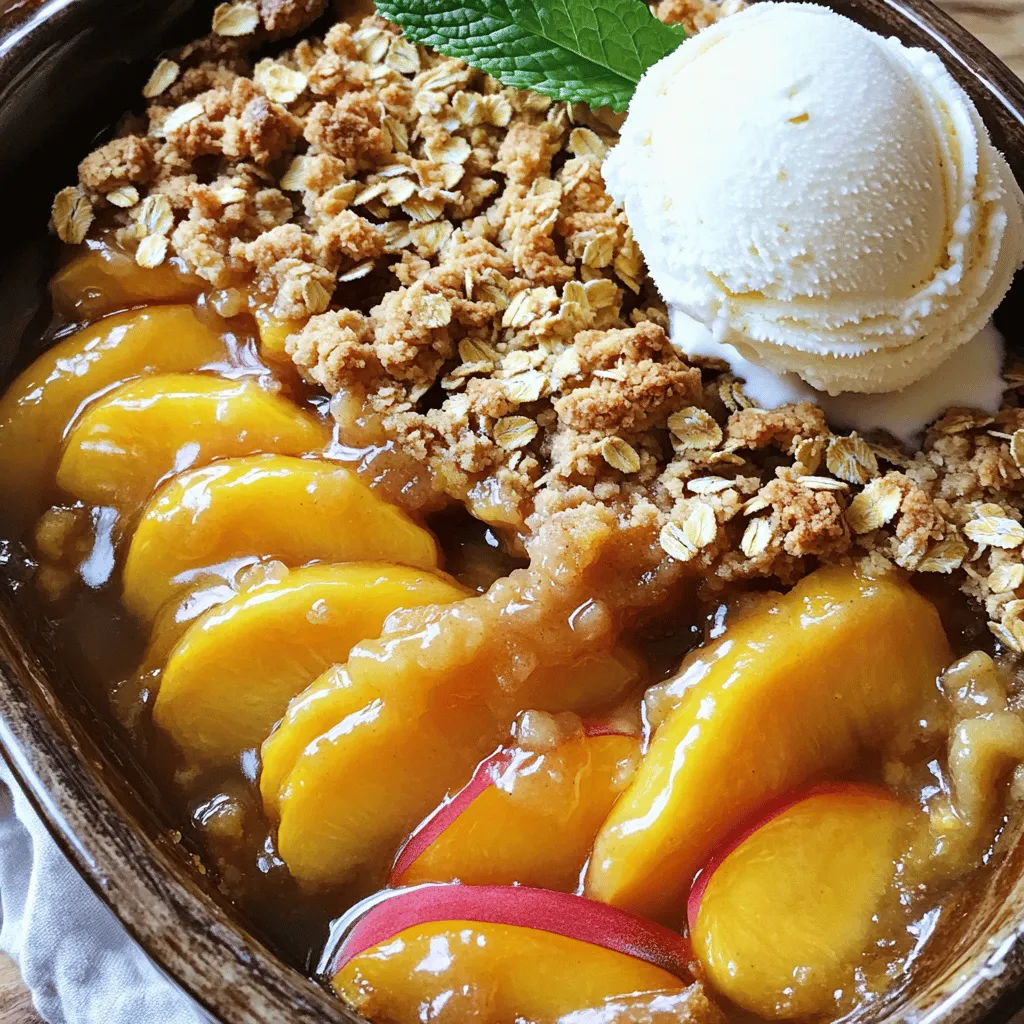
Craving a sweet treat that shines at any gathering? Look no further than peach crisp! This delightful dessert combines juicy peaches with a crunchy topping, making it a favorite for …

Craving a dessert that’s both simple and delicious? Look no further than this Easy Peach and Raspberry Cobbler! Bursting with fresh fruit and a buttery topping, this treat is perfect …