Skip to content
tossedflavors.com
  • Home
  • Appetizers
  • Desserts
  • Salads
  • Breakfast
  • Dinner
  • Privacy Policy
  • Contact
  • About

Chef Evan

Garden Frittata with Goat Cheese & Potatoes Delight

June 24, 2025 by Chef Evan
To make the garden frittata with goat cheese and potatoes, gather these key ingredients: - 4 large eggs - 1 cup fresh spinach, chopped - 1 medium potato, peeled and diced small - 1 small zucchini, diced - 1/2 red bell pepper, diced - 1/2 cup creamy goat cheese, crumbled - 1/4 cup whole milk - 1 small onion, diced - 2 tablespoons extra virgin olive oil - Salt and freshly ground pepper, to taste - Fresh herbs (such as parsley or chives) for garnish These ingredients blend to create a flavorful dish that shines at breakfast or brunch. Fresh produce is a star in this recipe. The spinach, zucchini, and red bell pepper add color and nutrients. I love how the potatoes provide a hearty base that pairs nicely with the creamy goat cheese. Each vegetable boosts flavor and makes the frittata bright and tasty. You can customize your frittata with optional add-ons. Consider: - Cherry tomatoes for a burst of sweetness - Mushrooms for an earthy flavor - Asparagus for a crunchy texture - Fresh herbs like basil or dill for added aroma These options let you play with flavors and make the dish your own. For the full recipe, refer to the main instructions above. Gather all your ingredients before you start cooking. This makes the process smooth and fun. You will need: - 4 large eggs - 1 cup fresh spinach, chopped - 1 medium potato, peeled and diced small - 1 small zucchini, diced - 1/2 red bell pepper, diced - 1/2 cup creamy goat cheese, crumbled - 1/4 cup whole milk - 1 small onion, diced - 2 tablespoons extra virgin olive oil - Salt and freshly ground pepper, to taste - Fresh herbs (like parsley or chives) for garnish Make sure your veggies are washed and chopped. This not only saves time but also keeps things tidy. Heat 1 tablespoon of olive oil in a skillet over medium heat. Add the diced potato first. Sauté for about 5-7 minutes. Stir often until the potatoes are golden and tender. This step gives the frittata a great base. Next, toss in the diced onion and red bell pepper. Sauté for another 3-4 minutes. You want the onions to become clear and the peppers to soften. Now, add the diced zucchini and chopped spinach. Cook for about 2 minutes until the spinach wilts. This step adds color and flavor. Season the mix with salt and pepper to taste. While the veggies cook, crack the eggs into a mixing bowl. Add the milk and whisk until frothy. This helps create a light texture. Fold in half of the crumbled goat cheese for creaminess. Once your veggies are cooked, pour the egg mixture over them in the skillet. Make sure it spreads evenly for a full flavor in every bite. Let the frittata cook on the stovetop for about 2-3 minutes. You’ll see the edges set and firm up. Sprinkle the remaining goat cheese on top. Now, transfer the skillet to the preheated oven at 400°F (200°C). Bake for 10-12 minutes. The frittata should puff up and the center should feel firm. Carefully take the skillet out of the oven. Let it cool for a couple of minutes. Slice into wedges and garnish with fresh herbs. For the full recipe, refer to the complete list and instructions above. Enjoy your delicious garden frittata! To get a frittata with a fluffy texture, use fresh eggs. Whisk the eggs well to add air. This makes the frittata light. Cook the veggies until soft, but not mushy. This helps keep the frittata from being soggy. Make sure to bake it until the center is firm. A little jiggle is fine, but it should not be runny. To boost the flavor, use herbs like parsley or chives. Add them right before serving for a fresh taste. You can also try different veggies. Bell peppers and spinach add great color and taste. For a kick, sprinkle some red pepper flakes over the top. This gives it a nice heat without overpowering the dish. Serve the frittata warm, cut into wedges. A bright plate makes it look more inviting. Pair it with a side of mixed greens drizzled with olive oil. This adds a fresh crunch. You can also serve it with crusty bread or a light salad. For a unique twist, add a dollop of Greek yogurt on top. It makes every bite creamy and rich. For the full recipe, check out the details above. {{image_4}} You can make this frittata fully vegetarian. Simply skip any meat. You can add more veggies instead. Try mushrooms, asparagus, or bell peppers. These options add great taste and texture. You can also swap out the goat cheese for feta for a tangy flavor. If you want to add protein, consider cooked bacon or ham. Chopped cooked sausage is another tasty choice. You can also use cooked chicken for a heartier dish. Just add these proteins to the skillet with the veggies before pouring in the egg mixture. This step ensures even cooking. Using seasonal ingredients keeps your frittata fresh and exciting. In spring, add fresh peas or asparagus. In summer, swap in ripe tomatoes and corn. Fall brings great options like sweet potatoes or roasted squash. In winter, consider kale or hearty root vegetables. These swaps help you enjoy the best of every season. For the full recipe, check out the Garden Frittata with Goat Cheese & Potatoes. To keep your garden frittata fresh, store it in an airtight container. Let it cool down before sealing it. This helps keep moisture out. You can keep it in the fridge for up to three days. If you want it to last longer, consider freezing it. When you're ready to enjoy your frittata again, take it out of the fridge. Preheat your oven to 350°F (175°C). Place the frittata on a baking sheet. Bake for about 10-15 minutes. This method warms it through without drying it out. You can also microwave it for 1-2 minutes if you're in a hurry. If you freeze the frittata, cut it into wedges first. Wrap each piece tightly in plastic wrap. Then, put them in a freezer-safe bag. Label the bag with the date. The frittata can last for up to three months in the freezer. To eat, thaw it overnight in the fridge before reheating. Enjoy your delicious meal anytime! For the full recipe, check out the section above. You can make the frittata ahead of time. Just follow these steps. First, cook the frittata as usual. Let it cool completely after baking. Then, cover it tightly with plastic wrap or foil. Store it in the fridge for up to three days. To serve, reheat it in the oven or microwave. This keeps the flavors fresh and tasty. Yes, you can use different cheeses! Goat cheese gives a creamy taste, but other cheeses work too. Feta adds a salty kick, while cheddar brings a sharp flavor. You can also try mozzarella for a milder taste. Just remember to adjust the amount based on the cheese’s strength. A frittata pairs well with many sides. Try a simple mixed green salad dressed with olive oil and vinegar. Fresh fruit like berries or melon adds a sweet touch. You can also serve crusty bread or toast on the side. For brunch, a glass of fresh juice or coffee complements the meal perfectly. For the full recipe, check out the Garden Frittata with Goat Cheese & Potatoes. This guide covered how to make a frittata step by step. We discussed key ingredients, their prep, and cooking methods. You learned tips for texture and flavor, plus ways to mix it up. I shared storage tips to keep your frittata fresh and tasty. Making a frittata is easy and fun. Experiment with ingredients to find your perfect dish. Enjoy cooking and sharing your frittata masterpiece!

Looking for a flavorful and easy dish? My Garden Frittata with Goat Cheese & Potatoes Delight is the answer! Packed with fresh veggies and creamy goat cheese, this frittata is …
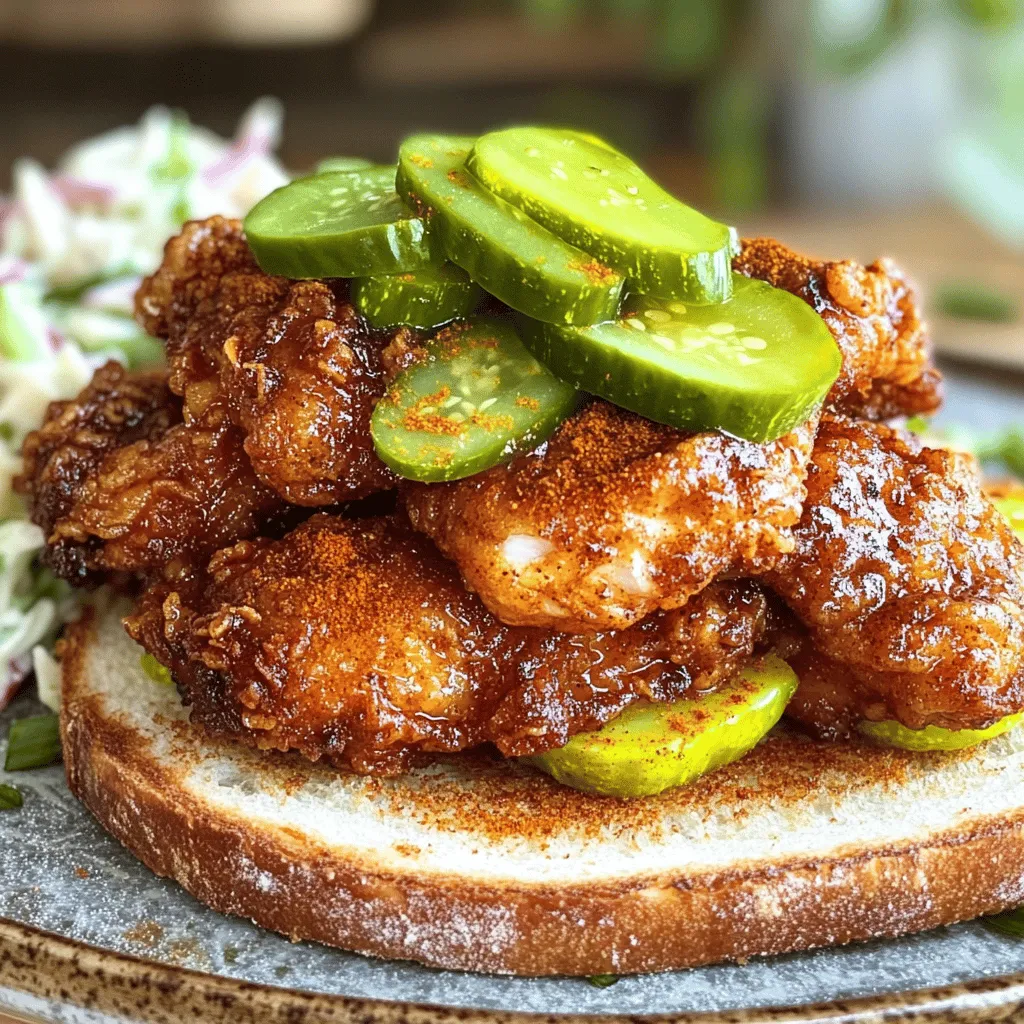
Read more

Categories Breakfast Leave a comment

Old School Fried Chicken Crispy and Flavorful Delight

June 24, 2025 by Chef Evan
To make old school fried chicken, you need some key items. Here’s a list: - 4 pieces of chicken (preferably legs and thighs) - 1 cup buttermilk - 1 teaspoon hot sauce (optional for a spicy kick) - 2 cups all-purpose flour - 1 teaspoon smoked paprika (for extra flavor) - 1 teaspoon garlic powder - 1 teaspoon onion powder - 1 teaspoon dried oregano - Salt and pepper, to taste - Vegetable oil, for frying These ingredients work together to create a crispy and flavorful delight. You can add a few things to boost flavor even more. Consider using: - 1 teaspoon cayenne pepper (for heat) - 1 tablespoon fresh herbs (like thyme or rosemary) - 1 teaspoon sugar (to balance flavors) These options can take your chicken to the next level. Having the right tools makes cooking easier. Here’s what I recommend: - Large mixing bowl - Whisk for mixing ingredients - Skillet or deep frying pan - Tongs for turning chicken - Wire rack for draining chicken These tools help ensure your fried chicken comes out perfect every time. For the complete recipe, check the [Full Recipe]. To start, you need to marinate the chicken. Combine buttermilk and hot sauce in a big bowl. Stir it well until it's mixed. Add the chicken pieces, making sure they are fully covered. This part is crucial for making the chicken tender. Cover the bowl with plastic wrap. Place it in the fridge for a minimum of 2 hours. If you can, let it sit overnight. This allows the flavors to soak in deeply. Next, let's prepare the coating. In a separate bowl, mix the flour, smoked paprika, garlic powder, onion powder, oregano, salt, and pepper. Whisk it all together till it’s blended well. This will create a tasty crust that makes the chicken shine. Make sure the mixture is ready when the chicken comes out of the fridge. Now, it's time to fry. Heat about one inch of vegetable oil in a large skillet or deep pan over medium heat. You want the oil to reach 350°F (175°C). To check if it’s hot enough, drop a small pinch of flour in the oil. If it sizzles, it’s ready for the chicken. Carefully add the chicken pieces one by one, making sure not to crowd the pan. Fry the chicken for about 8 to 10 minutes on each side. Look for a deep golden brown color. The internal temperature should hit 165°F (75°C) to ensure it’s safe to eat. Once the chicken is done, use tongs to take it out of the oil. Place the chicken on a wire rack over a baking tray. This helps the extra oil drip off and keeps the chicken crispy. Let it rest for about 5 minutes before serving. This resting time is key. It allows the juices to settle back into the meat, making each bite juicy and delicious. You can find the full recipe and more tips in the recipe section above. To make great fried chicken, start with good chicken. I prefer legs and thighs for their flavor. Marinating in buttermilk is a must. It makes the meat tender and juicy. Let it soak for at least two hours. Overnight is even better. For the coating, use a mix of flour and spices. This forms a crispy crust. Don't rush the frying. Keep the oil hot but not smoking. Fry the chicken in small batches. This ensures even cooking. A common mistake is not seasoning enough. Always add salt and pepper to your flour mixture. Another issue is overcrowding the pan. This can make the chicken soggy. Also, don’t skip the resting step. Letting the chicken rest helps keep it juicy. Lastly, avoid flipping the chicken too soon. Wait until it's golden brown before turning. To jazz up your fried chicken, try adding spices to your flour. Smoked paprika adds depth, while garlic powder gives flavor. You can also try cayenne for heat. For a twist, mix in some dried herbs like thyme or rosemary. A splash of lemon juice or hot sauce in the marinade can brighten the taste. These small changes can elevate your dish. Explore different combinations to find what you love. For more tips, check out the Full Recipe for even more ideas! {{image_4}} Southern-style fried chicken is crispy and juicy. It features a seasoned flour coating and has a mild flavor. You fry it until it's golden brown. In contrast, Nashville hot chicken brings the heat! This version uses a spicy oil to coat the chicken after frying. It has a bold kick that many love. Both styles are great, but they cater to different tastes. Try them both to see which one you like more! If you want a gluten-free option, use almond flour or rice flour instead of regular flour. They still give a nice crunch. You can also use crushed cornflakes for extra crispy texture. For a healthier choice, try using whole wheat flour. It adds fiber and nutrients. Another option is to use a mixture of nuts and seeds for a unique taste. These swaps can make your fried chicken fit your diet better without losing flavor. Marinating chicken is key to flavor. You can switch up the classic buttermilk marinade. For a tangy twist, try yogurt mixed with lemon juice. This adds a nice zest. If you love Asian flavors, use soy sauce and ginger in your marinade. Another fun idea is to use pickle juice for a salty and sour kick. Let your chicken soak in these marinades for at least two hours. The longer, the better! Explore these options to find your favorite flavor. For the full recipe, check out the Crispy Classic Fried Chicken section above. To keep your fried chicken fresh, let it cool first. Then, wrap each piece in foil or parchment paper. Place the wrapped chicken in an airtight container. This helps keep the moisture in while preventing sogginess. Avoid stacking the pieces too tightly, as this can cause them to lose their crispiness. Store the container in the fridge for the best results. When it's time to enjoy your leftover fried chicken, reheating it properly is key. The best way is to use an oven. Preheat your oven to 375°F (190°C). Place the chicken on a wire rack over a baking sheet. This allows hot air to circulate around the chicken, keeping it crispy. Bake for about 15-20 minutes, or until heated through. If you're in a hurry, you can use a microwave, but it may not keep the skin crunchy. Fried chicken can last in the fridge for about 3-4 days. If you want to keep it longer, consider freezing it. Wrap the chicken tightly in plastic wrap and foil. In the freezer, it can last up to 4 months. For best flavor, try to consume it within 2-3 months. This way, you'll enjoy that crispy, flavorful delight just like when it was freshly made! The best oil for frying chicken is one with a high smoke point. Vegetable oil works great. Canola oil is also a good choice. These oils help achieve that crispy texture without burning. They are neutral, so they won’t change the chicken's flavor. Yes, you can bake old school fried chicken. Baking is a healthier option. To do this, preheat your oven to 425°F (220°C). Place the coated chicken on a baking sheet lined with parchment paper. Bake for about 30-40 minutes, or until golden brown. This method may not be as crispy as frying, but it’s still tasty. To check if the chicken is fully cooked, use a meat thermometer. Insert it into the thickest part of the chicken. You want it to reach 165°F (75°C). Another way is to check the juices. If they run clear, the chicken is ready. Proper cooking keeps it safe and juicy. Old school fried chicken pairs well with many sides. Here are a few favorites: - Coleslaw: Crunchy and refreshing. - Mashed potatoes: Creamy and comforting. - Cornbread: Sweet and soft. - Green beans: Light, fresh, and healthy. These sides complement the rich flavors of the chicken and make a complete meal. For more ideas, check the full recipe! Old school fried chicken requires care and attention, from ingredients to tips. You learned about essential ingredients and some extra options for flavor. The step-by-step instructions teach effective frying and marinating techniques. We explored variations like Southern-style and gluten-free options. Lastly, storing and reheating tips help keep your chicken fresh. In the end, the secret lies in your practice and enthusiasm. Frying chicken can be both fun and rewarding. Enjoy each bite and share with loved ones!

Welcome to the crispy world of Old School Fried Chicken! I’ll guide you through making this classic dish, packed with rich flavor and satisfying crunch. You’ll learn the essential ingredients …

Read more

Categories Dinner Leave a comment

The BEST Tomato Tart Simple and Tasty Recipe

June 24, 2025 by Chef Evan
- 1 pre-made flaky pie crust - 4 large ripe tomatoes, sliced to about 1/4 inch thick - 1 cup ricotta cheese - 1 cup shredded mozzarella cheese - 2 tablespoons fresh basil, finely chopped (plus extra leaves for garnish) - 1 teaspoon dried oregano - 1 tablespoon extra virgin olive oil (plus more for drizzling) - Salt and freshly ground black pepper, to taste To create The BEST Tomato Tart, you need fresh and simple ingredients. The star of the dish is ripe, juicy tomatoes. Look for ones that feel heavy for their size and have a rich aroma. For the cheese, I recommend a mix of creamy ricotta and stretchy mozzarella. This combo gives the tart a wonderful texture and flavor. Fresh herbs like basil and oregano add depth. Don't forget the salt and pepper to enhance the taste. - Balsamic glaze - Additional vegetables If you want to add more flavor, you can drizzle balsamic glaze on top. It adds a sweet tang that pairs well with tomatoes. You can also mix in other veggies, like zucchini or bell peppers. This makes your tart even more colorful and tasty. - Tart pan - Mixing bowls - Baking sheets To make the tart, you’ll need a few tools. A tart pan helps shape the crust and gives it a nice edge. Use mixing bowls to combine your cheese and herbs. Finally, a baking sheet is handy for catching any drips while the tart bakes. This setup will make your cooking process smooth and fun. For the full recipe, check out The Ultimate Savory Tomato Tart. 1. Roll out the pie crust: Start with a pre-made flaky pie crust. Roll it out evenly on a clean surface. 2. Fit into the tart pan: Carefully place the rolled crust into the tart pan. Make sure it covers the bottom and sides without tears. 3. Prick the crust: Use a fork to prick the bottom of the crust. This helps it cook evenly and prevents bubbles. 1. Combine ricotta and mozzarella: Take a medium bowl and add 1 cup of ricotta cheese and 1 cup of shredded mozzarella cheese. 2. Add fresh herbs and seasonings: Stir in 2 tablespoons of fresh basil, 1 teaspoon of dried oregano, and a pinch of salt and pepper. 3. Mix until uniform: Blend all the ingredients together until they form a smooth cheese mixture. 1. Spread the cheese mixture: Evenly spread the cheese mix onto the crust. Make sure it covers the base entirely. 2. Arrange the tomato slices: Layer 4 large, thin tomato slices over the cheese. Overlap them for a lovely look. 3. Drizzle with olive oil and season: Lightly drizzle extra virgin olive oil on top and sprinkle with more salt and pepper. 1. Preheat the oven: Set your oven to 400°F (200°C) and let it heat up. 2. Bake time and monitoring: Place the tart in the oven. Bake for 30-35 minutes. Watch for a golden crust and tender tomatoes. This step-by-step guide ensures you create a delicious tomato tart. For the full recipe, check out the detailed instructions above. Choose ripe tomatoes for the best flavor. I like using heirloom or vine-ripened tomatoes. These types are sweet and juicy. Look for tomatoes that feel heavy for their size. They should have smooth skin and vibrant color. To check ripeness, gently squeeze the tomato. It should yield a bit but not be mushy. If you can smell the tomato, it’s usually ripe and ready to eat. A soggy crust will ruin your tart. To prevent this, always prick the crust with a fork before baking. This helps steam escape. Consider pre-baking the crust for a few minutes. This sets it and keeps it crisp. Aim for a golden brown color. You want a flaky texture that contrasts with the soft tomatoes. Serve your tomato tart warm or at room temperature. Cut it into neat wedges for a nice look. Pairing it with a crisp green salad adds freshness. A light vinaigrette complements the tart well. You can also drizzle balsamic glaze on top for extra flavor. Fresh basil leaves make a beautiful garnish. They add color and a hint of herbal note. For a fun twist, serve with some crusty bread. {{image_4}} You can make your tomato tart even tastier. Add other vegetables like zucchini or bell peppers. These veggies add color and flavor. You can also try different cheeses. Swap mozzarella for goat cheese or feta. Both add a nice tangy taste. Fresh herbs can change the whole dish. Instead of basil, use thyme or parsley. These herbs give a fresh kick. You can also add spices for an exciting twist. A pinch of red pepper flakes adds heat. Try smoked paprika for a deep flavor. For a gluten-free crust, look for pre-made options. Many brands offer tasty gluten-free choices. You can also make your own with almond flour or coconut flour. For the filling, use the same great ingredients. Just check for gluten in the cheese and herbs you choose. This way, everyone can enjoy your delicious tart. To store leftovers, let the tart cool. Wrap it tightly in plastic wrap or foil. You can also place it in an airtight container. This keeps it fresh for up to three days in the fridge. For freezing, slice the tart into pieces. Wrap each slice in plastic wrap, then place them in a freezer bag. Squeeze out excess air before sealing. The tart can stay in the freezer for up to two months. To reheat, bake the slices straight from the freezer at 350°F (175°C) for 15-20 minutes. This helps the crust stay crisp and the cheese melt smoothly. The tart stays fresh for about three days in the fridge. Watch for signs of spoilage: a sour smell, mold, or a change in texture. If you see any of these, it’s best to discard it. Taking these steps will help you enjoy The BEST Tomato Tart at its best, whether fresh or stored! To make The BEST Tomato Tart from scratch, follow these steps: 1. Preheat your oven to 400°F (200°C). 2. Use a pre-made flaky pie crust and fit it into your tart pan. 3. Prick the bottom of the crust with a fork. 4. In a bowl, mix ricotta cheese, mozzarella cheese, basil, oregano, olive oil, salt, and pepper. 5. Spread the cheese mixture evenly on the crust. 6. Layer sliced tomatoes over the cheese. 7. Drizzle olive oil and season with salt and pepper. 8. Bake for 30-35 minutes. 9. Let it cool before slicing. This process yields a savory and beautiful tart. Yes, you can use store-bought ingredients. Pre-made pie crust saves time. You can also choose fresh tomatoes from your local market. Store-bought ricotta and mozzarella work well too. Using high-quality ingredients makes a big difference in taste. This tomato tart pairs well with a crisp green salad. A light vinaigrette enhances the meal. You can also serve it with roasted vegetables. For a more filling option, add grilled chicken or fish. These sides balance the dish and add variety. To prevent the crust from burning, check the oven temperature. If the crust browns too fast, cover it with foil. Make sure you prick the crust to avoid bubbling. Baking on the middle rack allows even cooking. Yes, The BEST Tomato Tart is great for meal prep. You can make it ahead of time and store it in the fridge. It stays fresh for about three days. Reheat slices in the oven for the best taste. Enjoy this tart throughout the week! To make the best tomato tart, gather simple ingredients like a pre-made crust, ripe tomatoes, and cheese. Follow the step-by-step guide to create a dish that impresses. Don't forget to customize it using fresh herbs and extra veggies. Proper storage keeps leftovers fresh. In the end, this tart offers flavors and options for all. Enjoy making it your own!

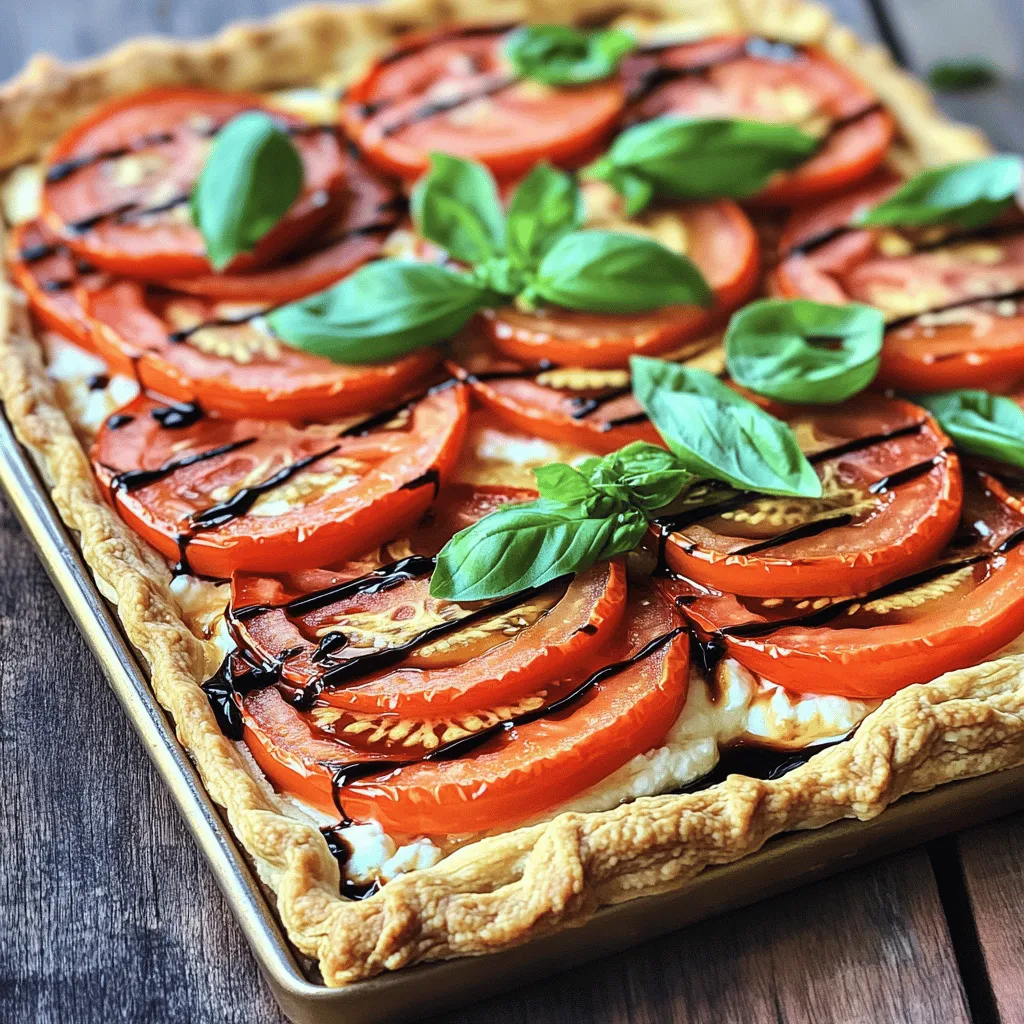
If you’re after a delicious dish that looks as good as it tastes, you’ve found it! This simple tomato tart recipe is both easy to make and packed with flavor. …

Read more

Categories Appetizers Leave a comment

Nashville Hot Chicken Recipe Simple and Delicious

June 23, 2025 by Chef Evan
To make Nashville hot chicken, you need a few key items. These ingredients create that famous flavor and crispy texture. Here’s what you will need: - 2 lbs chicken (thighs or drumsticks preferred for juiciness) - 1 cup buttermilk (for tenderizing) - 2 tablespoons hot sauce (such as Texas Pete or Frank's RedHot for flavor kick) - 1 tablespoon smoked paprika (adds depth) - 1 tablespoon garlic powder (for aromatic goodness) - 1 tablespoon onion powder (enhances flavor) - 1 teaspoon cayenne pepper (adjust according to your heat tolerance) - 1 teaspoon black pepper (for seasoning) - 1 teaspoon salt (to boost overall taste) - 1 cup all-purpose flour (for a crispy coating) - ½ cup vegetable oil (for frying, use a neutral oil) - 1 tablespoon brown sugar (to balance heat in the spice mix) To really elevate your Nashville hot chicken, consider adding these extra ingredients. They take the dish to the next level: - Dill pickles (for serving, adds a tangy crunch) - Sliced bread (for a classic Nashville experience) These ingredients not only complement the hot chicken but also make the meal more satisfying. The pickles add a nice tartness, while the bread helps soak up all the delicious flavors. When serving Nashville hot chicken, think about sides that balance the heat. Here are my top picks: - Coleslaw (for added crunch and creaminess) - Potato salad (for a cool, comforting touch) - Macaroni and cheese (for a rich, cheesy flavor) These sides work well with the spicy chicken. Each bite of hot chicken paired with a cool side creates a delightful contrast. Enjoy your cooking adventure! For the full recipe, check out the link. To start, gather your ingredients. In a large mixing bowl, combine these items: - 1 cup buttermilk - 2 tablespoons hot sauce - 1 tablespoon smoked paprika - 1 tablespoon garlic powder - 1 tablespoon onion powder - 1 teaspoon cayenne pepper - 1 teaspoon black pepper - 1 teaspoon salt Whisk them together until smooth. This marinade adds flavor and tenderness to the chicken. Next, add your chicken pieces to the marinade. I prefer thighs or drumsticks for juiciness. Make sure each piece is fully submerged. Cover the bowl with plastic wrap. Place it in the fridge for at least 4 hours, but overnight is best. This lets the flavors soak in deeply. When you are ready to fry, take the chicken out. Allow excess marinade to drip off. In a separate bowl, mix 1 cup of all-purpose flour with a teaspoon of salt and black pepper. Dredge each chicken piece in this flour mix. Make sure they are well-coated. Heat ½ cup of vegetable oil in a large skillet over medium-high heat. The oil should shimmer when hot. Carefully add the chicken, but do not overcrowd the pan. Fry each piece for 12-15 minutes, turning halfway. The chicken should be golden brown and reach an internal temperature of 165°F. As the chicken fries, mix any leftover flour with cayenne pepper and brown sugar. Once the chicken is done, sprinkle this spice mix over each piece while they are still hot. This gives it that classic Nashville hot flavor. Let the fried chicken rest on a wire rack for a few minutes. This helps keep the coating crispy. Enjoy this Nashville hot chicken on soft bread with crispy dill pickles for a perfect meal. For the full recipe, check out the details above! To get the right spice level, balance is key. Start with one teaspoon of cayenne pepper. Taste the spice mix as you go. If you want more heat, add more cayenne. You can also mix in hot sauce for extra flavor. Adjust the spice to suit your taste buds. Everyone likes heat differently, so make it your own! For a crispy coating, the flour mix is vital. Use all-purpose flour combined with salt and black pepper. Dredge the chicken well and shake off excess flour. This lets the oil work its magic. Make sure the oil is hot enough before adding chicken. A deep golden brown color means you’ve nailed it! Avoid overcrowding the pan when frying. This can lower the oil’s temperature. Give the chicken space so it cooks evenly. Another mistake is not letting the chicken rest after frying. Let it sit on a wire rack. This keeps the coating crispy. Lastly, don’t skip the spice sprinkle after frying. It gives the chicken that unforgettable Nashville flavor. For the complete cooking experience, check out the Full Recipe. {{image_4}} You can change the heat level with different spice blends. Try using smoked paprika for a smoky touch. For a sweeter taste, mix in brown sugar. If you want more heat, add more cayenne pepper. Experiment with your favorite spices, like chili powder or even garlic salt. Each blend gives a new flavor twist to Nashville hot chicken. Pair your Nashville hot chicken with sides for a complete meal. Coleslaw offers a cool crunch that balances the heat. Baked beans add a sweet and savory contrast. You can also serve it with mac and cheese for a creamy texture. Another great choice is cornbread, which absorbs the spicy juices well. If you prefer a healthier option, consider baking or air frying your chicken. For baking, preheat your oven to 400°F. Place the coated chicken on a baking sheet. Bake for 30-35 minutes until crispy and golden. For air frying, set your air fryer to 375°F. Cook for about 25 minutes, flipping halfway through. Both methods still deliver great flavor with less oil. Store any leftover Nashville hot chicken in an airtight container. Place the chicken in the fridge. It stays fresh for up to four days. Make sure it cools down to room temperature before sealing it. This helps prevent sogginess. When reheating, aim to keep that crispy texture. Preheat your oven to 375°F (190°C). Place the chicken on a baking sheet. Heat it for about 15-20 minutes. Check that the internal temperature hits 165°F (74°C). This method crisps up the coating while warming the meat. Freezing your Nashville hot chicken is easy. Wrap each piece in plastic wrap. Then, put them in a freezer bag. Remove as much air as possible. It can last up to three months in the freezer. When you’re ready to eat, thaw it in the fridge overnight before reheating. Enjoy the spicy goodness later! Nashville Hot Chicken is a spicy fried chicken dish. It features a crispy coating and a fiery sauce. People serve it on bread with pickles. The dish has roots in Nashville, Tennessee. It combines heat, flavor, and a crunchy texture. This meal is famous for its bold taste. To adjust the heat, change the cayenne pepper amount. If you like it spicy, add more. If you prefer less heat, add less cayenne. You can also use milder hot sauces. Try mixing different spices to find your ideal flavor. For the best Nashville Hot Chicken, visit Nashville itself. Some popular spots include Hattie B's and Prince's Hot Chicken. Many restaurants outside Nashville also serve great versions. Look for places that focus on Southern cuisine. Online reviews can help you find hidden gems. Yes, you can make Nashville Hot Chicken in an air fryer. First, marinate and coat the chicken as usual. Then, preheat the air fryer to 375°F. Cook the chicken for about 25-30 minutes. Flip the pieces halfway through for even cooking. This method gives a healthier twist to the classic recipe. Nashville Hot Chicken lasts about 3-4 days in the fridge. Store it in an airtight container to keep it fresh. Reheat it in an oven or air fryer for the best texture. Avoid microwaving if you want to maintain the crispiness. For longer storage, consider freezing it. This blog post covered Nashville Hot Chicken from start to finish. We explored key ingredients, step-by-step instructions, and tips to avoid common mistakes. We also discussed fun variations and how to store leftovers. In conclusion, making Nashville Hot Chicken is easier than it looks. With practice, you can make a delicious dish that impresses everyone. Dive in, enjoy the flavors, and share your creations!

Nashville Hot Chicken is a spicy, crispy delight that brings heat and flavor to your plate. In this simple and delicious recipe, I will guide you through each step, from …

Read more

Categories Dinner Leave a comment

Fresh Southern Peach Cobbler Delightful Summer Treat

June 23, 2025 by Chef Evan
- Fresh peaches (4 cups, peeled and sliced) - Sugar (1 cup, divided) - Lemon juice (1 tablespoon) - Ground cinnamon (1 teaspoon) - Pure vanilla extract (1 teaspoon) - All-purpose flour (1 cup) - Baking powder (1 tablespoon) - Fine salt (½ teaspoon) - Whole milk (1 cup) - Unsalted butter (½ cup, melted) - Brown sugar (1 teaspoon for topping) - Optional: Vanilla ice cream for serving Fresh peaches are the star of this dish. Look for ripe, juicy peaches that smell sweet. You will need four cups of peaches, peeled and sliced. This gives the cobbler its lovely fruit base. You will also use one cup of sugar. Half will sweeten the peaches, and half will mix into the batter. The lemon juice brings brightness to the fruit. Just one tablespoon is enough. Ground cinnamon adds warmth to the cobbler. You only need one teaspoon. Pure vanilla extract boosts flavor, too. Use one teaspoon for a rich taste. For the dry ingredients, you need one cup of all-purpose flour, one tablespoon of baking powder, and half a teaspoon of fine salt. These help create a soft batter. The wet ingredients include one cup of whole milk and half a cup of melted unsalted butter. This makes the batter creamy. Lastly, add one teaspoon of brown sugar on top before baking. It gives a sweet, crispy finish. You can serve the cobbler warm with vanilla ice cream for a perfect summer dessert. For the full recipe, check the Golden Southern Peach Cobbler 🥧 section. - Preheat the oven to 350°F (175°C). - Grease a 9x13 inch baking dish with butter or non-stick spray. - Combine 4 cups of sliced peaches, ½ cup sugar, lemon juice, cinnamon, and vanilla in a bowl. - Let the mixture sit for 10 minutes. This helps the flavors blend together. - In a separate bowl, mix 1 cup flour, 1 tablespoon baking powder, ½ cup sugar, and ½ teaspoon salt. - Gradually add 1 cup milk and stir to form a smooth batter. Then, fold in ½ cup melted butter. - Spread the batter evenly in the greased baking dish. - Spoon the marinated peaches over the batter, including the juices. - Sprinkle 1 teaspoon brown sugar on top for extra sweetness. - Bake for 40-45 minutes. The cobbler should turn golden brown and a toothpick should come out clean. Enjoy the warm, sweet aroma filling your kitchen as it bakes! You can find the Full Recipe if you want all the details. To make a great peach cobbler, you need the best peaches. Look for ripe, slightly soft peaches. They should smell sweet and juicy. Avoid peaches that are overly bruised or firm. Firm peaches may not taste good when baked. A soft peach means it is ripe and ready to use. The texture of your cobbler matters. Adjust the sugar based on how sweet your peaches are. If your peaches are very sweet, you may need less sugar. This helps keep the dish balanced. Also, keep the batter and peaches separate. Don’t stir them together. This way, you get layers that are soft and tasty. Serving your cobbler is just as important as making it. Top it with a scoop of vanilla ice cream for extra indulgence. The cold ice cream melts into the warm cobbler. It's a great mix of flavors. Serve it warm for the best taste and texture. Warm peach cobbler is a delightful treat that everyone loves. For the full recipe, check out Golden Southern Peach Cobbler. {{image_4}} You can mix things up by adding berries. Blueberries or raspberries work great. They add a nice burst of color and flavor. Just toss in one cup of your chosen berries with the peaches. This combo makes a fresh and fruity dessert. The berries will bring a slight tartness that blends well with the sweet peaches. If you need a gluten-free dessert, you can easily change the flour. Instead of all-purpose flour, use almond or coconut flour. These flours give a nutty taste and are perfect for this dish. Just swap them in a 1:1 ratio. The cobbler will still be soft and delicious, perfect for everyone to enjoy. Want to try something new? Add spices like nutmeg or ginger for a warm twist. Just a pinch will do. These spices will give your peach cobbler a cozy flavor. You can mix in half a teaspoon of either spice into the peach mixture. It adds a unique touch that surprises and delights. Try these variations to make your fresh southern peach cobbler even more special! For the full recipe, check out the details above. After enjoying your peach cobbler, cover it with plastic wrap or foil. Store it in the fridge for up to three days. For the best taste, reheat it in the oven. This keeps the topping crisp and the filling warm. You can freeze peach cobbler for later. Use an airtight container to prevent freezer burn. It stays fresh for up to three months. When you’re ready to eat, just reheat it straight from the freezer. Add a few extra minutes to the cooking time to warm it through. To keep the topping nice and crunchy, store the cobbler uncovered. This way, it won’t get soggy. Enjoy your cobbler at its best by following these simple steps. For more details, check the Full Recipe. Yes, but adjust sugar as canned peaches are often sweeter. Canned peaches come in syrup, making them sticky. Use less sugar in your recipe. This change helps keep your cobbler from being too sweet. Look for a golden top and a clean toothpick test. When you insert a toothpick into the center, it should come out clean. The top should be brown and firm, not soft. Warm with vanilla ice cream or whipped cream for best experience. The cold ice cream melts into the warm cobbler. This mix of warm and cold is truly delightful. It lasts up to 3 days when properly stored. Store it in an airtight container to keep it fresh. Reheat it in the oven for the best taste. You will enjoy every bite, just like the first time! This article detailed how to make a delicious peach cobbler. We covered the main, dry, and wet ingredients needed. I shared step-by-step instructions for preparation and baking. Tips on selecting peaches and variations added depth. Storing and reheating methods ensure your cobbler stays fresh. Peach cobbler is simple and satisfying. Enjoy it warm with ice cream for a treat. This dessert brings comfort and joy, making every bite worthwhile. Try making it your own!

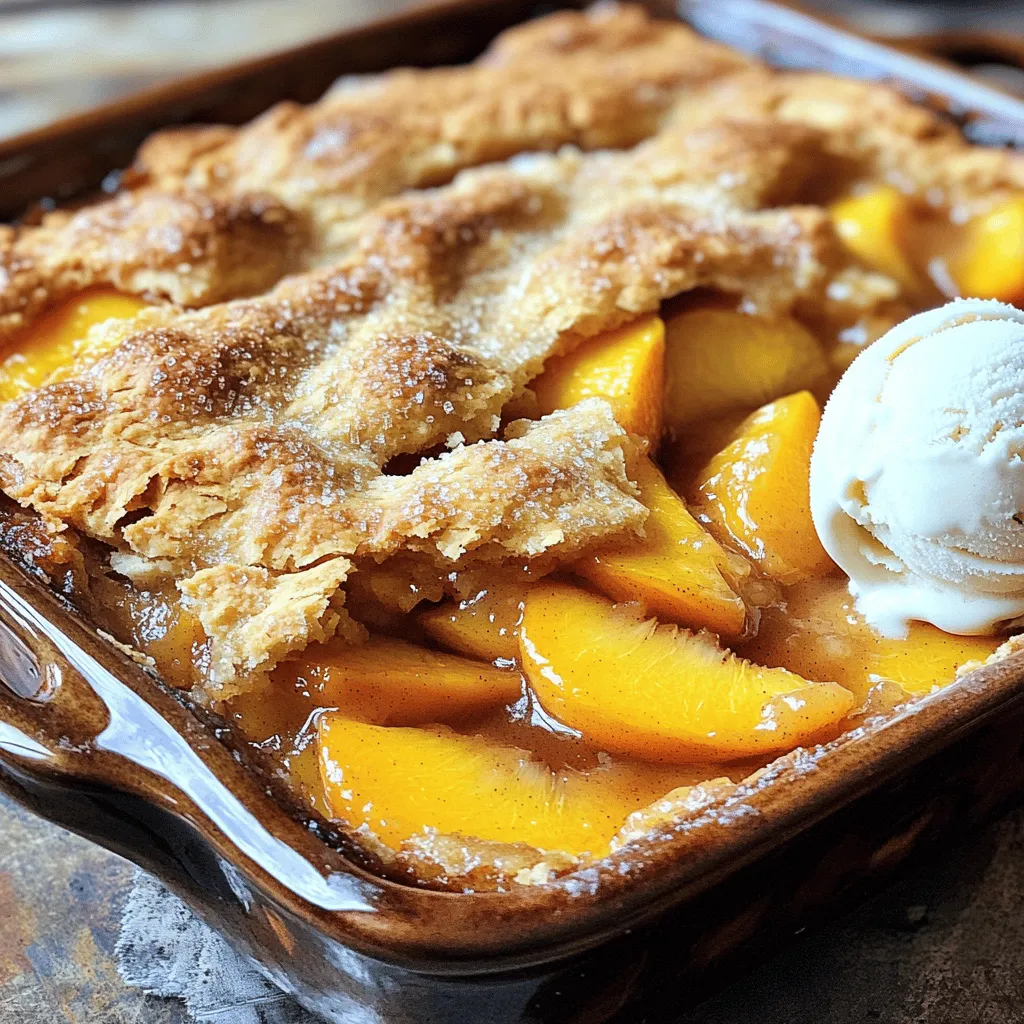
Are you ready to savor the taste of summer? This Fresh Southern Peach Cobbler is the perfect way to enjoy ripe, juicy peaches. With just a handful of simple ingredients, …

Read more

Categories Desserts Leave a comment

Peach Crisp Treat Simple and Delicious Delight

June 23, 2025 by Chef Evan
- Fresh peaches - Rolled oats - All-purpose flour Fresh peaches are the star of this dish. Choose ripe, juicy peaches for the best flavor. They add sweetness and moisture to the crisp. Next, rolled oats give texture. They create that crunchy topping you love. All-purpose flour helps bind the oats and adds a nice crumb. - Brown sugar - Ground cinnamon - Ground nutmeg Brown sugar adds depth and a rich sweetness. It caramelizes nicely when baked. Ground cinnamon and nutmeg offer warm flavors. Together, these spices enhance the peach taste. They make each bite delightful. - Unsalted butter - Chopped nuts - Vanilla extract Unsalted butter brings richness to the topping. It helps create that sought-after crumbly texture. Chopped nuts add crunch. You can use walnuts or pecans for a nice twist. Vanilla extract brightens the flavors. It makes the crisp smell amazing. For the full recipe, check out the link. Now you're ready to gather these ingredients and start cooking! To start, you need fresh peaches. Take four ripe peaches and peel them. Next, slice the peaches into thin wedges. Place the sliced peaches in a large bowl. Add 1/4 cup of brown sugar and a teaspoon of vanilla extract. Gently toss the peaches to coat them. This makes the peaches sweet and tasty. Then, spread the peach mixture evenly in a greased 9x13 inch baking dish. In another bowl, mix together the dry ingredients. Combine 1 cup of rolled oats, 1 cup of all-purpose flour, and 1/2 cup of brown sugar. Add a teaspoon of ground cinnamon, 1/2 teaspoon of ground nutmeg, and 1/4 teaspoon of salt. Stir this mixture well. Now, pour in 1/2 cup of melted unsalted butter. Mix it all until you get a crumbly texture, like wet sand. This will be your crisp topping. Now, it's time to layer the dish. Sprinkle the oat mixture evenly over the peaches. Make sure to cover all the fruit. This helps them cook evenly. Preheat your oven to 350°F (175°C). Place the baking dish in the oven. Bake for 30-35 minutes. You want the top to turn golden brown and the peaches to bubble. When it’s done, let it cool for a few minutes. Enjoy your Peach Crisp Treat warm, maybe with some ice cream on top. For the complete recipe, check the Full Recipe section. To get the right crumbly topping, mix the dry ingredients well. Use cold butter to keep the topping light. You want it to look like wet sand, not dough. This method keeps the crisp crunchy. For the peaches, slice them thick. Thick slices stay tender and juicy. If they are too thin, they can turn mushy. Mix the peaches gently with sugar and vanilla. This step helps enhance their natural flavor without losing their shape. You can add spices like ginger or cardamom for extra kick. A dash of nutmeg complements the sweetness of peaches. Try mixing in some fresh berries, too. They add a pop of color and flavor. Different nuts can change the taste. Walnuts add a rich flavor, while pecans give a buttery crunch. Feel free to experiment with your favorites. Each nut brings its own unique crunch. For serving, you can keep it simple. Serve the Peach Crisp Treat right from the baking dish. This gives a rustic feel and invites sharing. For a fancier look, scoop portions into bowls. Drizzle honey on top for sweetness. Finish with a mint sprig for color. This little touch makes it special. You can find the Full Recipe to create your own Peach Crisp Treat. Enjoy the warmth and joy it brings! {{image_4}} You can switch up the fruit in your Peach Crisp Treat. Apples and berries work great! For apples, use tart varieties like Granny Smith. They bring a nice balance to the sweet topping. You can also mix berries like blueberries or raspberries for a burst of color and flavor. Feel free to add a blend of fruits. This adds depth and fun to your dish. If you need gluten-free options, swap out the all-purpose flour for almond or oat flour. You can still enjoy a tasty dessert without gluten. For a vegan twist, use coconut oil instead of butter. Replace brown sugar with coconut sugar or maple syrup. These changes make the recipe suitable for various diets while keeping it delicious. Seasonal spices can elevate your Peach Crisp Treat. In fall, add nutmeg and cloves for warmth. During winter, use a hint of peppermint extract for a festive touch. You can also get creative with toppings. Try crushed gingerbread cookies for a holiday flair or sprinkle cinnamon on top for extra spice. Each season offers new ways to enjoy this dessert. Store your Peach Crisp Treat in the fridge. Use an airtight container to keep it fresh. This helps maintain its taste and texture for a few days. It’s best to cover the dish with plastic wrap if you don’t have a container. This keeps out air and moisture. To freeze Peach Crisp Treat, let it cool completely. Cut it into squares, then wrap each piece tightly in plastic wrap. Place wrapped pieces in a freezer bag. This way, they won’t stick together. For best results, eat within three months. To reheat, place a piece in the oven at 350°F (175°C) for about 15-20 minutes. This warms it up nicely. How long does peach crisp last? In the fridge, it lasts about three to four days. If frozen, expect it to last up to three months. Check for signs of spoilage. If you see mold or an off smell, it’s time to toss it. Enjoy your Peach Crisp Treat while it’s fresh! For the full recipe, explore the earlier section. Yes, you can use frozen peaches. First, thaw them completely. Place them in a bowl and let them sit at room temperature or microwave them for a short time. Once thawed, drain any excess liquid. This helps prevent a watery crisp. You want the peaches to hold their shape. Use the thawed peaches in the same way as fresh ones in the recipe. There are many fun options! Here are a few ideas: - Serve with whipped cream for a light touch. - Try yogurt for a creamy contrast. - Top with a sprinkle of granola for extra crunch. - Pair with a slice of cheddar cheese for a savory twist. These choices add variety and enhance the flavors of the peach crisp. To keep the topping crispy, follow these tips: - Bake the peach crisp until the top is golden brown. - Avoid over-mixing the topping; it should be crumbly. - Use old-fashioned rolled oats, as they hold up better. - Let it cool slightly before serving. This helps the juices set. These steps will ensure your crisp topping stays delicious and crunchy. To make a delicious Peach Crisp, we covered the key ingredients and steps. Fresh peaches, oats, and spices come together for the perfect treat. I shared how to prep, bake, and ensure the best texture. You can even try variations or dietary swaps for a unique twist. With proper storage, this dessert lasts and stays tasty. Enjoy creating your Peach Crisp, and impress others with your skills. Food is meant to be shared, so savor those moments with loved ones. Happy baking!

Are you ready for a sweet escape? This Peach Crisp Treat combines fresh peaches with a crunchy topping to create a simple and delicious dessert. In this post, I’ll guide …

Read more

Categories Desserts Leave a comment

Peach Crumble Pie Simple and Delicious Delight

June 23, 2025 by Chef Evan
To make this pie, you need fresh peaches. Here’s the list of main ingredients: - 6 ripe peaches, peeled and sliced into thin wedges - 1 cup granulated sugar - 1 tablespoon fresh lemon juice - 1 teaspoon pure vanilla extract - 1 teaspoon ground cinnamon - 2 tablespoons cornstarch - 1 prepared pie crust (store-bought or homemade) These ingredients create a sweet and juicy filling that pairs perfectly with the crunchy topping. You will also need some common pantry items. Here’s what you need for the crumble: - 1 cup all-purpose flour - 1 cup rolled oats - 1/2 cup packed light brown sugar - 1/2 cup unsalted butter, melted and slightly cooled - Pinch of salt These staples help create that delicious crumble that adds texture to the pie. You can customize your peach crumble pie with some fun add-ins. Here are a few ideas: - Add nuts like walnuts or pecans for extra crunch. - Use honey or maple syrup instead of granulated sugar for a unique flavor. - Try adding a splash of almond extract for a twist on the classic taste. Feel free to mix and match to make this pie your own. For the complete recipe, check out the [Full Recipe]. Start by washing six ripe peaches. Use a peeler to remove the skin. Slice the peaches into thin wedges. Place them in a large bowl. Add one cup of granulated sugar. Squeeze in one tablespoon of fresh lemon juice. Pour in one teaspoon of pure vanilla extract. Sprinkle in one teaspoon of ground cinnamon. Finally, add two tablespoons of cornstarch. Stir gently to coat all the peach slices. Let this mixture sit for ten minutes. This time allows the flavors to blend well. Next, roll out your prepared pie crust. You can use store-bought or homemade crust. Dust a clean surface with flour to prevent sticking. Carefully place the crust into a 9-inch pie dish. Gently press it down into the dish. Trim any extra dough from the edges with a knife. This makes for a neat finish. In a separate bowl, mix together one cup of all-purpose flour. Add one cup of rolled oats and half a cup of packed light brown sugar. Pour in half a cup of melted and slightly cooled unsalted butter. Add a pinch of salt for taste. Use your fingers or a fork to blend these ingredients. Mix until it looks crumbly, like wet sand. Now, pour the peach mixture into your pie crust. Spread it out evenly for a balanced flavor. Sprinkle the crumble topping generously over the peaches. Make sure to cover all the filling. Place the pie in your preheated oven set to 350°F (175°C). Bake for 35 to 40 minutes. Look for a golden brown crumble and bubbling peach juices around the edges. Once done, take it out and let it cool for 15 minutes before slicing. This cooling time helps the filling set nicely. Enjoy your delicious peach crumble pie! For the complete recipe, refer to the Full Recipe section. When picking peaches, look for ones that feel slightly soft. A ripe peach should have a sweet aroma. The color should be a mix of yellow and red. Avoid peaches with bruises or dark spots. If they are hard, let them ripen at room temperature for a few days. You want the best fruit for a great pie! A flaky crust makes all the difference. If using store-bought crust, let it sit at room temp for 10 minutes. This helps it relax, making it easier to roll. For a homemade crust, chill your butter and water before mixing. This keeps the crust flaky. When making the crumble topping, mix until it looks like wet sand. This texture is key for crispiness. Spread it evenly on the peach filling. This ensures every bite has that crunchy topping. To boost flavor, add a pinch of nutmeg with the cinnamon. It adds warmth and depth. You can also mix in a handful of blueberries or raspberries for a color pop. For extra crunch, try adding chopped nuts like almonds or pecans to the crumble. If you want a burst of freshness, serve your pie with a scoop of vanilla ice cream. The cold creaminess pairs perfectly with warm pie. For a fun touch, sprinkle some fresh mint on top before serving. Try these tips to elevate your peach crumble pie experience. Enjoy the process, and happy baking! Check the full recipe for all the details. {{image_4}} You can boost flavors with spices. Try adding nutmeg or ginger to your peach mix. A pinch of allspice also works wonders. These spices enhance the natural sweetness of the peaches. You can also mix in some cardamom for a unique twist. Spice blends create warmth and depth in each bite. For a healthier pie, consider alternatives. You can use whole wheat flour instead of all-purpose flour. This adds fiber and nutrients to your crust. Swap white sugar for honey or maple syrup. Both options add sweetness and flavor while being more natural. If you want to cut calories, replace butter with coconut oil. This change keeps the topping crisp and tasty. Peach crumble pie is great with other fruits too. Mix in berries for a burst of color and taste. Blueberries and raspberries pair well with peaches. You can also use apples or pears for a fall vibe. Just adjust sugar based on the fruit's sweetness. Enjoy the fun of mixing flavors! Once you finish your peach crumble pie, you will want to keep it fresh. Store any leftover pie in the fridge. Use an airtight container or cover it with plastic wrap. This keeps the pie moist and prevents it from absorbing other smells. Enjoy your pie within 3 to 4 days for the best taste. If you want to save some pie for later, freezing is a great option. First, let the pie cool completely after baking. Wrap it tightly in plastic wrap and then in aluminum foil. This extra layer helps prevent freezer burn. You can freeze peach crumble pie for up to 3 months. When you're ready to eat it, just thaw it overnight in the fridge. When you want to enjoy your pie again, reheating it properly is key. Preheat your oven to 350°F (175°C). Place the pie on a baking sheet. Heat it for about 15-20 minutes. This warms the filling and crisp the crumble topping. If you prefer, you can also use the microwave. Just heat a slice for about 30 seconds, but it won't be as crisp. Enjoy every bite! Yes, you can use frozen peaches. Thaw them first and drain excess liquid. This helps prevent a soggy pie. Keep in mind that frozen peaches may need a bit more sugar for sweetness. Your pie is done when the top is golden brown and the fruit bubbles. You can check by looking for a bubbly fruit filling around the edges. This usually takes 35-40 minutes at 350°F (175°C). Peach crumble pie tastes great with vanilla ice cream. Whipped cream also works well. You can even serve it with a drizzle of caramel sauce for extra sweetness. To make the crumble topping gluten-free, swap all-purpose flour for almond flour or gluten-free flour. Use gluten-free oats to ensure the entire topping is safe for gluten-sensitive folks. This keeps the delicious crunch while meeting dietary needs. For the full recipe, check out the detailed instructions above. This peach crumble pie recipe is simple and delicious. It uses fresh, ripe peaches, which give it a sweet and juicy flavor. The pie has a buttery crust that holds all the goodness inside. You will love the crunchy crumble topping made from oats and brown sugar. Each bite is a mix of softness and crunch. To make this pie, you need to prepare the filling first. Combine peaches, sugar, and spices. Let it sit to enhance the taste. Then, spread the mixture into a pie crust. For the topping, mix flour, oats, and butter until crumbly. Bake the pie until golden brown. The warm, bubbling filling will tempt everyone. Each slice of this pie offers a delightful treat. Here’s a quick look at the nutritional facts: - Calories: 280 - Fat: 12g - Carbohydrates: 42g - Protein: 3g - Fiber: 2g - Sugar: 18g These values can change based on portion size and ingredients used. It's good to enjoy in moderation. Peach crumble pie shines on its own, but you can make it even better. Here are some tasty ideas: - Ice Cream: Serve warm slices with a scoop of vanilla ice cream. The cold creaminess balances the warm pie. - Whipped Cream: A dollop of fresh whipped cream adds lightness and sweetness. - Mint Leaves: Garnish with mint leaves for color and a fresh taste. - Coffee or Tea: Pair the pie with a warm drink for a comforting dessert experience. You can find the full recipe and detailed steps in the earlier sections. Enjoy every slice! You learned how to make a delicious peach crumble pie, from picking the right peaches to baking it perfectly. With simple steps, you can create a tasty dessert. Remember to experiment with flavors and substitutes for your own twist. Store leftovers well and enjoy them later. I hope you feel confident to try this recipe. Happy baking!

If you love peaches, you’ll adore this Peach Crumble Pie! It’s simple, tasty, and perfect for any occasion. I’ll guide you through each step, from picking the best peaches to …

Read more

Categories Desserts Leave a comment

Savory Southern Peach Pudding Simple and Tasty Recipe

June 23, 2025 by Chef Evan
- 4 ripe peaches, peeled and sliced into thin wedges - 1 cup granulated sugar, divided - 1/2 cup all-purpose flour - 1 teaspoon baking powder - 1/4 teaspoon salt - 1 cup whole milk - 1/2 cup unsalted butter, melted and slightly cooled - 1 teaspoon vanilla extract - 1 teaspoon ground cinnamon - Whipped cream or vanilla ice cream, for serving Fresh peaches are the star of this dish. They should be ripe and juicy. I recommend peeling and slicing them thin. This helps their flavor spread throughout the pudding. You will need some key pantry items for this recipe. Sugar adds sweetness, while flour helps bind everything together. Baking powder makes the pudding rise and become fluffy. Additionally, don’t forget the wet ingredients. Whole milk gives the pudding creaminess. Melted butter adds richness, and vanilla extract brings a lovely aroma. Finally, ground cinnamon elevates the flavor, making every bite warm and inviting. For serving, whipped cream or vanilla ice cream makes the perfect topping. It adds creaminess and contrasts nicely with the warm pudding. Check out the Full Recipe for more details! To peel peaches, first, make a small "X" on the bottom. Place them in boiling water for 30 seconds. Quickly transfer them to ice water. The skins will slip right off. Next, slice the peaches into thin wedges. Macerating the peaches makes them sweeter. In a bowl, mix the sliced peaches with half a cup of sugar. Stir gently and let them sit for about ten minutes. This draws out their juices and boosts their flavor. In a clean bowl, combine the flour, remaining sugar, baking powder, and salt. Stir them well. This mix gives the pudding a great texture. Now, pour in the milk, melted butter, and vanilla extract. Mix until just combined. It's okay if the batter is a bit lumpy. This helps create a nice texture in the final dish. Gently fold in the macerated peaches with their juices. Be careful not to overmix. You want to distribute the peaches evenly without breaking them up. Transfer the peach batter to your greased baking dish. Spread it evenly with a spatula. This ensures it bakes uniformly. Sprinkle ground cinnamon over the top. This adds extra flavor while it bakes. Place the dish in your preheated oven. Bake for 35 to 40 minutes. You'll know it's ready when it turns golden brown. A toothpick should come out clean from the center. Remove the pudding from the oven and let it cool for ten minutes. This makes it easier to slice and enhances the flavors. For the full recipe, check out the instructions above. To make your Southern peach pudding shine, avoid these common mistakes: - Using unripe peaches: They lack flavor and sweetness. Choose ripe, juicy peaches for the best taste. - Overmixing the batter: This makes the pudding tough. Mix just until combined for a light texture. - Skipping the maceration step: Letting the peaches sit with sugar boosts their flavor. Don’t rush this step. For the right texture, follow these tips: - Batter lumps are okay: They help create a delightful texture. Don’t worry about a perfectly smooth mix. - Check your oven temperature: An oven thermometer can help. An accurate temperature ensures even baking. When it’s time to serve, add these toppings for extra flavor: - Whipped cream: This classic choice adds lightness and sweetness. - Vanilla ice cream: The creaminess pairs perfectly with warm pudding. - Fresh peach slices: They add color and enhance the peach flavor. For plating and presentation, try these ideas: - Serve in individual bowls: This makes each portion feel special. - Drizzle peach juices on top: It adds a beautiful sheen and extra sweetness. - Sprinkle with cinnamon: A light dusting before serving adds warmth and aroma. For the complete recipe, check out the Full Recipe. Enjoy your cooking! {{image_4}} You can switch up the main fruit in Southern Peach Pudding. Try using ripe nectarines or plums if you can't find peaches. For sweeteners, consider brown sugar or honey. These options add a deep flavor and a unique touch. If you need a dairy-free version, substitute whole milk with almond or coconut milk. You can also use a dairy-free butter for the melted butter. For gluten-free options, swap all-purpose flour for almond flour or gluten-free flour blends. To make your pudding special, consider adding spices. Nutmeg, ginger, or cardamom can enhance the flavor. A splash of almond or lemon extract adds a nice twist, too. Seasonal variations can brighten your dish. In fall, add diced apples and a pinch of nutmeg. In winter, try cranberries or pears for a festive flair. Each change gives your dessert a fresh taste while keeping the comforting essence of Southern Peach Pudding. For more details, you can find the Full Recipe online. To keep your Southern Peach Pudding fresh, follow these steps. First, let the pudding cool completely at room temperature. After that, cover it tightly with plastic wrap or aluminum foil. This will prevent it from drying out. Store it in the fridge for up to three days. When you’re ready to enjoy it again, reheat your pudding in the oven. Preheat the oven to 350°F (175°C). Place the pudding in an oven-safe dish and cover it with foil. Heat for about 15-20 minutes or until warm. This method helps maintain its texture and flavor. If you want to save some pudding for later, freezing is a great option. Cut the pudding into individual portions. Wrap each piece tightly in plastic wrap, then place it in a freezer-safe bag. Make sure to remove as much air as possible to prevent freezer burn. You can freeze the pudding for up to two months. When you’re ready to eat it, take a portion out of the freezer. Let it thaw in the fridge overnight. If you need it faster, you can microwave it on low power until soft. Enjoy your delicious Southern Peach Pudding whenever you want! You can thicken your Southern Peach Pudding by using a few simple methods: - Add More Flour: Increase the flour to create a denser pudding. - Use Cornstarch: Mix a tablespoon of cornstarch with cold water to make a slurry. Add this to the batter. - Reduce Liquid: Use less milk to make the pudding thicker. If you want a creamier texture, try adding an extra egg. This can help bind everything together while adding richness. Yes, you can use canned peaches, but there are pros and cons: - Pros: Canned peaches save time. They are easy to find and often already sweetened. - Cons: Canned peaches may lack the fresh flavor of ripe ones. They can also be mushy, which changes the pudding's texture. If you use canned peaches, drain them well. This prevents extra liquid from making your pudding too runny. Southern Peach Pudding can last about 3 to 5 days in the fridge. Be sure to store it in an airtight container. To keep it fresh, let it cool completely before covering. If you notice any signs of spoilage, it’s best to toss it out. Enjoy it warm or cold, but avoid keeping it too long to enjoy the best flavor! In this blog post, we covered how to make Southern Peach Pudding from scratch. We looked at the necessary ingredients, how to prepare peaches, and the steps for mixing and baking. I shared valuable tips to help you avoid mistakes and suggested tasty toppings. Remember, you can also try variations to suit your taste. With the right techniques, your dessert will impress everyone. Enjoy making this treat and share it with loved ones. Your Southern Peach Pudding will surely be a hit!

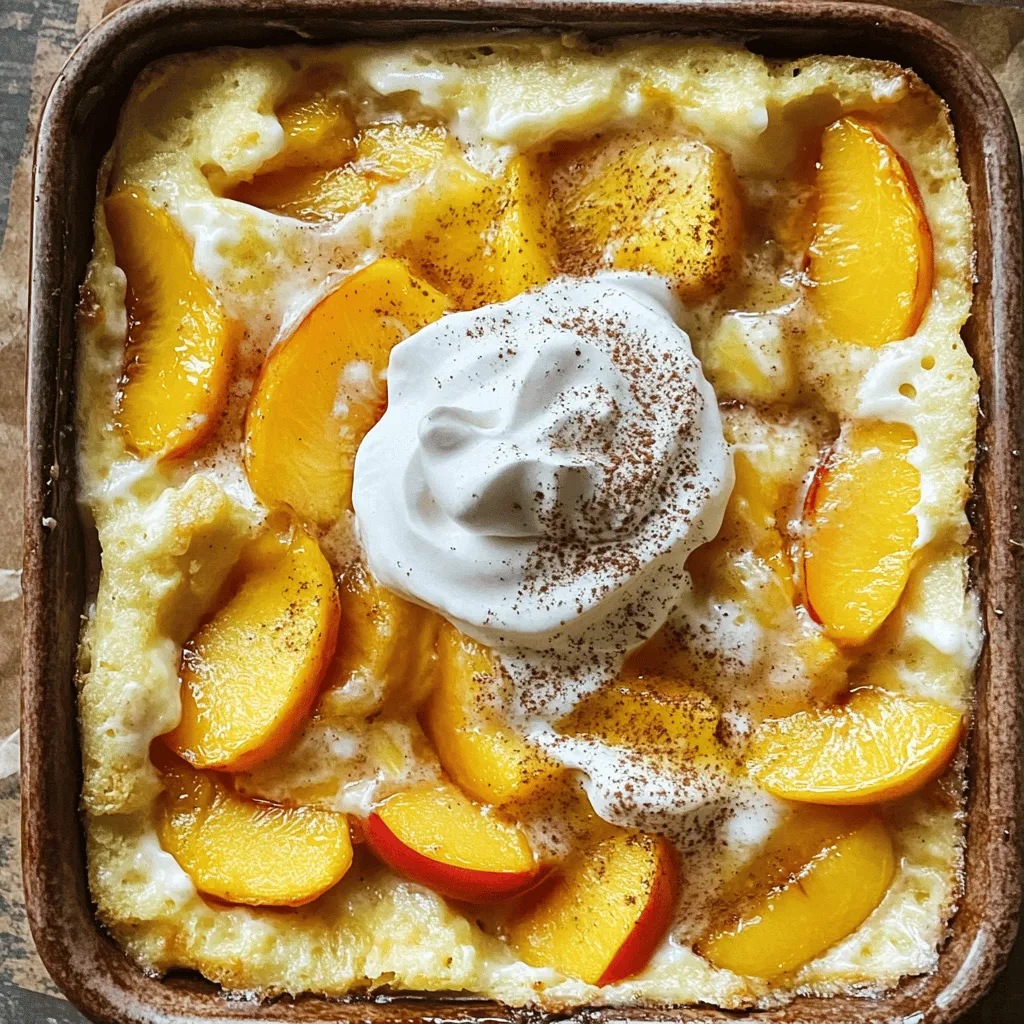
If you love sweet, juicy peaches, you’ll adore this Southern Peach Pudding! This simple recipe showcases fresh peaches and combines them with easy-to-find pantry staples. I’ll guide you through each …

Read more

Categories Desserts Leave a comment

Ultimate Strawberry Pie Irresistible Summer Treat

June 23, 2025 by Chef Evan
- 2 cups fresh strawberries, hulled and halved - 1 prepared pie crust (store-bought or homemade) - 1 cup granulated sugar (¾ cup + ¼ cup) - 2 tablespoons cornstarch - 1 tablespoon freshly squeezed lemon juice - 1 teaspoon pure vanilla extract - 1 tablespoon unsalted butter, diced - Whipped cream (optional) - Additional strawberry slices for garnish When making the ultimate strawberry pie, fresh strawberries are key. They bring bright flavor and sweetness. Choose ripe, juicy berries for the best taste. The pie crust can be store-bought or homemade, depending on your time. Granulated sugar sweetens the pie and helps it set. The cornstarch thickens the filling, giving it a nice texture. Lemon juice adds a zesty kick, enhancing the strawberry flavor. Vanilla extract brings warmth and depth. Diced butter adds richness and helps the filling caramelize as it bakes. For serving, whipped cream elevates the pie, making it even more special. You can also add extra strawberry slices on top for a nice touch. For the full recipe, it shows how to blend these ingredients into a delicious dessert. Start by tossing the halved strawberries with ¾ cup of sugar, cornstarch, lemon juice, and vanilla extract. Mix them gently to coat each strawberry slice. This step is key. Let the mixture sit for 10-15 minutes. During this time, the strawberries will release their juices, making the filling sweeter and more flavorful. Next, pour the strawberry mixture into your prepared pie crust. Spread it evenly so every bite is packed with flavor. Dot the top with small pieces of butter. This adds a rich taste to the filling. Then, sprinkle the remaining ¼ cup of sugar over the strawberries. This will help create a lovely caramelized top while baking. First, preheat your oven to 425°F (220°C). Place the pie in the oven and bake for 15 minutes. After that, reduce the heat to 350°F (175°C) and bake for another 30 minutes. Keep an eye on it! The filling should bubble, and the crust should turn a nice golden brown. Once done, remove the pie and cool it on a wire rack for at least 2 hours. This cooling time helps the filling set, making it easier to slice. For a great pie crust, you can go homemade or store-bought. Homemade crust gives a fresh taste. It also lets you control the ingredients. Store-bought is quick and easy, saving you time. If you choose store-bought, look for one with few ingredients. This ensures quality. To prevent a soggy bottom, keep these tips in mind: - Pre-bake the crust for about 10 minutes. This helps it firm up. - Use a fork to poke holes in the crust before baking. This allows steam to escape. - Brush a thin layer of melted butter or egg wash on the crust. This creates a barrier against moisture. To boost the flavor, consider adding a pinch of cinnamon or nutmeg. These spices add warmth and depth. A splash of almond extract can also enhance the pie's taste. Choosing ripe strawberries is key. Look for berries that are bright red, firm, and fragrant. Avoid any with white or green spots. These are not fully ripe. For the best flavor, buy strawberries in season. They taste sweeter and juicier. Serve your pie at room temperature for the best taste. Cold pie can dull the flavors. If you enjoy it warm, let it cool for about 30 minutes after baking. For an eye-catching presentation, try these garnishes: - A dollop of whipped cream adds creaminess. - Fresh mint leaves bring a pop of color and flavor. - Extra strawberry slices on top offer a lovely touch. These tips will help make your Ultimate Strawberry Pie even more delightful! {{image_4}} You can mix strawberries with other berries like blueberries or raspberries. This adds more flavor and color. Try different fruit combinations to find your favorite. Using frozen strawberries is another great option. They are easy to find and can taste just as good. Just make sure to thaw and drain them before using. This step helps prevent a soggy pie. If you need a gluten-free option, choose a gluten-free pie crust. Many stores sell these now. You can also make a crust using almond or coconut flour. Reducing sugar is easy too. You can cut the sugar in half or use alternatives like honey or maple syrup. These swaps keep the pie sweet while being a bit healthier. Turn the pie into mini tarts for fun servings. Use small tart shells and fill them with the strawberry mixture. This makes great bite-sized treats for parties. Pairing the pie with ice cream or yogurt is a classic choice. The coolness of ice cream and creaminess of yogurt complement the pie perfectly. It’s a delightful way to enjoy your Ultimate Strawberry Pie. To keep your leftover pie fresh, store it in the refrigerator. Place the pie in an airtight container or cover it tightly with plastic wrap. This helps avoid drying out. If you use a pie dish, just cover it well. Aim to eat the leftovers within three to four days for the best taste. Want to save your pie for later? You can freeze it! Wrap the pie tightly in plastic wrap, then in aluminum foil. This keeps it safe from freezer burn. For best results, freeze the pie whole. If you only have leftover filling, pour that into a freezer-safe container. When you're ready to enjoy, thaw the pie or filling in the fridge overnight. This keeps the texture nice and smooth. To reheat your pie without losing quality, use the oven. Preheat it to 350°F (175°C). Place the pie on a baking sheet and cover it with foil. Heat for about 15-20 minutes. This warms the filling gently and keeps the crust crisp. If you want, you can also microwave individual slices for quick bites. Just cover the slice with a damp paper towel to keep it moist. Enjoy your pie warm! Yes, you can use frozen strawberries. They work well in this pie. Just thaw them first and drain excess juice. This step helps keep your pie from getting soggy. Frozen berries might be a bit softer, but they still taste great. Make sure to adjust the sugar if your frozen berries are sweetened. Using frozen strawberries is a great option when fresh ones are out of season. You can store the Ultimate Strawberry Pie in the fridge for up to three days. Cover it with plastic wrap or foil to keep it fresh. After that, the crust may get soft. If you want to keep it longer, freeze it. This pie can last up to three months in the freezer. Just remember to wrap it tightly. Thaw it overnight in the fridge before serving. Yes, you can make the pie crust from scratch. A simple recipe uses flour, butter, and water. Combine 1 ½ cups flour, ½ cup butter (cold and diced), and a few tablespoons of ice water. Mix until it forms a dough. Roll it out and fit it into your pie dish. A homemade crust has a fresh taste and better texture than store-bought. Plus, you can adjust the flavor to your liking. You can use honey or maple syrup instead of granulated sugar. Both add sweetness and flavor. Use less honey or syrup since they are sweeter. If you prefer a sugar substitute, consider using Stevia or erythritol. These options are lower in calories. Just keep in mind that they may change the taste slightly. Always taste the filling as you mix, to find your perfect balance. For the Full Recipe, check out the detailed steps to make this delicious pie. We covered the essential ingredients and steps to make a delightful strawberry pie. You learned how to prepare the strawberries, assemble the pie, and bake it to perfection. Don’t forget to enhance flavors and consider variations for unique twists. Proper storage and reheating will keep leftovers tasty. Now, you can impress everyone with your pie-making skills. Enjoy each bite and share it with those you love. Happy baking!

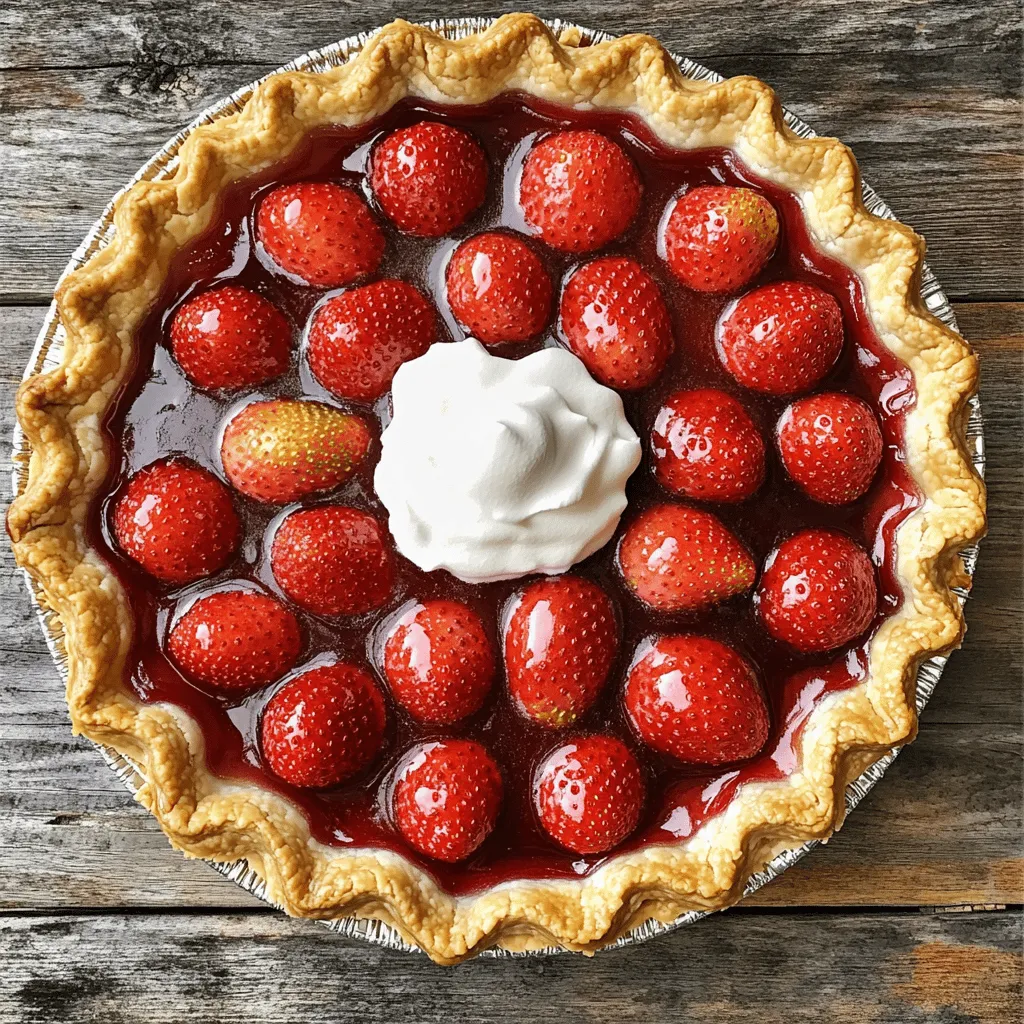
Summer is the perfect time for a delightful dessert, and there’s nothing better than the Ultimate Strawberry Pie. This pie bursts with fresh strawberries and offers a sweet balance of …

Read more

Categories Desserts Leave a comment

Buttermilk Chicken Tenders Juicy and Flavorful Recipe

June 23, 2025 by Chef Evan
To make buttermilk chicken tenders, you need fresh, quality items. Here are the main ingredients: - 1 lb chicken breast, cut into strips - 1 cup buttermilk - 1 teaspoon garlic powder - 1 teaspoon onion powder - 1 teaspoon paprika - 1 teaspoon salt - 1/2 teaspoon black pepper - 1 cup all-purpose flour - 1 cup Panko breadcrumbs - 1/2 teaspoon dried oregano - Oil for frying I recommend using chicken breasts for tender, juicy results. Look for organic, free-range chicken when possible. This choice enhances flavor and supports sustainable farming. Chicken thighs can also work well. They offer a richer taste, but they can be a bit fattier. Choose what you like best! You’ll need a few pantry staples for this recipe. Keep these on hand: - Garlic powder - Onion powder - Paprika - Salt - Black pepper - All-purpose flour - Panko breadcrumbs - Dried oregano - Cooking oil These ingredients make your chicken tenders flavorful and crispy. For the full recipe, refer to the beginning of this article. To start, we need to marinate the chicken. Grab a large bowl. In it, mix the buttermilk, garlic powder, onion powder, paprika, salt, and black pepper. Stir until it's smooth. Add the chicken strips to the bowl, making sure every piece is coated well. Cover the bowl with plastic wrap or a lid. Place it in the fridge for at least two hours. If you want a stronger flavor, let it marinate overnight. Now let’s set up the breading station. You will need two shallow dishes. In the first one, pour the all-purpose flour. In the second, mix the Panko breadcrumbs with dried oregano. This adds extra flavor and crunch. When your chicken is ready from the fridge, take it out. Let the excess buttermilk drip off each strip before coating. Here comes the fun part—coating the chicken! First, take a chicken strip and dip it into the flour. Make sure it’s fully covered, then shake off the extra. Next, dip it back into the buttermilk for a second coating. Finally, roll it in the Panko mix. Press lightly so it sticks well. Repeat this for all the strips. For frying, heat a large skillet. Add enough oil to reach about half an inch deep. Turn the heat to medium-high. To check if the oil is ready, drop in a few breadcrumbs. If they sizzle, you’re good to go. Carefully add the coated chicken strips in batches. Don’t crowd the pan; this keeps the oil hot. Fry each side for about 4-5 minutes until golden brown. The chicken should reach 165°F inside. Once the chicken is done, remove it from the skillet. Use a slotted spoon or tongs to lift it out. Place the strips on a paper towel-lined plate. This helps soak up extra oil. Serve the crispy chicken tenders warm. Offer dipping sauces like honey mustard or ranch. You can even try spicy sriracha mayo for a kick! Enjoy your delicious meal! For the full recipe, refer to the Crispy Buttermilk Chicken Tenders section. Marinating chicken in buttermilk makes it juicy and tender. Use a bowl big enough for all the chicken. Mix buttermilk with garlic powder, onion powder, paprika, salt, and pepper. Stir until smooth. Add chicken strips and cover. Chill it in the fridge for at least two hours. The longer you marinate, the more flavor it gets. Overnight is best for deep flavor. To get that extra crunch, use Panko breadcrumbs. They give a nice texture. First, coat the chicken in flour. Shake off the extra flour. Then, dip it back into the buttermilk. Finally, roll it in the Panko mixture. Press down a bit to make sure it sticks well. This double coating helps create a crunchy crust when fried. If your chicken isn't crispy, check the oil temperature. If it's too low, the coating will soak up oil. Aim for 350°F to 375°F. If the coating falls off, ensure each piece is coated well. Avoid overcrowding the pan while frying. This keeps the oil hot and helps the chicken cook evenly. If you're unsure about cooking time, use a meat thermometer. The chicken should reach 165°F for safety. For the full recipe, refer to the provided instructions. {{image_4}} You can elevate your buttermilk chicken tenders with extra flavors. Try adding herbs like thyme or rosemary to the marinade. This adds a fresh twist that makes each bite special. You can also experiment with spices. A pinch of cayenne or chili powder gives a nice kick. If you want a sweet touch, mix in some honey or brown sugar. This balance of sweet and savory brings joy to your meal. Not everyone wants to fry their chicken. Baking or air frying works great too. For baking, preheat your oven to 425°F. Place the breaded chicken on a lined baking sheet. Spray them lightly with cooking oil for a crispier finish. Bake for about 20-25 minutes, flipping halfway through. For air frying, set your air fryer to 400°F. Cook the chicken tenders in a single layer for 10-12 minutes, shaking halfway. Both methods keep the chicken tender and juicy. Dipping sauces can change your meal completely. Classic honey mustard pairs well with these tenders. Its sweetness complements the savory chicken. Ranch dressing is another favorite for its creamy texture. If you love heat, try sriracha mayo or buffalo sauce. Each sauce adds a new layer of flavor. You can even create a dipping sauce bar for fun! After you enjoy your buttermilk chicken tenders, store any leftovers quickly. Place them in an airtight container. This helps keep them fresh. If you leave them out, they can spoil fast. Make sure they cool to room temperature before sealing. Store in the fridge for up to three days. When you reheat your chicken tenders, aim for that crispy texture. Do not use the microwave, as it can make them soggy. Instead, use an oven or an air fryer. Preheat your oven to 375°F (190°C). Place the tenders on a baking sheet. Heat for about 10-15 minutes, until they are hot and crispy again. You can also lightly spray them with oil for extra crunch. Freezing buttermilk chicken tenders is easy. First, let them cool completely. Then, wrap each piece in plastic wrap. Place the wrapped tenders in a freezer bag or container. Squeeze out excess air to prevent freezer burn. They can stay good for up to three months. When ready to eat, thaw them in the fridge overnight before reheating. For the best taste, cook them fresh. You can find the full recipe in this article for a step-by-step guide when you decide to make them again! You can use milk mixed with vinegar or lemon juice. Just mix one cup of milk with one tablespoon of vinegar or lemon juice. Let it sit for five to ten minutes. This creates a similar tangy flavor and texture. Marinate the chicken for at least two hours. For best flavor, try to marinate it overnight. This allows the buttermilk to tenderize the meat and infuse it with flavor. Yes, chicken thighs work well too. They are juicier and more flavorful. Just make sure to adjust the cooking time if they are thicker. Heat the oil to around 350°F. This temperature helps the chicken become crispy without burning. You can check the heat by dropping a bit of bread into the oil; it should sizzle right away. Use a meat thermometer to check the internal temperature. It should reach 165°F. If you cut into the chicken, the juices should run clear, not pink. In this blog post, we explored how to make buttermilk chicken tenders. I covered essential ingredients, marinade tips, and frying techniques. You learned about variations and how to store leftovers. Cooking chicken tenders can be fun and tasty with the right steps. Don’t be afraid to experiment with flavors. Enjoy your homemade chicken tenders with your favorite dips. They are sure to impress!

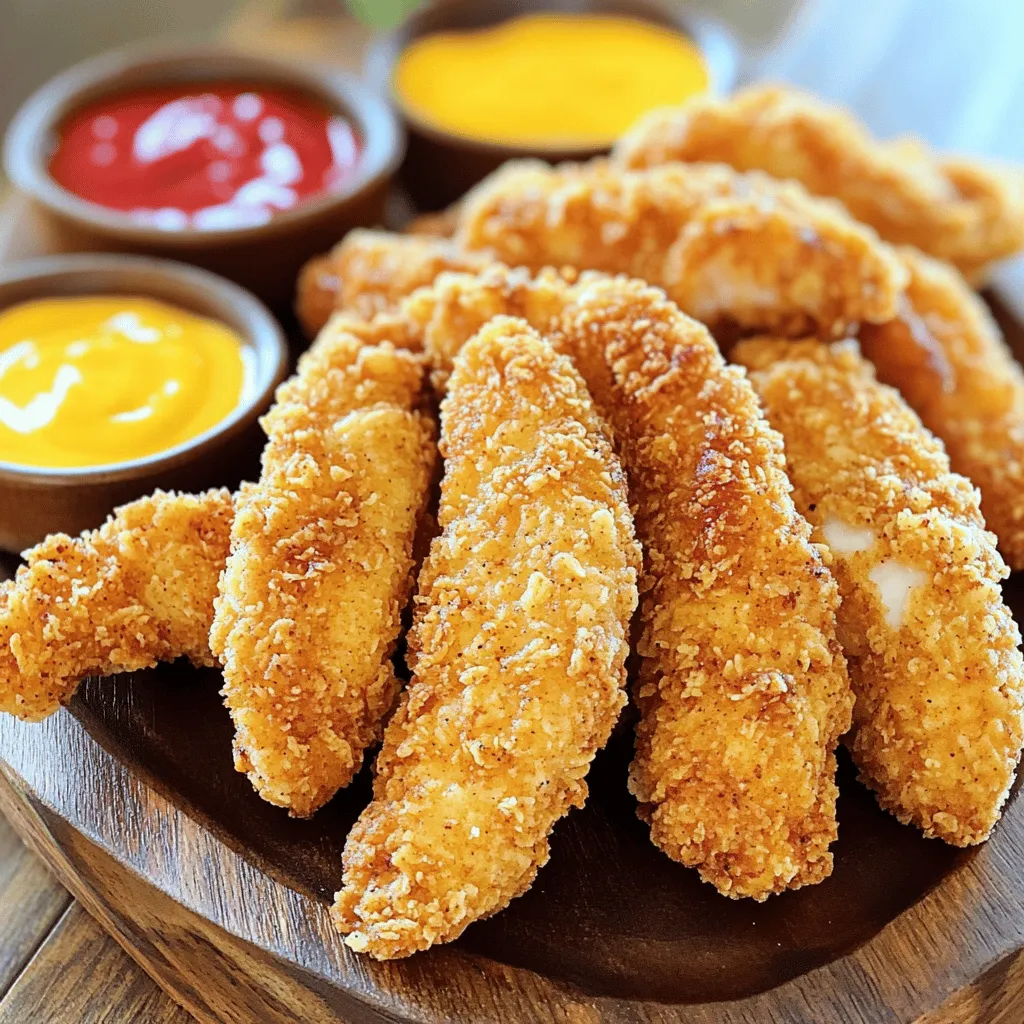
Are you ready to make the perfect buttermilk chicken tenders? This juicy and flavorful recipe will elevate your dinner game. I’ll guide you through each step, from marinating to frying, …

Read more

Categories Appetizers Leave a comment
Older posts
Newer posts
← Previous Page1 … Page51 Page52 Page53 … Page124 Next →

TOSSED FLAVORS

Where flavors are fresh, vibrant, and ready to toss! 🥗

PAGES

Home About Contact Privacy Policy Terms & Conditions Cookie Policy GDPR Policy Copyright Policy Disclaimer

CATEGORIES

Appetizers Desserts Salads Breakfast Dinner

Contact

  • Pinterest
  • Mail
Copyright © 2026 Tossed Flavors. All rights reserved.