Skip to content
tossedflavors.com
  • Home
  • Appetizers
  • Desserts
  • Salads
  • Breakfast
  • Dinner
  • Privacy Policy
  • Contact
  • About

Chef Evan

Peach Crisp Delightful Recipe You Can Easily Make

June 26, 2025 by Chef Evan
- 5 cups ripe peaches, peeled and sliced - 1 tablespoon fresh lemon juice - 1/4 cup packed brown sugar - 1 teaspoon ground cinnamon - 1 teaspoon pure vanilla extract - 1 cup rolled oats - 1/2 cup all-purpose flour - 1/2 cup finely chopped pecans - 1/2 cup granulated sugar - 1/2 cup cold, unsalted butter, cut into small cubes - 1/4 teaspoon salt - 9x13 inch baking dish - Mixing bowls - Pastry cutter or fork - Measuring cups and spoons The main ingredients create the sweet, juicy base. Peaches are key to this dish. They bring natural sweetness and flavor. Lemon juice brightens the mix, while brown sugar and cinnamon add warmth. Vanilla extract gives a lovely aroma. For the topping, rolled oats provide a hearty crunch. Flour helps bind the mix while chopped pecans add texture. Granulated sugar sweetens the topping, and butter makes it rich. Salt balances the flavors perfectly. You will need a 9x13 inch baking dish to hold all the goodness. Mixing bowls help combine everything well. A pastry cutter or fork works great for blending the butter. Don’t forget your measuring cups and spoons for accuracy. For the complete recipe, check out the Full Recipe section. 1. Preheat your oven to 350°F (175°C). This step warms up the oven for baking. 2. In a large bowl, mix 5 cups of sliced peaches with 1 tablespoon of lemon juice, 1/4 cup of brown sugar, 1 teaspoon of cinnamon, and 1 teaspoon of vanilla. Stir gently until the peaches are well coated. This mix brings out the sweet fruit flavor. 1. In a separate bowl, combine 1 cup of rolled oats, 1/2 cup of flour, 1/2 cup of chopped pecans, 1/2 cup of granulated sugar, and 1/4 teaspoon of salt. Stir these dry ingredients well. 2. Add 1/2 cup of cold butter, cut into small cubes. Use a pastry cutter or fork to blend until the mixture looks like coarse crumbs. You want some bigger pieces for crunch. 1. Spread the peach mixture evenly in a greased 9x13 inch baking dish. This dish helps the crisp bake evenly. 2. Sprinkle the oat topping over the peaches. Make sure to cover all the fruit. 3. Place the dish in the oven and bake for 30-35 minutes. Look for a golden-brown topping with bubbling peaches underneath. For the complete instructions, check out the Full Recipe. To peel peaches easily, try the blanching technique. Start by boiling water in a pot. Place the peaches in the boiling water for about 30 seconds. Then, transfer them to a bowl of ice water. This method makes the skin slide right off. When choosing peaches, look for ones that are ripe but firm. A good peach smells sweet and feels slightly soft when you press it. This ensures a great flavor in your crisp. For the best topping, blend your butter well with the dry mix. Use cold butter and cut it into small cubes. This helps create that crumbly texture. You might need to adjust your baking time. If your topping looks golden brown after 25 minutes, it’s likely ready. The peaches should bubble underneath. Serve your peach crisp warm, topped with ice cream or whipped cream. The cold cream melts into the warm fruit, making it extra delicious. For a pretty presentation, sprinkle some chopped pecans on top. This adds crunch and makes it look fancy! Enjoy every bite of your Peach Crisp Delight. For the complete recipe, check out the Full Recipe section above. {{image_4}} You can change up your peach crisp by adding other fruits. Try mixing in fresh berries like blueberries or raspberries. They add a burst of color and flavor. This makes a delightful mixed fruit crisp. You can also swap peaches for apples or pears. These fruits give a different taste and texture. Each fruit brings its own charm to the dish. Experimenting with these options can create fun new desserts. For those who need gluten-free options, there are easy swaps. Use gluten-free flour instead of all-purpose flour. This keeps the crisp tasty without the gluten. You can also try alternative sweeteners. Maple syrup or coconut sugar are great choices. They cater to different dietary needs while keeping the dish sweet and satisfying. Adding spices can elevate your peach crisp. Nutmeg or ginger can bring warmth and depth. Just a pinch can transform the flavor profile. You can also mix in extracts for a flavor boost. Almond or coconut extract can add a unique twist. These small changes can make your peach crisp even more delightful. For the full recipe, don't forget to check the main ingredients listed earlier! To keep your peach crisp fresh, store it in the fridge. Place it in an airtight container. This will help keep moisture out. You can also cover it with plastic wrap. Make sure it seals well. This helps keep the crisp topping crunchy. When you want to enjoy your peach crisp again, use the oven. Preheat it to 350°F (175°C). Place the crisp in a baking dish. Cover it with foil to keep it moist. Heat it for about 15 minutes. For a quicker option, use the microwave. Heat it in 30-second bursts, checking often. This way, you avoid overheating. You can freeze peach crisp if you have lots left over. First, let it cool completely. Then, cut it into squares. Wrap each piece in plastic wrap tightly. Place the wrapped pieces in a freezer bag. Squeeze out all the air before sealing. This keeps it fresh for up to three months. When you want to eat it, take it out. Let it thaw in the fridge overnight. To reheat, follow the oven instructions above. Enjoy your peach crisp just like the first time! Yes, you can use frozen peaches. First, thaw them completely. Place the frozen peaches in a bowl and let them sit at room temperature. Once thawed, drain any excess liquid. This helps keep the crisp from becoming too watery. Then, mix them with the lemon juice and other ingredients as stated in the Full Recipe. To keep the topping crunchy, avoid overmixing the butter with the dry ingredients. Blend until it looks like coarse crumbs. Also, make sure to bake the crisp until the top is golden brown. This ensures a nice crunch. Finally, let it cool for a bit before serving. I love serving it warm. It pairs well with vanilla ice cream or whipped cream. The cold cream melts slightly on the warm crisp, creating a delightful mix. You can also sprinkle some chopped pecans on top for extra crunch. Enjoy the blend of textures! Peach crisp can last about 3 to 5 days in the fridge. Store it in an airtight container to keep it fresh. The topping may soften over time, but it will still taste great. Reheat it in the oven for a few minutes to revive some crunch. Yes, you can prepare the peach filling and topping a day ahead. Keep the peach mixture and topping in separate containers. When you are ready to bake, just assemble them in the dish and pop it in the oven. This saves time and makes serving easy! Peach crisp is a tasty treat made with ripe peaches, spices, and a crunchy topping. You learned how to prepare the filling and create the perfect topping with oats, flour, and butter. I shared tips on peach peeling and baking for the best texture. You can even customize your crisp with other fruits or dietary options. Whether enjoyed warm or cold, peach crisp is simple to make and a delight to share. Now, grab your peaches and start baking!

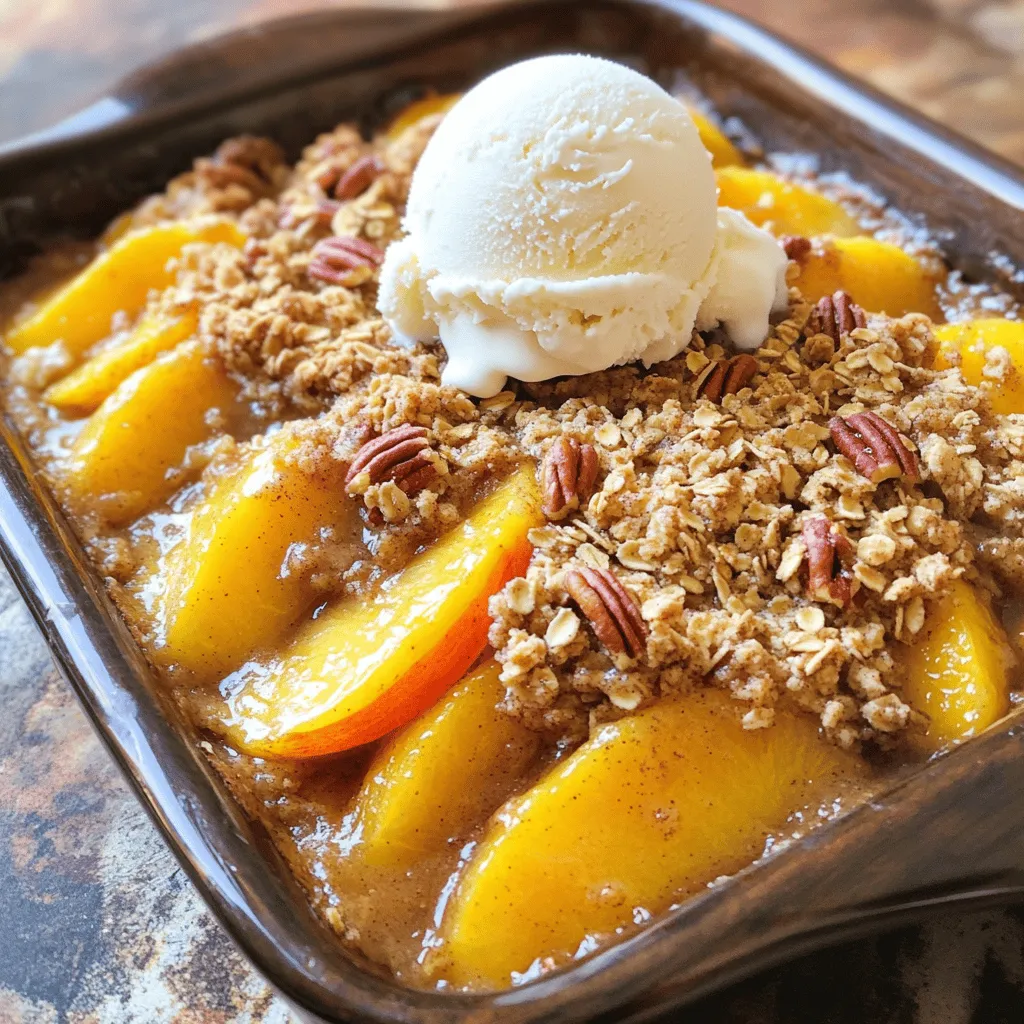
Peach Crisp is a joyful dessert you can easily make at home! With ripe peaches, a crumbly oat topping, and warm flavors, it’s perfect for any gathering. Whether you’re new …

Read more

Categories Desserts Leave a comment

No-Fuss Fried Chicken Simple and Crispy Recipe

June 26, 2025 by Chef Evan
- 4 chicken thighs (bone-in, skin-on) - 1 cup buttermilk - 1 cup all-purpose flour - 1 teaspoon garlic powder - 1 teaspoon onion powder - 1 teaspoon smoked paprika - ½ teaspoon cayenne pepper - Salt and freshly cracked black pepper - Vegetable oil (for frying) To make no-fuss fried chicken, start with basic ingredients. You need chicken thighs with skin for flavor and crispiness. Buttermilk adds moisture and helps the flour stick. All-purpose flour gives the chicken a nice coating. Next, choose your seasonings. Garlic and onion powder bring depth. Smoked paprika adds a subtle warmth. If you like heat, cayenne pepper is perfect. Don’t forget salt and pepper; they make everything taste better. For cooking, vegetable oil is ideal. It has a high smoke point, which means it can get hot without burning. This helps the chicken fry evenly and become crispy. That’s it for the ingredients. Simple, right? You can find the full recipe above to guide you through making this delicious dish. To start, mix 1 cup of buttermilk with your seasonings. Add 1 teaspoon of garlic powder, 1 teaspoon of onion powder, 1 teaspoon of smoked paprika, and ½ teaspoon of cayenne pepper. Season with salt and freshly cracked black pepper to taste. Whisk the marinade until well combined. This mixture will add flavor and moisture to your chicken. Next, submerge the chicken thighs completely in the buttermilk marinade. Make sure they are fully covered. Cover the bowl with plastic wrap or a lid. Refrigerate for at least 1 hour. For the best flavor, marinate overnight. Now, heat vegetable oil in a large skillet. Pour in about 1 inch of oil. Place the skillet over medium-high heat. As the oil heats, prepare your dredging station. In a shallow dish, combine 1 cup of all-purpose flour with a pinch of salt and pepper. Stir to mix evenly. Remove each chicken thigh from the marinade. Let any excess liquid drip off. Coat the chicken in the seasoned flour. Make sure each piece is evenly coated. Shake off any extra flour. Carefully place the coated chicken thighs skin side down into the hot oil. Fry in batches to avoid overcrowding the pan. This keeps the temperature steady. Cook the chicken for about 7-9 minutes on each side. Look for a beautiful golden-brown color. Check that the internal temperature hits 165°F (74°C) to ensure it is fully cooked. Once cooked, transfer the fried chicken to a plate lined with paper towels. This helps absorb any extra oil, keeping the skin crispy. Let the chicken rest for a few moments before serving. Enjoy your crispy no-fuss fried chicken! To get that crispy coating, you must dredge the chicken well. Make sure each piece is fully coated in the seasoned flour. This helps create a nice crunch. The right oil temperature is key. Heat the oil to about 350°F (175°C). If the oil is too cool, the chicken will soak up oil and become greasy. Too hot, and it can burn quickly. Use a thermometer to check. Fry the chicken in batches. This allows for even cooking and helps keep the oil temperature steady. Overcrowding can lead to uneven cooking and soggy skin. Always check the internal temperature. You want it to reach 165°F (74°C) for safe eating. Use a meat thermometer to ensure your chicken is fully cooked. Marinate the chicken for at least one hour. For the best flavor, marinate overnight. This gives the spices time to soak in. You can adjust the spice levels to match your taste. If you love heat, add more cayenne. If you prefer a milder flavor, leave it out or use less. Experiment with the spices to find your perfect mix. {{image_4}} You can use chicken breasts or drumsticks for this recipe. Each cut has its own charm. Chicken thighs are juicy and tender. Breasts are leaner, while drumsticks are fun to eat. If you switch cuts, adjust cooking times. Breasts cook faster, so check them at 5-7 minutes per side. Drumsticks need about 10 minutes on each side to cook through. Always ensure the chicken reaches an internal temperature of 165°F (74°C). Adding herbs or spices can change the flavor. You might try fresh thyme or rosemary for a garden touch. If you want heat, toss in some chili powder or cayenne pepper. Marinades also add flair. For a spicy kick, mix hot sauce into the buttermilk. Let your taste buds guide you. The more you experiment, the more fun it gets! Fried chicken pairs well with many sides. Think coleslaw, mashed potatoes, or cornbread for a classic meal. You can also create fried chicken sandwiches. Just add your favorite sauce and toppings. Wraps make a great lunch too. Use lettuce, tomatoes, and your choice of sauce. Fried chicken is versatile, so get creative and enjoy! For the full recipe, check out the instructions above. After enjoying your no-fuss fried chicken, let it cool down first. Place leftovers in a shallow container. Cover the container with a tight lid. This helps keep the chicken fresh. Aim to refrigerate it within two hours. Store it in the fridge for up to four days. When it's time to eat the leftovers, the goal is to keep it crispy. The oven is your best friend here. Preheat the oven to 375°F (190°C). Place the chicken on a baking sheet. Heat it for about 15-20 minutes. This method crisps the skin nicely. If you must use a microwave, cover the chicken with a paper towel. Heat it in short bursts of 30 seconds. Check it often to avoid sogginess. Freezing fried chicken is a great way to save it for later. First, let the chicken cool completely. Wrap each piece in plastic wrap. Then, place the wrapped pieces in a freezer bag. Squeeze out as much air as possible. You can freeze it for up to three months. To thaw, move the chicken to the fridge overnight. For quick thawing, place it in a bowl of cold water. After thawing, reheat it in the oven for the best crispiness. For the full recipe of this crispy delight, check out the Full Recipe. You should marinate the chicken for at least 1 hour. Marinating overnight gives better flavor. The buttermilk helps tenderize the meat. It also adds moisture, making each bite juicy. The longer you marinate, the deeper the flavor gets. Yes, you can use other oils for frying. Good options include peanut oil or canola oil. These oils have high smoke points. They can handle the heat without burning. Avoid oils with low smoke points, like olive oil. If your chicken isn't crispy, check a few things. First, make sure your oil is hot enough. If oil is too cool, it will soak into the chicken. Also, ensure you coat the chicken well in flour. Finally, avoid crowding the pan; fry in batches for best results. Yes, you can make this recipe healthier. Try baking the chicken instead of frying. Coat it lightly with oil and bake at 400°F. You can also use skinless chicken to reduce fat. Another option is to use whole grain flour for added fiber. For the full recipe, explore the steps to enjoy this dish your way. This blog post explores how to make perfect fried chicken. We covered the key ingredients, from chicken thighs to seasonings. You learned a step-by-step process for marinating and cooking. I shared tips for a crispy crust and variations to mix things up. Lastly, I highlighted storage and reheating methods to keep your chicken delicious. Now, you can create a comforting meal that satisfies every time. Enjoy the process and the tasty results!

Are you craving crispy, mouthwatering fried chicken without the fuss? You’ve come to the right place! In this simple recipe, I’ll show you how to create perfectly fried chicken using …

Read more

Categories Dinner Leave a comment

Smoked Paprika Garlic Butter Corn Flavorful Side Dish

June 26, 2025 by Chef Evan
Here is what you need for smoked paprika garlic butter corn: - 4 ears of fresh corn - 4 tablespoons unsalted butter - 3 cloves garlic, finely minced - 1 teaspoon smoked paprika - 1 teaspoon sea salt - 1/2 teaspoon freshly ground black pepper - 1 tablespoon fresh parsley, finely chopped (for garnish) - Lime wedges (for serving) Each ingredient plays an important role in the flavor. The corn gives a sweet crunch. The butter adds richness. Garlic brings a nice depth. Smoked paprika gives a warm, smoky taste. Sea salt enhances all the flavors. Black pepper adds a hint of spice. Fresh parsley provides a bright finish. Lime wedges are perfect for a zesty kick. For the full recipe, check the details above. Enjoy making this delightful side dish! - Bring water to a boil. - Cook corn for 5-7 minutes. Start by filling a large pot with water. Turn the heat up high and wait until it boils. When the water is bubbling, add your corn. Make sure the corn is husked and cleaned well. Let it cook for 5-7 minutes. You want it to be tender but not mushy. Once done, use tongs to take the corn out. Place it on a plate or a cutting board to cool a bit. - Melt unsalted butter. - Sauté minced garlic. Next, grab a small saucepan and set it on medium heat. Add the unsalted butter to the pan. Let it melt slowly. Once it is fully melted, add the finely minced garlic. Stir it often for about 1-2 minutes. You want the garlic to smell great but not brown. Brown garlic can taste bitter, and we don’t want that. - Mix in smoked paprika, sea salt, and pepper. - Allow to sit for a minute. After the garlic is fragrant, it’s time to add flavor. Stir in the smoked paprika, sea salt, and black pepper. Make sure everything mixes well. Remove the pan from the heat and let it sit for a minute. This helps the flavors blend. - Brush garlic butter over corn. - Arrange and garnish for serving. Now, it’s time for the best part! Use a pastry brush or a spoon to coat the corn with the garlic butter. Be generous so every bite is full of flavor. Once coated, place the corn on a nice platter. If you have leftover garlic butter, drizzle it over the corn for extra taste. Finally, sprinkle chopped parsley on top for color. Serve it hot with lime wedges on the side. This adds a refreshing zing to each bite. For the full recipe, check it out above! To coat corn with butter evenly, use a pastry brush. Dip the brush into the garlic butter and sweep it over the corn. Make sure to cover all sides. This method ensures every bite bursts with flavor. You can also use a spoon, but the brush gives a nice, even layer. When sautéing garlic, keep the heat low. If the heat is too high, garlic can burn quickly. Burnt garlic tastes bitter, which ruins your dish. Stir the garlic constantly for 1-2 minutes until it smells great. You want it soft and fragrant, not brown. Serve the corn with lime wedges for a zesty kick. Squeeze fresh lime juice over the corn right before eating. This adds brightness and balances the rich flavors. For pairing, this corn goes well with grilled chicken or fish. The flavors complement each other perfectly. Try serving it alongside a fresh salad for a complete meal. It also works well with tacos or barbecued meats, making it a versatile side. For the full recipe, check out the details to make this dish shine! {{image_4}} You can change things up with different spices. Try chili powder for a kick. If you want a smoky taste, use chipotle powder instead. You can also mix in herbs like thyme or oregano for added depth. For low-calorie options, swap butter for olive oil. You can also use a light butter spread to cut calories. This keeps the flavor while making it a bit healthier. If you need a vegan option, use plant-based butter. Many brands offer great taste that works well in this recipe. Coconut oil is another good choice. It adds a hint of sweetness. Make sure your corn is gluten-free, as it naturally is. Just check the butter or any spreads you use. Some may contain gluten, so always read labels. To store leftover corn, let it cool first. Place it in an airtight container. This keeps it fresh for up to three days. When you’re ready to eat, reheat it on the stove or in the microwave. For stovetop reheating, add a splash of water to keep it moist. Heat it over low until warm. In the microwave, cover it with a damp paper towel. Heat for 30 seconds at a time, stirring in between. Can you freeze smoked paprika garlic butter corn? Yes, you can! To freeze it, let the corn cool completely. Wrap it tightly in plastic wrap or foil. Then, place it in a freezer bag. Make sure to remove as much air as possible. This helps prevent freezer burn. To thaw, simply move it to the fridge for a few hours or overnight. For a quicker option, you can microwave it on low power. Once thawed, you can reheat it just like the refrigerated corn. Enjoy your tasty leftovers anytime! For full details, check out the Full Recipe. If you do not have smoked paprika, try these options: - Regular paprika adds color but less smoke. - Cumin gives a warm, earthy flavor. - Chipotle powder adds heat and a smoky taste. - Ancho chili powder offers a mild, sweet heat. Each replacement brings unique flavors, but they keep your dish tasty. Yes, you can prepare this dish ahead of time. Here are my best tips: - Cook the corn and cool it completely. - Store the corn in an airtight container in the fridge. - You can make the garlic butter in advance too. - Warm the corn and butter together before serving. This way, you save time when it's meal time. To add some heat, try these simple ideas: - Mix in cayenne pepper with the garlic butter. - Add chopped fresh jalapeños for a fresh kick. - Use spicy smoked paprika for a stronger flavor. - Drizzle hot sauce over the corn before serving. These options will jazz up the dish and make it exciting! This blog post shared a simple and tasty garlic butter corn recipe. You learned about the ingredients, preparation steps, and ways to enhance flavors. Tips on serving and variations provided added value for every taste. Storing ideas ensured you can enjoy leftovers, while FAQs answered common questions. In conclusion, this dish is easy to make and customize. Try it with lime for a zesty kick. Explore variations and enjoy garlic butter corn any time!

Looking for a side dish that packs a flavorful punch? You’ll love this Smoked Paprika Garlic Butter Corn! This easy recipe combines sweet corn, rich butter, and smoky spices for …

Read more

Categories Appetizers Leave a comment

Copycat KFC Fried Chicken Crispy and Flavorful Recipe

June 26, 2025 by Chef Evan
Here’s what you need for the best Copycat KFC Fried Chicken: - Chicken pieces: 10 (preferably legs and thighs) - Buttermilk: 2 cups - All-purpose flour: 2 cups - 1 teaspoon paprika - 1 teaspoon garlic powder - 1 teaspoon onion powder - 1 teaspoon salt - 1/2 teaspoon black pepper - 1/2 teaspoon cayenne pepper (adjust according to your spice preference) - 1 teaspoon dried thyme - 1 teaspoon dried basil - Vegetable oil (for frying) These ingredients bring out the flavor and crunch that everyone loves. The buttermilk makes the chicken tender and juicy. The mix of seasonings adds that famous taste. When you combine these ingredients, you create magic in your kitchen. You can find the Full Recipe for this crispy delight later in this article. Enjoy cooking! Marinating chicken in buttermilk is key to great flavor. The buttermilk tenderizes the meat and adds moisture. I recommend marinating for at least 4 hours, but overnight is best. This extra time helps the flavors soak in deeply. Mixing the dry ingredients correctly is important for the perfect coating. In a bowl, combine the flour, paprika, garlic powder, onion powder, salt, black pepper, cayenne pepper, thyme, and basil. Whisk until everything blends well. For a crunchy texture, make sure to use fresh flour. After marinating, take the chicken out of the buttermilk. Let any extra liquid drip off. Dredge each piece in the flour mixture. Press firmly to coat well. Tap off any extra flour before setting the chicken aside. Heat vegetable oil in a large skillet to about 350°F (175°C). Keep a thermometer handy to check the temperature. Fry the chicken in batches. This prevents overcrowding and keeps the oil hot. Cook each piece for about 12-15 minutes. Flip them halfway through for even cooking. The chicken should be golden brown and reach an internal temperature of 165°F (75°C). Once cooked, place the chicken on a wire rack over a baking sheet. This helps drain excess oil. Let it rest for 5-10 minutes to stay crispy. Your fried chicken is now ready! Enjoy it with your favorite sides and sauces. To get that perfect crispiness, you need to pay attention to the frying temperature. Heat your oil to 350°F (175°C). Use a cooking thermometer for accuracy. Fry each piece for 12-15 minutes. Flip the chicken halfway to ensure even cooking. To check doneness, use a meat thermometer. The internal temperature should be 165°F (75°C). One common mistake is overcrowding the frying pan. When you add too much chicken, the oil cools down. This can lead to soggy chicken. Fry in batches instead. Another mistake is skipping the marination step. Marinating in buttermilk adds flavor and moisture. Don’t rush this step; aim for at least 4 hours in the fridge. Want to boost the flavor? Add more spices to your mix. Try 1 teaspoon of cayenne pepper for heat or 1 teaspoon of smoked paprika for a smoky taste. You can also mix in 1 teaspoon of dried oregano for a fresh twist. Adjust the cayenne pepper to match your spice level. This way, you can make your fried chicken truly your own. For the Full Recipe, check out the detailed instructions to make this dish a hit! {{image_4}} To make your fried chicken spicy, you can adjust the cayenne pepper. Start with 1/2 teaspoon, then add more if you want more heat. You can also add hot sauce to the buttermilk. This will give your chicken a nice kick and extra flavor. If you prefer using an air fryer, you can modify the recipe. First, prepare the chicken as usual. Then, place the coated chicken pieces in a single layer in the air fryer basket. Cook them at 400°F for about 25 minutes. Flip the chicken halfway through for even cooking. This method gives you a crispy result with less oil. For a gluten-free option, substitute regular flour with gluten-free flour. You can use almond flour or a gluten-free all-purpose blend. Ensure you mix well to keep the flavor and texture. You might need to adjust the amount of flour to get the right coating consistency. To keep your leftover chicken fresh, place it in an airtight container. If you do not have one, wrap it tightly in plastic wrap or aluminum foil. Refrigerate the chicken within two hours of cooking to avoid bacteria growth. Leftover fried chicken can last up to four days in the fridge. However, it is best to eat it sooner for the best taste. For reheating fried chicken, the oven is your best friend. Preheat your oven to 375°F (190°C). Place the chicken on a baking sheet and cover it with foil. This keeps the chicken moist. Heat it for about 15-20 minutes. If you want to keep the coating crispy, remove the foil for the last 5 minutes. You can also reheat chicken in an air fryer for a crispy finish. Set it to 350°F (175°C) and heat for about 8-10 minutes. To freeze cooked chicken, first let it cool completely. Wrap each piece tightly in plastic wrap. Place the wrapped chicken in a freezer bag, removing as much air as possible. This helps prevent freezer burn. Fried chicken can last up to three months in the freezer. When ready to eat, thaw it in the fridge overnight. Reheat the chicken using the oven or air fryer for the best results. This way, you maintain its crispy goodness. The secret lies in the right blend of spices and a good marination. KFC’s crispy coating uses a mix of flour, spices, and buttermilk. For this recipe, you need: - 2 cups all-purpose flour - 1 teaspoon paprika - 1 teaspoon garlic powder - 1 teaspoon onion powder - 1 teaspoon salt - 1/2 teaspoon black pepper - 1/2 teaspoon cayenne pepper - 1 teaspoon dried thyme - 1 teaspoon dried basil Marinating the chicken in buttermilk helps keep it moist. This combination of flavors creates that tasty crunch you love. Yes, you can use various chicken cuts. Legs and thighs work best for frying. Breasts can also be used, but they cook faster, so adjust your time. Here are some ideas: - Chicken thighs: Cook for about 12-15 minutes. - Chicken legs: Cook for about 12-15 minutes. - Chicken breasts: Cook for about 8-10 minutes. Make sure all pieces reach an internal temperature of 165°F (75°C) for safety. Frying chicken takes time based on the cut size. Here’s a breakdown: - Small pieces (like wings): 8-10 minutes. - Medium pieces (like breasts): 8-10 minutes. - Large pieces (like thighs and legs): 12-15 minutes. Always check the internal temperature to ensure it’s safe to eat. Classic Southern sides are perfect with fried chicken. Here are my top picks: - Coleslaw: Creamy and crunchy, it adds a refreshing touch. - Cornbread: Slightly sweet, it complements the savory chicken. These sides will enhance your meal and make it feel complete. For the full recipe, check the main article! You've learned how to make crispy, flavorful fried chicken, just like KFC. From marinating in buttermilk to the frying tips, each step matters. Remember, don’t rush the marination; it’s key to moist chicken. Avoid common mistakes, like overcrowding the pan, for perfect results every time. Feel free to experiment with variations that suit your taste, such as the air fryer method. With proper storage and reheating techniques, your leftovers can still be delicious. Enjoy this easy recipe and make it your own!

Craving the crispy, flavorful taste of KFC fried chicken? You’re not alone! In this post, I will share an easy copycat recipe that captures all the taste without needing a …

Read more

Categories Dinner Leave a comment

Paula Deen’s Tomato Pie Savory and Simple Delight

June 26, 2025 by Chef Evan
To make Paula Deen's Tomato Pie, you need fresh and simple ingredients. Each one adds to the pie's rich taste. Here’s what you will need: - 1 pre-made pie crust - 4 large ripe tomatoes, sliced into 1/4-inch rounds - 1 cup shredded mozzarella cheese - 1 cup shredded sharp cheddar cheese - 1/2 cup mayonnaise - 1 tablespoon Dijon mustard - 1/4 cup fresh basil, chopped (plus extra for garnish) - 1 teaspoon garlic powder - Salt and freshly cracked black pepper to taste - 1/4 cup green onions, finely chopped These ingredients come together to create a dish that is both savory and comforting. The ripe tomatoes provide juiciness, while the cheeses offer a creamy texture. Mayonnaise and Dijon add a slight tang that balances the flavors. Fresh basil and green onions give an aromatic touch that makes each bite refreshing. This pie is truly a celebration of simple ingredients that turn into something special. - Preheat the oven to 375°F. - Prepare the pie crust. Fit it snugly in a pie dish. Use a fork to poke holes in the bottom. This helps prevent bubbles when baking. - Start with a layer of sliced tomatoes. Use half of the tomatoes. Spread them evenly across the crust. - Sprinkle salt and black pepper on the first layer. This brings out the flavor. - Next, spread half of the creamy mixture over the tomatoes. Make sure to cover them fully. - Add half of the mozzarella and cheddar cheese on top of the creamy layer. This adds a nice texture and flavor. - Repeat the same steps with the rest of the tomatoes, creamy mixture, and cheese. - For the final touch, sprinkle chopped green onions and extra basil on top of the cheese. This adds color and taste. - Place the pie in the oven and bake for 35-40 minutes. Look for a golden brown and bubbling top. - Once baked, take it out and let it cool for 10 minutes. This makes it easier to slice. Enjoy your delicious pie! For the full recipe, check the details above. To avoid sogginess, always prick the bottom of the crust before baking. This helps air escape. You can also bake the crust slightly before adding the filling. This gives it a head start. If you want to skip the store-bought crust, try making your own. A simple mix of flour, butter, and water works great! Fresh herbs add a burst of flavor. I love using basil in this pie. You can also try oregano or thyme for a twist. For seasoning, don’t forget salt and pepper. They bring out the flavors of the tomatoes. Adding a splash of vinegar can balance the dish's richness too. Serve this pie warm for the best taste. It pairs well with a light salad. A simple mix of greens with vinaigrette complements the pie nicely. You can also serve it with roasted veggies for a heartier meal. Enjoy it fresh for the best flavor and texture! {{image_4}} You can switch up the cheese in this pie. Try using gouda or fontina for a rich taste. Blend different cheeses for a unique flavor. For a vegan option, use cashew cheese or tofu. These options work well and keep the pie creamy and delicious. Want to add protein? You can include crispy bacon or cooked chicken. Both will give the pie a savory kick. For a vegetarian choice, use chickpeas or lentils. They add texture and boost nutrition without meat. Make this pie your own by adding different veggies. Try spinach, zucchini, or bell peppers for a fresh touch. You can also use seasonal herbs. Fresh thyme or dill can really brighten the dish. These twists keep your Tomato Pie exciting all year round. For the full recipe, check the provided details and enjoy! To store leftovers, let the pie cool completely. Cover it tightly with plastic wrap or aluminum foil. You can also use an airtight container. This keeps the pie fresh and prevents odors from mixing. The shelf life in the fridge is about three to four days. After that, the flavors may fade. It’s best to enjoy Paula Deen’s Tomato Pie while it’s fresh. To freeze the pie, slice it first for easy servings. Wrap each slice in plastic wrap. Then place the slices in a freezer-safe bag or container. This way, they stay fresh and don’t get freezer burn. For reheating, take the slice out and let it thaw in the fridge overnight. You can also reheat it directly from the freezer. Preheat your oven to 350°F (175°C). Place the slice on a baking sheet. Heat for about 20-30 minutes, or until it's warm and the cheese is bubbly. Enjoy it hot for the best flavor! To make Paula Deen's Tomato Pie gluten-free, you can use a gluten-free pie crust. Many brands offer ready-made options. You can also make your own crust using almond flour or rice flour. Just follow a simple recipe for a gluten-free crust. Ensure all your other ingredients are gluten-free as well. Yes, you can use canned tomatoes. However, the flavor and texture may change. Fresh tomatoes provide a bright taste and juicy texture. Canned tomatoes can be more watery. Drain them well and consider using less salt. This helps keep the pie from becoming too soggy. To cut the pie cleanly, let it cool for about ten minutes. Use a sharp knife for even slices. Start from the center and work your way out. This will help keep the layers intact. Serve each slice on a plate for a nice presentation. Enjoy your savory slice! This blog post showed you how to make a delicious tomato pie. We covered the key ingredients, the steps to prepare, layer, and bake your pie. You learned tips for the crust and flavor, along with variations for every taste. We also discussed how to store your leftovers safely. By following these steps, you can create a dish that impresses and satisfies friends and family. Enjoy your cooking journey and share this delightful recipe with others!

If you crave comfort food packed with flavor, you’ll love Paula Deen’s Tomato Pie. This dish combines ripe tomatoes, creamy cheese, and fresh herbs in a simple pie crust. Whether …

Read more

Categories Dinner Leave a comment

Easy Baked Tomato Casserole Simple and Tasty Dish

June 26, 2025 by Chef Evan
- 4 large, ripe tomatoes, sliced into thick rounds - 1 medium onion, thinly sliced - 2 cloves garlic, finely minced - 1 cup fresh basil leaves, roughly chopped - 1 cup mozzarella cheese, freshly shredded The ripe tomatoes are the star of this dish. They bring a juicy and sweet flavor. Onions and garlic add a rich depth to the casserole. Fresh basil gives it a bright, earthy note. Finally, mozzarella cheese melts beautifully, tying everything together. - 1/2 cup breadcrumbs (preferably seasoned) - 1/4 cup extra virgin olive oil - 1 teaspoon dried oregano Breadcrumbs provide a lovely crunch on top. Olive oil adds healthy fats and richness. Dried oregano enhances the dish with its warm, fragrant notes. - Seasoned breadcrumbs - Additional herbs and spices Feel free to use seasoned breadcrumbs for added taste. You can also play with herbs and spices like thyme or red pepper flakes. These can boost flavor and make the dish your own. For the full recipe, check out the detailed instructions above. Start by slicing your tomatoes. Use four large, ripe tomatoes to get the best flavor. Cut them into thick rounds. Next, slice one medium onion thinly. Then, finely mince two cloves of garlic. This will add a nice kick to your dish. Finally, chop one cup of fresh basil leaves. You can use a knife or scissors for this. Don’t forget to shred one cup of mozzarella cheese. Fresh cheese melts better and tastes great. Now, it’s time to layer your casserole. Begin with a layer of half the sliced tomatoes. Place them evenly in a medium-sized baking dish. Next, add half of the sliced onion and half of the minced garlic. Spread them evenly over the tomatoes. Then, add half of the chopped basil. Season this layer with a pinch of sea salt, black pepper, and half a teaspoon of dried oregano. Now, sprinkle half of the shredded mozzarella cheese over this layer. Follow with half of the breadcrumbs for a nice crunch. Repeat this process. Add the remaining tomatoes, onions, garlic, basil, oregano, mozzarella, and breadcrumbs. Layering creates great flavors! Preheat your oven to 375°F (190°C). This step is key for even cooking. Once preheated, cover the dish tightly with aluminum foil. This helps keep moisture in while baking. Bake for 30 minutes. After that, carefully remove the foil. This allows the top to get crispy. Bake for another 15-20 minutes. You want the top to be golden brown and the tomatoes tender. Once done, take the casserole out of the oven. Let it cool for a few minutes. It will set nicely before you serve it. For the full recipe, refer to the provided details. Enjoy this easy baked tomato casserole! To avoid sogginess in layers, start with thick tomato slices. This helps them hold their shape. Use a good amount of breadcrumbs. They soak up excess moisture and add crunch. For seasoning, balance is key. Use sea salt and black pepper to enhance the flavors. Dried oregano brings warmth to the dish. Taste as you go to find what works best. For a great presentation, serve the casserole warm in the baking dish. It looks rustic and inviting. Garnish with fresh basil leaves for color and flavor. Pair your casserole with a side salad. A light, crisp salad complements the dish well. For drinks, try a chilled white wine. It enhances the tomato flavors perfectly. Adding protein can make your casserole heartier. Cooked ground beef, chicken, or sausage works well. Feel free to layer these with the tomatoes. Different cheese varieties can also elevate the taste. Try sharp cheddar or feta for a new twist. Mixing cheeses adds depth and richness to each bite. For the full recipe, check out the details above. {{image_4}} You can make this baked tomato casserole even better by adding more veggies. Try adding sliced zucchini or bell peppers for extra flavor and texture. These veggies will blend well with the tomatoes and add great color. If you need a gluten-free option, use quinoa or rice instead of breadcrumbs. They will give the dish a nice base while keeping it light and healthy. If you love meat, you can make this casserole heartier. Incorporate ground beef or sausage for a tasty twist. Just cook the meat ahead of time and layer it in with the tomatoes. You can also layer prosciutto in the dish. This adds richness and a savory taste that pairs well with the fresh tomatoes. Want to add some kick? Sprinkle in red pepper flakes or chili powder. This will give your casserole a nice heat without overpowering the dish. You can also create a Mediterranean twist by adding olives. The briny flavor of olives blends perfectly with the tomatoes and fresh basil, making each bite delicious. For the full recipe, check out the [Full Recipe]. To keep your baked tomato casserole fresh, store it in the fridge. Use an airtight container to lock in moisture and flavor. You can keep it for up to four days in the fridge. If you want to save it for later, freezing is a great option. Just let it cool completely, then wrap it tightly in foil or plastic wrap. It can last for up to three months in the freezer. When you want to eat it, thaw it overnight in the fridge. For the best taste, reheat your casserole in the oven. Preheat the oven to 350°F (175°C). Place the casserole in a dish and cover it with foil. Heat for about 20 to 25 minutes, or until it's warm all the way through. You can use the microwave, but the oven makes it crispier. If you use a microwave, heat it on medium power for three to five minutes. Make sure to check it often to avoid hot spots. In the fridge, your baked tomato casserole will last for about four days. If you notice any strange smells or mold, it’s time to toss it. Look for changes in color or texture. If the top looks dry or the cheese has turned a weird shade, don’t eat it. Always trust your senses; they help you spot spoilage. Enjoy your leftovers while they’re still delicious! For the full recipe, check out the complete guide. Yes, you can prepare this casserole a day in advance. Just layer all the ingredients in your dish. Cover it tightly with plastic wrap or foil. Store it in the fridge until you're ready to bake. This can save time on busy days. Just make sure to let it sit at room temperature for about 30 minutes before baking. This helps it cook evenly. If you need a cheese alternative, try these options: - Cheddar cheese for a sharper taste - Provolone for a richer flavor - Feta for a crumbly, tangy twist - Vegan cheese for a dairy-free option These options can change the flavor and texture of your dish. Choose one based on your taste and dietary needs. To make this recipe vegan, substitute the mozzarella cheese with vegan cheese. You can also use nutritional yeast for a cheesy flavor. Replace the olive oil with a plant-based oil, if needed. Use a vegetable broth instead of any animal-based ingredients. With these changes, you can enjoy a tasty, plant-based version of this dish. This baked tomato casserole is simple and full of flavor. I covered key ingredients like ripe tomatoes, fresh basil, and tasty spices. Step-by-step, you saw how to prep, layer, and bake it for a delicious dish. Remember, add your own twist with veggies or meat. Don’t forget how to store leftovers for later enjoyment. With these tips, you’re ready to create a meal that everyone will love. Enjoy customizing your casserole to fit your taste!

Looking for a simple and tasty dish to impress your family? This Easy Baked Tomato Casserole is just what you need! With juicy tomatoes, fresh basil, and gooey mozzarella, this …

Read more

Categories Dinner Leave a comment

Grilled Corn in Foil Flavorful and Simple Recipe

June 26, 2025 by Chef Evan
- 4 ears of fresh corn, husked - 1/4 cup unsalted butter, softened - 1 tablespoon chili powder - 1 teaspoon smoked paprika - Zest and juice of 1 lime - 1/4 cup grated cotija cheese - 1/4 cup fresh cilantro, finely chopped - Salt and pepper to taste - Aluminum foil For grilled corn in foil, fresh ingredients are key. Start with four ears of corn. Look for ears that are bright and firm. The husks should be green and tightly wrapped. Next, use unsalted butter. It allows you to control the salt. Mix in chili powder and smoked paprika for a warm kick. The lime zest and juice add a bright, fresh flavor. Don’t forget the cotija cheese! Its salty and crumbly texture pairs well with the sweet corn. Lastly, fresh cilantro gives a burst of color and taste. Salt and pepper round out the flavor. You can adjust these to fit your taste. Using aluminum foil helps steam the corn, keeping it tender and juicy. For the full recipe, refer to the instructions provided. These ingredients combine to create a delicious dish that you will love to share! Preheat your grill to medium-high heat, around 400°F (200°C). This heat gives the corn a nice char. Make sure the grill grates are clean. Oil them lightly to stop sticking. In a small bowl, mix softened butter with chili powder, smoked paprika, lime zest, salt, and pepper. Stir until smooth. This flavorful butter will coat your corn and make it tasty. Tear off four sheets of aluminum foil. Place an ear of corn in the center of each sheet. Spread the butter mixture all over the corn. Cover it well to infuse the flavor. Wrap the foil tightly to keep the steam inside. Put the wrapped corn on the grill. Cook for 15-20 minutes. Turn them every few minutes for even cooking. The corn will be ready when the kernels are tender and juicy. Carefully unwrap each ear of corn. Watch out for steam! Sprinkle cotija cheese and cilantro on top. Squeeze lime juice over the corn for a fresh, zesty flavor. Enjoy your grilled corn fiesta! For the full recipe, check back above. To get tender kernels, you need to watch the clock. Grill the corn for 15 to 20 minutes. Turn it every few minutes to cook evenly. The steam inside the foil helps keep the corn juicy. You’ll know it’s done when the kernels look plump and bright. This timing works best for fresh corn, so use it if you can. You can add your twist to grilled corn. Try different seasonings for diverse tastes. Garlic powder adds a nice kick. Fresh herbs like thyme or basil can brighten the flavor. If you love spice, add cayenne or crushed red pepper. The options are endless! Charcoal and gas grills have unique ways of cooking. Charcoal provides a smoky flavor, perfect for grilling. It takes longer to heat, but it's worth it. Gas grills heat up quickly and offer more control over the temperature. They cook evenly, which helps avoid burnt spots. Choose the one that suits your style! {{image_4}} To make your corn spicy, add jalapeños or cayenne pepper to the butter mix. Start with one finely chopped jalapeño for a mild kick. If you like heat, add more. The spice will blend well with the rich butter. This twist makes the corn exciting and full of flavor. For vegetarian and vegan cooks, you can easily switch the butter. Use plant-based margarine or olive oil instead. Both options give a nice flavor without dairy. You can still enjoy the same great taste while keeping it plant-based. Feel free to explore global flavors. Try adding different cheeses like feta or cheddar. Spices from around the world can also enhance your corn. Think about using Italian herbs, or a sprinkle of cumin for a Mexican flair. Each choice adds a new layer of taste to your grilled corn. Store leftover grilled corn in the fridge. Use an airtight container. It stays fresh for up to 3 days. To keep the flavor, seal it well. This helps lock in moisture, so the corn does not dry out. When you’re ready to eat the leftovers, you can reheat them in a few ways. The stovetop works great. Heat a skillet over medium heat and add the corn. Stir it often for even heating. You can also use the microwave. Just place the corn on a plate and cover it with a damp paper towel. Heat for about 1-2 minutes. This keeps the corn moist. Freezing grilled corn is easy if you want to save it for later. First, let the corn cool completely. Then, wrap each ear tightly in plastic wrap. Place the wrapped corn in a freezer bag. It can stay in the freezer for up to 3 months. To enjoy it later, simply remove it from the bag and thaw in the fridge overnight. You can also grill it straight from the freezer, just cook a bit longer. To check if your corn is done, look for a few signs. The kernels should be plump and tender. You can also poke a kernel with a fork. If it bursts easily, your corn is ready. The husks will also look slightly charred. Aim for about 15-20 minutes on the grill for perfect results. Always keep an eye on your corn as it cooks. Yes, you can grill corn without foil. You can grill it directly on the grates. Just soak the husked corn in water for 30 minutes first. This helps it stay moist. You can also leave the husks on for added flavor. Remove the husks and silk after grilling for a fun charred flavor. There are many tasty toppings for grilled corn! Try adding Parmesan cheese or feta for a salty kick. You can also use fresh herbs like basil or parsley. For a spicy twist, consider adding hot sauce or diced jalapeños. Mix in some diced tomatoes or avocado for a fresh touch. The options are endless! Check out the Full Recipe for more ideas. Grilled corn in foil is simple and fun to make. You need fresh corn, butter, spices, and herbs. I shared steps to prepare and grill your corn perfectly. Feel free to tweak the flavors with different spices or toppings. Store any leftovers safely, and enjoy them later. Grilled corn adds joy to any meal. Try it out for tasty bites at your next gathering!

If you crave a tasty summer treat, make grilled corn in foil! This simple recipe transforms fresh corn into a flavorful dish with just a few ingredients. You’ll love the …

Read more

Categories Appetizers Leave a comment

Spicy Garlic Edamame Fast and Flavorful Snack Recipe

October 8, 2025June 26, 2025 by Chef Evan
- 2 cups edamame (fresh or frozen) - 3 tablespoons olive oil - 4 cloves garlic, minced - 1-2 teaspoons red pepper flakes (adjust for spice preference) - 1 tablespoon soy sauce - 1 teaspoon sesame oil - 1 tablespoon freshly squeezed lemon juice - Salt to taste - 1 tablespoon toasted sesame seeds (for garnish) - Fresh cilantro, chopped (for garnish) To create the best spicy garlic edamame, you need simple yet bold ingredients. Edamame is the star of this dish. You can use fresh or frozen edamame. Both options work well. Olive oil adds richness and helps cook the garlic. Minced garlic gives a deep flavor. Red pepper flakes bring the spice. You can adjust the amount to suit your taste. Next, we have some seasonings and garnishes. Soy sauce adds a savory kick. Sesame oil gives a nutty taste. Fresh lemon juice adds brightness. Salt is key for balancing flavors. Toasted sesame seeds enhance the dish's look and flavor. Fresh cilantro adds a pop of color and freshness. Each ingredient plays a role in making this snack truly special. {{ingredient_image_1}} To cook the edamame, you have two options. If you use frozen edamame, start by boiling a pot of salted water. Add the edamame and cook for about 3-5 minutes. You want them tender but not mushy. Drain them and set aside. If you choose fresh edamame, simply steam them. You will know they are done when they turn a vibrant green and feel tender. This method keeps their flavor fresh. Next, it’s time for the spice mixture. In a large skillet, heat 3 tablespoons of olive oil over medium heat. Once the oil is warm, add 4 minced garlic cloves. Sauté for 1-2 minutes. Stir them often to avoid burning. You want that garlic to be fragrant but not brown. Now, add red pepper flakes to the skillet. I recommend starting with 1 teaspoon and going up to 2 teaspoons based on your spice preference. Cook for another minute to let the flavors blend. Then, toss in the cooked edamame. Mix well to coat them with the garlic oil. Drizzle in 1 tablespoon of soy sauce and 1 teaspoon of sesame oil. Stir everything together and sauté for 2-3 minutes until heated through. Remove the skillet from heat and stir in 1 tablespoon of freshly squeezed lemon juice. Taste the dish and add salt if needed. Finally, transfer the spicy garlic edamame to a serving bowl. Top it with 1 tablespoon of toasted sesame seeds and chopped cilantro. This adds flair and extra flavor to your dish. Enjoy your snack! You can change the spice in this dish easily. For a milder taste, use less red pepper flakes. Start with just 1 teaspoon and taste as you cook. If you want more heat, add another teaspoon. You can also swap red pepper flakes for chili powder for a different flavor. Cooking edamame takes just a few minutes. If using frozen, boil salted water and cook for 3-5 minutes. For fresh edamame, steam them until bright green. Keep an eye on them to avoid overcooking. Perfect edamame should be tender yet firm. Want to kick up the taste? Consider adding a splash of rice vinegar for brightness. You could also mix in some ginger for warmth. Another great idea is to toss in some chopped scallions or a dash of lime juice for a fun twist. Pro Tips Use Fresh Ingredients: For the best flavor, opt for fresh edamame and garlic whenever possible. Fresh ingredients enhance the overall taste of the dish. Adjust the Spice Level: Feel free to modify the amount of red pepper flakes according to your spice preference. Start with less and add more if desired. Experiment with Toppings: Try adding other toppings like crushed peanuts or green onions for a unique twist and added texture to your dish. Serve Immediately: Enjoy the edamame while they are warm for the best texture and flavor. They can become less appealing if left to cool for too long. {{image_2}} You can switch up the flavors by using different oils. For instance, sesame oil adds a nutty taste. Try avocado oil for a light flavor. You can also experiment with spices. Add cayenne for more heat or garlic powder for a deep garlic taste. You have choices when cooking edamame. Air frying gives it a crispy texture. Set your air fryer to 375°F and cook for about 10 minutes. Toss halfway for even cooking. Sautéing is quick and easy. In a skillet, heat oil and cook the edamame until warm and tender. Both methods are tasty! Spicy garlic edamame pairs well with many dishes. Serve it as a side with rice or noodles. It also goes great with a cold beer or a refreshing iced tea. For a fun twist, try it with sushi or as a topping on salads. Enjoy mixing and matching! To keep your spicy garlic edamame fresh, store it in an airtight container. Place it in the fridge. This way, it stays tasty for about 3 days. Make sure it cools down first before sealing. Avoid leaving it out for too long to prevent spoilage. When reheating, you want to keep the flavor and texture just right. The best way is to use a skillet. Heat it on medium-low and add the edamame. Stir it gently for about 3-5 minutes until hot. You can also use the microwave if you're in a hurry. Place the edamame in a bowl, cover it, and heat for 1-2 minutes. Stir halfway through to warm evenly. Freezing edamame is a great option for long-term storage. To freeze, first, let it cool completely. Then, place it in a freezer-safe bag or container. Remove as much air as possible before sealing. When you're ready to eat, thaw in the fridge overnight or boil it straight from frozen. Just remember to adjust the cooking time since it’s frozen. Edamame is young soybeans. They are often found in their pods. These green gems are not just tasty but also packed with nutrients. They are high in protein, fiber, and vitamins. One cup of edamame has about 17 grams of protein. They also contain essential amino acids that help build muscles. Eating edamame can support heart health and aid in weight management. Plus, they are low in calories, making them a great snack option. Yes, frozen edamame works well in this recipe. It is convenient and saves time. To cook frozen edamame, boil salted water in a pot. Add the edamame and cook for about 3 to 5 minutes. They are ready when they are tender. Drain them and set aside for later use. Spicy garlic edamame lasts about 3 to 5 days in the fridge. Store it in an airtight container. Make sure it cools down before sealing. Always check for any signs of spoilage before eating. If you see any changes in smell or color, it’s best to throw it away. This blog post showed you how to make spicy garlic edamame from start to finish. We covered the main ingredients you need, cooking steps, and tips for great taste. You learned how to adjust spice levels and explored variations and storage information. If you try this dish, it will add flavor to any meal. Remember, cooking is about experimenting and having fun. Enjoy your tasty, healthy snack!

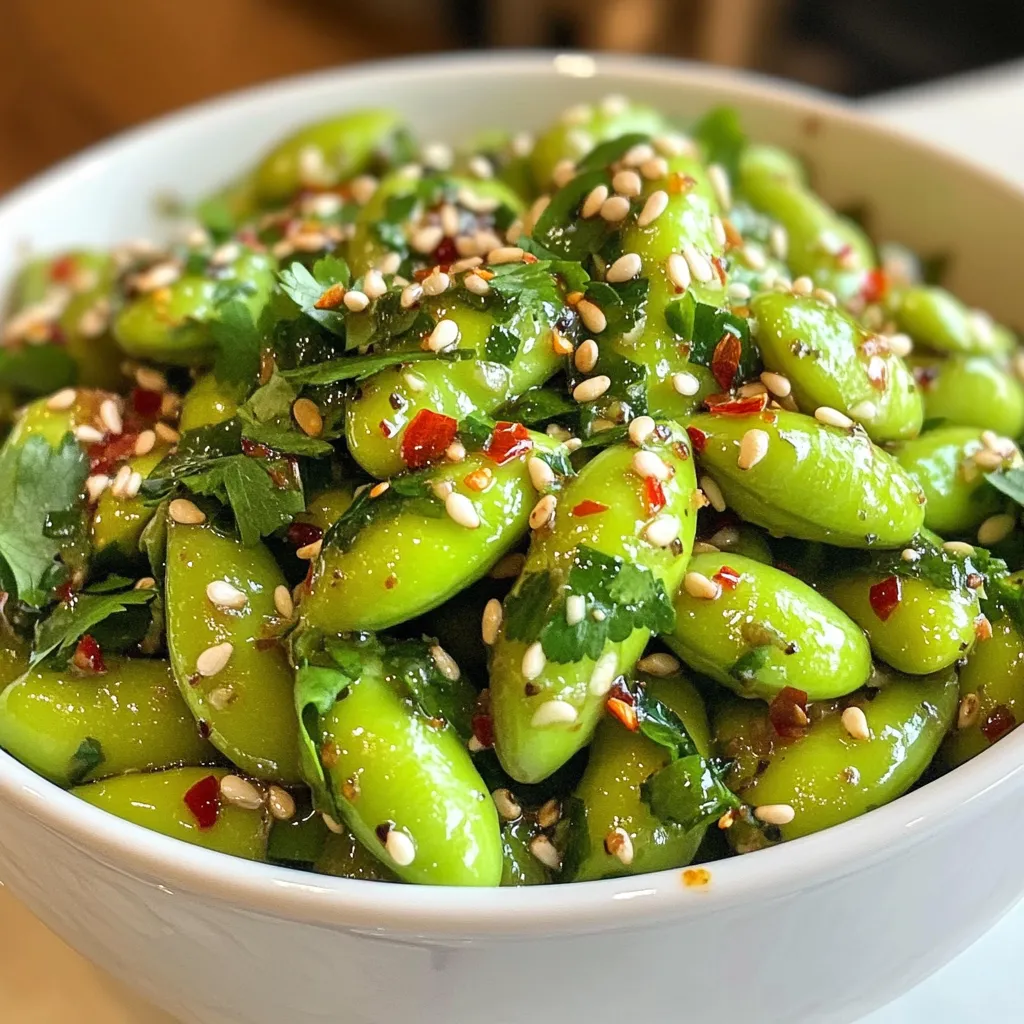
Looking for a quick and tasty snack? You’re in the right place! This Spicy Garlic Edamame recipe brings bold flavors to your table in no time. With fresh or frozen …

Read more

Categories Appetizers Leave a comment

Cake Mix Peach Cobbler Delightful and Easy Recipe

June 25, 2025 by Chef Evan
To make this delicious cake mix peach cobbler, you need some key items. Here’s what you need: - 1 box of yellow cake mix - 4 cups fresh or canned peaches (sliced if fresh) - 1/2 cup unsalted butter (melted) - 1 cup granulated sugar (adjust based on sweetness of peaches) - 1 teaspoon vanilla extract - 1 teaspoon ground cinnamon - 1/4 teaspoon ground nutmeg - 1/2 cup milk - Vanilla ice cream for serving (optional) These ingredients come together to create a sweet and comforting dessert. The cake mix saves time while still delivering great flavor. You can add some optional ingredients to make your cobbler even better. Consider these: - Fresh herbs like mint for a bright touch - A sprinkle of brown sugar for a caramelized crust - Chopped nuts like pecans or walnuts for crunch - A splash of lemon juice to brighten the peach flavor These extras can add fun twists to your cobbler. If you don't have an ingredient, no worries! Here are some easy swaps: - Use gluten-free cake mix if you need a gluten-free option. - Swap fresh peaches with other fruits like apples or berries. - Replace butter with coconut oil for a dairy-free version. - Use almond milk instead of regular milk for a nutty flavor. These substitutions keep your cobbler tasty and versatile. No matter what, your cake mix peach cobbler will always shine! Start by preheating your oven to 350°F (175°C). This heat is perfect for baking. Next, grab a 9x13 inch baking dish and grease it well. Use butter or non-stick spray. This helps the cobbler come out easily. Now, take your peaches. If you use fresh ones, peel and slice them first. In a large bowl, mix the peaches with 1/2 cup of sugar, the cinnamon, nutmeg, and vanilla extract. Stir gently until the peaches get coated. This will bring out their sweet flavor. Spread this peach mixture evenly in your greased dish. In a separate bowl, prepare the yellow cake mix as the box says. For extra flavor, swap half the water for milk. Mix in the melted butter until smooth. This makes a rich batter. Carefully pour it over the peaches. Make sure to cover them well but don’t mix them in. The batter will rise and create a lovely top. Now it’s time to bake! Place the baking dish in your preheated oven. Bake for 40-45 minutes. You can check if it’s done by inserting a toothpick in the center. If it comes out clean, your cobbler is ready. The top should be golden brown and smell amazing. Once baked, let the cobbler cool for a few minutes. This helps with cutting and serving. To get the best texture, make sure your butter is melted. This adds richness to the batter. Also, don’t stir the batter into the peaches. Let it sit on top. As it bakes, it will create a delightful, fluffy layer. If you want a crispy top, bake a bit longer, but watch closely. Too long can dry it out. Serving it warm with vanilla ice cream is a great touch. The cold ice cream melts into the warm cobbler, creating a delicious mix. For the full recipe, check out the detailed instructions above! When making peach cobbler, it’s easy to make a few mistakes. Here’s what to watch for: - Overmixing the batter: When you mix the cake batter, do it gently. Overmixing can make it tough. - Not greasing the dish: Always grease your baking dish well. This helps the cobbler come out easily. - Skipping the spices: Don’t forget the cinnamon and nutmeg! They add great flavor to the peaches. - Using too much sugar: Adjust the sugar based on your peaches' sweetness. Too much sugar can make it overly sweet. To make your peach cobbler even better, try these tips: - Use fresh peaches: Fresh peaches give the best taste. If you use canned, choose ones in light syrup. - Add a splash of lemon juice: A bit of lemon juice brightens the peach flavor. - Try different extracts: Swap vanilla with almond extract for a unique twist. - Top with nuts: Sprinkle chopped pecans or walnuts on the batter before baking for added crunch. Serving your peach cobbler well makes a big difference. Here’s how to do it: - Serve warm: Warm cobbler tastes best. Heat it slightly if it cools down. - Add vanilla ice cream: A scoop of vanilla ice cream on top makes it a real treat. - Drizzle syrup: Use the syrup from baked peaches as a drizzle over each slice. - Garnish with mint: Fresh mint leaves add color and a fresh taste to the dish. These tips will help you create a peach cobbler that everyone will love! For the full recipe, check out the instructions above. {{image_4}} You can get creative with this recipe! While peaches shine in this cobbler, you can use other fruits too. Try using: - Apples - Berries (blueberries, raspberries, or strawberries) - Cherries - Pears Mixing different fruits can add exciting flavors. For example, apples bring a sweet crunch, and berries add a tart bite. Just remember to adjust the sugar based on the fruit's sweetness. You don't have to stick to just yellow cake mix. You can explore various flavors to change the taste of your cobbler. Good options include: - White cake mix - Butter cake mix - Spice cake mix Each mix will give a unique twist to your cobbler. For a fun twist, try chocolate cake mix. It pairs well with fruit and creates a delightful dessert! If you need a gluten-free option, don't worry! You can still enjoy this dessert. Here are some easy swaps: - Use a gluten-free cake mix from the store. - Substitute all-purpose flour with almond flour or oat flour. These changes will help you keep the tasty texture. Just make sure to follow the instructions on the gluten-free mix you choose. To discover the full details, check out the Full Recipe. To keep your leftover peach cobbler fresh, let it cool completely. Then, cover it tightly with plastic wrap or aluminum foil. You can also place it in an airtight container. Store it in the fridge for up to three days. This way, you can enjoy the cobbler later without losing its taste. If you want to save your peach cobbler for later, freezing is a great option. First, let the cobbler cool. Cut it into squares to make it easier to thaw later. Then, wrap each piece tightly in plastic wrap. Place the wrapped pieces in a freezer-safe bag or container. You can freeze it for up to three months. When you're ready to eat it, just thaw it in the fridge overnight. To reheat your peach cobbler, start by preheating your oven to 350°F (175°C). Place the cobbler in an oven-safe dish. Cover it with foil to keep it moist. Heat for about 20 minutes, or until it's warm throughout. If you prefer, you can use the microwave. Just heat it in short bursts, checking often. Enjoy your warm peach cobbler with a scoop of vanilla ice cream for a delightful treat! Yes, you can use frozen peaches. Just make sure to thaw and drain them first. This keeps the cobbler from becoming too watery. Frozen peaches work well and save time. They taste great in this recipe! To make a healthier peach cobbler, try these simple swaps: - Use a sugar substitute or less sugar. - Choose whole wheat flour for the cake mix. - Add rolled oats for extra fiber. - Use light butter or applesauce instead of regular butter. These changes help reduce calories while keeping the dish tasty. Serve peach cobbler warm for the best taste. I love adding a scoop of vanilla ice cream on top for extra flavor. You can also drizzle some syrup from the dish over the cobbler. This adds a nice touch. Garnish with fresh peach slices for a pop of color! For more details, check the Full Recipe. We covered key ingredients for making cake mix peach cobbler, including essential and optional items. I shared steps to prepare and bake it, plus tips for a great texture. Common mistakes to avoid and expert flavor tips can enhance your dish. You can also try various fruit or cake mix options, even gluten-free versions. Lastly, I explained how to store leftovers and answered common questions. Embrace your creativity, and enjoy making this delicious dessert!

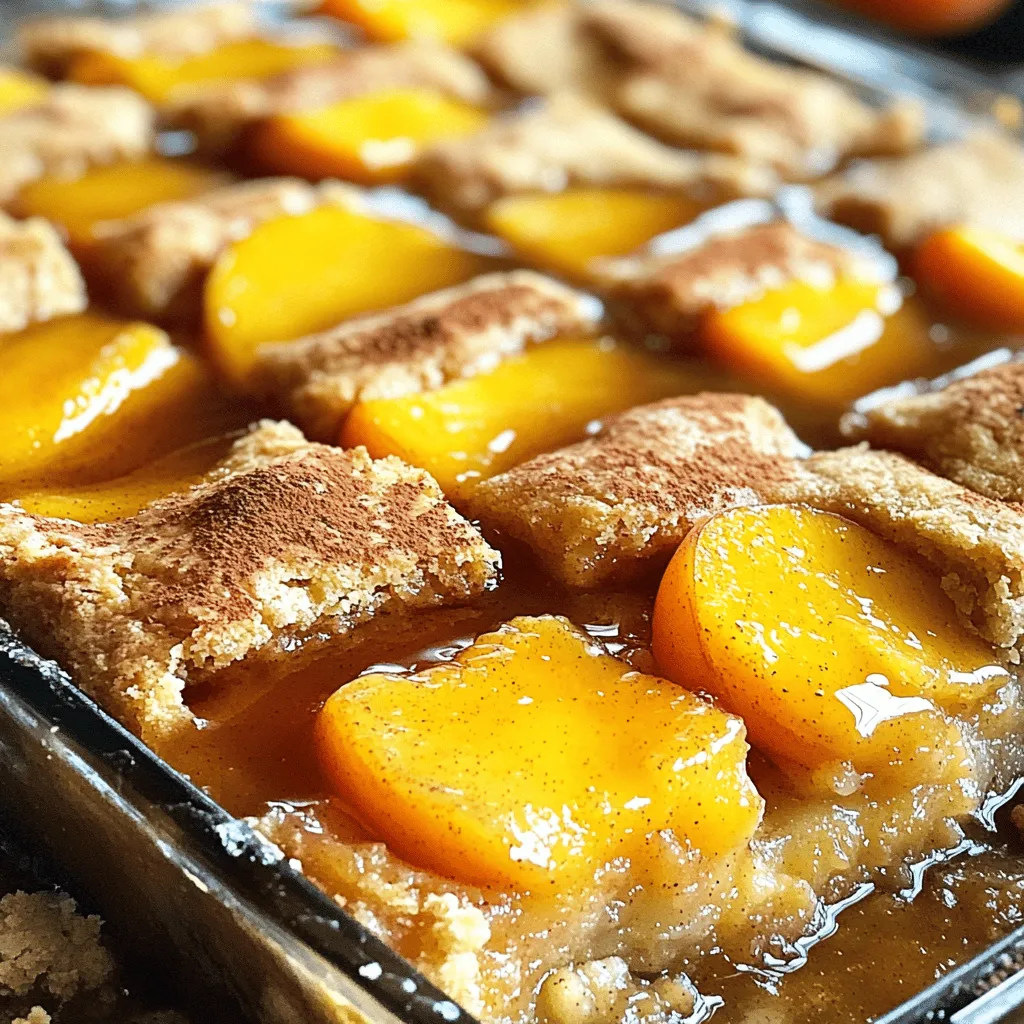
Do you love a warm dessert that’s quick and easy to make? My Cake Mix Peach Cobbler recipe will delight your taste buds without any fuss! With just a few …

Read more

Categories Desserts Leave a comment

Easy Crispy Cheddar Chicken Delightful Dinner Recipe

June 25, 2025 by Chef Evan
- 4 boneless, skinless chicken breasts - 1 cup shredded cheddar cheese - 1 cup breadcrumbs (recommend using panko) - 1/2 cup all-purpose flour - 2 large eggs - 1 teaspoon garlic powder - 1 teaspoon smoked paprika - 1/2 teaspoon salt - 1/2 teaspoon freshly ground black pepper - 1/4 teaspoon cayenne pepper (optional) - Cooking spray or olive oil To make my Easy Crispy Cheddar Chicken, gather the ingredients listed above. Each one plays a key role in building flavor. The chicken breasts are the star. I love using boneless and skinless for ease and quick cooking. The cheddar cheese brings a rich and creamy taste. Panko breadcrumbs add the crunch we all crave. For the coating, we use flour, eggs, and spices. Garlic powder and smoked paprika give depth. Salt and pepper add balance, while cayenne offers a kick if you want it spicy. Don't forget the cooking spray or olive oil. They help the chicken crisp up in the oven. - Calories: 320 - Protein: 28g - Fat: 16g - Carbohydrates: 18g - Fiber: 1g - Sugar: 1g This meal packs a punch with protein. It's filling, yet not overly heavy. The calories are reasonable for a dinner. Each ingredient supports a balanced meal, making it a great choice for families. For more details, check out the full recipe. 1. Preheat your oven to 400°F (200°C). Line a baking sheet with parchment paper. 2. In a bowl, mix the flour, garlic powder, smoked paprika, salt, black pepper, and cayenne pepper. 3. In a separate bowl, crack the eggs and beat them until smooth. 1. Take a chicken breast and coat it in the seasoned flour. Shake off extra flour. 2. Dip the floured chicken in the beaten eggs, letting excess egg drip back into the bowl. 3. Press the chicken into the breadcrumb and cheese mixture. Make sure it is well coated. 1. Place the coated chicken on the prepared baking sheet. Leave space between each piece. 2. Lightly spray cooking oil or drizzle olive oil over the chicken to help it brown. 3. Bake for 25-30 minutes. Check that the chicken reaches 165°F (75°C) and is golden brown. You can find the full recipe with more details and tips to enhance your meal. To get that crunchy texture, use panko breadcrumbs. They are lighter and crispier than regular breadcrumbs. Preheat your oven to 400°F (200°C) before you start. This helps the chicken cook evenly. A drizzle of oil or a light spray also helps create that golden color. It makes the chicken look and taste amazing. Pair your crispy cheddar chicken with fresh sides. Think about mashed potatoes or a colorful salad. A creamy sauce like ranch or a zesty garlic dip makes it even better. For presentation, serve the chicken on a bed of mixed greens. Add lemon wedges and a sprinkle of parsley for color. This makes your dish pop! Don't overcrowd your baking sheet. If the chicken pieces touch, they won't crisp up well. Also, let the chicken rest for a few minutes after baking. This helps the juices settle, making each bite juicy and flavorful. Following these tips will help you make the best crispy cheddar chicken! For the full recipe, check out the link above. {{image_4}} You can make this dish even more fun by adding herbs or spices to the coating. Try mixing in dried oregano, thyme, or even a touch of Italian seasoning. These flavors give the chicken a tasty twist. You can also use different types of cheese for variety. Consider using mozzarella for a stretchy bite or pepper jack for a spicy kick. Each cheese adds a unique taste to the dish. If you want a healthier option, try using an air fryer. Set the air fryer to 375°F (190°C) and cook the chicken for about 15-20 minutes. This method keeps the chicken crispy while using less oil. You can also explore alternative oven techniques like broiling. Broil the chicken for a few minutes at the end to get a nice, golden finish. Just keep an eye on it to prevent burning. For a gluten-free option, substitute flour and breadcrumbs. You can use almond flour or coconut flour instead of regular flour. For breadcrumbs, try gluten-free panko or crushed rice cereal. These swaps keep the crunch while ensuring everyone can enjoy this dish. Always check labels to confirm your ingredients are gluten-free. To keep your crispy cheddar chicken fresh, place it in the fridge. Use airtight containers for best results. Make sure it cools down first before sealing. This helps keep the chicken from getting soggy. It can last up to three days in the fridge. When reheating, I recommend using an oven or toaster oven. This keeps the chicken crispy. Preheat your oven to 350°F (175°C) and bake for about 10-15 minutes. If you use a microwave, cover the chicken to avoid dryness. Check that it reaches 165°F (75°C) for safe eating. To freeze your cooked cheddar chicken, let it cool completely. Wrap each piece tightly in plastic wrap, then place them in a freezer bag. This helps to keep out air and prevent freezer burn. For best results, eat it within three months. When ready to enjoy, thaw in the fridge overnight. Reheat as mentioned above for the best taste and texture. To make chicken crispy, use these key techniques: - Coat the chicken: A good coating is vital. Start with flour, then egg, and finish with breadcrumbs. - Use panko: Panko breadcrumbs give the best crunch. They are lighter and crispier than regular breadcrumbs. - Oil it right: Lightly spray the coated chicken with cooking spray or drizzle olive oil. This helps achieve a golden brown color. - Preheat your oven: Always preheat your oven to 400°F (200°C) before baking. A hot oven cooks the chicken evenly and creates a crispy texture. Yes, you can use frozen chicken breasts, but adjust your cooking time. - Thaw first: Thaw the chicken completely in the fridge for best results. - Increase cooking time: Frozen chicken may need an extra 10-15 minutes in the oven. Always check the internal temperature. Many sides pair nicely with this dish. Here are some popular choices: - Roasted vegetables: Carrots, broccoli, and zucchini add color and nutrition. - Mashed potatoes: Creamy potatoes complement the crunchy chicken. - Salads: A fresh green salad adds a nice crunch and balance. - Rice: Fluffy white rice or seasoned rice works well. Checking the internal temperature is crucial for safety. - Use a meat thermometer: Insert it into the thickest part of the chicken. - Target temperature: Chicken should reach 165°F (75°C) to be safe to eat. - Visual cues: The chicken should be golden brown and juices should run clear. This article guides you through making Easy Crispy Cheddar Chicken. First, we covered the ingredients needed, from chicken breasts to spices. Next, I shared step-by-step instructions to ensure perfect flavor and crispiness. Tips on baking and variations let you customize the dish. Storing and reheating advice ensures you enjoy leftovers at their best. Overall, this chicken recipe is simple, tasty, and versatile, making it a must-try for any meal. Enjoy your cooking and savor these delicious bites!

Craving a dinner that’s both tasty and easy to make? Look no further! This Easy Crispy Cheddar Chicken recipe is your answer to quick family meals. With just a few …

Read more

Categories Dinner Leave a comment
Older posts
Newer posts
← Previous Page1 … Page49 Page50 Page51 … Page124 Next →

TOSSED FLAVORS

Where flavors are fresh, vibrant, and ready to toss! 🥗

PAGES

Home About Contact Privacy Policy Terms & Conditions Cookie Policy GDPR Policy Copyright Policy Disclaimer

CATEGORIES

Appetizers Desserts Salads Breakfast Dinner

Contact

  • Pinterest
  • Mail
Copyright © 2026 Tossed Flavors. All rights reserved.