Skip to content
tossedflavors.com
  • Home
  • Appetizers
  • Desserts
  • Salads
  • Breakfast
  • Dinner
  • Privacy Policy
  • Contact
  • About

Chef Evan

Creamy Spinach Mushroom Gnocchi Delicious Dinner Idea

September 30, 2025 by Chef Evan
- 1 pound potato gnocchi - 2 tablespoons olive oil - 1 medium onion, finely chopped - 3 cloves garlic, minced - 8 ounces mushrooms, sliced (cremini or button) - 5 ounces fresh spinach - 1 cup heavy cream - 1/2 cup grated Parmesan cheese - 1 teaspoon Italian seasoning - Salt and pepper to taste - Fresh parsley, chopped (for garnish) Gather these ingredients before you start cooking. The potato gnocchi makes this dish soft and fluffy. Olive oil brings a rich taste to the mix. The onion and garlic add depth and great aroma. The sliced mushrooms give a nice texture and umami flavor. Fresh spinach adds a pop of color and nutrition. Heavy cream makes the sauce smooth and rich. Parmesan cheese adds a salty kick that enhances all the flavors. Using Italian seasoning ties everything together with a hint of herbs. Don’t forget salt and pepper to adjust the taste. Finally, fresh parsley will make your dish look beautiful. You can find these ingredients at your local grocery store. If you want to make it more special, choose organic or fresh produce. Enjoy the process of cooking and feel free to explore! 1. Fill a large pot with salted water and bring it to a boil. 2. Once boiling, add the potato gnocchi. Cook them until they float to the surface. This usually takes just a few minutes. 3. Carefully drain the gnocchi and set them aside. They are ready when they float up. 1. In a large skillet, heat the olive oil over medium heat. 2. Add the finely chopped onion. Sauté it until it turns translucent, about 4 to 5 minutes. 3. Next, add the minced garlic and sliced mushrooms to the skillet. Cook for 5 to 7 minutes. The mushrooms should be tender and release their moisture. 4. Toss in the fresh spinach. Cook until it wilts, which takes about 2 minutes. 1. Lower the heat and pour in the heavy cream. Stir well to combine. 2. Let the cream simmer for 3 to 4 minutes, allowing it to thicken slightly. 3. Add the grated Parmesan cheese and Italian seasoning. Stir until the cheese melts and the sauce is creamy. 4. Taste and season with salt and pepper as needed. 1. Gently fold the cooked gnocchi into the creamy sauce. Ensure they are well coated. 2. Remove from heat and let the dish sit for a minute. 3. Adjust the seasoning if necessary, and prepare to serve. Enjoy your delicious creamy spinach mushroom gnocchi! To prevent curdling of the cream, always heat it slowly. High heat can cause the cream to separate. Stir it gently as it warms. This helps keep the texture smooth. For the right consistency, let the sauce simmer. This allows it to thicken naturally. If you want it creamier, add a bit more cheese. The Parmesan not only adds flavor but also helps with texture. If you need an alternative for heavy cream, try using half-and-half or coconut milk. These options still give a rich flavor. You can also use Greek yogurt for a lighter choice. For gluten-free gnocchi, look for brands made from rice or corn. Many stores offer gluten-free options now, making it easy to find the right one. Serve the gnocchi in shallow bowls for a nice look. This helps show off the creamy sauce. Add a sprinkle of extra Parmesan on top for a pop of color. Garnish with freshly chopped parsley for brightness. A drizzle of olive oil adds a lovely finishing touch. This not only enhances flavor but also makes the dish look inviting. {{image_2}} To boost flavor, add more veggies to your creamy spinach mushroom gnocchi. Here are some great options: - Sun-Dried Tomatoes: They add a tangy kick. - Bell Peppers: Sweet and colorful, they bring crunch. - Zucchini: Soft and mild, it blends nicely. - Broccoli: Adds a healthy crunch and bright color. - Peas: Sweet and pop with every bite. You can mix and match these to suit your taste. Each vegetable will change the dish slightly but keep it delicious. Want to make your gnocchi heartier? Add some protein! Here are my favorites: - Grilled Chicken: Tender slices pair well with the creamy sauce. - Shrimp: Quick-cooking and flavorful, shrimp adds a seafood twist. - Italian Sausage: Spicy or sweet, it adds depth to your meal. These proteins work well with the dish and add a satisfying element. You can cook them separately or toss them right into the sauce. If you're looking for a vegan or dairy-free option, I've got you covered. Here are a few tips: - Use Vegan Gnocchi: Many brands offer vegan-friendly options. - Swap the Cream: Use coconut cream or cashew cream for a rich texture. - Nutritional Yeast: Replace Parmesan with nutritional yeast for a cheesy flavor without dairy. These swaps keep the dish tasty while meeting your dietary needs. Enjoy the creamy goodness without missing out! To keep your creamy gnocchi fresh, store it in an airtight container. Let it cool down first. Place it in the fridge. Use it within three days for the best taste. If you want to avoid sogginess, layer parchment paper between servings. This keeps the gnocchi and sauce separate. When you reheat creamy gnocchi, do it slowly. Use low heat on the stove. Add a splash of milk or cream to keep it creamy. Stir often to prevent sticking. You can also use the microwave. Heat it in short bursts, stirring in between. This way, you maintain the right texture. Can you freeze creamy gnocchi? Yes, but it’s best to freeze the sauce and gnocchi separately. Cook the gnocchi until just tender, then cool it. Place it in a freezer bag, removing as much air as possible. For the sauce, let it cool, then freeze in a sealed container. When you’re ready, thaw in the fridge overnight, then reheat. Yes, you can make this dish ahead. To prep in advance, cook the gnocchi and sauce separately. Store them in airtight containers in the fridge. - Cook the gnocchi: Boil and drain them as usual. - Prepare the sauce: Follow the steps up to mixing in the cheese. - Store: Keep gnocchi and sauce separate to avoid sogginess. When you're ready to serve, just reheat the sauce. Then, mix in the gnocchi before serving. Yes, this recipe is perfect for vegetarians. It uses only plant-based ingredients like spinach and mushrooms. The heavy cream and Parmesan cheese are dairy products but are vegetarian-friendly. You can easily scale this recipe. For larger servings, just increase the ingredient amounts. Here are some simple tips: - Double the recipe: Use 2 pounds of gnocchi, 4 tablespoons of olive oil, and double all other ingredients. - Mixing: Cook in batches if your pan is small. This ensures everything cooks evenly. - Adjust seasoning: Always taste as you go. You may need a bit more salt and pepper for larger amounts. In this blog post, we covered how to make a creamy gnocchi dish. I shared main ingredients like potato gnocchi, mushrooms, and heavy cream. We went through step-by-step instructions from cooking the gnocchi to making the sauce. I also shared tips for perfect consistency and ways to customize the dish. You can store leftovers easily and even freeze them. Enjoy this recipe as a cozy meal for yourself or a gathering. With a few tweaks and variations, you can make it your own. Happy cooking!

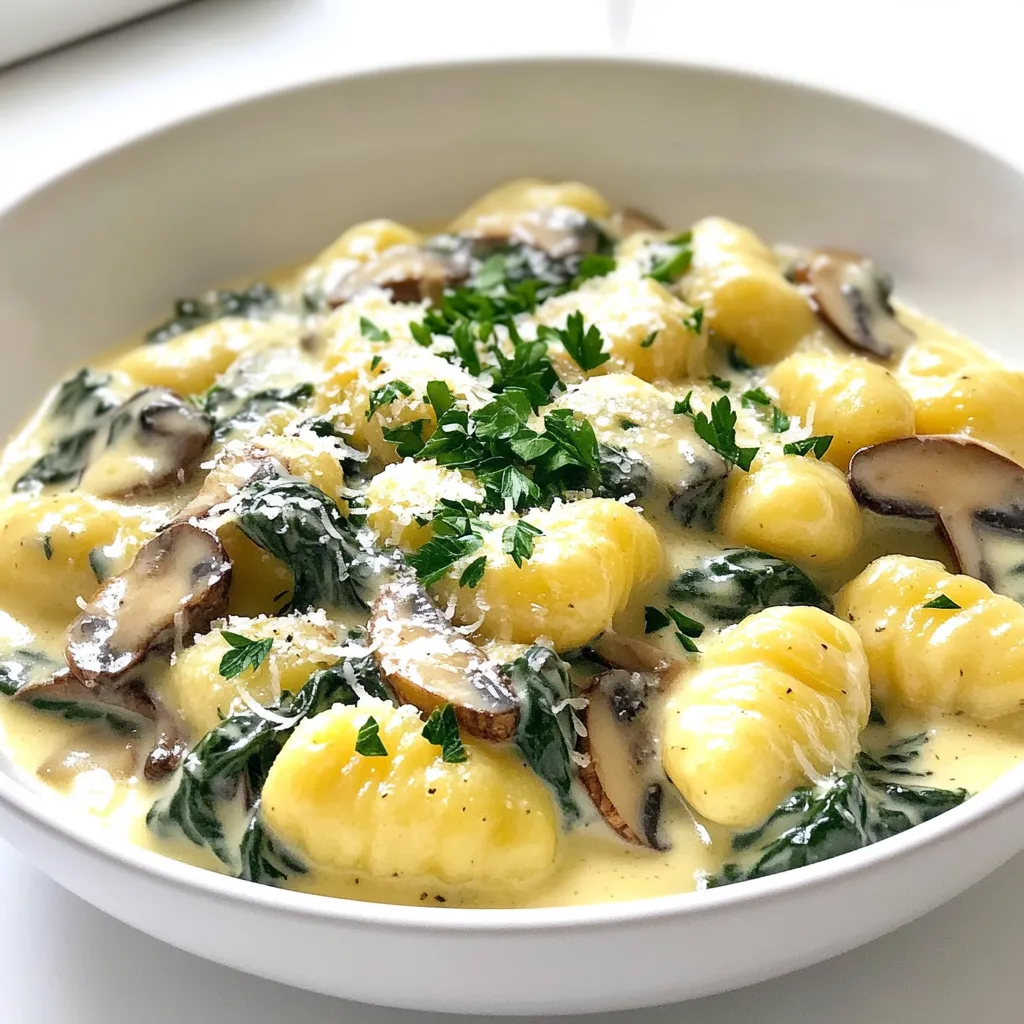
Looking for a quick, tasty dinner idea? Creamy Spinach Mushroom Gnocchi checks all the boxes! This dish combines soft potato gnocchi with fresh spinach, savory mushrooms, and a rich cream …

Read more

Categories Dinner Leave a comment

Pumpkin Chocolate Chip Scones Easy and Tasty Treat

September 30, 2025 by Chef Evan
To make delicious pumpkin chocolate chip scones, gather the following items: - 2 cups all-purpose flour - 1/3 cup granulated sugar - 1 tablespoon baking powder - 1/2 teaspoon baking soda - 1/2 teaspoon salt - 1 teaspoon ground cinnamon - 1/2 teaspoon ground nutmeg - 1/4 cup cold unsalted butter, cubed - 1/2 cup pumpkin puree - 1/4 cup heavy cream - 1 large egg - 1 teaspoon vanilla extract - 1/2 cup chocolate chips - Additional sugar for sprinkling You can switch some ingredients if needed. Here are some good options: - Use whole wheat flour for a nuttier taste. - Swap granulated sugar with brown sugar for a richer flavor. - Coconut oil can replace butter for a dairy-free option. - Use almond milk instead of heavy cream for a lighter scone. - Try using dark chocolate chips for a deeper chocolate flavor. Using high-quality ingredients makes a big difference. Here’s what I recommend: - Choose organic flour for better taste and texture. - Look for pure vanilla extract instead of imitation for true flavor. - Use real pumpkin puree, not pumpkin pie filling, for better results. - Select high-quality chocolate chips for a richer flavor and texture. These tips help you create the best pumpkin chocolate chip scones. Enjoy the process and the tasty results! 1. Preheat your oven to 400°F (200°C). Line a baking sheet with parchment paper to prevent sticking. 2. In a large bowl, whisk together these dry ingredients: - 2 cups all-purpose flour - 1/3 cup granulated sugar - 1 tablespoon baking powder - 1/2 teaspoon baking soda - 1/2 teaspoon salt - 1 teaspoon ground cinnamon - 1/2 teaspoon ground nutmeg 3. Cube 1/4 cup of cold unsalted butter and add it to the dry mix. Use your fingers or a pastry cutter to blend it in. Aim for a crumbly texture, like coarse crumbs. 4. In another bowl, mix together: - 1/2 cup pumpkin puree - 1/4 cup heavy cream - 1 large egg - 1 teaspoon vanilla extract Stir until the mixture is smooth and well combined. 5. Pour the pumpkin mixture into the bowl with dry ingredients. Gently fold until just mixed. Avoid overmixing; this keeps the scones light. 6. Fold in 1/2 cup chocolate chips. Make sure they are evenly spread throughout the dough. 1. Turn the dough onto a floured surface. Pat it into a circle about 1-inch thick. 2. Cut the dough into 8 wedges, like cutting a pizza. Place these on your prepared baking sheet. 3. Sprinkle a bit of sugar on top of each scone for extra sweetness and crunch. 4. Bake the scones in the preheated oven for 15-18 minutes. They should turn golden brown. A toothpick inserted in the center should come out clean. 1. After baking, let the scones cool on the baking sheet for a few minutes. 2. Transfer them to a wire rack to cool completely. 3. Serve warm with a pat of butter or a dusting of powdered sugar. For a charming look, arrange them on a rustic wooden platter. To get the best texture in your pumpkin chocolate chip scones, follow these steps: - Use cold butter. It helps create flaky layers. - Combine the dry and wet ingredients gently. Stir until just mixed; don’t overwork the dough. - Pat the dough into a circle instead of rolling it out. This keeps it thick and moist. To make your scones burst with flavor, consider these tips: - Add extra spices. A pinch of ginger or cloves can elevate the taste. - Use high-quality chocolate chips. They make a big difference in flavor. - Try adding a splash of maple syrup to the pumpkin mixture for a deeper sweetness. Here are some common pitfalls when making these scones: - Overmixing the dough. This leads to tough scones instead of tender ones. - Skipping the sugar sprinkle. It adds a nice crunch and extra sweetness on top. - Not checking the oven temperature. An oven that’s too hot or too cool can ruin the bake. Always use an oven thermometer for accuracy. {{image_2}} You can easily make gluten-free pumpkin chocolate chip scones. Just swap the all-purpose flour for a gluten-free blend. Look for one that works cup-for-cup. This keeps the texture nice and light. The result will still taste great and be safe for those avoiding gluten. To make vegan pumpkin chocolate chip scones, replace the butter with coconut oil. Use a plant-based milk instead of heavy cream. You can also substitute the egg with a flaxseed meal. Mix one tablespoon of flaxseed with three tablespoons of water. Let it sit for five minutes. This will work as a binding agent, just like the egg. You can add your favorite nuts to the scone dough. Chopped walnuts or pecans add a nice crunch. You could also boost the spices. Try adding ginger, allspice, or cloves for extra warmth. If you want a sweeter scone, toss in some dried cranberries or raisins. These small changes can create a new flavor profile that keeps it exciting! To keep your pumpkin chocolate chip scones fresh, store them in an airtight container. They stay good at room temperature for about 2 days. If you want to keep them longer, place them in the fridge. This will help them last up to a week. Just remember to let them cool completely before sealing them up. If you want to enjoy these scones later, freezing is a great option. Wrap each scone tightly in plastic wrap. Then, place them in a freezer bag or container. Make sure to label with the date. They can stay frozen for up to 3 months. When you're ready to eat, just take out what you need. To reheat your scones, preheat your oven to 350°F (175°C). Place the scones on a baking sheet. Heat for about 10 minutes. This brings back their crispy edges and soft centers. You can also microwave them for 15-20 seconds. Just be careful, as they can get chewy if heated too long. Enjoy your delicious scones! Yes, you can use fresh pumpkin. First, cook the pumpkin. You can roast or steam it. Once soft, let it cool. Then, mash it until smooth. Use it just like canned puree. This fresh pumpkin adds a nice touch to your scones. You can tell when scones are done by their color. They should be golden brown. Insert a toothpick in the center. If it comes out clean, they are ready. If it has wet batter, bake them a bit longer. Watch closely towards the end of baking. Pumpkin chocolate chip scones taste great with many things. You can serve them warm with butter. Cream cheese or a sweet glaze also works well. For drinks, try coffee or tea. These pair nicely and enhance the flavors of the scones. In this post, we explored all you need for making pumpkin chocolate chip scones. We covered key ingredients, substitutions, and tips to achieve the best texture and flavor. You learned about gluten-free and vegan options, too. Remember to store your leftovers properly and freeze for later use. By avoiding common mistakes and following these steps, you can enjoy tasty scones any time. Use this guide to bake with confidence and impress everyone with your delicious results. Happy baking!

Get ready to delight your taste buds with these Pumpkin Chocolate Chip Scones! In this easy recipe, I will guide you step-by-step to create a tasty treat perfect for any …

Read more

Categories Desserts Leave a comment

Chocolate Hazelnut Mug Cake Quick and Easy Recipe

October 19, 2025September 30, 2025 by Chef Evan
- 4 tablespoons all-purpose flour - 4 tablespoons granulated sugar - 2 tablespoons unsweetened cocoa powder - 1/4 teaspoon baking powder - 1/8 teaspoon salt To make a delicious chocolate hazelnut mug cake, you need some key ingredients. The all-purpose flour gives the cake structure. Granulated sugar adds sweetness. Unsweetened cocoa powder gives it that rich chocolate flavor. Baking powder helps the cake rise, while salt enhances the taste. - 1 tablespoon chocolate hazelnut spread - 1 tablespoon chopped hazelnuts - A pinch of vanilla extract - 3 tablespoons milk (or almond milk) You can make your mug cake even better with some optional ingredients. Chocolate hazelnut spread, like Nutella, adds a gooey center. Chopped hazelnuts give a nice crunch. A pinch of vanilla extract adds warmth. You can use regular or almond milk, depending on your taste. Choosing almond milk can make it dairy-free. {{ingredient_image_1}} Start by choosing a mug that holds about 12 ounces. This size gives the cake room to rise. A microwave-safe mug is very important. This keeps the mug from cracking while cooking. First, combine the dry ingredients. In your mug, add: - 4 tablespoons all-purpose flour - 4 tablespoons granulated sugar - 2 tablespoons unsweetened cocoa powder - 1/4 teaspoon baking powder - 1/8 teaspoon salt Whisk these together well. Next, add the wet ingredients: - 3 tablespoons milk (or almond milk) - 2 tablespoons vegetable oil - A pinch of vanilla extract (optional) Stir until you have a smooth batter. Make sure there are no lumps. This step is key to a good texture. Now, it’s time to add the chocolate hazelnut spread. Carefully spoon 1 tablespoon into the center of the batter. Do not mix it in; you want it to stay on top for a gooey center. If you like, sprinkle 1 tablespoon of chopped hazelnuts on top. Microwave the mug on high for 40 to 60 seconds. Start with 40 seconds and check the cake. If it’s not done, microwave in 10-second increments. The cake should rise and be set but still slightly moist. Let the mug cake cool for a minute before you dig in. Enjoy your warm, delicious creation! To get the best gooey center, add the chocolate hazelnut spread right in the middle. Don't mix it in. This creates a warm, melty surprise. The key to success is to watch the cooking time. Start with 40 seconds in the microwave. Check it, and if it needs more time, add 10 seconds. Overcooking can lead to a dry mug cake. Aim for a cake that is set but still moist. Add toppings to make your mug cake even better. Try a dollop of whipped cream or a scoop of vanilla ice cream. You can also sprinkle more chopped hazelnuts on top. For a twist, use flavored milk. Almond milk adds a nice nutty taste, while chocolate milk boosts the chocolate flavor. Experiment with what you like best. Serve your mug cake warm right in the mug for a cozy feel. If you're feeling creative, flip the mug over onto a plate. This gives a fun, fancy look. You can add a drizzle of chocolate sauce around the plate or a dusting of cocoa powder on top. These small touches make it feel special and inviting. Pro Tips Use a Larger Mug: Ensure to use a mug with at least a 12 oz capacity to prevent overflow while the cake rises during microwaving. Check for Doneness: Microwaves vary in power; start with 40 seconds and check. If the cake is slightly wet but set, it's perfect! Customize Flavors: Feel free to add a pinch of cinnamon or a dash of espresso powder to enhance the chocolate flavor of your mug cake. Top it Off: For an extra indulgent treat, top your mug cake with whipped cream, a scoop of ice cream, or a drizzle of chocolate syrup. {{image_2}} You can switch hazelnuts for other nuts. Try walnuts or almonds for a different taste. Each nut brings its own flavor. If you want to make it nut-free, use seeds. Sunflower seeds or pumpkin seeds are great choices. They add crunch without nuts. To make a gluten-free version, swap all-purpose flour for a gluten-free blend. Check that your baking powder is also gluten-free. You can enjoy this mug cake without gluten. For a vegan adaptation, use almond milk instead of regular milk. Replace the chocolate hazelnut spread with a vegan option. This keeps the mug cake plant-based and tasty. You can add other chocolate spreads, like peanut butter or almond butter. Each spread adds a new twist to your mug cake. For extra flavor, infuse it with coffee or mint. A dash of instant coffee can give a rich taste. A drop of mint extract can add a refreshing kick. Experiment with flavors to find your perfect mug cake! To keep your chocolate hazelnut mug cake fresh, place it in an airtight container. This method helps lock in moisture and flavor. If you have leftovers, store it in the fridge. It will stay good for up to two days. When it's time to reheat, you can use the microwave. Heat your mug cake for 10-15 seconds. Check to see if it’s warm throughout. If it needs more time, add a few more seconds. Be careful not to overheat it, as this can make the cake tough. The mug cake stays fresh for about two days in the fridge. After that, it may lose its taste and texture. If you notice any hard spots or a dry texture, it’s time to toss it. Also, if you see mold or an off smell, do not eat it. Always trust your senses when it comes to food safety! Yes, you can make this mug cake in the oven. Use an oven-safe dish. Preheat your oven to 350°F (175°C). Pour the batter into the dish, then bake for about 15-20 minutes. Check the cake with a toothpick to see if it's done. If you don’t have a microwave, use the oven method I mentioned. You can also try steaming it over boiling water for about 10-15 minutes. This will give you a moist mug cake without a microwave. Yes, you can double the recipe. Just mix the ingredients in a larger bowl. Divide the batter between two mugs. Make sure not to fill the mugs too high. Microwave each mug for about 1-2 minutes, checking for doneness. To make your mug cake less sweet, reduce the sugar. You can cut down the sugar to 2 tablespoons. You can also use unsweetened cocoa powder to balance the flavor. This gives a nice chocolate taste without too much sweetness. Yes, this recipe is great for kids. It’s easy and quick to make. Just be sure to supervise them with the microwave. They will love the gooey chocolate hazelnut center! This blog post covered everything you need for a delicious chocolate hazelnut mug cake. We explored the right ingredients, easy steps to mix and bake, and tips for perfecting the texture. I shared fun variations to suit your tastes and how to store any leftovers. In conclusion, this quick dessert is simple and fun to make. Enjoy making it your own, and share the joy with friends and family!

Craving a warm, sweet treat? Look no further than my Chocolate Hazelnut Mug Cake! In just a few minutes, you can whip up a gooey, chocolatey delight with simple ingredients. …

Read more

Categories Desserts Leave a comment

Coconut Caramel Samoas Bars Irresistible Delight

November 29, 2025September 30, 2025 by Chef Evan
- Unsweetened shredded coconut: This adds a rich, chewy texture. It balances sweetness and gives a tropical flavor. Use fresh coconut if you can. It enhances the bar's taste. - Rolled oats: They give structure and heartiness. Oats absorb moisture and bind the bars. This helps them hold together and adds a nutty flavor. - All-purpose flour: This is key for binding. It provides the base for the bars. Flour helps create a nice, firm crust that contrasts with the soft top. - Brown sugar vs. granulated sugar: Brown sugar adds a deeper flavor. It gives a hint of caramel. Granulated sugar is sweeter and helps with texture. Using both provides balance. - Vanilla extract and salt: Vanilla extract brightens the flavor. It adds warmth and richness. A pinch of salt enhances sweetness, making every bite more flavorful. - Sweetened condensed milk: This is the secret to a gooey topping. It binds the coconut together and adds sweetness. It makes the bars rich and creamy. - Semi-sweet chocolate chips: These add a melt-in-your-mouth experience. They provide a nice contrast to the coconut caramel. Their sweetness balances the flavors perfectly. - Coconut oil: This helps the chocolate melt smoothly. It prevents the chocolate from hardening too much. Coconut oil adds a subtle coconut taste, enhancing the overall flavor. {{ingredient_image_1}} 1. First, preheat your oven to 350°F (175°C). Grease a 9x9-inch baking pan or line it with parchment paper. This makes it easy to remove the bars later. 2. In a medium bowl, mix together 1 cup of unsweetened shredded coconut and 1 cup of rolled oats. Set this bowl aside for later. 3. Take a large mixing bowl and cream together 1/2 cup of softened unsalted butter and 1/2 cup of brown sugar. Mix until it’s light and fluffy. 4. Add 1/2 cup of granulated sugar, 1/4 teaspoon of salt, and 1/2 teaspoon of vanilla extract to the butter mixture. Stir well until everything is combined. 5. Gradually add 1 cup of all-purpose flour to the bowl. Mix gently until just combined. 6. Fold in the coconut and oat mixture until you see it evenly spread throughout the dough. 7. Press the dough firmly into the bottom of your prepared baking pan. Ensure it forms an even layer across the base. 1. Place the pan in the preheated oven and bake for 15 to 20 minutes. 2. Keep an eye on it. The bars are done when they turn golden brown. Remove them from the oven and let them cool slightly. 1. In a small saucepan, combine 1/2 cup of sweetened condensed milk and a pinch of salt. Heat it over low heat, stirring gently until it's warmed through. 2. Add the remaining shredded coconut to the mixture. Stir until it’s well combined. 3. Once your base has cooled a bit, spread the coconut caramel mixture evenly over it. Press down gently to help it stick. 1. In a microwave-safe bowl, combine 1 cup of semi-sweet chocolate chips and 1 tablespoon of coconut oil. 2. Microwave this mixture in 30-second intervals, stirring in between, until it melts and becomes smooth. 3. Drizzle the melted chocolate over the coconut caramel layer. You can also use a knife to create a marbled effect by swirling the chocolate around. 4. Let the bars set at room temperature or pop them in the fridge for about 30 minutes to speed things up before cutting them into squares. - Importance of ingredient temperatures: Use room temperature butter. Cold butter makes mixing hard. It leads to a dense bar. Let your butter sit out for about 30 minutes. This helps it cream well with the sugars. Room temperature eggs also help the mix blend smoothly. - How to avoid overmixing: Mix just until ingredients combine. Overmixing makes the bars tough. When adding flour, stir gently. You want a soft, sticky dough. Once the flour disappears, stop mixing. This keeps your bars light and chewy. - Tips for adjusting baking time based on oven variations: Ovens can bake unevenly. Check your bars at 15 minutes. If they look pale, give them a few more minutes. Use a toothpick to test doneness. It should come out clean or with few crumbs. - Signs of perfect doneness for the base layer: Look for a golden brown color. The edges should be firm but soft in the middle. Let it cool slightly before adding the coconut caramel. This helps layers stick together better. - Creative ways to serve Coconut Caramel Samoas Bars: Cut the bars into squares and place them on a nice plate. You can stack them for a fun display. Pair them with a scoop of vanilla ice cream for a treat. - Garnishing ideas for an impressive presentation: Drizzle melted chocolate over the top. Add toasted coconut flakes for crunch. A sprinkle of sea salt can enhance flavors too. These small touches make your bars look and taste gourmet. Pro Tips Use Fresh Coconut: For an enhanced flavor, consider using fresh coconut instead of shredded. It adds a delightful texture and taste. Cool Before Cutting: Let the bars cool completely before cutting. This helps the layers set properly and makes for cleaner squares. Experiment with Toppings: Feel free to add chopped nuts or drizzle caramel sauce on top for an extra layer of flavor and crunch. Storage Tips: Store the bars in an airtight container at room temperature for up to a week or refrigerate for longer freshness. {{image_2}} To make Coconut Caramel Samoas Bars even better, try adding nuts or dried fruit. Chopped almonds or pecans give a nice crunch. Dried cherries or apricots add a sweet twist. These small changes can really boost the flavor and texture. If you want to change how sweet the bars are, consider using alternative sweeteners. You can use agave syrup or coconut sugar. These options can fit different diets while still tasting great. You can switch up the toppings for a new look. Instead of semi-sweet chocolate, try white or dark chocolate. Each type brings its own unique flavor. White chocolate adds a creamy touch, while dark chocolate gives a rich taste. Drizzling caramel sauce over the top is another fun idea. It adds a sweet and sticky finish. You can also mix it with the chocolate for a delicious swirl effect. For a gluten-free version, use almond flour or coconut flour instead of all-purpose flour. These flours keep the bars tasty and enjoyable. Be sure to check all other ingredients too. Some brands of chocolate chips and sweetened condensed milk may have gluten. Always read labels to keep your bars gluten-free without losing flavor. To keep your Coconut Caramel Samoas Bars fresh, store them at room temperature. Place the bars in an airtight container. This will help them stay soft and tasty for up to a week. If you want to keep them longer, you can refrigerate them. Just make sure to wrap each bar in plastic wrap. This will prevent them from drying out in the fridge. You can also freeze them. Place the wrapped bars in a freezer bag. They can last up to three months in the freezer. Coconut Caramel Samoas Bars are best enjoyed fresh. They stay good for about one week at room temperature. In the fridge, they can last about two weeks. Look for signs of spoilage. If you see mold or an odd smell, it's best to toss them. The bars may also become hard over time. If they lose their soft texture, they may not taste as good. How to make Coconut Caramel Samoas Bars vegan? To make these bars vegan, swap the butter for coconut oil. Use a plant-based sweetened condensed milk or make your own with coconut milk and sugar. This change keeps the bars creamy and delicious without dairy. Can I use different types of chocolate? Yes, you can! Try dark chocolate for a richer flavor. White chocolate also works well if you prefer a sweeter taste. Each type offers a unique twist to your bars. What can I substitute for sweetened condensed milk? Coconut cream mixed with sugar is a great swap. You can also blend soaked cashews with a bit of maple syrup for a creamy option. Both alternatives keep the bars tasty and rich. What to do if the bars are too crumbly? If your bars crumble, they may need more moisture. Try adding a tablespoon of melted butter or coconut oil to the mix. Press the mixture down firmly in the pan to help it hold together. How to fix overly sticky bars? If your bars are too sticky, they may need more flour. Add a tablespoon of all-purpose flour to the mixture. Chill the bars in the fridge for a bit to help them firm up before cutting. Best beverages to pair with Coconut Caramel Samoas Bars These bars go well with cold milk or a warm cup of coffee. Try pairing them with a fruity iced tea for a refreshing touch. Each drink complements the sweet coconut flavor nicely. Ideas for serving these bars for special occasions For special events, cut the bars into fancy shapes or serve them in cute wrappers. Drizzle extra melted chocolate on top and sprinkle toasted coconut for a stunning finish. This blog post covered how to make delicious Coconut Caramel Samoas Bars. We explored essential ingredients like coconut, oats, and chocolate, and learned clear baking steps. I shared tips on perfecting texture, adjusting baking times, and creative serving ideas. Variations allow for personalization while ensuring taste. Enjoy these bars fresh or stored for later. With practice, you'll master this recipe and impress your friends and family. Happy baking!

If you crave a sweet treat that perfectly blends coconut and caramel, you’re in for a real delight! My Coconut Caramel Samoas Bars are easy to make and are sure …

Read more

Categories Desserts Leave a comment

Garlic Herb Chicken and Brussels Sprouts Sheet Pan Delight

September 29, 2025 by Chef Evan
For this dish, you will need: - 4 boneless, skinless chicken thighs - 4 cloves garlic, minced - 2 tablespoons fresh rosemary, chopped - 2 tablespoons fresh thyme, chopped - 1 lemon, juiced and zested - 3 tablespoons olive oil - Salt and pepper to taste - 1 teaspoon paprika These chicken thighs are juicy and full of flavor. The garlic adds zest, while rosemary and thyme give it a fresh touch. Lemon juice brightens the dish, making it taste alive. You will also need: - 1 lb Brussels sprouts, halved - Olive oil - Salt and pepper to taste Brussels sprouts have a unique taste that pairs well with chicken. When roasted, they become tender and have a slight sweetness. The olive oil helps them crisp up nicely. To create a flavorful marinade, mix these ingredients: - Minced garlic - Chopped rosemary - Chopped thyme - Lemon juice - Lemon zest - Olive oil - Paprika - Salt and pepper This marinade is the key to tasty chicken. It infuses every bite with rich, herbaceous flavor. Plus, the acid from lemon juice helps tenderize the chicken. This blend makes every part of the meal shine. First, set your oven to 400°F (200°C). This high heat helps the chicken and Brussels sprouts cook well. While the oven heats, grab your chicken thighs. They should be boneless and skinless for the best results. In a big bowl, mix together 4 cloves of minced garlic, 2 tablespoons each of chopped rosemary and thyme, juice and zest from 1 lemon, 3 tablespoons of olive oil, 1 teaspoon of paprika, and salt and pepper. This mix is your marinade. Add the chicken thighs to the marinade and coat them completely. Let them sit for at least 15 minutes. If you have more time, marinate them in the fridge for a few hours. While the chicken marinates, take 1 pound of Brussels sprouts and cut them in half. In another bowl, drizzle them with olive oil and season with salt and pepper. Toss the sprouts well so they get coated. This step adds flavor and helps them roast nicely. Once the chicken has marinated, take a large sheet pan. Place the chicken thighs on the pan, spaced out well. Next, add the seasoned Brussels sprouts around the chicken. Pour any leftover marinade over the sprouts for more taste. Put the sheet pan in your preheated oven. Roast for 25 to 30 minutes. The chicken should reach an internal temperature of 165°F (75°C). The Brussels sprouts will be tender and caramelized. When done, take them out and let them rest for a few minutes. Before serving, sprinkle with fresh parsley for a pop of color and flavor. Enjoy your meal! To get the best taste, marinate the chicken. I use garlic, herbs, and lemon juice. This combo adds a nice kick. Let the chicken sit in the marinade for at least 15 minutes. For deeper flavor, marinate for a few hours or overnight. The longer, the better! This helps the chicken soak up all the tasty juices. If you use chicken breasts instead of thighs, adjust your cooking time. Breasts cook faster due to less fat. They may need about 20 to 25 minutes. Always check for doneness. The chicken should reach 165°F (75°C). A meat thermometer ensures you don’t overcook. For great Brussels sprouts, cut them in half. This helps them cook evenly. Toss them with olive oil, salt, and pepper. Spread them out on the pan. Crowding can make them soggy. Aim for a single layer. Roast until they turn golden brown and crisp. This brings out their natural sweetness! {{image_2}} You can swap chicken thighs for chicken breasts. Breasts cook faster, so check them early. Bone-in chicken legs work well too. They stay juicy and add rich flavor. Just remember to adjust the cooking time. If using other meats, consider their cooking times. Brussels sprouts are great, but you can try other veggies. Carrots add sweetness and color. Broccoli provides a nice crunch. Cauliflower can soak up flavors well. Bell peppers bring a pop of freshness. Just cut them into even pieces to ensure they cook evenly. Herbs and spices can change this dish a lot. Instead of rosemary and thyme, use oregano or basil for a twist. A sprinkle of cumin adds warmth and depth. If you like heat, try chili flakes or cayenne pepper. Experimenting helps you find your perfect flavor! After your meal, let the chicken and Brussels sprouts cool down. This step prevents condensation in your storage container. Once cool, place them in an airtight container. You can store them in the fridge for up to three days. This keeps your meal fresh and safe to eat. Remember to label the container with the date. This way, you will know how long it has been stored. When you are ready to enjoy leftovers, you can reheat them easily. Preheat your oven to 350°F (175°C). Place the chicken and Brussels sprouts on a baking sheet. Cover them with foil to keep moisture in. Heat for about 15-20 minutes, or until warmed through. You can also use a microwave if you're in a hurry. Just heat in short bursts, stirring in between to ensure even heating. If you want to save leftovers for later, freezing is a good option. First, let the chicken and Brussels sprouts cool completely. Then, divide them into small portions. Place each portion in a freezer-safe bag or container. Make sure to remove as much air as possible before sealing. Label each bag with the date. You can freeze them for up to three months. When you are ready to eat, thaw in the fridge overnight before reheating. You can check if the chicken is done by using a meat thermometer. Insert it into the thickest part of the thigh. The safe internal temperature for chicken is 165°F (75°C). If you don't have a thermometer, cut into the chicken. The meat should be white, not pink. Yes, you can use frozen Brussels sprouts. However, they may release extra moisture when cooked. This can make them less crispy. If you want a better texture, thaw and pat them dry before using. This dish pairs well with many sides. You could serve it with rice, quinoa, or mashed potatoes. A fresh salad or crusty bread also makes a great addition. Choose sides that you enjoy to complete your meal. Absolutely! This recipe is perfect for meal prep. You can cook a batch and store it in the fridge. It lasts for about 3 to 4 days. Just reheat portions as needed for a quick and healthy meal. Garlic Herb Chicken with Brussels sprouts is simple and tasty. We covered key ingredients, like chicken and veggies, and how to roast them right. I shared tips for marinating for more flavor and cooking different chicken cuts. You also learned about variations to keep meals fresh and exciting, plus storage tips for leftovers. Enjoy cooking this dish and feel proud of your meal. Follow these steps and tips for success. Happy cooking!

Are you ready to elevate your weeknight dinners? This Garlic Herb Chicken and Brussels Sprouts Sheet Pan Delight is easy, tasty, and healthy! In just a few steps, you’ll combine …

Read more

Categories Dinner Leave a comment

Cinnamon Spiced Apple Butter Slow Cooker Delight

September 29, 2025 by Chef Evan
To make this rich apple butter, gather these main ingredients: - 6 pounds of assorted apples (like Honeycrisp, Granny Smith, and Fuji), peeled and diced - 1 cup brown sugar - 1/2 cup granulated sugar - 1 tablespoon lemon juice - 1/2 cup apple cider - 1/4 teaspoon salt These ingredients form the base of your apple butter, giving it sweetness and depth. The right spices make this apple butter truly special. Here are the key spices to add: - 2 teaspoons ground cinnamon - 1/2 teaspoon ground nutmeg - 1/4 teaspoon ground allspice - 1/4 teaspoon ground cloves These spices bring warmth and flavor to your apple butter, enhancing the taste of the apples. Selecting the right apples is crucial for great apple butter. I recommend using a mix of sweet and tart apples. Honeycrisp apples add sweetness, while Granny Smith apples provide a nice tartness. Fuji apples also offer a sweet flavor and good texture. This blend creates a well-rounded taste that makes your apple butter shine. Start by peeling and dicing your apples. I like using a mix of sweet and tart apples. Honeycrisp, Granny Smith, and Fuji work well together. Aim for about 6 pounds of apples. The more variety, the better the flavor. In a big bowl, combine the diced apples with sugar and spices. Add 1 cup of brown sugar and 1/2 cup of granulated sugar. Sprinkle in 2 teaspoons of ground cinnamon, 1/2 teaspoon of nutmeg, and a pinch of allspice and cloves. Don’t forget the tablespoon of lemon juice and 1/2 cup of apple cider! Mix everything well. This ensures that every piece of apple gets coated. Now, transfer this tasty apple mix to your slow cooker. Spread it out evenly and cover it with the lid. Set the slow cooker to low and let it cook for 8 to 10 hours. Stir the mixture halfway through. The apples should become soft and easy to mash. After cooking, it’s time to blend! Use an immersion blender to make it smooth. If you don’t have one, you can use a regular blender in small batches. Once it's blended, return it to the slow cooker. Cook it uncovered for an extra hour. This step helps thicken the apple butter and makes the flavors pop. Let it cool before putting it into jars. To get the right thickness for your apple butter, blending is key. After cooking, use an immersion blender. This tool makes it easy to mix the apples until smooth. If you don’t have one, use a regular blender. Just blend in small batches. After blending, cook it uncovered for an hour. This step will help thicken it up nicely. You can make your apple butter even tastier with simple tweaks. Try adding a splash of vanilla extract. This adds a warm depth to the flavor. You can also mix in a bit of maple syrup for a sweet twist. If you like it spicy, add more cinnamon or a pinch of ginger. Just remember to taste as you go! Stirring your apple butter is important. It helps prevent sticking and burning. I suggest stirring halfway through the cooking time. This way, you can check the consistency too. Keep an eye on your slow cooker. If you notice it getting too thick too quickly, add a bit of apple cider. This keeps your apple butter nice and smooth. {{image_2}} You can swap out regular sugar for healthier sweeteners. Try honey or maple syrup. These options add a nice flavor and can lower the calorie count. If you prefer a no-calorie option, use stevia or monk fruit sweetener. Just adjust the amount, as these are often sweeter than sugar. Feel free to get creative with spices! You can add ginger for a warm kick. Cardamom brings a lovely floral note. Try adding a pinch of cayenne for a spicy twist. Each spice changes the apple butter's flavor profile, making it fun to experiment. You don't have to stick with just apples. You can mix in pears or peaches for a fruity blend. Try adding some berries for a tart flavor. Just remember to adjust the sugar based on the sweetness of the fruit you choose. Mixing fruits gives a fresh twist to the classic apple butter. I recommend using clean glass jars to store your apple butter. Make sure the jars are dry. Fill each jar, leaving some space at the top. Seal them tightly with lids. Store the jars in a cool, dark place. You can also keep some in the fridge for easy access. Homemade apple butter lasts up to two weeks in the fridge. If you want it to last longer, you can freeze it. In the freezer, it stays good for up to six months. Just make sure to use airtight containers or freezer bags. This will prevent freezer burn and keep it fresh. If you have leftover apple butter, there are many ways to use it. Spread it on toast or pancakes for breakfast. It’s also great in oatmeal or yogurt. You can mix it into smoothies for added flavor. Try using it as a filling for pastries or cakes. The options are endless! Yes, you can make apple butter on the stove. Cook the apples in a large pot over low heat. Stir often to prevent burning. You will need to watch it closely. The cooking time may be shorter, around 2-3 hours. Blend it like you would in the slow cooker. Homemade apple butter lasts about 1 week in the fridge. Store it in a clean jar with a tight lid. If you want to keep it longer, freeze it. It can last up to 6 months in the freezer. Just thaw it in the fridge before using. Apple butter is great on toast, pancakes, and scones. You can use it in baking, too, like in muffins or cakes. It adds moisture and flavor. You can even swirl it into yogurt or oatmeal for a tasty breakfast treat. Yes, you can can apple butter! Use sterilized jars and lids. Fill jars while hot, leaving a little space at the top. Process them in a water bath for about 10-15 minutes. This will help it last for up to a year on your shelf. This blog post covers how to make delicious cinnamon spiced apple butter. We explored the main ingredients, spices, and the best apples to use. I shared step-by-step instructions, plus tips for perfect consistency and flavor. You also learned about fun variations and proper storage methods. Homemade apple butter offers a tasty treat that lasts. Try it as a spread or in recipes. Now, it's time to make your own apple butter and enjoy its sweet flavors!

Get ready to enjoy a warm, cozy treat with my Cinnamon Spiced Apple Butter Slow Cooker Delight! This easy recipe transforms fresh apples into a thick, sweet spread that’s bursting …

Read more

Categories Desserts Leave a comment

Pumpkin Pie Cheesecake Bites Air Fryer Delight

September 29, 2025 by Chef Evan
- 1 cup pumpkin puree - 8 oz cream cheese, softened - 1/2 cup granulated sugar - 1/4 cup brown sugar - 1 teaspoon vanilla extract - 1 teaspoon ground cinnamon - 1/2 teaspoon ground nutmeg - 1/4 teaspoon ground ginger - 1/4 teaspoon salt - 1 package refrigerated pie crust (or homemade) - 1 egg, beaten (for egg wash) - Whipped cream and ground cinnamon for garnish You can swap pumpkin puree with sweet potato puree for a different flavor. Cream cheese can be replaced with mascarpone cheese for a richer taste. If you want a lower sugar option, use a sugar substitute like stevia. For a dairy-free version, choose a plant-based cream cheese. To make these bites, you need: - A large mixing bowl for mixing ingredients - A rolling pin to flatten the pie crust - A cookie cutter or glass for cutting circles - An air fryer for cooking - A fork for sealing the bites - A brush for applying the egg wash To start, I mix the creamy filling. In a large bowl, combine 8 oz of softened cream cheese, 1 cup of pumpkin puree, 1/2 cup of granulated sugar, and 1/4 cup of brown sugar. I add 1 teaspoon of vanilla extract for flavor. Then, I blend this mixture until it’s smooth and creamy. Next, I add spices. I sprinkle in 1 teaspoon of ground cinnamon, 1/2 teaspoon of ground nutmeg, 1/4 teaspoon of ground ginger, and 1/4 teaspoon of salt. I mix until everything is well combined. This filling is rich and full of fall flavors. Now, it's time to shape the bites. I roll out my pie crust on a floured surface. I make sure it’s nice and smooth. Using a cookie cutter or a glass, I cut out circles, about 3-4 inches wide. For each circle, I scoop 1 tablespoon of the pumpkin cheesecake filling and place it in the center. Next, I fold the crust over the filling. To seal the bites, I crimp the edges with a fork. This creates a nice pocket for the filling. I brush each bite with a beaten egg. This step helps them turn golden brown when cooked. I preheat my air fryer to 330°F (165°C). Once it’s hot, I carefully place the bites in the basket. I ensure they don’t touch. This helps them cook evenly. I air fry for 10-12 minutes, or until they are golden brown. Halfway through the cooking time, I check the bites. If they need it, I gently shake the basket to help them cook evenly. This little tip keeps them from sticking together. Once they’re done, I take them out and let them cool a bit. They smell amazing! I serve them warm with a dollop of whipped cream and a sprinkle of ground cinnamon. Enjoy this delightful treat! For a perfect golden finish, brush each bite with beaten egg. This step helps the crust turn a lovely shade of brown. The air fryer cooks quickly, so keep an eye on them. If they're not golden after 10 minutes, air fry for another 2 minutes. This small change can make a big difference. One common mistake is overfilling the bites. If you add too much filling, they may burst. Aim for one tablespoon of filling per bite. Another mistake is not sealing the edges well. Use a fork to crimp them tight. This keeps the filling inside and the crust crisp. To boost the flavor, try adding a pinch of ground cloves. It pairs well with pumpkin and spices. You can also mix in some chocolate chips for a sweet twist. Top the bites with a dusting of cinnamon after cooking. These small changes can take your bites to the next level. {{image_2}} You can easily change these bites for the seasons. Adding cranberries gives a nice twist. The tartness of cranberries contrasts well with the sweet pumpkin filling. You can mix in about half a cup of fresh or dried cranberries into the filling. This adds color and a fresh taste. It’s a fun way to make your bites festive and bright. You don’t have to stick with pie crust. Try using phyllo dough for a lighter option. Phyllo gives a crispy texture that many enjoy. You can also use graham cracker crumbs mixed with melted butter for a sweet crust. Just press the mixture into the bottom of your air fryer basket before adding the filling. Each crust option brings its own charm, so feel free to experiment! The filling is not just for pumpkin. You can mix in different flavors too. Try adding a pinch of cocoa powder for a chocolatey twist. Or, mix in some maple syrup for a deeper sweetness. You can even add a splash of orange zest for a citrus kick. These little changes can make your bites unique and fun to share. To keep your pumpkin pie cheesecake bites fresh, store them in an airtight container. Make sure they are completely cool before sealing. This helps prevent moisture. You can keep them in the fridge for up to three days. If you want to enjoy them later, freezing is a great option. To reheat your bites, use the air fryer again. Preheat the air fryer to 300°F (150°C). Place the bites in a single layer and heat for about 5 minutes. This will make them warm and crispy again. You can also use a microwave, but the crust may not stay crispy. Heat in 10-second intervals until warm. Freezing is simple! First, let the bites cool completely. Then, place them on a baking sheet lined with parchment paper. Freeze them for about 1 hour. After that, transfer them to a freezer-safe bag. They can stay in the freezer for up to three months. When you want to eat them, just reheat as mentioned above. Enjoy your tasty treats anytime! Yes, you can use homemade pie crust. Just make sure it is thin and easy to fold. Roll it out to about 1/8 inch thick. Cut it into circles like you would with the store-bought crust. Homemade crust can taste fresher and give a nice touch. To make these bites gluten-free, use a gluten-free pie crust. Many stores offer pre-made options. You can also make your own with gluten-free flour. Just mix gluten-free flour, butter, and a bit of water. This way, everyone can enjoy them! Serve these bites warm for the best flavor. Top them with a dollop of whipped cream. A sprinkle of ground cinnamon adds a nice touch. You can pair them with coffee or apple cider. For an extra treat, serve with a scoop of vanilla ice cream. These bites are perfect for fall gatherings or cozy nights. You learned about making pumpkin pie cheesecake bites, from ingredients to storage. Remember to check your tools and follow cooking steps closely. Avoid common mistakes for the best bites. Feel free to try new flavors or crusts to make this treat your own. Store leftovers properly for fresh taste. Enjoy these bites with your favorite drinks or snacks. Experiment and have fun in the kitchen!

Craving something sweet and festive? Let’s make Pumpkin Pie Cheesecake Bites in your air fryer! These little treats combine the rich flavors of pumpkin pie with creamy cheesecake, all in …

Read more

Categories Desserts Leave a comment

Fall Veggie Tacos with Chili Lime Slaw Delight

September 29, 2025 by Chef Evan
For the best fall veggie tacos, I like to use: - 1 medium butternut squash, peeled and diced - 1 red bell pepper, sliced - 1 cup Brussels sprouts, thinly sliced These vegetables give a lovely mix of sweet and savory flavors. The butternut squash adds creaminess. The red bell pepper brings brightness. Brussels sprouts add a nice crunch. To make the chili lime slaw, gather: - 2 cups green cabbage, finely shredded - 1 carrot, grated - 1 jalapeño, finely sliced (remove seeds for less heat) - 3 tablespoons fresh lime juice - 1 tablespoon honey - 1 teaspoon chili powder - Salt to taste - Fresh cilantro, for garnish This slaw pairs well with the tacos. The lime juice gives it a fresh kick. Honey adds a touch of sweetness to balance the heat. For seasoning and tortillas, you will need: - 1 tablespoon olive oil - 1 teaspoon smoked paprika - 1 teaspoon cumin - Salt and pepper to taste - 8 small corn tortillas The olive oil helps the veggies roast nicely. Smoked paprika and cumin add depth to the flavor. Corn tortillas are perfect for holding all the goodness! Start by preheating your oven to 400°F (200°C). This ensures your veggies roast evenly. In a large bowl, combine the diced butternut squash, sliced red bell pepper, and thinly sliced Brussels sprouts. These colorful veggies bring great taste and nutrition. Drizzle one tablespoon of olive oil over them. Add one teaspoon of smoked paprika, one teaspoon of cumin, salt, and pepper. Toss everything together until the veggies are well coated. Spread the mixture on a baking sheet lined with parchment paper. Roast them for about 25-30 minutes. Toss the veggies halfway through for even cooking. They will turn tender and caramelized, bringing out their natural sweetness. While your veggies roast, it’s time to prepare the chili lime slaw. Grab a large bowl and combine two cups of finely shredded green cabbage, one grated carrot, and one sliced jalapeño. If you prefer less heat, remove the seeds from the jalapeño. In a small bowl, whisk together three tablespoons of fresh lime juice, one tablespoon of honey, one teaspoon of chili powder, and a pinch of salt. Pour this tangy dressing over the slaw mix and toss it all together. This slaw adds a zesty crunch to your tacos. Once the veggies are roasted and the slaw is ready, it’s time to assemble your tacos. Warm eight small corn tortillas on a skillet over medium heat. Heat them for about 30 seconds on each side until they are pliable. To build your taco, add a generous helping of the roasted veggies to each tortilla. Then, top it off with a handful of chili lime slaw. For an extra touch, garnish with fresh cilantro. This brings a burst of flavor and color to each bite! Roasting veggies brings out their natural sweetness. Start by preheating your oven to 400°F (200°C). Cut your butternut squash, red bell pepper, and Brussels sprouts into even pieces. This helps them cook evenly. Toss the veggies with olive oil, smoked paprika, cumin, salt, and pepper in a bowl. Spread them out on a lined baking sheet. Roast for 25-30 minutes. Don’t forget to stir them halfway through. This will help them brown and caramelize nicely. You can add your own twist to the chili lime slaw. Try adding sliced radishes or diced bell peppers for crunch. Want more heat? Add more jalapeño or some hot sauce. If you prefer a sweeter slaw, increase the honey a bit. Fresh herbs like parsley or mint can also brighten the slaw. Just make sure to toss everything well in the dressing to get the best flavor. Warming your tortillas makes them soft and foldable. Use a skillet over medium heat. Place each tortilla in the skillet for about 30 seconds on each side. You can also wrap them in a damp paper towel and microwave them for about 15-20 seconds. This keeps them warm and soft. Avoid overheating, as this can make them brittle. Warm tortillas will hold all your tasty fillings beautifully! {{image_2}} You can change up the veggies in your tacos. Think about using sweet potatoes instead of butternut squash. Zucchini and eggplant also work well. Try adding carrots or parsnips for extra crunch. Seasonal veggies keep your tacos fresh and exciting. You can mix and match based on what you find at your local market. The key is to pick vegetables you enjoy. If you want to switch up the slaw, there are many options. A yogurt-based dressing can add creaminess. You can mix Greek yogurt with lime juice and some spices. Another option is a vinegar-based dressing. Use apple cider vinegar, olive oil, and a little sugar for a tangy twist. Each dressing gives the slaw a unique taste. Feel free to experiment until you find your favorite. For meat lovers, adding protein is easy. Grilled chicken or shrimp can make your tacos heartier. You can also use ground beef or turkey seasoned with similar spices. If you want a smoky flavor, try adding pulled pork. To keep the meal balanced, add the meat on top of the veggies. This way, you still get the great taste of fall veggies with a protein boost. To store your leftover tacos, place them in an airtight container. Keep the tacos separate from the slaw. This helps keep the tortillas from getting soggy. You can store them in the fridge for up to three days. When you’re ready to enjoy your tacos again, reheat them in a skillet. Heat the skillet over medium heat. Add the tacos for about two minutes on each side. This warms them up and keeps them crispy. You can also use the microwave. Just heat them for 30 seconds, but the texture may not be as good. For the slaw, store it in a separate airtight container. It stays fresh for two days in the fridge. If you notice any water in the container, drain it off. This keeps the slaw crunchy and tasty. You can also add a little extra lime juice when serving to refresh the flavors. Yes, you can make these tacos ahead of time. First, roast the veggies and cool them. Store them in the fridge in an airtight container. You can prepare the chili lime slaw as well. Just keep the dressing separate until you are ready to serve. This way, the slaw stays fresh. Assemble the tacos just before serving for the best taste. If you want to replace honey, use maple syrup or agave nectar. Both options add sweetness without changing the slaw’s taste much. You can also try brown sugar. Just mix it with the lime juice well so it dissolves. This keeps the slaw flavorful. The spice level of these tacos depends on the jalapeño. If you remove the seeds, they will be milder. If you want more heat, add some seeds back in. You can also use a different pepper, like a serrano, for extra kick. Adjust the amount to your liking for the perfect spice. In this post, we explored taco ingredients, like fresh veggies and zesty slaw. I shared step-by-step instructions for prepping, making, and assembling your tacos. You learned tips for roasting, customizing slaw, and warming tortillas. We also discussed variations, including seasonal veggies and meat options. Lastly, I provided storage advice and answered common questions. Making these tacos can be easy and fun. Enjoy the flavors and let your creativity shine!

Get ready to savor the season with my Fall Veggie Tacos with Chili Lime Slaw Delight! These tacos celebrate rich fall flavors packed with colorful veggies and a zesty slaw …

Read more

Categories Dinner Leave a comment

Peanut Butter Pumpkin Energy Bites Nourishing Snack

September 29, 2025 by Chef Evan
To make these tasty Peanut Butter Pumpkin Energy Bites, gather these ingredients: - 1 cup rolled oats - 1/2 cup creamy peanut butter - 1/2 cup canned pumpkin puree - 1/4 cup honey or maple syrup - 1 teaspoon vanilla extract - 1 teaspoon pumpkin pie spice - 1/4 cup mini chocolate chips (optional) - 1/4 cup chopped nuts (almonds or walnuts, optional) These simple ingredients come together for a healthy, no-bake snack. You can swap out some ingredients to fit your needs. Try the following: - Use crunchy peanut butter for extra texture. - Replace honey with agave syrup for a vegan option. - Substitute pumpkin puree with sweet potato puree for a different taste. - For nut-free bites, skip the nuts and chocolate chips. These changes keep the bites tasty while meeting dietary needs. Each energy bite provides a great mix of nutrients. Here’s the breakdown per bite: - Calories: 110 - Protein: 3g - Carbohydrates: 15g - Fat: 5g - Fiber: 2g - Sugar: 4g These bites not only taste good but also offer energy for your day. To make these peanut butter pumpkin energy bites, gather all your ingredients first. This step saves time and makes cooking more fun. You will need rolled oats, creamy peanut butter, canned pumpkin puree, honey or maple syrup, vanilla extract, pumpkin pie spice, and optional add-ins like chocolate chips or nuts. In a large mixing bowl, combine these ingredients. First, add 1 cup of rolled oats, 1/2 cup of peanut butter, and 1/2 cup of pumpkin puree. Next, pour in 1/4 cup of honey or maple syrup. Then, add 1 teaspoon of vanilla extract and 1 teaspoon of pumpkin pie spice. Mix everything well. You want a sticky dough that holds together. If you like, fold in 1/4 cup of mini chocolate chips or chopped nuts for extra crunch. Now it’s time to shape the mixture. Take a small amount of the dough and roll it into a ball, about 1 inch wide. Keep your hands slightly damp to avoid sticking. Place each ball on a baking sheet lined with parchment paper. Once you’ve formed all the bites, refrigerate them for at least 30 minutes. This helps them firm up. After chilling, store them in an airtight container in the fridge. Enjoy these tasty snacks for a quick boost anytime! To get the best texture, use creamy peanut butter. It blends well with the other ingredients. Make sure to measure your oats carefully. Too many oats can make the bites dry. If your mix feels too sticky, add a bit more oats. If it’s too dry, mix in a little water or extra pumpkin puree. To boost flavor, try adding a pinch of salt. It makes the sweetness pop. You can also swap pumpkin pie spice for cinnamon or nutmeg. If you love chocolate, add more mini chocolate chips. Nuts like almonds or walnuts add a nice crunch. Feel free to experiment with flavors to find your favorite mix! One mistake is not mixing well enough. Make sure everything is combined for even flavor. Don’t skip the chilling step. If you don’t chill the bites, they may fall apart. Lastly, don’t rush the rolling. Take your time to form nice, even balls for a great look and taste. {{image_2}} You can change the flavor of your peanut butter pumpkin energy bites easily. Try using almond butter instead of peanut butter for a nutty twist. You can replace the pumpkin pie spice with cinnamon or nutmeg for a new taste. If you want a sweeter bite, add more honey or maple syrup. You can also mix in dried fruit like cranberries or raisins for added flavor. These energy bites can fit into many diets. To make them gluten-free, ensure you use certified gluten-free oats. For a vegan option, swap honey for maple syrup. You can also use a plant-based peanut butter that has no added sugars. This way, everyone can enjoy these tasty treats without worry. Add-ins can change the texture and taste of your energy bites. Consider including mini chocolate chips for sweetness. Chopped nuts like almonds or walnuts add crunch. You can also fold in seeds like chia or flaxseeds for extra nutrition. For a fun topping, roll the bites in shredded coconut or cocoa powder. These options keep your snacks exciting and full of flavor! To keep your Peanut Butter Pumpkin Energy Bites fresh, store them in an airtight container. This helps keep moisture out and keeps them from drying out. Place a piece of parchment paper between layers if you stack them. This prevents them from sticking together. You can also use reusable silicone bags for a more eco-friendly choice. These energy bites last up to a week in the fridge. After that, they may lose their texture and flavor. To check for freshness, look for any changes in smell or appearance. If they look or smell off, it's best to toss them out. If you want to keep these bites for longer, freezing is a great option. Place them in a single layer on a baking sheet until solid. Once frozen, transfer them to an airtight container or freezer bag. They can stay in the freezer for up to three months. When you're ready to eat, just thaw them in the fridge or at room temperature. Enjoy a tasty snack anytime! Yes, you can use natural peanut butter. It adds a rich taste. Natural peanut butter has no added sugar or oils, making it a healthy choice. Just note that the texture may be a bit different. Natural peanut butter can be thinner, so your energy bites might be softer. If you want a firmer bite, add a bit more oats. To lower the sugar, swap honey for a sugar-free syrup. You can also reduce the amount of honey or syrup used. Another option is to add unsweetened cocoa powder for flavor without sugar. This keeps the bites tasty while cutting sugar content. You could also rely on the natural sweetness of pumpkin to boost flavor. Yes, these energy bites are perfect for meal prep. They are easy to make and store well. You can prepare a batch on a Sunday and enjoy them all week. Just keep them in an airtight container in the fridge. They stay fresh for up to a week. Plus, they make a great snack for busy days. You learned about making tasty energy bites using simple ingredients. We covered substitutions and their nutritional benefits. The step-by-step guide made it easy to mix and form them. I shared tips for perfect texture and flavor, plus some common mistakes to avoid. You also discovered fun flavor variations and dietary modifications. Finally, we discussed how to store these bites for freshness. Energy bites are a quick and healthy snack you can enjoy anytime. Use this guide to make them your own!

Looking for a quick, nutritious snack? These Peanut Butter Pumpkin Energy Bites are perfect for you! Easy to make, no baking required, and packed with flavor, they are ideal for …

Read more

Categories Desserts Leave a comment

Air Fryer Ranch Potato Bites Crispy and Flavorful Snack

September 29, 2025 by Chef Evan
To make Air Fryer Ranch Potato Bites, gather these ingredients: - 1 pound baby potatoes, halved - 2 tablespoons olive oil - 2 tablespoons ranch seasoning mix - 1 teaspoon garlic powder - 1 teaspoon onion powder - ½ teaspoon smoked paprika - Salt and pepper to taste - Fresh chives or parsley, chopped (for garnish) You can easily swap some ingredients. If you don’t have baby potatoes, use regular potatoes. Just cut them into smaller pieces. For olive oil, try avocado oil or canola oil. If ranch seasoning is not on hand, mix dried herbs like dill and parsley with some salt. Garlic and onion powder can be replaced with fresh garlic or onion, but use less. Smoked paprika adds a nice touch, but regular paprika works too. Each serving of Air Fryer Ranch Potato Bites has about: - Calories: 180 - Protein: 3g - Carbohydrates: 26g - Fat: 7g - Fiber: 3g - Sugars: 1g These bites are a tasty snack. They have good carbs and healthy fats. Enjoy them in moderation for a balanced diet. To make Air Fryer Ranch Potato Bites, start with fresh baby potatoes. You need one pound of these small gems. First, wash them well and then slice each potato in half. This helps them cook evenly and get crispy. In a large bowl, take two tablespoons of olive oil. Pour the oil over the potato halves. Toss them gently until every piece is coated. Next, add two tablespoons of ranch seasoning mix. This gives the potatoes a tasty flavor. Then, sprinkle one teaspoon each of garlic powder and onion powder. Finally, add half a teaspoon of smoked paprika, plus salt and pepper to taste. Mix everything until the potatoes are well coated in the spices. Now that your potatoes are ready, it's time to preheat the air fryer. Set it to 400°F (200°C) and let it heat for about five minutes. Preheating is key for getting that crispy texture. While the air fryer warms up, you can prepare the potatoes, saving time for later. Once the air fryer is hot, place the seasoned potato halves in the basket. Make sure to spread them out in a single layer. Avoid crowding the basket; this helps them cook evenly. Close the air fryer and cook for 15 to 20 minutes. At the halfway mark, shake the basket gently to move the potatoes around. This ensures they brown nicely on all sides. When they’re golden and crispy on the outside but tender inside, they are done. Carefully remove the potato bites and let them cool for a couple of minutes. For a finishing touch, garnish with fresh chives or parsley before serving. Enjoy your tasty snack! For crispy potato bites, start by cutting the baby potatoes in half. This increases the surface area for crispiness. Toss them well with olive oil. Make sure each potato half gets a good coat. Don’t overcrowd the air fryer basket. Give each piece space to breathe. This helps hot air circulate and crisp them up. Shake the basket halfway through cooking. This ensures even crispiness on all sides. Aim for a golden color on the outside and a tender inside. Ranch seasoning is a star here, but you can mix it up. Try adding some cayenne pepper for heat. You can use different herbs like dill or thyme for a fresh taste. If you want a smokier flavor, more smoked paprika works wonders. Adjust salt and pepper to your liking. Fresh garlic adds great taste, so consider using minced garlic for an extra kick. Always taste as you go to find your perfect mix. These potato bites shine as a snack or side dish. Serve them with a side of ranch dressing for dipping. They pair great with grilled chicken or burgers. Add a fresh salad to make a complete meal. For a fun twist, top them with cheese and jalapeños. Fresh chives or parsley as a garnish adds color and flavor. Enjoy them hot for the best taste! {{image_2}} You can change up the flavor of your ranch potato bites. Try using taco seasoning for a zesty twist. A sprinkle of Cajun spice brings a kick. You can even use Italian seasoning for a herby taste. Just mix your choice into the olive oil before coating the potatoes. This small change can make a big difference. While baby potatoes work great, other types can shine too. Yukon gold potatoes give a buttery flavor. Red potatoes add a nice color and sweetness. You can even use sweet potatoes for a healthier option. Just remember to cut them into similar sizes for even cooking. Air frying is fast and makes the potatoes crispy. In an oven, the cooking time is longer, but you can make larger batches. If you use the oven, set it to 425°F (220°C). Spread the potatoes on a baking sheet, and bake for about 25-30 minutes. Shake them halfway through to get that golden color. Both methods yield tasty results; it just depends on your time and tools. After enjoying your Air Fryer Ranch Potato Bites, store any leftovers in an airtight container. Let them cool first to avoid steam buildup. Keep the container in the fridge for up to three days. This way, you can enjoy those tasty bites again! To reheat, place the potato bites back in the air fryer. Set it to 350°F (175°C) and cook for about 5-7 minutes. This method keeps them crispy. You can also use a microwave, but they may lose their crunch. If you choose the microwave, heat in short bursts of 30 seconds until warm. You can freeze Air Fryer Ranch Potato Bites for up to three months. To do this, let them cool completely. Then, place them in a freezer bag and remove as much air as possible. When you’re ready to eat, thaw them in the fridge overnight. Reheat them in the air fryer to get that crispy texture back. Enjoy your snack anytime! You should cook air fryer ranch potato bites for 15 to 20 minutes. Set your air fryer to 400°F (200°C). Shake the basket halfway through cooking. This helps them cook evenly. They should be golden and crispy when done. Yes, you can make these potatoes ahead of time. Cook them fully and let them cool. Store them in an airtight container in the fridge. They will stay fresh for up to three days. Reheat them in the air fryer for a crispy finish. Most air fryers work well for this recipe. I recommend models with a good capacity. A basket-style air fryer helps with even cooking. Brands like Philips or Ninja are popular for their reliability. Check the manual for optimal cooking times. Air fryer ranch potato bites can be a healthy snack. They use less oil than frying. Baby potatoes provide vitamins and fiber. The ranch seasoning adds flavor without extra calories. Enjoy them in moderation as part of a balanced diet. Cooking air fryer ranch potato bites is simple and fun. You learned the right ingredients and how to prepare them. I shared tips for perfect texture and tasty pairs. You also found ways to store leftovers and reheat them easily. Try out different seasonings or types of potatoes for fun twists. Enjoy these tasty bites as a snack or meal side. Happy cooking!

Are you ready to indulge in a crispy, flavorful snack that’s easy to make? My Air Fryer Ranch Potato Bites will satisfy your cravings without all the guilt. With a …

Read more

Categories Appetizers Leave a comment
Older posts
Newer posts
← Previous Page1 … Page4 Page5 Page6 … Page124 Next →

TOSSED FLAVORS

Where flavors are fresh, vibrant, and ready to toss! 🥗

PAGES

Home About Contact Privacy Policy Terms & Conditions Cookie Policy GDPR Policy Copyright Policy Disclaimer

CATEGORIES

Appetizers Desserts Salads Breakfast Dinner

Contact

  • Pinterest
  • Mail
Copyright © 2026 Tossed Flavors. All rights reserved.