Cheesy Zucchini Tots Scrumptious and Easy Snack

Are you looking for a fun and tasty snack? My Cheesy Zucchini Tots will satisfy your cravings! They’re simple to make and packed with flavor. With just a few fresh …
Are you looking for a fun and tasty snack? My Cheesy Zucchini Tots will satisfy your cravings! They’re simple to make and packed with flavor. With just a few fresh …
![- 3 medium zucchinis - 1 cup brown sugar - Ground cinnamon and nutmeg - Fresh lemon juice - Rolled oats, all-purpose flour, and unsalted butter - Optional ingredients like walnuts To create a delicious zucchini crisp like apple crisp, you need just the right ingredients. First, you want three medium zucchinis, finely grated. Zucchini adds moisture and a subtle taste that blends well with sweet flavors. Next, you need one cup of brown sugar to balance the natural flavors of the zucchini. Now, let’s add some flavor enhancers. Ground cinnamon and nutmeg will give your crisp that cozy, warm taste. A tablespoon of fresh lemon juice brightens the dish, cutting through the sweetness. For the topping, you will need rolled oats, all-purpose flour, and unsalted butter. The oats add a nice crunch, while the butter keeps everything rich and moist. If you want some extra texture, consider adding walnuts. They offer a delightful crunch and a nutty flavor that pairs well with the sweet zucchini. With these ingredients, you can create a dish that surprises and delights. You can check the full recipe for all the steps needed to bring this sweet dessert to life! - Preheat the oven to 350°F (175°C). This step warms the oven for even baking. - Prepare the zucchini mixture. In a bowl, mix grated zucchini, 1/2 cup brown sugar, cinnamon, nutmeg, and lemon juice. Stir well and let it sit for 10 minutes. This helps the zucchini release moisture. - Combine oats, flour, and the remaining 1/2 cup brown sugar in a bowl. This blend forms a sweet, crunchy topping. - Incorporate softened butter and salt. Use your fingers or a pastry cutter. Mix until it looks like coarse crumbs with small butter bits. - Grease an 8x8-inch baking dish with butter or cooking spray. This step prevents sticking. - Layer zucchini and oat mixture. Spread the zucchini evenly in the dish. Then, sprinkle the oat topping on top, pressing slightly. - Bake in the preheated oven for 30-35 minutes. The topping should become golden brown. - Check for doneness by piercing the zucchini with a fork. If it’s tender, your crisp is ready! For the full recipe, check out the complete details. Enjoy your warm and cozy zucchini crisp! How to avoid watery crisp To prevent a watery zucchini crisp, start by removing excess moisture from the zucchini. After grating, place the zucchini in a clean dish towel or cheesecloth. Squeeze it gently to release any liquid. This step helps keep your crisp from becoming soggy. Ensuring a golden topping For a golden topping, use softened butter in your oat mixture. It creates a nice crunch and color. Make sure to press the topping down lightly. This helps it hold its shape while baking and forms a lovely crust. Suggestions for spice adjustments You can play with spices to enhance the flavor. Try adding a pinch of ground ginger or cloves for warmth. If you love a sweeter touch, increase the cinnamon slightly. This adds depth to your crisp. Adding fruit for extra flavor Consider mixing in fruits like diced apples or berries. They add sweetness and flavor. Just chop them small, so they bake evenly with the zucchini. You can also use peaches or pears for a twist. Best pairings with ice cream Warm zucchini crisp tastes amazing with vanilla ice cream. The cold ice cream melts slightly, mixing with the warm crisp. This contrast creates a delightful bite. You can also try whipped cream for a lighter option. How to serve for gatherings For gatherings, serve the crisp directly from the baking dish. This keeps it warm and inviting. Offer a scoop of ice cream or whipped cream on the side. Let guests add their own toppings for a fun experience. For the full recipe, check out the Zucchini Crisp with a Sweet Twist. {{image_4}} If you need a nut-free option, you can easily adapt the recipe. Instead of walnuts, use seeds like pumpkin or sunflower seeds. They add a nice crunch without the nuts. Adjust the amount based on your taste. A quarter cup of seeds works well. Always check for allergies when cooking for others. Looking for a different sweet touch? You can swap brown sugar for honey or maple syrup. If you use honey, cut back a bit on the liquid in your mix. Generally, use about three-quarters of the amount of honey or syrup compared to sugar. This keeps the flavor rich but balanced. Want to mix things up? Try adding other fruits to your zucchini crisp. Chopped apples or pears work great to add sweetness. You can also use different nuts or toppings. Pecans or almonds are tasty options. Experimenting with spices like ginger or cloves can create new flavor layers. Don't be afraid to get creative! [Full Recipe] To keep your zucchini crisp fresh, store it in an airtight container. This prevents moisture from getting in. Use a glass or plastic container with a tight lid. It helps maintain the crisp's texture. Place the container in the fridge. Your leftover zucchini crisp will last for about three days. When it's time to enjoy your leftovers, reheating is key. The oven is the best choice for keeping the crispiness. Preheat the oven to 350°F (175°C) and place the crisp in for about 10-15 minutes. This will warm it up nicely and keep the topping crunchy. If you're in a hurry, you can use the microwave. Just heat it in short bursts of 30 seconds. Stir in between to avoid hot spots. Freezing leftover zucchini crisp is easy too. First, let it cool completely. Then, wrap it tightly in plastic wrap. After that, place it in a freezer-safe bag or container. This helps prevent freezer burn. You can freeze it for up to three months. When you're ready to eat, thaw it in the fridge overnight. For the best taste, reheat it in the oven after thawing. This keeps the texture just right. Yes, you can! Zucchini is just one option. You can also try other veggies like yellow squash or carrots. Both will add a nice sweetness to the dish. You might even mix in some apples or pears for a fruity twist. Just keep the texture in mind. Grate them finely so they cook well. Look for a golden brown top. This shows the oats are toasted just right. You can also poke the crisp with a fork. If the zucchini feels tender, it’s done. The juices should be bubbling around the edges too. This means the flavors are all melted together. Absolutely! You can prepare the zucchini mixture and oat topping a day before. Just store them in the fridge in separate containers. When you’re ready to bake, layer them and pop it in the oven. You can also bake it ahead and chill it. Just warm it up before serving. Enjoy this sweet treat anytime! For the full recipe, check out the details above! Zucchini crisp is simple and fun to make. You learned about key ingredients like zucchinis and brown sugar. You also discovered how spices and toppings enhance flavor. I shared ways to avoid a watery texture and suggestions for serving. Don't forget the variations, from nut-free adjustments to alternative sweeteners. Proper storage and reheating tips keep your crisp fresh, too. Enjoy your baking, and share this tasty treat with friends!](https://tossedflavors.com/wp-content/uploads/2025/07/45839bfc-9831-4730-b383-b4e60c95be17.webp)
Craving a sweet dessert that’s both unique and delicious? Let me introduce you to Zucchini Crisp like Apple Crisp! This surprising dish combines fresh zucchinis with warm spices to create …

Looking for a quick and tasty dinner? Let me introduce you to Quick Mozzarella Chicken! This dish brings together juicy chicken breasts, fresh mozzarella, and vibrant cherry tomatoes for a …

Looking for fun and tasty ways to use yellow squash? You’re in the right place! In this post, I’ll share four easy recipes that will make your taste buds sing. …
![To make the World's Best Apple Cinnamon Zucchini Bread, you need a few key ingredients. These ingredients work together to create a delicious and moist loaf that everyone will love. Here’s the list of ingredients: - 2 cups grated zucchini (about 2 medium zucchinis) - 1 cup finely grated apple (about 1 large apple, peeled and cored) - 2 cups all-purpose flour - 1 cup granulated sugar - 1/2 cup packed brown sugar - 1/2 cup vegetable oil - 3 large eggs - 1 teaspoon vanilla extract - 1 tablespoon ground cinnamon - 1/2 teaspoon baking powder - 1 teaspoon baking soda - 1/2 teaspoon salt - 1/2 cup chopped walnuts or pecans (optional) - 1/2 cup raisins or dried cranberries (optional) Each ingredient plays a role. The zucchini adds moisture, while the apple brings sweetness. The sugars help with browning. The spices add flavor. You can also adjust the recipe. Adding nuts or dried fruit makes it even better. For the full recipe, check the cooking instructions. - Preheat your oven to 350°F (175°C). - Grease a 9x5 inch loaf pan or line it with parchment paper. - In a large bowl, mix 2 cups of grated zucchini and 1 cup of grated apple. - Let this mixture sit for a few minutes. This lets the moisture come out. - In another bowl, whisk together the following: - 2 cups all-purpose flour - 1 tablespoon ground cinnamon - 1/2 teaspoon baking powder - 1 teaspoon baking soda - 1/2 teaspoon salt - This step ensures the dry ingredients blend well, allowing the bread to rise nicely. - In a large bowl, mix these ingredients: - 1 cup granulated sugar - 1/2 cup packed brown sugar - 1/2 cup vegetable oil - Add 3 large eggs one at a time. Beat well after each egg. - Stir in 1 teaspoon of vanilla extract until smooth. - Gradually mix the dry ingredients into the wet mixture. Stir gently until combined. - It’s fine if the batter has a few lumps. - Fold in the zucchini and apple mixture. - If you like, add 1/2 cup of chopped nuts or 1/2 cup of raisins. - Pour the batter into your prepared loaf pan. - Bake for 55-65 minutes. - Check if it’s done by inserting a toothpick into the center. It should come out clean or with a few moist crumbs. - Let it cool in the pan for 10-15 minutes, then move it to a wire rack to cool completely. For the full recipe, check the details again after you’ve tried this method. Enjoy your baking! To make the best apple cinnamon zucchini bread, avoid overmixing the batter. Mix just until everything is combined. This keeps your bread light and fluffy. You want to see a few lumps; they are okay. Letting your ingredients sit is key. After you mix the grated zucchini and apple, let them rest for a few minutes. This helps draw out moisture. It makes your bread moist and full of flavor. To amp up the flavor, think about extra spices. You can add nutmeg or allspice for warmth. A pinch of ginger can also bring a nice kick. Consider adding mix-ins like chocolate chips or coconut for a twist. They add fun textures and tastes. When it's time to serve, slice the loaf and present it well. You can dust the top lightly with powdered sugar for a pretty touch. If you like, serve it warm with butter or cream cheese spread. It makes for a delightful treat. For an added flair, arrange slices on a platter with fresh fruit or nuts. Every detail counts! {{image_4}} If you want a gluten-free version, you can easily swap out the flour. Use a 1:1 gluten-free flour blend. This blend usually has a mix of flours that mimic the rise of regular flour. Always check the blend for added starches or gums. Make sure your baking powder is gluten-free too. To make this recipe vegan, replace the eggs and oil. Use 1/4 cup of unsweetened applesauce for each egg. You can also use 1/4 cup of melted coconut oil or a neutral oil as a substitute for vegetable oil. This keeps the bread moist and tasty, without using animal products. You can add different fruits or spices to change the flavor. Try adding mashed bananas, chopped peaches, or even pineapple. For spices, consider nutmeg or ginger. These flavors can brighten the bread and make it unique. You can mix and match to find your favorite combo! For the full recipe, click here: [Full Recipe]. To keep your apple cinnamon zucchini bread fresh, wrap it tightly in plastic wrap. You can also use aluminum foil. This helps keep moisture in and prevents it from drying out. Store it in a cool, dry place, away from direct sunlight. If you see mold or it smells bad, throw it away. You can freeze apple cinnamon zucchini bread for longer storage. First, let the bread cool completely. Then, wrap it in plastic wrap and place it in a freezer bag. Label the bag with the date. To thaw, take it out of the freezer and leave it in the fridge overnight. You can also let it sit at room temperature for a few hours. At room temperature, the bread lasts about 3 to 5 days. Keep it in an airtight container to maintain its softness. If you want to enjoy it longer, freezing is your best option. For best flavor, eat it fresh or within a week. For more details, check the Full Recipe. Can I substitute other fruits for apple? Yes, you can use other fruits. Pears, bananas, or even peaches work well. These fruits add their unique flavor and moisture to the bread. How can I make it less sweet? To reduce sweetness, cut back on the sugar. Use half a cup of granulated sugar instead of one cup. You can also skip the brown sugar for less sweetness. What can I serve with the bread? This bread pairs great with butter or cream cheese. You can also serve it with a cup of tea or coffee for a cozy snack. How do I know when the bread is done baking? Check with a toothpick. Insert it into the center of the bread. If it comes out clean or with a few crumbs, the bread is done. Is it necessary to peel the apple? Peeling the apple is not required but recommended. Peeling makes the texture smoother in the bread. If you like extra fiber, leave the skin on for a wholesome twist. For the full recipe, check out the detailed instructions above. In this blog post, we covered the essentials for baking apple cinnamon zucchini bread. You learned about the ingredients, step-by-step instructions, and tips to perfect your bread. We discussed variations and how to store your leftovers. Remember, baking should be fun and creative. Enjoy experimenting with different flavors and ingredients. Your bread can suit any taste. So, grab your ingredients and start baking. You'll love the tasty results!](https://tossedflavors.com/wp-content/uploads/2025/07/17ef47eb-d7e5-4613-aa72-d876363760b2.webp)
Are you ready to bake a treat that combines two favorites: apples and zucchini? This recipe for the world’s best Apple Cinnamon Zucchini Bread is your ticket to a moist, …
![To make delicious chocolate zucchini cookies, you need specific ingredients. Here are the key ones: - 1 cup finely grated zucchini (make sure to squeeze out extra water) - 1/2 cup unsweetened cocoa powder - 1 cup all-purpose flour - 1/2 teaspoon baking soda - 1/2 teaspoon baking powder - 1/4 teaspoon fine salt - 1/2 cup granulated sugar - 1/2 cup packed brown sugar - 1/2 cup vegetable oil - 1 teaspoon pure vanilla extract - 1 large egg, beaten - 1/2 cup semi-sweet chocolate chips These ingredients form the base of your cookies. The zucchini adds moisture and nutrition without changing the taste much. You can enhance your cookies with fun add-ins. Here are some options: - 1/4 cup chopped walnuts (adds crunch) - A pinch of cinnamon (adds warmth) - A dash of espresso powder (boosts chocolate flavor) Feel free to mix and match these options. They can make your cookies even more special. To bake these cookies, you will need some basic kitchen tools: - Mixing bowls (one large and one medium) - Whisk or spoon for mixing - Baking sheet lined with parchment paper - Measuring cups and spoons - Grater for zucchini - Wire rack for cooling Having the right tools makes baking easier and more fun. Now you’re ready to make your chocolate zucchini cookies from the full recipe! To start, preheat your oven to 350°F (175°C). This step is key for great cookies. Next, line a baking sheet with parchment paper to prevent sticking. In a medium bowl, whisk together these dry ingredients: all-purpose flour, cocoa powder, baking soda, baking powder, and salt. Mix them well and set aside. In a larger bowl, combine finely grated zucchini, granulated sugar, brown sugar, vegetable oil, and vanilla extract. Add in a beaten egg and stir until the mixture is smooth. This wet mixture brings all the flavors together. Gradually add the dry mixture to the wet, stirring gently. Do not overmix; we want soft cookies. Finally, fold in semi-sweet chocolate chips and chopped walnuts, if you like. This will make your cookies even more delicious. Now, use a spoon to drop tablespoon-sized mounds of dough onto the baking sheet. Make sure to space them about 2 inches apart. This space helps them spread while baking. Once they are all on the sheet, place it in your oven. Bake for 10 to 12 minutes. Keep an eye on them; the edges should be set, but the centers should still look soft. This gives that chewy texture we love. After baking, remove the cookies from the oven. Let them cool on the baking sheet for about 5 minutes. Then, move them to a wire rack to cool completely. For a lovely presentation, arrange your cookies on a decorative plate. Dust them lightly with powdered sugar for a nice touch. You can also add fresh zucchini slices or chocolate pieces on the side for a fun look. These little steps make your cookies stand out. Enjoy your delicious creation! To get the best texture in your cookies, ensure you squeeze out extra water from the zucchini. This step keeps your cookies from being too wet. Mix your dry and wet ingredients gently. Overmixing can lead to tough cookies. Bake them until the edges are set but the centers look soft. This keeps them chewy and delicious. One common mistake is not measuring the flour correctly. Too much flour can make cookies dry. Make sure you spoon the flour into the measuring cup and level it off. Another mistake is not preheating your oven. An oven that isn’t hot enough can affect the rise and texture of your cookies. Also, avoid opening the oven door too often while baking. This lets heat escape and can lead to uneven baking. You can boost the flavor of your cookies by adding a pinch of cinnamon or a dash of espresso powder. These ingredients add depth to the chocolate taste. If you like nuts, chopped walnuts give a nice crunch. You can also use dark chocolate chips for a richer flavor. If you want a fun twist, try adding a tablespoon of orange zest for a fresh note. For more ideas, check out the Full Recipe. {{image_4}} You can change some ingredients to make these cookies healthier. Instead of granulated sugar, use coconut sugar. It has a lower glycemic index. You can also swap out vegetable oil for applesauce. Applesauce keeps the cookies moist while cutting calories. For flour, try using whole wheat flour. Whole wheat adds fiber and nutrients. You can make these cookies even more fun with extra flavors. Try adding shredded coconut for a tropical twist. Dried fruit, like cranberries or cherries, can add a sweet touch. You can also mix in different types of chocolate chips. White chocolate or dark chocolate can change the flavor profile completely. If you need a gluten-free version, use almond flour or a gluten-free flour mix. These options work well and still create a tasty cookie. For a dairy-free treat, choose dairy-free chocolate chips. You can also use almond milk instead of regular milk in the dough. This way, everyone can enjoy these delicious cookies! For the full recipe, check out the Chocolate Zucchini Delight Cookies. To keep your chocolate zucchini cookies fresh, store them in an airtight container. This will help maintain their soft texture. Place parchment paper between layers to prevent sticking. If you have cookies with nuts, keep them separate to avoid sogginess and maintain crunchiness. Keep the container in a cool, dry place, away from direct sunlight. Freezing cookie dough is a smart way to enjoy cookies anytime. After mixing your dough, scoop it into mounds on a baking sheet. Freeze the mounds for about an hour until firm. Then, transfer them to a freezer bag. Label the bag with the date and type of cookies. When you're ready to bake, just pop them in the oven straight from the freezer. Adjust the baking time by a minute or two. Chocolate zucchini cookies stay fresh for about five days at room temperature. If stored properly in an airtight container, they can last up to a week. For longer storage, freeze them. They can last up to three months in the freezer without losing flavor. Remember, the zucchini helps keep them moist and tasty! For the full recipe, check out the [Full Recipe]. Yes, you can use other sweeteners. Honey or maple syrup works well. However, you may need to adjust the liquid in the recipe. If you use a granulated sweetener like stevia, follow its packaging for the right amount. Always taste your dough to ensure it is sweet enough. To avoid soggy cookies, squeeze out excess water from the zucchini. Use a clean kitchen towel or cheesecloth. This step is key for achieving the right texture. Also, don’t overmix the dough. This helps keep the cookies light and chewy. Chocolate zucchini cookies likely started in the U.S. during the 1970s. This recipe became popular as a way to use extra summer zucchini. Home bakers liked the idea of sneaking vegetables into sweet treats. It’s a clever way to enjoy more veggies in a fun form. This article covered how to make delicious chocolate zucchini cookies. We explored key ingredients and optional flavors. You learned the steps for prepping, baking, and cooling cookies. I shared tips to improve texture and avoid common mistakes. We also discussed fun variations like gluten-free options. Lastly, I provided storage tips to keep them fresh. Now, you have all the tools to bake and enjoy these tasty treats! Happy baking!](https://tossedflavors.com/wp-content/uploads/2025/07/ee670f0e-5b48-4056-8e8d-f4abcc631e0a.webp)
If you’re looking for a fun and tasty way to use up zucchini, you’ve found it! Chocolate zucchini cookies are not only easy to make, but they’re also a delicious …
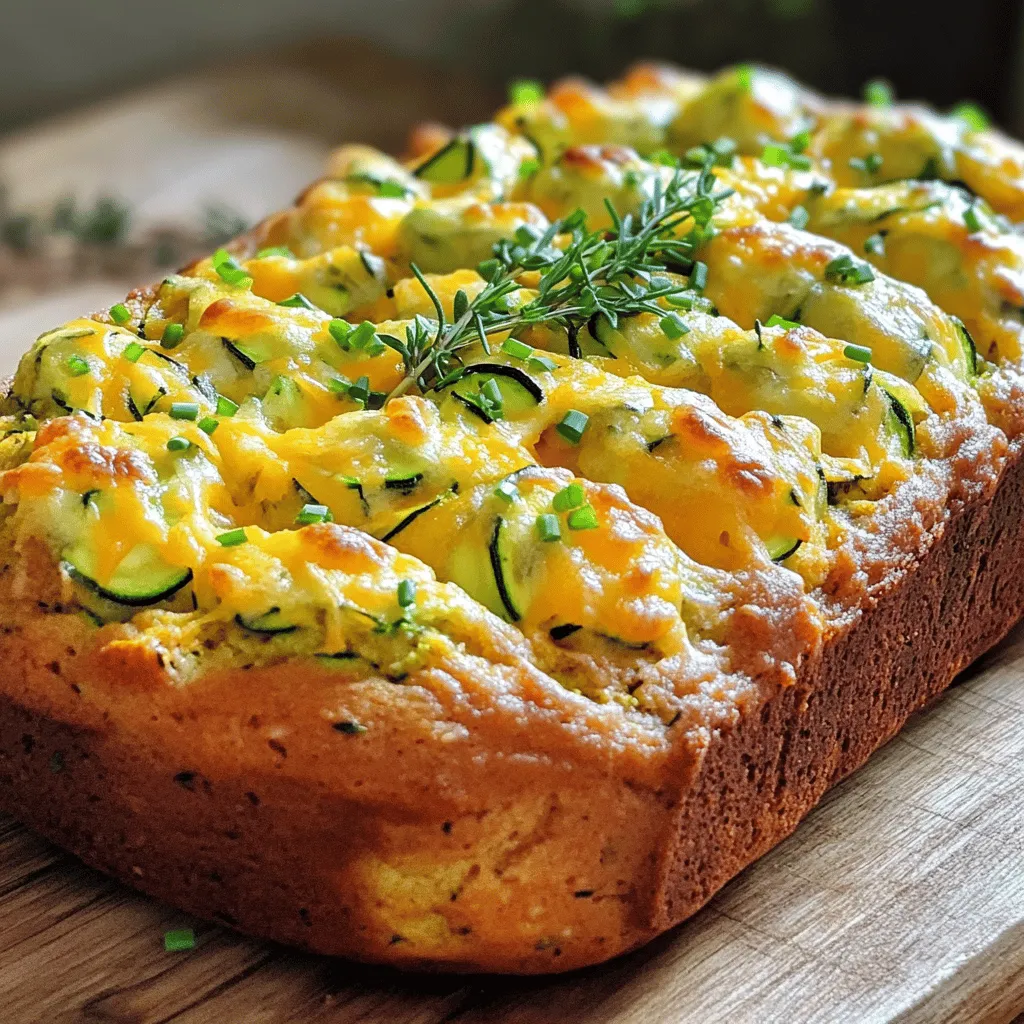
Are you ready to try a delicious twist on a classic favorite? My Savory Cheddar Zucchini Bread recipe is not just easy to make but bursting with flavor. Made with …
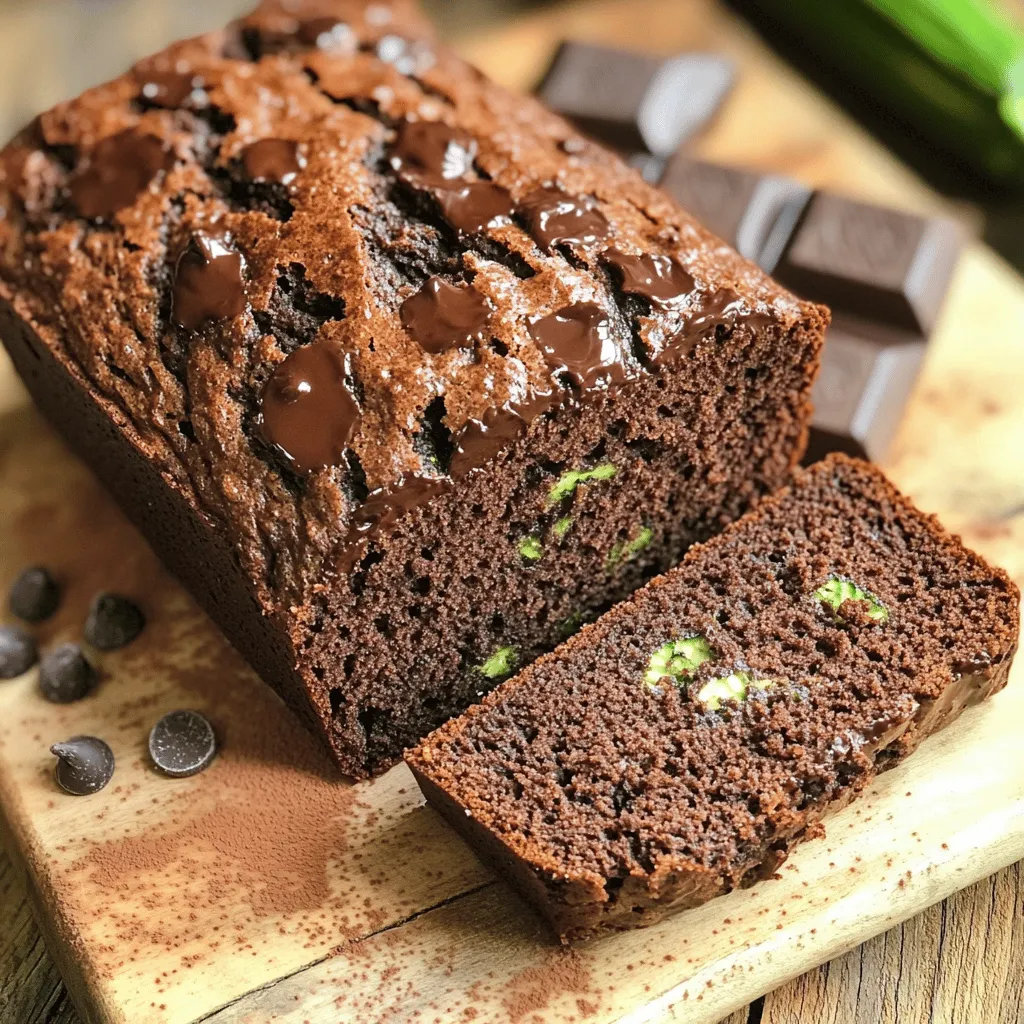
Do you crave a moist, tasty treat that fits your paleo lifestyle? Look no further than my Paleo Chocolate Zucchini Bread! This delightful recipe combines healthy ingredients like shredded zucchini …

Are you ready for a twist on a classic? Zucchini grilled cheese is both tasty and easy to make! This recipe will transform ordinary ingredients into a delicious meal your …

Are you ready to bake a treat that bursts with bright flavor? My Moist Lemon Zucchini Bread is a quick and easy recipe you’ll love. With fresh ingredients and simple …