Chocolate Zucchini Cupcakes Delightful and Easy Recipe
![- Zucchini: Select a medium zucchini that feels firm. Grate it finely and squeeze out excess moisture. This step ensures your cupcakes won’t be soggy. Moisture affects the texture, so don’t skip it. - Dry ingredients: You need all-purpose flour, unsweetened cocoa powder, baking soda, and baking powder. Each ingredient plays a role. The flour gives structure, while cocoa adds rich flavor. Baking soda and baking powder help the cupcakes rise. - Sugars: Use a mix of granulated sugar and brown sugar. This balance gives the cupcakes sweetness and moisture. The brown sugar adds depth and a slight caramel flavor, enhancing the overall taste. - Variations in oil types: You can use vegetable oil for a neutral flavor. If you want a twist, try melted coconut oil. It gives a subtle coconut taste that blends well with chocolate. - Chocolate chips: Choose between dark or semi-sweet chocolate chips. Dark chips offer a deep flavor, while semi-sweet adds a nice sweetness. Both options work great, depending on your taste. For the full recipe, check the [Full Recipe] section above. Preheating your oven is key. Set it to 350°F (175°C). This helps cupcakes rise well. Line your muffin tin with cupcake liners. This makes it easy to remove them later. Start by sifting your flour, cocoa powder, baking soda, baking powder, and salt. This removes lumps. It also helps mix the dry ingredients well. Next, whisk them together in a bowl. Make sure they are fully combined for the best texture. In a large bowl, combine granulated sugar, brown sugar, and vegetable oil. Whisk until it looks smooth. This step makes sure the sugars dissolve well. Now, add your room temperature eggs one at a time. Mix well after each egg. This keeps the batter light and fluffy. Finally, stir in pure vanilla extract for flavor. Now, it’s time to mix wet and dry. Gradually add the dry mix to the wet mixture. Use a spatula or wooden spoon to mix gently. Be careful not to overmix. It’s okay if some lumps remain; they will disappear while baking. Take your finely grated zucchini and chocolate chips. Fold them into the batter gently. Use a spatula and mix just until they are evenly spread. Avoid stirring too hard, as this can make the cupcakes tough. Spoon your batter into the lined muffin tin. Fill each liner about two-thirds full. Place the tin in your preheated oven. Bake for 18-20 minutes. To check if they are done, insert a toothpick into the center. If it comes out clean or with a few moist crumbs, they are ready. Once baked, let them cool in the tin for about 5 minutes. Then, move them to a wire rack to cool completely. For the full recipe, refer to the earlier section. When baking chocolate zucchini cupcakes, avoid overmixing the batter. Overmixing leads to tough cupcakes. Mix just until the wet and dry ingredients come together. Some lumps are okay! Another mistake is undercooking your cupcakes. Always check for doneness by inserting a toothpick in the center. If it comes out clean or with a few crumbs, they are ready to enjoy. To enhance the taste of your cupcakes, adjust the sugar levels. Too much sugar can make them overly sweet. Try reducing the granulated sugar slightly if you prefer a less sweet treat. Adding spices like cinnamon or nutmeg can also elevate the flavor. These spices blend well with chocolate and zucchini, creating a warm, inviting taste. Presentation matters! After the cupcakes cool, top them with fluffy whipped cream or a light dusting of powdered sugar. This adds a lovely touch. For extra flair, sprinkle chocolate shavings on top or add a slice of fresh zucchini. These garnishes not only look great but also enhance the taste, making your cupcakes even more delightful. For the full recipe, check the link above. {{image_4}} You can make your chocolate zucchini cupcakes healthier by switching to whole wheat flour. Whole wheat flour adds fiber and nutrients. You can also use alternative sweeteners like honey or maple syrup. These options can lower refined sugar intake. When using liquid sweeteners, reduce the liquid in your recipe slightly. This makes the cupcakes moist and tasty. Adding flavor makes cupcakes special. You can mix in chopped nuts for crunch. Walnuts or pecans work great. Spices like cinnamon or nutmeg can add warmth. You could also try adding a teaspoon of espresso powder. This enhances the chocolate flavor without changing the taste much. Get creative and add your favorite flavors to your batter! The frosting can change your cupcake's taste. Cream cheese frosting gives a tangy kick. It pairs well with the sweetness of the cupcakes. Whipped cream, on the other hand, keeps it light and fluffy. If you want something richer, try chocolate ganache. Each option offers a unique way to enjoy these treats. Choose your favorite to make your cupcakes shine! For the complete recipe, check out the [Full Recipe]. You can store your chocolate zucchini cupcakes at room temperature or in the fridge. If you plan to eat them within three days, keep them in an airtight container at room temperature. If you want to keep them longer, store them in the fridge. Just be aware that cold can make the cupcakes a bit dense. To freeze your chocolate zucchini cupcakes, first, let them cool completely. Wrap each cupcake in plastic wrap tightly. Then, place them in a freezer bag or container. When you are ready to eat them, take them out and let them thaw at room temperature. You can also reheat them in the oven at 350°F (175°C) for about 10 minutes if you want them warm. Chocolate zucchini cupcakes stay fresh for about three days at room temperature. In the fridge, they can last up to a week. If frozen, they can last for about three months. Just remember, the sooner you eat them, the better they taste! For the full recipe, check out the Chocolate Zucchini Cupcakes section. Yes, you can use frozen zucchini. Thaw it first before adding it to your batter. To thaw, place the zucchini in a bowl and let it sit in the fridge overnight. You can also microwave it for a few minutes. Make sure to drain excess water after thawing. This keeps your batter from getting too wet. To check if your cupcakes are done, use a toothpick. Insert it into the center of a cupcake. If the toothpick comes out clean or with a few crumbs, they are ready. This method helps avoid overbaking, which can make your cupcakes dry. Yes, you can make these cupcakes vegan. Replace the eggs with flax eggs or applesauce. Use plant-based milk and a vegan butter substitute instead of dairy. This way, you can enjoy the same rich flavor without animal products. If your batter seems too dry, add a little milk or water. Start with one tablespoon and mix well. If needed, add more gradually. This will help achieve a smooth batter and keep your cupcakes moist. Yes, it is important to squeeze out excess moisture from the zucchini. This helps your cupcakes rise and keeps them fluffy. If you skip this step, your cupcakes may turn out dense and soggy. Absolutely, you can double the recipe. Just keep the same ratios for each ingredient. Use a larger mixing bowl and muffin tin. This way, you can bake more cupcakes at once and share them with friends! You learned about making chocolate zucchini cupcakes in an easy way. We covered essential and optional ingredients, and I shared step-by-step instructions to help you bake like a pro. You also picked up key tips to avoid common mistakes and variations for customization. Remember, these cupcakes are not just tasty; they stay fresh when stored right. With these insights, you can enjoy baking and sharing your treats confidently. Happy baking!](https://tossedflavors.com/wp-content/uploads/2025/07/82e9f4d6-4676-4096-816a-b0d07cccdfac.webp)
Are you ready to indulge in a sweet treat that’s both tasty and healthy? These Chocolate Zucchini Cupcakes are the perfect dessert! This easy recipe hides veggies in a delightful …
Are you ready to indulge in a sweet treat that’s both tasty and healthy? These Chocolate Zucchini Cupcakes are the perfect dessert! This easy recipe hides veggies in a delightful …
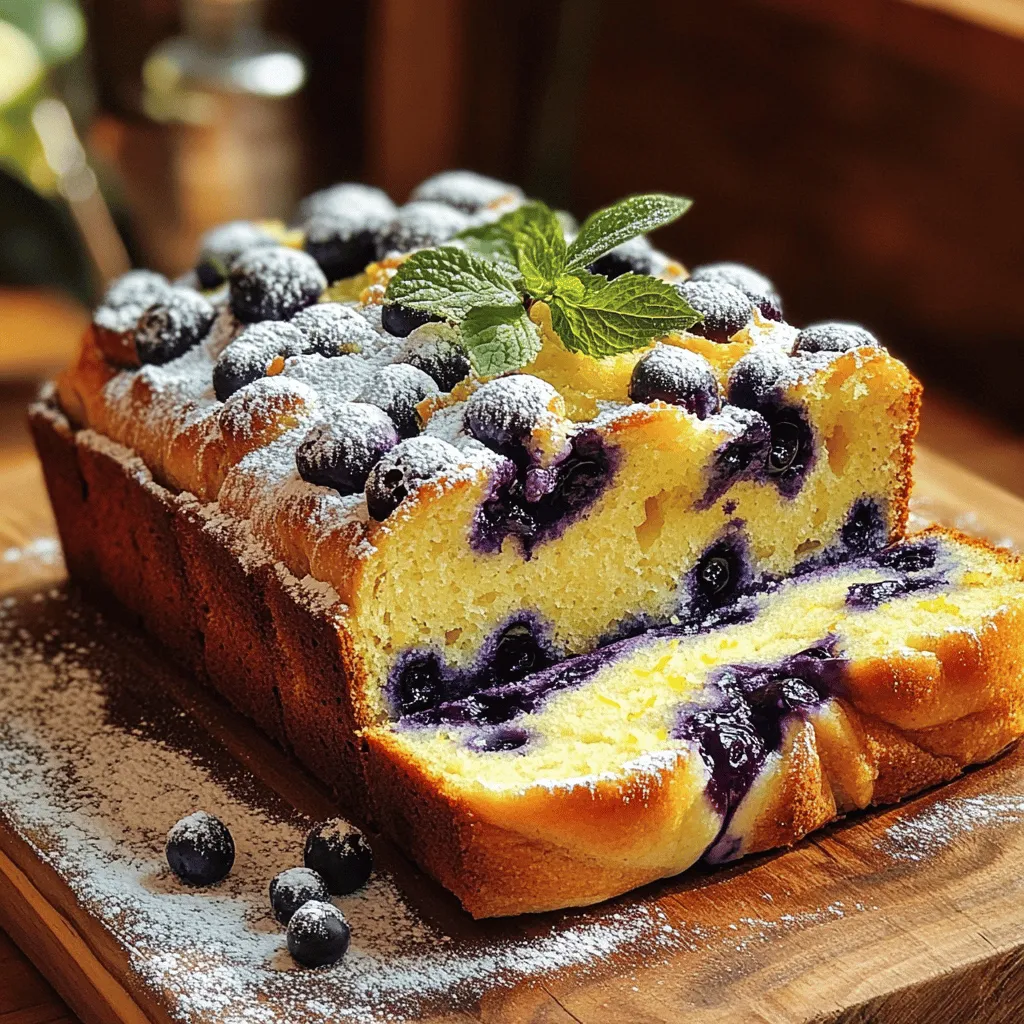
Are you ready to bake a treat that fills your kitchen with sweet, berry goodness? In this post, I’ll share my simple and tasty blueberry bread recipe. You’ll learn about …
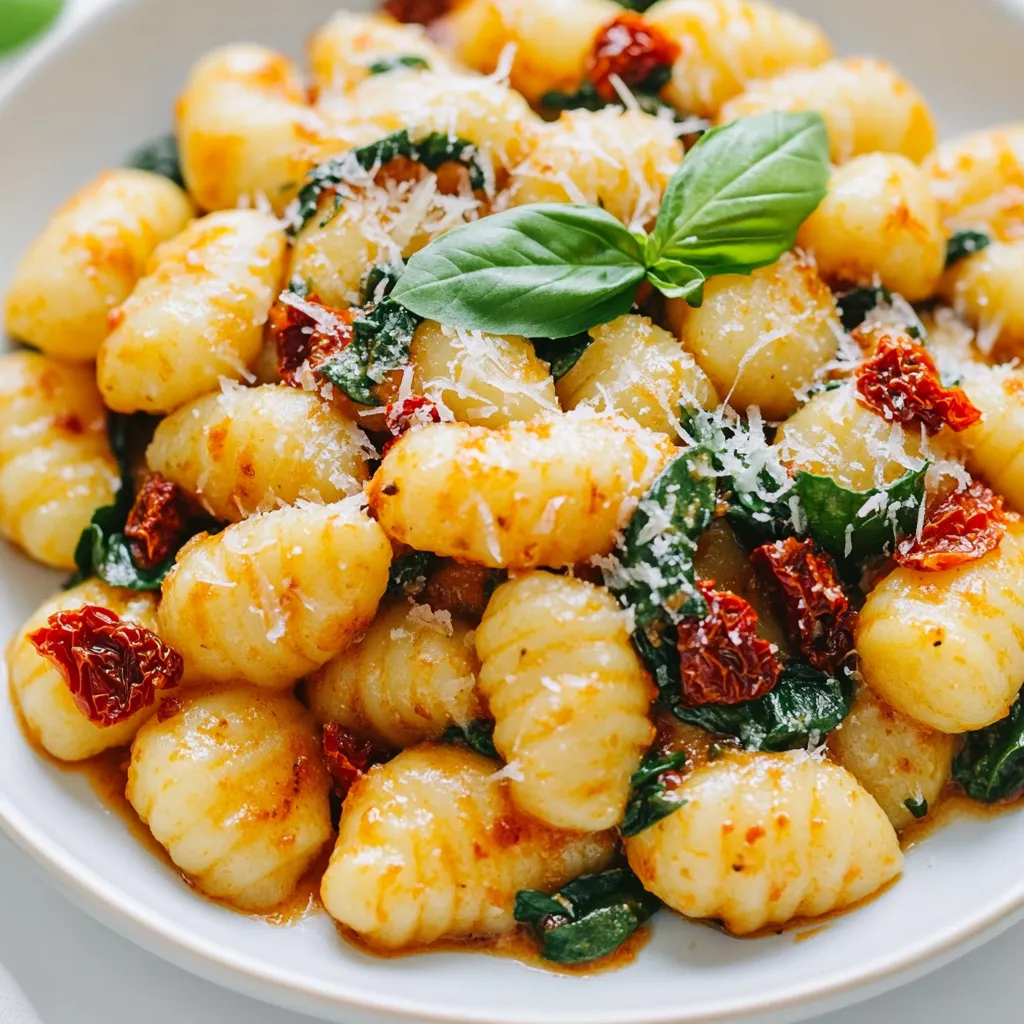
Are you ready to take your pasta night to a whole new level? This creamy sun-dried tomato gnocchi will wow your taste buds and impress your family. With simple ingredients …
![To make delicious zucchini fritters, you need fresh ingredients. Start with two medium zucchinis. Grate them well to release their flavor. You also need half a cup of finely grated Parmesan cheese. This cheese adds a rich, savory taste to the fritters. Next, let's add some seasonings. You need one teaspoon of salt. The salt draws moisture from the zucchini, which is key for crispiness. You will also need half a teaspoon of freshly ground black pepper and half a teaspoon of smoked paprika. These spices bring warmth and depth to your dish. Finally, gather the remaining ingredients. You will need one cup of all-purpose flour to bind everything. Two large eggs help hold the fritters together, while a quarter cup of finely chopped green onions adds freshness. Don't forget one clove of minced garlic for an extra kick. Use olive oil for frying, and serve your fritters with sour cream or Greek yogurt for a creamy finish. For the full recipe, check out the Zesty Zucchini Fritters. Start by grating two medium zucchinis. Place the grated zucchini in a colander. Sprinkle 1 teaspoon of salt over it. This step helps draw out moisture. Let it sit for 10-15 minutes. After that, use a clean kitchen towel to wring out the zucchini. Remove as much liquid as you can. This is key for crispy fritters! In a large bowl, combine the drained zucchini with 1 cup of all-purpose flour. Add 1/2 cup of finely grated Parmesan cheese. Next, pour in two beaten eggs and add 1/4 cup of finely chopped green onions. Don’t forget 1 clove of minced garlic, 1/2 teaspoon of black pepper, and 1/2 teaspoon of smoked paprika. Mix everything well until you have a thick batter. Heat a good amount of olive oil in a non-stick skillet over medium heat. Once the oil shimmers, drop spoonfuls of batter into the skillet. Lightly flatten each spoonful with the back of a spoon. Make sure not to overcrowd the skillet; you may need to cook in batches. Cook the fritters for about 3-4 minutes on each side. Look for a golden brown color. Once done, place them on paper towels to drain excess oil. Serve warm with sour cream or Greek yogurt. Enjoy your crispy zucchini fritters! For the full recipe, check out the earlier sections. To get crispy zucchini fritters, start by removing excess water from the grated zucchini. After grating, sprinkle the zucchini with salt. Let it sit for 10-15 minutes. This step helps draw out moisture. Then, wring out the zucchini using a clean kitchen towel. The less water, the crispier your fritters will be. These fritters pair well with many dips. Try serving them with sour cream or Greek yogurt. You can also add a squeeze of lemon for a fresh kick. Arrange the fritters on a bright plate. A sprinkle of fresh herbs like parsley adds color and flavor. You can even serve them as a side dish or a light main course. One mistake is not draining the zucchini enough. If it’s too watery, the fritters will be soggy. Another common error is overcrowding the skillet. This can steam the fritters instead of frying them. Fry them in batches for the best results. Always adjust the heat as needed to prevent burning. {{image_4}} You can make zucchini fritters even better by adding herbs and spices. Fresh herbs like dill or parsley can brighten up the flavor. Try adding 1 tablespoon of chopped fresh herbs to the batter. For a spicy kick, add a pinch of cayenne pepper or red pepper flakes. Smoked paprika gives a nice depth, but don’t stop there! Experiment with thyme or oregano for an Italian twist. If you need gluten-free fritters, it’s easy to adapt the recipe. Swap the all-purpose flour for almond flour or a gluten-free blend. Make sure the baking powder you use is gluten-free as well. This keeps the fritters light and fluffy while still being crispy. You can also use chickpea flour for a nutty flavor and added protein. To make zucchini fritters vegan, replace the eggs with flax eggs. Mix 1 tablespoon of ground flaxseed with 2.5 tablespoons of water. Let it sit for 5 minutes to thicken. You can also use a plant-based cheese instead of Parmesan. Nutritional yeast gives a cheesy flavor without dairy. Lastly, ensure you use a vegan-friendly oil for frying. For the full recipe, check the link above and start your culinary journey! To keep leftover fritters fresh, place them in an airtight container. Make sure they cool completely first. This helps prevent moisture from making them soggy. Store them in the fridge for up to three days. If you want to eat them later, freezing is a great option. For the best taste, reheat fritters in a skillet. Heat a small amount of olive oil over medium heat. Place the fritters in the skillet and cook for about 2-3 minutes on each side. This method keeps them crispy. You can also use the oven. Preheat it to 350°F (175°C). Place the fritters on a baking sheet and heat for about 10-12 minutes. To freeze fritters, first, let them cool completely. Place them in a single layer on a baking sheet. Freeze for about an hour to firm them up. Then, transfer the fritters to a freezer bag. Remove as much air as possible. They can stay in the freezer for up to three months. When you’re ready to eat, follow the reheating instructions for a quick and tasty meal. Enjoy your crispy zucchini fritters any time you want! For the full recipe, refer to the section above. To make zucchini fritters crispy, you need to remove excess moisture. Start by grating the zucchini and sprinkling it with salt. Let it rest for 10-15 minutes. The salt draws out the water. Then, use a clean towel to squeeze out the liquid. This step is key for achieving that perfect crunch. Yes, you can make zucchini fritters ahead of time. Prepare the batter and refrigerate it. You can also cook the fritters in advance. Just store them in the fridge. When you’re ready to eat, reheat them in a skillet or oven for a tasty snack. Zucchini fritters pair well with many sides. You can serve them with sour cream or Greek yogurt for dipping. A fresh salad adds a nice touch. You might also enjoy them with a tangy sauce, like tzatziki. These options enhance the flavors and make your meal more exciting. For the complete recipe, check out the [Full Recipe]. You learned how to make delicious zucchini fritters. We covered key ingredients, like cheese and spices, and how to prepare them right. I shared tips for great texture and serving ideas. You can try fun variations, including gluten-free or vegan options. Storing and reheating your fritters is easy. These fritters are tasty and simple. Enjoy them at any meal. You now have the skills to impress friends and family. Happy cooking!](https://tossedflavors.com/wp-content/uploads/2025/07/c2cf16bd-363a-439b-abc8-bdaf8d36ec40.webp)
If you’re craving a dish that’s easy and bursting with flavor, zucchini fritters are the way to go! These crispy delights are a perfect way to use up your garden’s …
![- 4 boneless, skinless chicken breasts - 1 can (10.5 oz) cream of chicken soup - 1 cup sour cream - 1 cup shredded cheddar cheese - 1 cup fresh or frozen broccoli florets - 1 teaspoon garlic powder - 1 teaspoon onion powder - 1 tablespoon olive oil - Salt and pepper to taste - 1 cup seasoned breadcrumbs - If you want to switch the cream of chicken soup, use mushroom or vegetable soup. - For a lighter dish, choose low-fat sour cream or Greek yogurt. - You can swap cheddar cheese for mozzarella or pepper jack for a kick. - A 9x13-inch baking dish is perfect for this recipe. - Use measuring cups and spoons for accuracy. - Mixing bowls help combine your ingredients well. This dish is simple yet tasty. You will love how easy it is to prepare. Check out the Full Recipe for more details. - Preheat your oven to 375°F (190°C). This ensures even cooking. - Grease a 9x13-inch baking dish with cooking spray or olive oil. This helps prevent sticking. - In a large bowl, mix one can of cream of chicken soup and one cup of sour cream. Stir until smooth. - Add one teaspoon of garlic powder and one teaspoon of onion powder. Season with salt and pepper to taste. Mix well to blend all flavors. - Place the four boneless, skinless chicken breasts in a single layer in the greased dish. Drizzle one tablespoon of olive oil over the chicken. - Season the chicken with salt and pepper on both sides for great flavor. - Pour the creamy soup mixture over the chicken. Make sure each piece is well-coated. - Spread one cup of broccoli florets evenly on top of the creamy layer. - Add one cup of shredded cheddar cheese on top of the broccoli. Then, sprinkle one cup of seasoned breadcrumbs for a crispy finish. - Cover the dish tightly with aluminum foil to keep moisture in. Bake for 30 minutes. - After 30 minutes, remove the foil. Bake for an additional 15-20 minutes. Check that the chicken reaches 165°F for safety. - Once done, let the dish rest for 5 minutes before serving. This helps keep the chicken juicy. For the full recipe, check the section above. To check for doneness, use a meat thermometer. Insert it into the thickest part of the chicken. The safe internal temperature is 165°F. If you don’t have a thermometer, cut the chicken open. The meat should be white and the juices clear. To avoid dryness, coat the chicken well with the creamy soup. This keeps the meat moist while it bakes. Also, cover the dish with aluminum foil for the first 30 minutes. This traps steam and helps the chicken cook evenly. You can enhance the flavor with herbs and spices. Try adding dried thyme or rosemary for a nice touch. Fresh herbs work well too, like parsley or basil. A dash of paprika can add warmth and depth. Incorporating vegetables boosts taste and nutrition. Sliced carrots or bell peppers mix well with broccoli. You can also add mushrooms for earthiness. This adds color and makes the dish even more appealing. For serving, you can dish it straight from the baking dish. This gives a homey feel. Pair it with steamed rice or fresh bread to soak up the sauce. Garnishing adds visual appeal. Sprinkle chopped parsley on top for a pop of color. You can also add a slice of lemon for brightness. This makes the dish look fresh and inviting. For the full recipe, check [Full Recipe]. {{image_4}} You can easily change the flavor of baked chicken. For a Mexican twist, add taco seasoning and diced green chilies to the cream of chicken soup. Top it with pepper jack cheese for a spicy kick. Serve it with warm tortillas or rice for a complete meal. For an Italian twist, swap the cream of chicken soup with marinara sauce. Layer fresh basil leaves and sliced tomatoes on top before baking. This adds a fresh taste that pairs well with mozzarella cheese. If you want a meat-free option, use plant-based meat. Substitute chicken with products like Beyond Meat or Impossible Chicken. These options taste great and keep the creamy texture. You can also use tofu or seitan. Press the tofu to remove excess water, then cut it into cubes. Marinate it in your favorite sauce before mixing it with the creamy soup. This method adds flavor and keeps the dish satisfying. For gluten-free options, look for certified gluten-free breadcrumbs. You can also make your own by blending gluten-free bread. This keeps the crispy topping while making it suitable for gluten-sensitive diets. If you need a dairy-free version, use coconut cream instead of sour cream. There are many dairy-free cheese options available, too. They melt well and still give you that cheesy flavor you love. To keep your baked chicken fresh, follow these tips: - Refrigeration: Place leftover chicken in an airtight container. This helps avoid drying out. Store it in the fridge for up to three days. - Freezing: For longer storage, freeze the chicken. Use a freezer-safe container or bag. Make sure to remove as much air as possible. This helps prevent freezer burn. To enjoy your chicken again, you can reheat it in a few ways: - Oven method: Preheat your oven to 350°F (175°C). Place the chicken in a baking dish, cover it with foil, and heat for about 20 minutes. This keeps the moisture in. - Microwave method: Place a piece of chicken on a microwave-safe plate. Cover it with a damp paper towel. Heat for 1-2 minutes, checking often to avoid drying it out. Wondering how long your chicken lasts? - Fridge: Baked chicken can stay good for three days. After that, it may not taste as fresh. - Freezer: If you freeze it, the chicken lasts for up to three months. For best flavor, enjoy it sooner rather than later. You can pair baked chicken with many tasty sides. Here are some great options: - Steamed rice - Mashed potatoes - Roasted vegetables - Green salad - Garlic bread Each of these sides adds flavor and texture. They also soak up the creamy sauce well, making every bite more enjoyable. Yes, you can prep this dish ahead of time. Here are some tips for meal prepping: - Prepare the dish up to the point of baking. - Cover it tightly with plastic wrap or foil and store it in the fridge. - You can also freeze it if you won’t bake it within two days. - For frozen dishes, allow it to thaw overnight in the fridge before baking. This way, you can enjoy a delicious meal with less hassle on busy days. To keep your chicken juicy, follow these techniques: - Start with high-quality chicken breasts. - Don’t overbake; use a meat thermometer to check for 165°F. - Cover the dish with foil for the first half of baking. - Let the chicken rest for a few minutes after baking. These steps help lock in moisture and flavor, giving you a succulent meal every time. This blog post guides you through cooking a delicious baked chicken dish. We covered ingredients, cooking tools, and step-by-step instructions. You learned about flavoring, variations, and how to store leftovers. To make this meal even more enjoyable, explore the many flavors and substitutes. Cooking is all about creativity. So, don’t hesitate to try new ideas. You can impress anyone with this simple yet tasty recipe! Happy cooking!](https://tossedflavors.com/wp-content/uploads/2025/07/cc364195-a51b-44d2-99bd-2a3a17f43e40.webp)
Are you ready to elevate your dinner game? This Best Baked Chicken with Cream of Chicken Soup dish is a game-changer. Imagine juicy chicken breasts smothered in creamy goodness, topped …
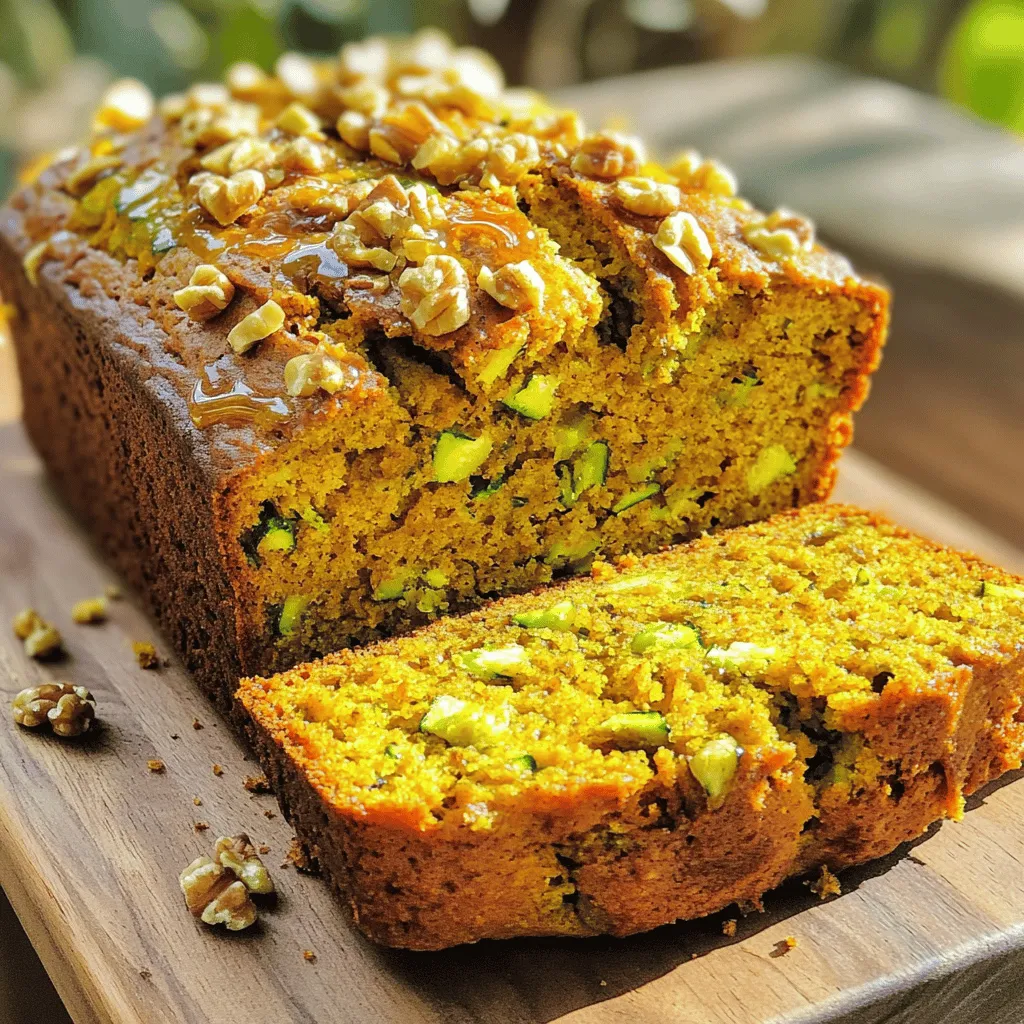
Are you ready to bake something delicious? Pumpkin Zucchini Bread is a perfect mix of fall flavors. This simple recipe combines pumpkin and zucchini for a moist, tasty treat. You …
![To make Cheesy Garlicky Zucchini Steaks, you need a few simple ingredients. These will create a flavorful dish that you will love. Here’s what you need: - 2 medium zucchinis - 4 cloves of garlic, minced - 1 cup shredded mozzarella cheese - ½ cup grated Parmesan cheese - 2 tablespoons olive oil - 1 teaspoon Italian seasoning - Salt and black pepper to taste - Fresh parsley, finely chopped (for garnish) Using fresh ingredients is key. Zucchinis should feel firm and look bright. Garlic adds a nice kick, while the cheeses bring creaminess and flavor. The Italian seasoning gives your dish an aromatic touch. A sprinkle of fresh parsley at the end brightens the meal. This is a great recipe for anyone looking to impress friends or family. You can find the full recipe in the section above. Enjoy your cooking! 1. Preheat the oven and prepare zucchini Start by preheating your oven to 400°F (200°C). This heat will make your zucchini steaks cook just right. Next, wash the zucchinis under cold water. Cut each zucchini lengthwise into thick steaks. Aim for about ½ inch thick. This thickness helps them cook evenly. 2. Make the garlic marinade In a big bowl, mix 4 minced garlic cloves, 2 tablespoons of olive oil, 1 teaspoon of Italian seasoning, salt, and black pepper. Stir until it is well combined. This garlic marinade gives the zucchini a great flavor. 3. Coat the zucchini steaks Now, add the zucchini steaks to the bowl. Make sure each steak gets coated in that tasty garlic mix. You can use a brush or just your hands to cover both sides. Let the zucchini sit in the marinade for about 10 minutes. This step helps the flavors soak in. 1. Arrange zucchini on a baking sheet Line a baking sheet with parchment paper. This makes cleaning up easy. Place the marinated zucchini steaks on the sheet in a single layer. Leave some space between each steak for even baking. 2. Add cheese and bake to perfection Sprinkle 1 cup of shredded mozzarella cheese and ½ cup of grated Parmesan cheese over each zucchini steak. Make sure each piece is well-covered. Then, pop the baking sheet into your preheated oven. Bake for 15-20 minutes. Keep an eye on them until the cheese is bubbly and golden. 3. Cooling down time Once they are cooked, carefully take the baking sheet out of the oven. Let the zucchini steaks cool for a few minutes before serving. This cooling time helps the cheese set a bit. Enjoy your cheesy garlicky zucchini steaks! You can find the Full Recipe for more details. How to maximize garlic flavor To bring out the best garlic taste, use fresh garlic cloves. Mince them finely to release more oils. Let the minced garlic sit for a few minutes before mixing it with the olive oil. This step helps enhance the garlic's aroma and flavor. Cheese selection tips Choose cheeses that melt well. Mozzarella brings gooeyness, while Parmesan adds a salty kick. Mixing these cheeses creates a nice balance. You can also try adding aged Gouda or Fontina for a richer flavor. Baking vs. grilling zucchini steaks Baking is simple and keeps the moisture in. Grilling adds a smoky touch and appealing grill marks. If you grill, use medium heat and watch closely to avoid burning. Both methods yield tasty results, so choose your favorite! Achieving optimal texture Aim for zucchini steaks about ½ inch thick. This thickness keeps them tender while preventing mushiness. When baking, don't overcrowd the pan; give them space to roast properly. If grilling, flip them gently to keep their shape intact. For the full recipe, check out the detailed instructions above. Enjoy your cooking adventure! {{image_4}} You can easily change the cheese in this recipe. If you like a strong flavor, try sharp cheddar or gouda. For a creamy touch, use fontina or goat cheese. Mixing cheeses adds depth to the dish. You can also add spices or herbs for extra flavor. Try red pepper flakes for heat, or smoked paprika for a twist. Fresh basil or thyme can brighten the taste. These swaps let you customize your cheesy garlicky zucchini steaks. Zucchini pairs well with other summer veggies. You can add bell peppers, tomatoes, or eggplant. Slice them thin and roast alongside the zucchini. This mix adds color and flavor. As fall comes, consider using squash. Butternut or acorn squash works great. Slice them thick and follow the same steps. This change gives you a warm, hearty dish that fits the season. For the full recipe, check out the [Full Recipe]. To keep your Cheesy Garlicky Zucchini Steaks fresh, use proper containers. Glass or BPA-free plastic containers work well. Make sure to let the zucchini cool before storing. This helps prevent sogginess. Place a paper towel inside the container to absorb moisture. Seal the container tightly and store it in the fridge. Enjoy your leftovers within three days for the best taste. If you want to freeze the zucchini steaks, it's easy! First, let them cool completely. Then, wrap each steak in plastic wrap. Place them in a freezer-safe bag or container. This helps prevent freezer burn. You can freeze them for up to three months. When reheating, avoid mushy zucchini. Use the oven to keep them crispy. Preheat your oven to 350°F (175°C). Place the zucchini on a baking sheet and heat for about 10 minutes. This way, the cheese melts and the zucchini stays firm. You can also reheat them in a skillet. Heat a little olive oil over medium heat. Add the zucchini steaks and cook for about 3-4 minutes. Flip them to warm evenly. This method helps maintain their crispiness. For more details, check the Full Recipe. - Can I make Cheesy Garlicky Zucchini Steaks ahead of time? Yes, you can prepare the zucchini steaks ahead. Just marinate and store them in the fridge. Bake them when you are ready to serve. - What pairs well with cheesy zucchini steaks? These steaks go well with a light salad, grilled chicken, or rice. You can also serve them with a tangy dipping sauce. - Are there vegan options for this recipe? Absolutely! You can use vegan cheese instead of mozzarella and Parmesan. Make sure to check the labels for dairy-free options. - Why is my zucchini too watery? Zucchini can be watery if it’s overcooked. Ensure you slice them evenly and remove excess moisture with a paper towel before baking. - How to know when the zucchini steaks are done? The zucchini steaks are done when they are tender and the cheese is bubbly and golden. You can test with a fork; it should go in easily. You learned how to make cheesy garlicky zucchini steaks from fresh ingredients. We covered preparation, baking, and tips to enhance flavor. You can adapt the dish with seasonal veggies and different cheeses to suit your taste. Storing and reheating the leftovers plays a big role in keeping them tasty. Enjoy experimenting with this simple recipe, and remember, cooking is about having fun! Your culinary journey starts here, so get cooking and savor every bite!](https://tossedflavors.com/wp-content/uploads/2025/07/32330346-26a0-400b-9155-fc542da97d68.webp)
Craving a dish that’s both delicious and easy to make? Let me introduce you to Cheesy Garlicky Zucchini Steaks! These tasty veggie steaks are packed with flavor thanks to garlic …
![Zucchini: Zucchini is the star of this recipe. It adds moisture and nutrition. It’s rich in vitamins A and C, plus fiber. When picking zucchini, choose ones that are firm and shiny. Smaller zucchinis are often sweeter and less seedy. Grate the zucchini finely to blend well into the batter. Cocoa Powder: Cocoa powder gives these muffins their rich chocolate flavor. I recommend using unsweetened cocoa powder. It allows you to control the sweetness better. If you use sweetened cocoa, the muffins may taste overly sweet. Look for high-quality cocoa for the best taste. Sweeteners: You can choose between honey and maple syrup for sweetness. Honey adds a floral note, while maple syrup gives a deeper, earthy flavor. Both sweeteners keep the muffins moist. Adjust the amount based on your taste. Just remember, a little goes a long way! For the Full Recipe, check back to see how these ingredients come together to create a delightful treat. 1. Mixing wet and dry ingredients separately First, gather two bowls. In one bowl, mix the wet ingredients. Combine the grated zucchini, melted coconut oil, honey or maple syrup, applesauce, eggs, and vanilla extract. Use a whisk or spatula to blend well. In the second bowl, sift the dry ingredients. Whisk together the whole wheat flour, cocoa powder, baking soda, baking powder, and sea salt. This helps avoid lumps and ensures an even texture. 2. Tips for proper folding techniques to avoid overmixing When you combine the wet and dry ingredients, pour the wet mixture into the dry bowl. Use a spatula to gently fold them together. Be careful not to stir too hard. It’s okay if the batter looks a bit lumpy. Overmixing can lead to tough muffins, so be gentle in your approach. 3. How to check for doneness After baking, you’ll want to check if your muffins are done. Insert a toothpick into the center of a muffin. If it comes out clean or with a few moist crumbs, they are ready. If not, give them a few more minutes in the oven. Remember, the baking time is about 18-20 minutes, but ovens can vary. For the full recipe, refer to the section above. Enjoy baking these healthy chocolate zucchini muffins! Adjusting sweetness levels to taste You can change the sweetness of your muffins based on your taste. If you love sweeter treats, add more honey or maple syrup. Start with an extra tablespoon, and taste the batter. Remember, the sweetness can change after baking. How to store for maximum freshness To keep your muffins fresh, use an airtight container. Store them at room temperature for 2-3 days. For longer storage, place them in the fridge for up to a week. This helps keep them moist and tasty! Baking time adjustments for high-altitude cooking If you live at a high altitude, your muffins may bake differently. At higher altitudes, reduce the baking time by a few minutes. Start checking for doneness around 15 minutes. This way, you can avoid dry muffins and keep them soft! For more tips, check out the Full Recipe to ensure you nail these muffins every time! {{image_4}} You can make these muffins fit your diet. Here are some great swaps: - Gluten-free alternatives for whole wheat flour: Use almond flour or gluten-free flour blends. They work well and keep the muffins moist. - Vegan modifications to accommodate dietary preferences: Instead of eggs, try flax eggs. Mix 1 tablespoon of ground flaxseed with 2.5 tablespoons of water for each egg. This will bind your muffins beautifully. - Adding spices (cinnamon, nutmeg) for enhanced flavor: A pinch of cinnamon or nutmeg adds warmth and depth. Start with 1/2 teaspoon of your favorite spice. Mix it into the dry ingredients for a tasty twist. These variations keep the recipe fun and flexible. You can enjoy healthy chocolate zucchini muffins no matter your diet! For the complete recipe, check the [Full Recipe]. To keep your Healthy Chocolate Zucchini Muffins fresh, you have a few choices. - Short-term storage methods: You can store the muffins at room temperature for up to two days. Place them in an airtight container to keep them moist. If you want to keep them longer, store them in the refrigerator. This will keep them fresh for up to a week. - Freezing muffins: If you want to save some for later, freezing is a great option. Here’s how: 1. Allow the muffins to cool completely after baking. 2. Wrap each muffin tightly in plastic wrap. 3. Place the wrapped muffins in a freezer-safe bag or container. 4. Label the bag with the date. They will stay fresh for up to three months. - Reheating tips: To enjoy your muffins again, thaw them at room temperature or in the fridge overnight. You can reheat them in the microwave for about 20 seconds. For a crispier texture, pop them in the oven at 350°F (175°C) for 5 to 10 minutes. This will restore their fresh-baked goodness. For the full recipe, check out the section above. Yes, you can make these muffins without eggs. Use 1/4 cup of unsweetened applesauce for each egg. This swap keeps muffins moist and adds natural sweetness. You can also try using flaxseed meal. Mix one tablespoon of flaxseed with three tablespoons of water. Let it sit for five minutes to thicken before adding it to your batter. To keep your muffins moist, use fresh zucchini. Grate it finely and squeeze out excess water. This step helps keep the batter balanced. Also, don’t overmix when combining wet and dry ingredients. Overmixing can lead to dry muffins. Finally, keep an eye on baking time to avoid drying them out in the oven. You can add many fun ingredients to boost flavor. Try mixing in cinnamon or nutmeg for warmth. Chopped nuts like walnuts or pecans add crunch. You can also use different types of chocolate chips, like white chocolate or peanut butter chips. Dried fruit, like raisins or cranberries, can add sweetness and texture. Check the full recipe for more ideas! You learned about key ingredients for tasty muffins, like zucchini and cocoa powder. We explored easy steps for mixing and checking for doneness. Tips for adjusting sweetness help you get your perfect muffin. With ideas for variations and storage, your muffins will always be fresh. Remember, baking is fun and creative. Feel free to experiment and make it your own!](https://tossedflavors.com/wp-content/uploads/2025/07/47bc6762-1c6d-43e7-bf54-e9ab07a39f33.webp)
Looking for a tasty treat that’s both healthy and easy to make? These Healthy Chocolate Zucchini Muffins hit the spot! Packed with nutrient-rich zucchini and rich chocolate flavor, they are …

Are you ready to add a burst of flavor to your meals? My easy recipe for quick pickled vegetables will do just that! With simple ingredients and a few easy …
 to guide you through this fun process. To make the best overnight pickles, keep these tips in mind: - Optimal submerged cucumber method: Use a weight or small plate to keep cucumbers under the brine. This helps them soak up the flavor evenly. If they float, the brine won’t work well. - Marinating time for flavor development: Let your pickles sit for at least 24 hours. For better taste, wait 2 to 3 days. The longer they sit, the more flavor they gain. You can easily change the taste of your pickles: - Tips for reducing or increasing spice: If you want milder pickles, cut back on red pepper flakes. For more heat, add extra flakes. You control the spice level! - Suggestions for varying sweetness: To make your pickles sweeter, add more sugar. If you prefer less sweetness, reduce the sugar to fit your taste. You can even try using honey or agave syrup for a different twist. Feel free to explore these ideas and make the pickles your own! For the full recipe and more details, check out the Crispy Sweet & Spicy Overnight Refrigerator Pickles recipe. {{image_4}} You can make your overnight refrigerator pickles even more fun by adding different flavors. One great idea is to use herbs. Herbs like thyme or oregano can bring a fresh taste. Just add a few sprigs when you layer your cucumbers in the jar. These herbs mix well with the brine. You can also add other vegetables for a colorful twist. Carrots and radishes are great choices. Slice them thin and mix them with the cucumbers. This gives you a crunchy and tasty mix. Each bite will surprise you with new flavors. If you want to change the sweetness of your pickles, try different sweeteners. Honey is a natural choice. It adds a nice touch of flavor. You can also use agave syrup. This is a great option for those who want a vegan substitute. You might want to experiment with different sugars too. Brown sugar can add a deeper flavor. It can make your pickles taste richer. Just remember to adjust the amount to keep the balance with the brine. These variations can make your pickles special. Feel free to mix and match flavors and sweeteners. Enjoy creating your own unique recipe! For a full recipe, check out the crispy sweet and spicy overnight refrigerator pickles. For the best results, use glass jars for your overnight refrigerator pickles. They keep the pickles fresh and let you see them. Make sure to pick jars with tight-fitting lids. This will help keep air out. If you don’t have jars, any food-safe plastic container works too. Layer your cucumbers and spices carefully for even flavor. To keep pickles crunchy, store them in the brine. The brine helps seal in the crisp texture. You can also place a weight on top of the cucumbers. This keeps them submerged in the liquid. If they float, they may not absorb all the flavor. Refrigerator pickles can last for about two to three weeks. However, the flavor gets better with time. After about a week, you’ll notice a nice tang. If you see any signs of spoilage, like a strange smell or mold, it’s best to throw them away. Look for these signs of spoilage: - Cloudy brine - Off smell - Soft or mushy cucumbers Storing your pickles properly helps them last longer and taste great. For the full recipe, check out my Crispy Sweet & Spicy Overnight Refrigerator Pickles. To make pickles less salty, you can rinse them. Just take the pickles out of the brine and rinse them under cold water. This will help remove some salt. Another option is to add a little extra sugar to the brine. The sugar will balance the saltiness. You can also add more vinegar or water to the brine. This will dilute the salt flavor. Yes, you can use different cucumbers! Pickling cucumbers work best because they stay crunchy. You can also use English cucumbers or Kirby cucumbers. Both have a firm texture that holds up well in pickling. If you choose larger cucumbers, slice them into smaller pieces for better flavor. If you want to can your pickles, follow safe canning standards. Use sterilized jars to avoid any bacteria. You must heat the brine to a rolling boil before filling the jars. Seal the jars tightly and process them in a water bath for 10 to 15 minutes. This will keep the pickles safe to eat for longer. You should refrigerate the pickles for at least 24 hours. This lets the flavors blend well. For a crunchier pickle, let them sit for up to 3 days. The longer they sit, the more flavor they will have. If you want a quick snack, 24 hours is just fine! For the full recipe, check out the Crispy Sweet & Spicy Overnight Refrigerator Pickles! You learned how to create delicious pickles at home. We covered ingredients, step-by-step instructions, and tips for success. Don't forget to experiment with flavors and storage methods. Every batch can be unique, adding fun to your cooking. With these skills, you can make pickles that suit your taste. Enjoy the process and savor your homemade creations!](https://tossedflavors.com/wp-content/uploads/2025/07/cf0e388a-be39-41ed-a0a3-819a61f93172.webp)
Are you ready to take your snacking game to the next level? Overnight refrigerator pickles are the perfect crunchy treat that you can whip up in no time. With a …