Skip to content
tossedflavors.com
  • Home
  • Appetizers
  • Desserts
  • Salads
  • Breakfast
  • Dinner
  • Privacy Policy
  • Contact
  • About

Chef Evan

Loaded Steak and Potato Bake Hearty and Satisfying Meal

July 17, 2025 by Chef Evan
To make a loaded steak and potato bake, gather these ingredients: - 2 large russet potatoes, thinly sliced - 1 lb sirloin steak, diced into bite-sized pieces - 1 cup shredded sharp cheddar cheese - 1 cup sour cream - 1/2 cup green onions, chopped (both green and white parts) - 1/4 cup fresh cilantro, finely chopped - 2 cloves garlic, minced - 2 tablespoons olive oil - 1 teaspoon smoked paprika - Salt and freshly ground black pepper to taste You can swap ingredients if needed. For potatoes, use Yukon gold instead of russet. They add a creamy taste. If you don't have sirloin steak, try flank steak or ground beef. Both work well and maintain flavor. For cheese, feel free to use Monterey Jack or a spicy pepper jack. If sour cream isn't available, Greek yogurt is a great alternative. It adds creaminess and tang. When choosing potatoes, russet potatoes shine for this dish. They are starchy and fluffy, creating a great texture. Yukon gold potatoes also work. They are creamy and hold their shape nicely. Avoid waxy potatoes like red or new potatoes, as they may not bake well. Choose the right potato for a perfect bake! To start, gather all your ingredients. Here’s what you’ll need: - 2 large russet potatoes, thinly sliced - 1 lb sirloin steak, diced into bite-sized pieces - 1 cup shredded sharp cheddar cheese - 1 cup sour cream - 1/2 cup green onions, chopped (both green and white parts) - 1/4 cup fresh cilantro, finely chopped - 2 cloves garlic, minced - 2 tablespoons olive oil - 1 teaspoon smoked paprika - Salt and freshly ground black pepper to taste First, preheat your oven to 400°F (200°C). Next, take a large skillet and heat the olive oil over medium-high heat. Add the diced sirloin steak to the skillet. Season it with salt, pepper, and smoked paprika. Cook the steak for about 5-7 minutes. Make sure to stir it occasionally until it is nicely browned. When the steak is ready, add the minced garlic and cook for another 1-2 minutes. This will make the steak smell great. Remove the skillet from heat and set it aside. Now, let’s layer everything in a large baking dish. Start with the first layer. Arrange half of the thinly sliced potatoes evenly across the bottom. Sprinkle a little salt and add half of the shredded cheddar cheese on top. Next, spread the sautéed steak mixture evenly over the potatoes. Ensure the steak is well spread throughout. For the second layer, place the remaining sliced potatoes over the steak. Top it off with the rest of the cheddar cheese. Now, take the sour cream and pour it over the whole dish. Make sure it covers the potatoes and cheese well to keep everything moist. Cover the baking dish tightly with aluminum foil. This will lock in moisture while it bakes. Bake it in the preheated oven for 30 minutes. After this time, carefully remove the foil. Bake for an additional 15-20 minutes. Check if the potatoes are tender by piercing them with a fork. You want the cheese to be bubbly and golden too. When it’s done, take the dish out of the oven. Immediately sprinkle with chopped green onions and fresh cilantro. This will add flavor and a pop of color. To make your dish look charming, serve it directly in the baking dish. This adds a rustic vibe. For a little extra flair, add a dollop of sour cream on the side. You can also toss in some extra cilantro leaves to make it even more appealing. Enjoy your delicious creation! To keep your potatoes crisp, slice them thin. Thin slices cook evenly and stay firm. Avoid soaking them in water before baking. Water draws out starch and causes sogginess. Instead, rinse and dry them with a towel. Season your potatoes well with salt before layering. This enhances their flavor and texture. For great steak, use a high-quality cut like sirloin. Cut it into bite-sized pieces for even cooking. Sear the steak on high heat for a rich color. Season it with salt and pepper to enhance its natural taste. Cook just until browned, about 5-7 minutes. Don't overcrowd the pan; this helps it brown nicely. Let the steak rest for a few minutes before adding it to your bake. To boost flavors, use smoked paprika for a rich, smoky taste. Fresh herbs like cilantro and green onions add brightness. Add minced garlic to the steak for a fragrant kick. You can also mix in different cheeses for added depth. Consider adding jalapeños for a spicy twist. Experimenting with your ingredients can lead to a unique dish every time. For more ideas, check out the Full Recipe. {{image_4}} You can easily make a vegetarian version of the loaded bake. Swap the sirloin steak for hearty mushrooms or lentils. Use firm tofu for added protein and a nice texture. Keep the potatoes and cheese to maintain that comforting feel. You can also add black beans for a boost in flavor and texture. Top with your favorite veggies like bell peppers or spinach for extra color and nutrients. If you love heat, try a spicy version. Add diced jalapeños or crushed red pepper flakes when cooking the steak. You can also mix in some spicy cheese, like pepper jack, instead of sharp cheddar. For a smoky flavor, consider adding chipotle sauce to the sour cream. This version adds a nice kick, making every bite exciting and full of flavor. Have fun with different toppings and mix-ins! Consider adding crispy bacon bits for extra crunch. You can also try caramelized onions for a sweet depth. A layer of sautéed bell peppers or corn adds great color and flavor. For freshness, top with avocado or extra cilantro before serving. Each topping can change the dish and make it feel new. These variations keep the loaded steak and potato bake fun and interesting. Try out different options to find your favorite twist! For the full recipe, check out the details above. After enjoying your loaded steak and potato bake, store leftovers in an airtight container. Let the dish cool before sealing it. This helps keep it fresh. Place it in the fridge for up to three days. If you want to save it longer, freezing is an option. To reheat your leftovers, I recommend using the oven. Preheat it to 350°F (175°C). Place your portion in a baking dish. Cover it with foil to keep it moist. Heat for about 20 minutes. If you're in a hurry, use the microwave. Just be sure to cover it to prevent splatter. If you want to freeze the loaded steak and potato bake, cut it into portions. Wrap each piece in plastic wrap, then place it in a freezer bag. Remove as much air as possible. Label the bags with the date. This dish can stay good in the freezer for up to three months. When you're ready to eat, just thaw it overnight in the fridge before reheating. Enjoy your meal anytime! To make a loaded steak and potato bake, follow these steps: 1. Preheat Oven: Set your oven to 400°F (200°C). 2. Cook Steak: Heat olive oil in a skillet. Add diced sirloin, salt, pepper, and smoked paprika. Cook for 5-7 minutes until brown. Add minced garlic and cook for another 1-2 minutes. 3. Layer Potatoes: In a baking dish, layer half the sliced potatoes. Sprinkle with salt and half the cheddar cheese. 4. Add Steak: Spread the sautéed steak over the potato layer. 5. Finish Layering: Add the rest of the sliced potatoes and top with remaining cheddar cheese. 6. Add Sour Cream: Pour sour cream over the top to keep it moist. 7. Bake: Cover with foil and bake for 30 minutes. Remove the foil and bake for an extra 15-20 minutes. 8. Garnish: Once done, sprinkle with green onions and cilantro. This recipe is easy and rewarding. You can find the full recipe above. Yes, you can use different types of cheese. Some good options include: - Monterey Jack - Pepper Jack - Gouda Each cheese adds a unique flavor. If you like it spicy, try Pepper Jack. For a smoky taste, Gouda works well. Feel free to mix cheeses for a richer taste. Common side dishes that pair nicely with loaded steak and potato bake include: - Steamed broccoli or green beans - A fresh garden salad - Garlic bread These sides balance the hearty bake. They add freshness and crunch. You can choose based on your taste or what you have at home. Enjoy your meal! In this blog post, I covered how to make a loaded steak and potato bake. We explored the best ingredients and substitutes. I shared step-by-step instructions to ensure your bake turns out perfectly. You learned tips to avoid soggy potatoes and enhance flavors. We discussed variations to suit your tastes and storage tips to keep leftovers fresh. This dish is fun to customize and easy to make. Remember, cooking is about enjoying the process and sharing delicious meals with others.

Ready for a hearty meal that hits the spot? My Loaded Steak and Potato Bake is the answer! It’s a warm, satisfying dish packed with tender steak, creamy potatoes, and …

Read more

Categories Dinner Leave a comment

Ground Beef & Rice Casserole Hearty and Simple Meal

July 17, 2025 by Chef Evan
- 1 lb ground beef - 1 cup uncooked long-grain rice - 1 can (15 oz) diced tomatoes with green chilies - 1 can (10.5 oz) cream of mushroom soup - 1 medium onion, diced - 2 cloves garlic, minced - 2 cups beef broth - 1 teaspoon ground cumin - 1 teaspoon smoked paprika - 1 teaspoon onion powder - 1 teaspoon garlic powder - Salt and freshly cracked pepper to taste - 1 cup shredded sharp cheddar cheese - 1/2 cup frozen peas - Fresh parsley, chopped, for garnish You need these ingredients for a tasty casserole. Start with ground beef, rice, and tomatoes. The cream of mushroom soup adds creaminess. Diced onion and garlic give the dish a nice base. Beef broth makes sure the rice cooks well. The spices give it flavor. Ground cumin and smoked paprika warm up the dish. Onion and garlic powders boost the taste. You can add salt and pepper to your liking. For extra fun, you can add cheese and peas. Cheese gives a rich topping, while peas add color and sweetness. Fresh parsley makes it look pretty. This list makes cooking easy. You can check out the Full Recipe for more details. Enjoy mixing these ingredients for a hearty meal! - Preheat oven to 350°F (175°C). - Brown the ground beef in a large skillet. In this step, heat your large skillet over medium heat. Add the ground beef and break it apart with a spatula. Cook it for about 5-7 minutes until it turns a rich brown. If there’s too much fat, drain it for a leaner dish. - Sauté onion and garlic with beef. - Mix spices into the beef mixture. Once the beef is browned, toss in the diced onion and minced garlic. Cook them together for 3-4 minutes. This adds great flavor as the onion softens. Next, mix in the ground cumin, smoked paprika, onion powder, and garlic powder. Don’t forget to season with salt and pepper! - Prepare the rice mixture in a separate bowl. - Combine beef mixture with rice mixture. In a large bowl, combine the uncooked rice, diced tomatoes with their juices, cream of mushroom soup, and beef broth. If you like, add frozen peas for a pop of color. After that, pour in the beef mixture. Stir everything until it’s well mixed and the rice is coated. - Transfer to greased casserole dish. - Cover with foil and bake for 45 minutes. - Add cheese and bake uncovered for an additional 15 minutes. Pour the mixture into a greased 9x13 inch casserole dish. Spread it out evenly with a spatula. Cover the dish tightly with aluminum foil. Bake it in the preheated oven for 45 minutes. After that, remove the foil and sprinkle shredded cheddar cheese on top. Bake it uncovered for another 15 minutes. The cheese should be melted and bubbly, ready to enjoy! - Drain the beef well after cooking. This helps make a less greasy casserole. - Want some heat? Add jalapeños or a splash of hot sauce for a spicier dish. - Serve the casserole hot right from the baking dish. This keeps it warm and inviting. - Garnish with fresh parsley for a pop of color. Pair with crusty bread for a nice touch. - If you use more ingredients, adjust the baking time. A larger dish may need extra time. - Add more broth if you want a moister casserole. This keeps the rice nice and tender. {{image_4}} You can easily switch up the meats in this casserole. Using turkey or chicken instead of ground beef makes it lighter. If you prefer a healthier grain, try substituting brown rice for white rice. Brown rice adds fiber and a nuttier flavor. Cheese is a great way to change the flavor. Adding Monterey Jack or Pepper Jack gives a creamy texture and a little kick. You can also toss in your favorite herbs. Fresh basil or thyme can brighten the dish and add aroma. If you're looking for a vegetarian option, swap the beef for beans or lentils. This change keeps the meal filling and nutritious. For those avoiding dairy, use a dairy-free cream soup. This keeps the casserole rich without the milk. These variations let you customize your dish to fit your taste and diet. Enjoy playing with flavors and ingredients to make this casserole your own! Store leftovers in an airtight container for up to 3 days. This keeps your casserole fresh. Always cool it down before sealing. You can enjoy it again for lunch or dinner. Freeze for up to 2-3 months. First, let it cool completely. Once cooled, you can wrap it tightly in foil or place it in a freezer-safe container. Thaw overnight in the refrigerator before reheating. This method helps maintain the texture and flavor. Reheat in the oven or microwave. If using the oven, cover it with foil to keep it moist. If using the microwave, add a splash of broth to maintain moisture. This keeps your casserole from drying out and enhances the flavor. Enjoy your hearty meal again! - Yes, prepare it and store it in the fridge overnight before baking. This makes it easy to serve on busy days. - Look for bubbling cheese and a golden crust; the internal temperature should reach 165°F (74°C). A meat thermometer helps ensure it's safe to eat. - Yes, quinoa or cauliflower rice are great alternatives. Each swap will give a new flavor and texture. - Pair with a fresh salad or steamed vegetables for a complete meal. This adds color and nutrients to your plate. - Add diced peppers or incorporate more spices to your taste. You can even use hot sauce for an extra kick. - Detailed nutritional information can be calculated based on your ingredient choices and serving sizes. This way, you can adjust for your needs. This casserole combines simple ingredients for a tasty dish. You start by browning beef with onion and garlic. Then, mix in spices, rice, and broth before baking. Add cheese for a gooey finish. For extra flavor, swap ingredients or add spices. Store leftovers easily or make it ahead to save time. Enjoy this comforting meal with friends or family. It’s quick, easy, and satisfying.

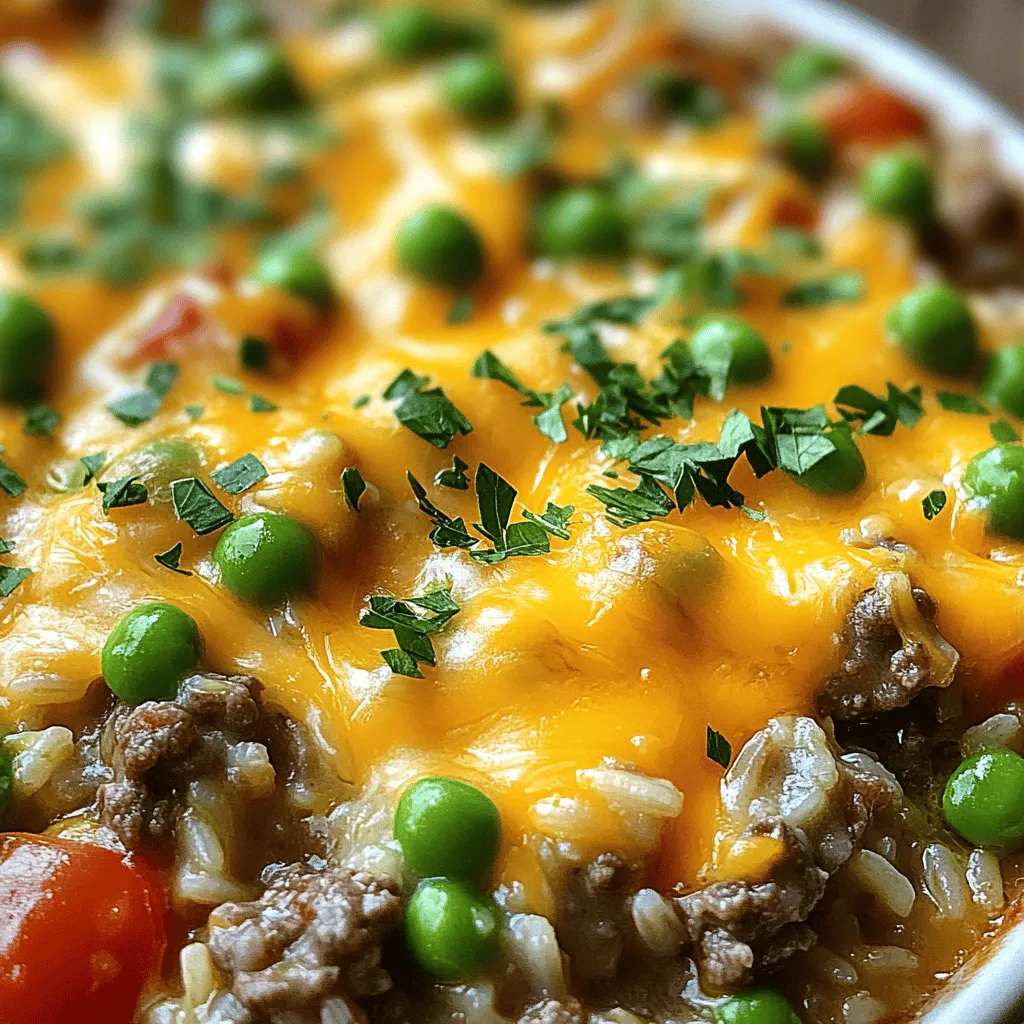
Are you craving a meal that’s hearty and easy to make? This Ground Beef & Rice Casserole hits all the right notes! Packed with flavor and simple ingredients, it’s perfect …

Read more

Categories Dinner Leave a comment

High-Protein Steak and Shrimp Stir-Fry Delight

July 17, 2025 by Chef Evan
- 8 oz sirloin steak, thinly sliced - 8 oz shrimp, peeled and deveined - 2 cups mixed bell peppers (red, yellow, green) - 1 medium onion, sliced - 3 cloves garlic, minced - 3 tablespoons soy sauce (or tamari for gluten-free) - 1 tablespoon sesame oil - 1 tablespoon vegetable oil - 1 teaspoon red pepper flakes (optional) - Salt and pepper to taste - 1 cup snap peas, trimmed - 2 green onions, chopped - Cooked brown rice or quinoa for serving To make a high-protein steak and shrimp stir-fry, gather these fresh, vibrant ingredients. They bring color and flavor to your dish. The protein from the steak and shrimp makes this meal filling. The bell peppers and snap peas add crunch and nutrition. Using soy sauce adds depth to the flavor. Sesame oil gives a nice nutty taste. Don't forget the garlic for that classic stir-fry aroma! You can serve this dish over brown rice or quinoa. They both add healthy fiber and additional protein. For a full recipe, check out the details in the recipe section. - Prep Your Ingredients: Start by slicing the sirloin steak thinly against the grain. This helps make it tender. Next, peel and devein the shrimp. Cut the mixed bell peppers into thin strips and slice the onion into rings. Mince the garlic and ginger finely. This prep work makes cooking easier and faster. - Heat the Pan: In a large skillet or wok, add the vegetable oil. Heat it over medium-high heat until it shimmers. This shows that the pan is hot enough for frying. - Cook the Steak: Add the sliced steak to the hot pan. Season it with salt and pepper. Stir-fry for about 3-4 minutes, until the steak turns brown. Check for your preferred doneness. Once done, move the steak to a plate. - Cook the Shrimp: In the same hot pan, add the shrimp. Stir-fry for 2-3 minutes. Watch for the shrimp to turn a vibrant pink color. This means they are fully cooked. Remove the shrimp and place them on the plate with the steak. - Sauté the Vegetables: Now, add the sliced onion, bell peppers, and snap peas to the pan. Stir frequently for about 4-5 minutes. You want the veggies to be tender but still crisp. This keeps them tasty and colorful. - Add Aromatics: Next, toss in the minced garlic, ginger, and red pepper flakes if you like heat. Sauté for another 1-2 minutes. This step brings out the lovely scents and flavors. - Combine Everything: Return the cooked steak and shrimp to the pan. Drizzle in the soy sauce and sesame oil. Toss everything together for another 2 minutes. This warms up the dish and mixes the flavors well. - Season to Taste: Taste your stir-fry and adjust the seasoning. Add more salt and pepper if needed. Before serving, sprinkle some chopped green onions on top for freshness. - Serve: Serve the stir-fry over a bed of cooked brown rice or quinoa. This not only adds flavor but also boosts the dish's protein and fiber. For presentation, use a large, shallow bowl. Top with extra green onions and sesame seeds for a beautiful finish. Enjoy your High-Protein Steak and Shrimp Stir-Fry Delight! To boost protein in your stir-fry, consider adding: - Tofu: Firm tofu adds protein and absorbs flavors well. - Eggs: Scramble in a few eggs for extra richness. - Quinoa: Use quinoa instead of rice for a protein-rich base. To get a perfect sear on your steak: - Start with a hot pan. This helps seal in juices. - Don't overcrowd the pan. Cook in batches if needed. - Let the steak rest before slicing. This keeps it juicy. For different levels of doneness, use these cooking times: - Rare: 2-3 minutes per side. - Medium: 4-5 minutes per side. - Well-done: 6-7 minutes per side. Use the right stir-frying techniques for great veggies: - Keep the pan hot to avoid soggy vegetables. - Stir frequently but let them sit occasionally for char. - Add hard veggies like carrots first, then softer ones like bell peppers. Spice up your dish with these extras: - Chili paste: Adds heat and depth. - Fish sauce: A little goes a long way for umami. - Cilantro or basil: Fresh herbs brighten flavors. For balanced seasoning, remember these tips: - Taste as you cook. Adjust salt and pepper to your liking. - Use low-sodium soy sauce to control salt levels. - Add a squeeze of lime or lemon juice before serving. This dish is all about balance and creativity. Explore flavors and enjoy your cooking! For more detailed steps, check the Full Recipe. {{image_4}} You can easily switch out the vegetables in this dish. If you want a fresh taste, try using zucchini, broccoli, or carrots. These veggies add color and crunch. For seafood, feel free to swap shrimp for scallops or even crab. They will offer a unique flavor and texture. If you're looking for gluten-free options, use tamari instead of soy sauce. This keeps the dish tasty for those with gluten issues. For a vegetarian twist, replace steak and shrimp with tofu or tempeh. Both options absorb flavors well and pack a protein punch. To add a global flair, consider using different spices or sauces. Adding teriyaki or oyster sauce can change the entire vibe. You can also sprinkle in some cumin or coriander for a Middle Eastern touch. Don't be afraid to experiment; your taste buds will thank you! To keep your high-protein steak and shrimp stir-fry fresh, follow these tips: - Cool Down: Let the stir-fry cool to room temperature before storing. - Use Airtight Containers: Place leftovers in airtight containers to prevent moisture loss. - Fridge Duration: Store in the fridge for up to 3 days. To enjoy your stir-fry again, use these methods: - Stovetop Method: Heat in a skillet over medium heat for even warming. - Microwave Method: Use a microwave-safe dish and heat in short bursts. - Avoid Soggy Veggies: Reheat just until warm to keep veggies crisp. Freezing is great for longer storage. Here’s how: - Portion Control: Divide stir-fry into single servings before freezing. - Use Freezer Bags: Place portions in freezer bags, removing excess air. - Thawing: Thaw in the fridge overnight or use the microwave. - Reheat After Thawing: Heat thoroughly on the stovetop or microwave for best results. For the full recipe, check out the detailed cooking instructions for more tasty ideas! How long does it take to prepare and cook this dish? It takes about 15 minutes to prep and 10 minutes to cook. So, you can have a yummy meal ready in just 25 minutes. Can I use frozen steak or shrimp for this recipe? Yes, you can use frozen steak or shrimp. Just make sure to thaw them fully before cooking. This helps them cook evenly and taste great. What can I substitute for soy sauce? If you need a soy sauce substitute, use coconut aminos or tamari. Both options are tasty and work well in this dish. How can I make this dish less spicy? To make this dish less spicy, skip the red pepper flakes. You can also add more bell peppers for sweetness. What is the protein content in this dish? This dish packs in about 40 grams of protein per serving. The steak and shrimp give you a great protein boost. Is this recipe suitable for meal prep? Yes, this recipe is perfect for meal prep. You can store leftovers in the fridge for up to three days. Just reheat and enjoy! For the complete recipe, check out the [Full Recipe]. This blog post guided you through making a delicious stir-fry. You learned about essential ingredients like steak and shrimp, seasonal oils, and tips for cooking. We also explored variations to suit your tastes and dietary needs. As you experiment with this recipe, remember to get creative. Cooking is fun, and it’s all about enjoying the process. Use these steps and tips to build your confidence in the kitchen!

Are you ready to taste a delightful high-protein meal? My High-Protein Steak and Shrimp Stir-Fry delivers both flavor and nutrition in every bite. With tender sirloin, juicy shrimp, and colorful …

Read more

Categories Dinner Leave a comment

Sushi Rolls Made Easy with Fresh Ingredients

July 17, 2025 by Chef Evan
To make sushi rolls, you need fresh ingredients. Here’s the complete list: - 2 cups sushi rice - 2 ½ cups water - ½ cup rice vinegar - 2 tablespoons sugar - 1 teaspoon salt - 4 sheets nori (seaweed) - 1 cucumber, julienned - 1 avocado, sliced - 1 small bell pepper, thinly sliced - 1 carrot, shredded - Soy sauce for dipping - Wasabi and pickled ginger (optional) Using fresh ingredients makes a big difference in taste. Sushi rice is key for perfect rolls. Rinse it well to remove excess starch. This step helps the rice stay fluffy. Nori sheets are the wrap. They should be crisp and dark. If they feel soft, they may be old. Fresh veggies add crunch and color. Cucumber and avocado are popular choices. They bring great flavors and textures. When you pick a bell pepper, choose one that is firm. Thin slices work best in sushi. Carrots add sweetness and a nice crunch. For dipping, soy sauce is traditional. Wasabi and pickled ginger add spice and zing. With these fresh ingredients, you can make delicious sushi rolls. Check the Full Recipe for detailed steps. - Rinsing and Cooking Rice: Start by rinsing 2 cups of sushi rice under cold water. Keep rinsing until the water runs clear. This step helps remove extra starch. After rinsing, drain the rice well. In a medium pot, combine the rinsed rice with 2 ½ cups of water. Bring this mixture to a boil. Once it boils, lower the heat, cover the pot, and let it cook for 20 minutes. - Seasoning the Rice: While the rice cooks, mix ½ cup rice vinegar, 2 tablespoons sugar, and 1 teaspoon salt in a small pot. Heat it gently on low. Stir until the sugar and salt dissolve completely. Once it's ready, remove it from the heat and let it cool. - Cooling the Rice: After the rice has cooked, let it sit covered for 10 minutes. Then, transfer it to a large bowl. Gently fold in the cooled vinegar mixture with a spatula. Be gentle to keep the rice grains intact. Let the seasoned rice cool to room temperature. - Setting Up Your Rolling Mat: Lay a bamboo sushi rolling mat on a clean, flat surface. This will help you roll your sushi with ease. - Adding Fillings to the Nori: Place a sheet of nori, shiny side down, on the mat. With wet hands, spread about 1 cup of sushi rice over the nori. Leave a 1-inch border at the top. This space will help seal the roll later. - Rolling Technique: In the center of the rice, lay a line of fillings. You can use julienned cucumber, sliced avocado, thin bell pepper, and shredded carrot. Starting from the bottom, lift the edge of the mat. Gently roll the sushi away from you, keeping the filling in place. Tuck the edge of the mat tightly as you roll. Moisten the top edge of the nori to seal the roll. - Slicing the Rolls: Take a sharp knife and slice the rolled sushi into bite-sized pieces. Clean the knife with a damp cloth between cuts for neat edges. - Presentation Tips: Arrange the sushi rolls on a decorative plate. You can present them in a circular pattern. Add small bowls of soy sauce, wasabi, and pickled ginger in the center for a beautiful display. For the full details on this process, check out the Full Recipe and get ready to impress your friends and family! Overcooking Sushi Rice Cook your sushi rice for exactly 20 minutes. If you cook it longer, the rice can become mushy. This will ruin the texture of your rolls. Always check the water level during cooking. Once the water is absorbed, let it sit off the heat. This helps the rice steam and become fluffy. Incorrect Rolling Technique Rolling sushi can be tricky. Start at the bottom edge of the mat. Tightly roll away from you while keeping the filling in place. If you roll too loosely, your sushi will fall apart. Make sure to seal the edge with a bit of water to keep everything together. Bamboo Rolling Mat Using a bamboo mat is key for making sushi rolls. It helps you shape the rolls evenly. Place the nori on the mat with the shiny side down. This mat provides the right support to roll tightly and evenly. Sharp Knife A sharp knife is essential for cutting sushi. A dull knife will squish your rolls and ruin their shape. Clean your knife with a damp cloth after each cut. This keeps the edges neat and helps maintain a beautiful presentation. Suggested Dipping Sauces Soy sauce is the classic dip for sushi rolls. You can also mix soy sauce with a bit of wasabi for a kick. If you like something sweeter, try a teriyaki sauce. You can create your own blend by mixing soy sauce with sesame oil. Garnishing Ideas Garnish your rolls for a pop of color. Use thinly sliced radishes or sprouts for freshness. A sprinkle of sesame seeds adds a nice crunch. Arrange your rolls on a plate with colorful garnishes. This makes the dish look inviting and fun. For the full recipe, check out the detailed instructions provided. {{image_4}} Meat and Seafood Options You can use many meats and seafood for sushi rolls. Here are some tasty choices: - Crab meat - Cooked shrimp - Grilled chicken - Spicy tuna - Salmon These options add great flavor and protein to your rolls. You can mix and match these fillings to suit your taste. Vegetarian Choices If you prefer veggies, there are many great options too. Try these fillings: - Cream cheese - Tofu - Sweet potato - Mango - Asparagus These ingredients give you a colorful and fresh sushi roll. They taste amazing and are filling, too. Maki vs. Temaki Maki rolls are the most common type. They are round and cut into pieces. You roll them tightly with nori on the outside. Temaki rolls are hand rolls. They look like cones. You fill and roll them by hand, making them fun to eat. Inside-out Rolls Inside-out rolls have the rice on the outside. This style is popular in many sushi bars. It allows for creative toppings. You can sprinkle sesame seeds or add avocado on the outside. This gives a nice texture and look. Adding Spices Want to spice things up? You can add sriracha or chili flakes to your fillings. This adds heat and exciting flavors. Try mixing these spices with mayonnaise for a creamy kick. Incorporating Sauces Sauces can elevate your sushi rolls. Here are some ideas: - Eel sauce for sweetness - Soy sauce for saltiness - Ponzu sauce for a citrusy twist These sauces can enhance the flavors in your rolls. Just drizzle them on top or serve them on the side for dipping. To keep leftover sushi rolls fresh, wrap them tightly in plastic wrap. This keeps air out and helps retain moisture. Place the wrapped rolls in the fridge. Try to eat them within 24 hours for the best taste. For reheating, do not use the microwave. Instead, let the rolls warm up to room temperature. This helps the rice regain some of its original texture. Sushi rolls taste best when fresh. If stored correctly, they can last about one day in the fridge. After that, the rice and fillings may lose flavor and texture. Signs of spoilage include a sour smell, a slimy texture, or discoloration. If you notice any of these signs, it’s best to throw them away. Storing fresh vegetables is key. Keep them in a cool, dark place or the fridge. Wrap them in a damp paper towel to help them stay crisp. For nori, keep it in a cool, dry place. Use an airtight container to keep it fresh. If nori gets too soft, it won’t roll well. Always check the package for the best storage tips. To get the full experience of making sushi rolls, check out the Full Recipe. The best rice for sushi is sushi rice. It is short-grain and sticky. This type helps the rolls hold together. Look for brands labeled "sushi rice" or "shari." Yes, you can make sushi rolls without rice. You can use thinly sliced vegetables or fruits instead. Options like cucumber or zucchini work well. These rolls are fresh and low-carb. To prevent rice from sticking, rinse it well before cooking. This step removes excess starch. Use wet hands when handling the rice. This also helps keep it from sticking. Sushi rolls can be frozen, but with caution. Freezing may change the texture of the ingredients. It’s best to freeze plain rolls without vegetables or seafood. Wrap them tightly before freezing. Sushi includes rice and toppings, while sashimi is just raw fish. Sushi is a complete dish, while sashimi focuses on the fish itself. Both are delicious and popular in Japanese cuisine. To enhance flavor, add sauces or seasonings. Try using soy sauce, spicy mayo, or sesame oil. Adding herbs like cilantro or mint can also boost taste. Experiment with different combinations for fun. For a complete guide to making sushi, check the Full Recipe. Making sushi rolls at home is fun and easy. You learned about the needed ingredients, how to prepare and roll sushi, and tips to avoid mistakes. I shared common variations and storage tips to keep your sushi fresh. Now, you have all the tools and knowledge to create delicious sushi rolls. Get creative with flavors and fillings. Enjoy your sushi-making journey!

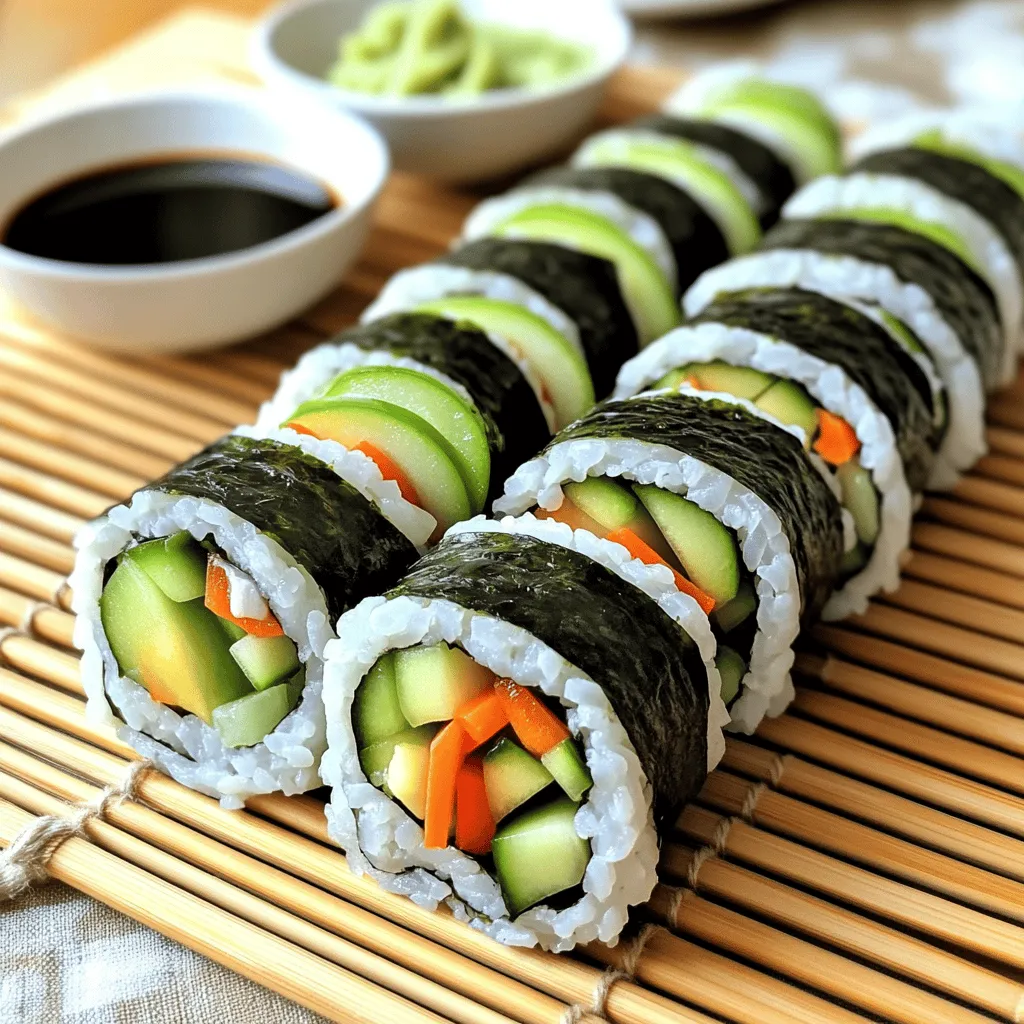
Making sushi rolls at home is easier than you think! With fresh ingredients and simple steps, you can impress your friends and family. I’ll guide you through selecting the right …

Read more

Categories Dinner Leave a comment

Blueberry Zucchini Bread with Lemon Glaze Delight

July 16, 2025 by Chef Evan
- 1 cup grated zucchini - 1 cup fresh or frozen blueberries - 1 ½ cups all-purpose flour - ½ cup granulated sugar - ½ cup packed brown sugar - 2 large eggs - ½ cup vegetable oil - 1 teaspoon baking powder - 1 teaspoon baking soda - ½ teaspoon salt - 1 teaspoon ground cinnamon - Zest and juice of 1 lemon The main ingredients in this blueberry zucchini bread create a wonderful balance of flavors. The grated zucchini keeps the bread moist while adding fiber without a strong taste. The blueberries burst with sweetness, making each bite a treat. The sugar combination of granulated and brown provides depth. The brown sugar adds a hint of caramel that pairs well with the cinnamon. Eggs bind the mix, while vegetable oil adds richness. In addition, baking powder and baking soda serve as leavening agents. They help the bread rise to a fluffy texture. Salt enhances the flavors, while lemon zest and juice brighten the dish with a zesty kick. - 1 cup powdered sugar - 2 tablespoons lemon juice - Zest of 1 lemon The lemon glaze is simple yet adds a bright finish. The powdered sugar gives it sweetness, balancing the tartness of the lemon juice. The zest amplifies the lemon flavor, making it fresh and vibrant. Drizzling the glaze over the warm bread creates a lovely shine. It adds both taste and visual appeal. If you want the glaze thicker, just add more powdered sugar. For a thinner glaze, increase the lemon juice. For the full recipe, check the details above. Enjoy a slice of this delicious blueberry zucchini bread with lemon glaze! - Preheat oven to 350°F (175°C). - Prepare a 9x5-inch loaf pan by greasing it or lining it with parchment paper. - In a medium bowl, combine 1 cup of grated zucchini, 1 cup of blueberries, and the zest of 1 lemon. Let this sit. - In a large bowl, whisk together 1 ½ cups of flour, 1 teaspoon baking powder, 1 teaspoon baking soda, ½ teaspoon salt, and 1 teaspoon ground cinnamon. - In another bowl, mix ½ cup granulated sugar, ½ cup brown sugar, 2 large eggs, ½ cup vegetable oil, 1 teaspoon vanilla extract, and 2 tablespoons lemon juice until smooth. - Gradually add the wet mixture to the dry ingredients. Stir gently until just combined. - Carefully fold in the zucchini and blueberry mixture, making sure it is evenly mixed. - Pour the batter into the prepared pan and smooth the top. - Bake for 55-65 minutes. Check doneness by inserting a toothpick into the center; it should come out clean. - Allow the bread to cool for about 10 minutes in the pan. Then transfer it to a wire rack to cool completely. For the lemon glaze, whisk together 1 cup powdered sugar, 2 tablespoons lemon juice, and the zest of 1 lemon until smooth. Once the bread cools, drizzle the glaze over the top. Enjoy this delightful Blueberry Zucchini Bread with Lemon Glaze! For the full recipe, refer to the earlier section. To start, squeezing the zucchini is key. Use a clean cloth or paper towel. Place the grated zucchini in the center and twist it to remove excess water. This step helps your bread stay firm. Next, avoid overmixing. When you combine the wet and dry ingredients, stir just until you see no flour. Overmixing can make your bread dense and tough. Aim for a few lumps in the batter. To check if your bread is done, use a toothpick. Insert it into the center of the loaf. If it comes out clean, your bread is ready. If not, give it a few more minutes. Cooling is also important. After baking, let the bread sit in the pan for about 10 minutes. Then, move it to a wire rack. This cooling method keeps the bread from getting soggy. For a beautiful finish, garnish your loaf with fresh blueberries and lemon slices. This adds color and a pop of freshness. When serving, slice the bread into even pieces. Arrange them on a nice plate. This makes it look special and inviting. Enjoy your blueberry zucchini bread warm or at room temperature for the best taste! {{image_4}} You can make this blueberry zucchini bread even more fun. Try adding nuts or seeds to the mix. They will add a nice crunch. Walnuts or sunflower seeds work well. You can also swap in other fruits. Raspberries or strawberries bring a new twist. Each fruit adds its own unique flavor. If you need a gluten-free option, you can easily swap the flour. Almond flour or coconut flour can work well. Just remember to adjust the moisture. You might need extra liquid, like applesauce, to keep it moist. For a vegan version, replace the eggs with flaxseed or applesauce. Flaxseed works as a great binder. You can also try using maple syrup or agave nectar as sweeteners. These alternatives keep the bread tasty and healthy. Store your blueberry zucchini bread at room temperature for up to three days. Use an airtight container to keep it fresh and moist. If you live in a warm area, consider refrigerating it. This helps it last a bit longer, but it may dry out. Wrap the bread in plastic wrap or place it in a sealed bag before refrigerating. To freeze the bread, first let it cool completely. Slice it into pieces for easy serving. Wrap each slice in plastic wrap and place them in a freezer bag. This way, you can take out just what you need. To reheat, you can either let it thaw in the fridge overnight or warm it in the microwave for a few seconds. Blueberry zucchini bread can stay fresh for about three days at room temperature. If stored in the fridge, it can last up to a week. For frozen bread, it remains good for about three months. Always check for signs of spoilage, like mold or an off smell, before eating. Enjoy the delightful flavors while they last! Yes, you can use frozen blueberries. They work great in this recipe. Here are some tips: - Thaw the blueberries before adding them to the batter. - Pat them dry with a paper towel to avoid excess moisture. - Toss them in a little flour before mixing to prevent sinking. To check if the bread is done, look for these signs: - A toothpick inserted in the center should come out clean. - The top should be golden brown and spring back when touched. - The edges may pull away slightly from the pan. If you don’t have zucchini, here are some alternatives: - Use grated carrots for a sweet twist. - Try using applesauce for moisture and sweetness. - Finely grated summer squash can also work well. To make the lemon glaze thicker, consider these tips: - Add more powdered sugar to the mix. - Reduce the amount of lemon juice slightly. - Mix until you reach your desired consistency. Yes, you can easily make muffins instead of bread. Here’s how: - Divide the batter into a muffin tin lined with paper cups. - Bake for about 20-25 minutes, checking for doneness with a toothpick. - The lemon glaze adds a nice finish to each muffin. For the full recipe, see above. Enjoy your baking! Blueberry zucchini bread combines fresh flavors and healthy ingredients for a tasty treat. We covered its main ingredients, step-by-step instructions, and valuable baking tips. Remember to check doneness with a toothpick for success. You can even tweak the recipe by adding fruits, nuts, or making it vegan. Store your bread right for the best taste and longer life. Enjoy crafting this delicious bread and sharing it with others!

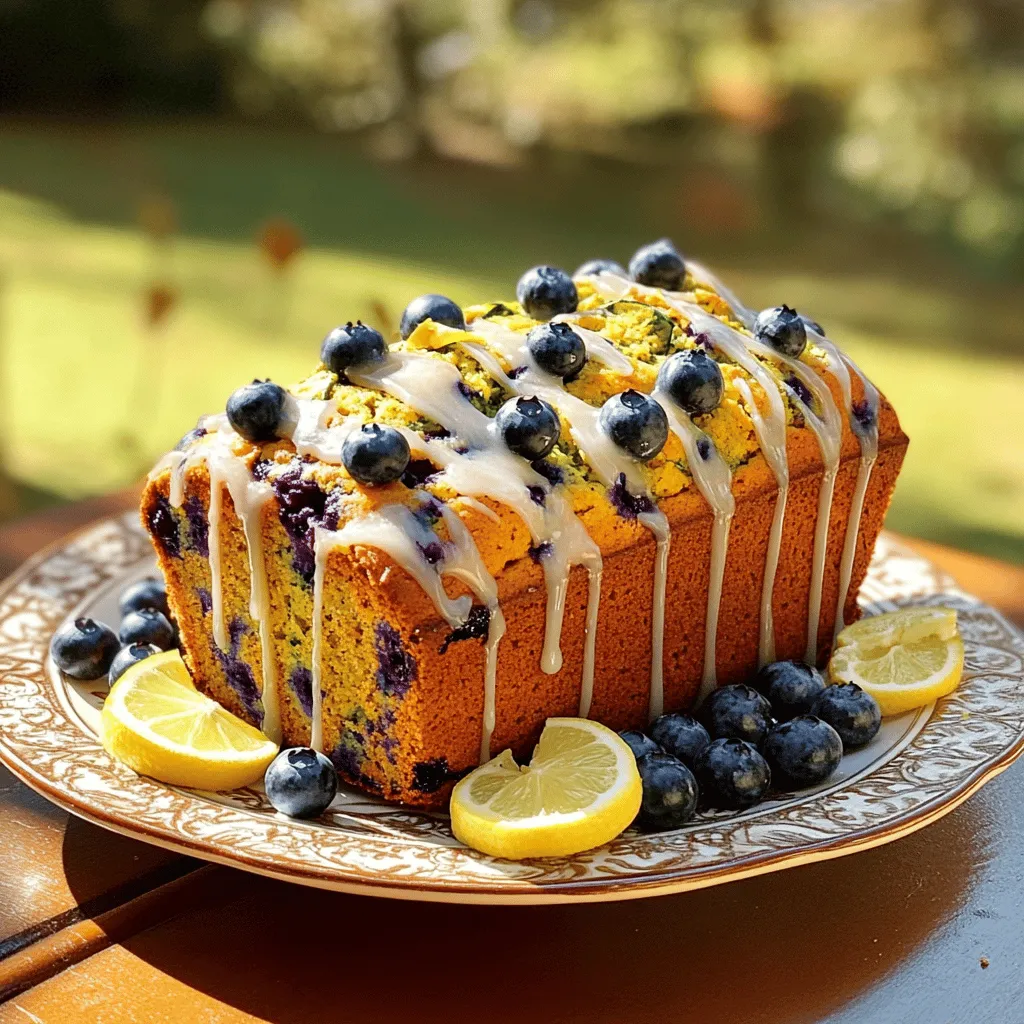
Are you ready to awaken your taste buds with a mouthwatering twist on classic banana bread? My Blueberry Zucchini Bread with Lemon Glaze brings together fresh zucchini, juicy blueberries, and …

Read more

Categories Desserts Leave a comment

Street Corn Chicken Rice Bowl Savory and Simple Meal

July 16, 2025 by Chef Evan
- 1 cup jasmine rice - 2 cups chicken broth - 1 lb boneless, skinless chicken thighs - 1 cup corn kernels (fresh or frozen) - 1 red bell pepper, diced - 1/2 cup red onion, diced - 2 cloves garlic, minced To make a Street Corn Chicken Rice Bowl, you start with jasmine rice. This rice is light and fluffy, and it pairs well with all the flavors. You use chicken thighs because they stay juicy and tender. For sweetness and texture, add corn kernels. Diced red bell pepper and onion give color and crunch. Fresh garlic adds a nice kick. - 1 tablespoon smoked paprika - 1 teaspoon ground cumin - 1 tablespoon olive oil - Salt and freshly ground black pepper to taste - 1/2 cup cotija cheese, crumbled - 1 ripe avocado, sliced - 1/4 cup fresh cilantro, chopped - Juice of 1 lime Seasonings make this bowl pop. Smoked paprika brings a warm flavor, while cumin adds earthiness. Olive oil helps cook the chicken and veggies nicely. Don’t forget salt and pepper; they enhance every bite. For toppings, cotija cheese gives a creamy finish. Sliced avocado adds richness and fresh cilantro brightens up the dish. Finally, a squeeze of lime juice ties all the flavors together. For the full recipe, you can follow the detailed steps to bring this meal to life! Start by rinsing the jasmine rice. Place it in a fine-mesh strainer and run it under cold water. Continue rinsing until the water runs clear. This step removes extra starch. Next, combine the rinsed rice and chicken broth in a medium saucepan. Bring the mixture to a boil. Then, lower the heat and cover the pot. Let it simmer for about 15 minutes. When finished, the rice should be tender and the liquid absorbed. Let the rice sit for 5 minutes, covered. Finally, fluff it with a fork to make it light. While the rice cooks, grab the boneless, skinless chicken thighs. Pat them dry using a paper towel. Season both sides with smoked paprika, ground cumin, salt, and pepper. Make sure to coat evenly to boost flavor. Heat a large skillet over medium-high heat and add olive oil. Once the oil is hot, carefully place the seasoned chicken thighs in the skillet. Cook for 6-7 minutes on each side. The chicken should turn golden brown and reach an internal temperature of 165°F. After cooking, transfer the chicken to a cutting board and let it rest for a few minutes before slicing. In the same skillet, add the diced red onion, bell pepper, and minced garlic. Cook for about 3-4 minutes. You want the veggies to soften without burning. Next, stir in the corn kernels. Continue to cook for another 2-3 minutes. The corn should heat through and start to caramelize. This adds a sweet flavor that works well in the dish. To assemble the bowls, start with a layer of fluffy jasmine rice at the bottom. Next, place the sliced chicken on top. Then, add the sautéed veggies and corn mixture. Finish with a sprinkle of crumbled cotija cheese. This cheese adds a creamy texture and salty flavor. The layers create a beautiful and tasty meal. For a complete recipe, check the Full Recipe. - Ensuring perfectly cooked rice: For fluffy rice, rinse jasmine rice under cold water. This removes extra starch. Cook it in chicken broth for added flavor. Bring to a boil, then reduce heat and cover. Let it simmer until tender. - Searing chicken for maximum flavor: Use boneless, skinless chicken thighs for juiciness. Season both sides well with smoked paprika and cumin. Heat olive oil in a skillet until hot. Sear chicken for 6-7 minutes on each side. This gives you a tasty, golden crust. - Presentation ideas with garnishes: Serve your bowls with fresh cilantro on top. Add lime wedges for color and extra taste. A sliced avocado makes it look beautiful too. - Pairing with additional sides or salsas: Add a fresh corn salsa or a spicy guacamole on the side. These will enhance the flavors and give a fun twist to your meal. - Alternative proteins: If you want something different, try shrimp or tofu. Both cook fast and soak up flavors well. - Vegetarian options: For a meatless meal, skip the chicken. Use black beans or chickpeas instead. They add protein and texture, making the dish filling. For the full recipe, check out the Street Corn Chicken Rice Bowl details above! {{image_4}} You can spice up your Street Corn Chicken Rice Bowl easily. Add fresh jalapeños or a splash of hot sauce for heat. These spicy additions will wake up your taste buds. You can also switch cheeses. If you want a creamier taste, use mozzarella instead of cotija cheese. Feta adds a salty kick, making the bowl even more tasty. To make your bowl heartier, try adding beans. Black beans or pinto beans boost protein and fiber. They also add a nice texture. Seasonal vegetables can also enhance your dish. Think about using zucchini in summer or roasted butternut squash in fall. These fresh additions keep your meal bright and colorful. You can serve your bowl in fun ways. Wrap the mix in a tortilla for a tasty burrito. This makes it easy to eat on the go! Or, if you want a lighter meal, turn it into a salad. Just toss everything together with some greens. This way, you get all the flavors in each bite. To keep your Street Corn Chicken Rice Bowl fresh, cool it down quickly. Divide the food into smaller portions. Place it in airtight containers. Store in the fridge right away. This helps keep the flavors and textures intact. You can enjoy leftovers for up to three days. After that, the taste might fade, and safety may be a concern. When you're ready to enjoy your leftovers, the right reheating method is key. I recommend using the microwave for quick heating. Place the chicken and rice in a bowl, cover it with a damp paper towel, and heat for 1-2 minutes. Stir halfway through to ensure even heating. You can also reheat on the stove. Use low heat and add a splash of chicken broth to keep it moist. This way, your dish stays fresh and flavorful, just like when it was first made. What is a Street Corn Chicken Rice Bowl? A Street Corn Chicken Rice Bowl is a tasty mix of rice, chicken, and corn. This dish features jasmine rice topped with seasoned chicken, sautéed veggies, and fresh toppings. It brings together sweet corn and rich flavors inspired by street food. You get a filling meal that is both savory and satisfying. Can I make this recipe ahead of time? Yes, you can! Cook the rice and chicken in advance. Store them in the fridge for up to three days. When you are ready to eat, just reheat and add the toppings. This makes meal prep easy and quick. How can I customize the heat level of the dish? To change the heat level, add jalapeños or hot sauce. You can also use spicy paprika instead of smoked paprika. Start with a little, then taste it. You can always add more heat if you like it spicy! Caloric content per serving Each serving of the Street Corn Chicken Rice Bowl has about 550 calories. This can vary based on the toppings you choose and the amount of cheese you add. Important dietary notes (e.g., gluten-free options) This recipe is naturally gluten-free. Make sure you use gluten-free chicken broth if needed. You can also skip the cheese for a dairy-free option. How long does it take to make a Street Corn Chicken Rice Bowl? The total time to make this dish is about 40 minutes. This includes 15 minutes for prep and 25 minutes for cooking. What is the best prep method for faster cooking? To save time, prep the ingredients before cooking. Chop the veggies and season the chicken first. This way, you can cook everything in a smooth flow. Also, use a rice cooker for faster rice cooking. You learned how to make a delicious Street Corn Chicken Rice Bowl. We covered the key ingredients, cooking steps, and tips for success. You now know how to customize your bowl with flavors and toppings. Remember to store leftovers properly and reheat them for the best taste. This dish is flexible, so make it your own. Enjoy the process, and don’t be afraid to try new things. Your kitchen adventures await!

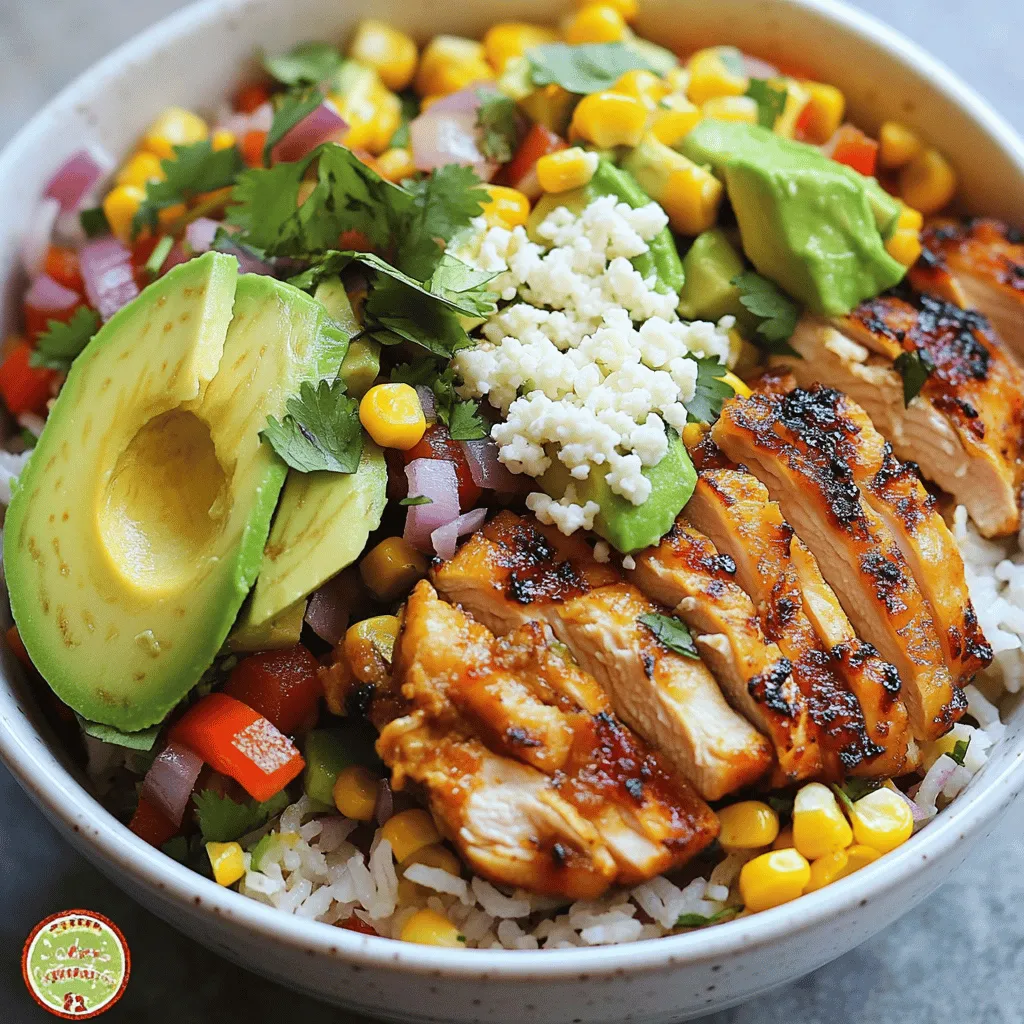
Are you ready to whip up a mouthwatering meal in no time? The Street Corn Chicken Rice Bowl is your ticket to a delicious and easy dish that bursts with …

Read more

Categories Dinner Leave a comment

High Protein Creamy Beef Pasta Quick and Flavorful Meal

July 16, 2025 by Chef Evan
High Protein Creamy Beef Pasta is both tasty and simple. To make this dish, gather these ingredients: - 8 oz whole grain pasta - 1 lb lean ground beef - 1 cup Greek yogurt - 1 cup fresh spinach, chopped - 1/2 cup parmesan cheese, freshly grated - 3 cloves garlic, finely minced - 1 medium onion, finely chopped - 1 teaspoon Italian seasoning blend - Salt and freshly ground pepper to taste - 1 tablespoon extra virgin olive oil - Fresh basil leaves for garnish Each ingredient plays a key role in the dish. Whole grain pasta gives you fiber and a nutty taste. Lean ground beef adds protein. Greek yogurt makes the sauce creamy without too many calories. Fresh spinach packs vitamins and color. Using freshly grated parmesan cheese boosts flavor, while garlic and onion add depth. The Italian seasoning blend brings warmth and earthiness to the mix. Don’t forget to season with salt and pepper for balance. With all ingredients on hand, you’re ready to create a meal that's quick, filling, and full of flavor. For the full recipe, check out the detailed instructions. - Cook the pasta until al dente - Sauté the vegetables and brown the beef - Create the creamy sauce Cook the Pasta: Instructions and tips Start with a big pot. Fill it with water and add salt. Bring it to a boil. Add 8 oz of whole grain pasta. Follow the package instructions for cooking time. You want it al dente, which means it is firm but not hard. Once cooked, drain it in a colander and set aside. This step is key for a great texture. Sauté the Vegetables: Timing and techniques Grab a large skillet and heat 1 tablespoon of olive oil over medium heat. Add 1 medium chopped onion and cook for about 3-4 minutes. You want it to be soft and see-through. Then, add 3 cloves of minced garlic. Cook for another minute. It should smell really good now. Next, add 1 lb of lean ground beef. Break it up with a spatula. Brown the beef for about 5-7 minutes. If there is fat, drain it off. Combine Ingredients for Sauce: Ensuring creaminess Turn the heat down to medium-low. Add 1 cup of chopped spinach and 1 teaspoon of Italian seasoning. Cook for 2-3 minutes until the spinach wilts. Now, lower the heat even more. Add 1 cup of Greek yogurt and 1/2 cup of grated parmesan cheese. Stir well until everything is creamy and smooth. If the sauce is too thick, add a splash of pasta water. This step brings all your flavors together. For the full recipe, check the earlier section. To cook pasta well, use a large pot with lots of water. Make sure to add salt to the water. This will add flavor to the pasta. Stir the pasta often while it cooks. This helps prevent sticking. Keep an eye on the time and check for doneness. You want it to be al dente, firm but not hard. When browning ground beef, use a hot skillet. This helps create a nice crust. Break the meat into small pieces with a spatula. This allows it to cook evenly. Let it sit for a minute before stirring. This helps it brown better. Drain any excess fat after cooking. This keeps the dish light and tasty. For a flavor boost, think about adding fresh herbs. Basil and parsley work well here. You can also add a dash of red pepper flakes for heat. A squeeze of lemon juice can brighten up the dish too. Pair this creamy beef pasta with a crisp side salad. A simple green salad with vinaigrette adds freshness. You might also enjoy some garlic bread on the side. This makes the meal feel complete and satisfying. Try the Full Recipe for more details on how to make this dish shine! {{image_4}} You can switch up the proteins in this dish. If you want a leaner option, try ground turkey or chicken instead of lean ground beef. Both choices will still give you a great flavor and keep it healthy. For a vegan twist, use plant-based protein like lentils or chickpeas. They offer a nice texture and blend well with the creamy sauce. Pair them with plant-based yogurt for that creamy touch without dairy. Adding more veggies can boost the dish's flavor and nutrition. Consider bell peppers, mushrooms, or zucchini. Just chop them up and sauté them with the onions and garlic. They add color and taste. You can also play with spices. If you like a little heat, add red pepper flakes. For a smoky flavor, try smoked paprika. Never be afraid to experiment with spices. Each change can turn this dish into something new and exciting. To keep your high protein creamy beef pasta fresh, store leftovers properly. Allow the dish to cool down to room temperature before placing it in the fridge. Use an airtight container to keep moisture in and prevent odors from mixing. This method will help maintain flavor and texture. For best results, consume your leftovers within 3 to 4 days. If you want to keep them longer, consider freezing them. When it’s time to enjoy your pasta again, you can reheat it easily. To avoid drying it out, add a small splash of water or extra Greek yogurt before reheating. Microwave Method: Place the pasta in a microwave-safe bowl. Cover it loosely with a lid or microwave-safe wrap. Heat in short bursts of about 30 seconds, stirring in between until heated through. Stovetop Method: Put the pasta in a skillet over low heat. Add a splash of water or yogurt, and stir gently. Heat until warm, ensuring the creamy texture stays intact. These methods will help you enjoy the delicious flavors again, just like when you first made it! For the full recipe, check back to the top. What are the health benefits of high protein pasta? High protein pasta offers many health perks. It helps build and repair muscles. It keeps you full longer, which can aid in weight loss. It also contains more fiber than regular pasta, promoting good digestion. Can I prepare this dish in advance? Yes, you can prepare this meal ahead of time. Cook the pasta and beef, then mix them with the sauce. Store everything in the fridge. When you are ready to eat, just heat it up. Is this recipe suitable for freezing? Yes, this recipe can be frozen. Let it cool first, then place it in an airtight container. It will stay fresh for up to three months. Thaw it in the fridge before reheating. How do I make the sauce thicker if needed? To thicken the sauce, add more parmesan cheese. You can also simmer it for a few extra minutes. If it's still thin, mix in a bit of cornstarch mixed with water. Can I use other types of pasta? Absolutely! You can use any pasta you like. Try penne, fusilli, or even gluten-free options. Cooking time may vary, so check the package instructions. What is the calorie count per serving? This dish has about 500 calories per serving. It depends on the brands you use and any extra toppings you add. How can I increase the protein content further? To boost protein, add more lean beef or use extra Greek yogurt. You can also throw in some cooked chickpeas or lentils for a plant-based option. These changes will add flavor and nutrition to your meal. For the complete recipe, check out the Full Recipe. This blog post covered a delicious recipe featuring whole grain pasta and lean ground beef. I shared step-by-step instructions for cooking, tips for perfecting flavors, and variations to suit your taste. Storing and reheating advice ensures you enjoy every bite later. Cooking can be fun and rewarding when you follow these methods. Explore this dish with your own spin, and enjoy the healthy benefits it brings to your table. Remember, cooking is all about creativity!

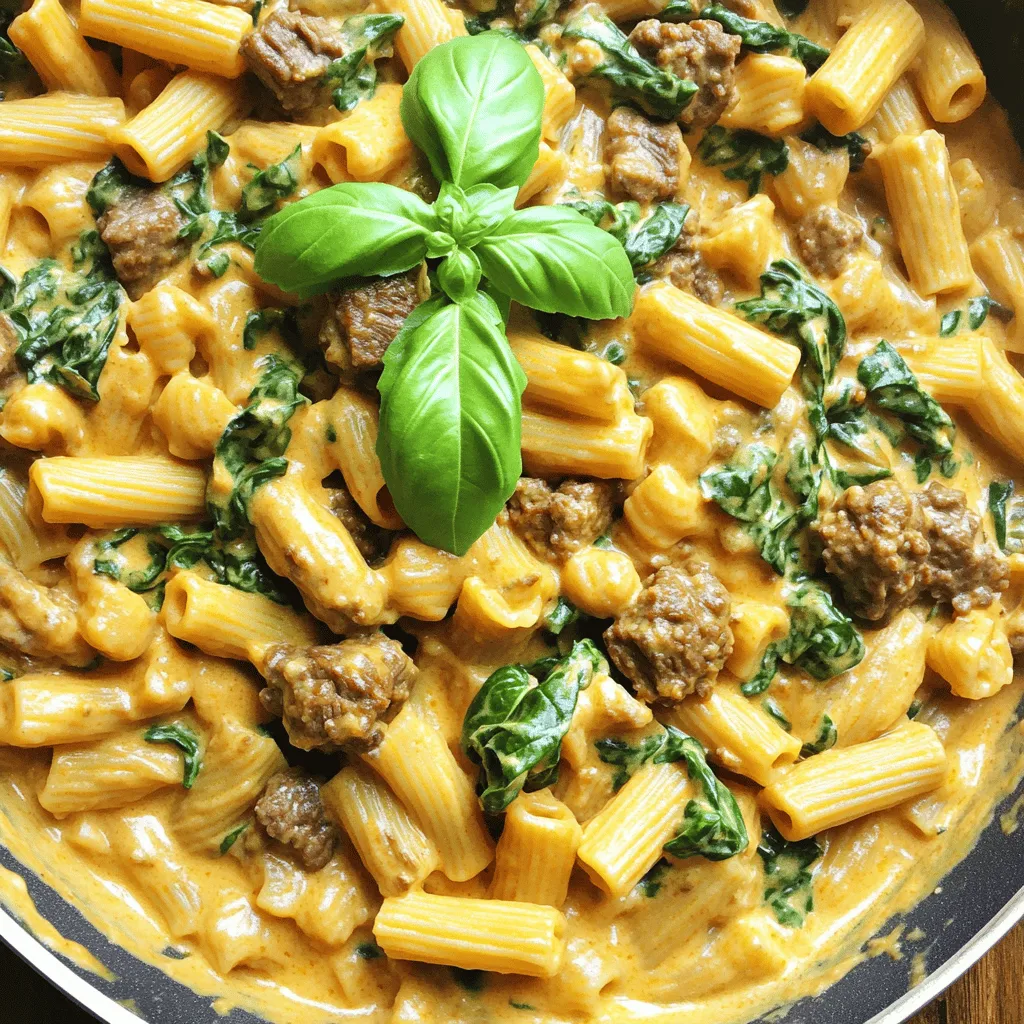
Looking for a quick meal that’s both tasty and nutritious? My High Protein Creamy Beef Pasta has you covered! With lean ground beef, whole grain pasta, and a creamy yogurt …

Read more

Categories Dinner Leave a comment

Easy Chicken Stir Fry Quick and Tasty Meal Idea

July 16, 2025 by Chef Evan
- 2 boneless, skinless chicken breasts, thinly sliced - 1 red bell pepper, sliced into strips - 1 yellow bell pepper, sliced into strips - 1 cup fresh broccoli florets - 1 large carrot, julienned Chicken breasts are the star of this dish. They cook quickly and soak up flavors well. I like using fresh veggies like bell peppers, broccoli, and carrots. They add color and crunch. - 3 tablespoons low-sodium soy sauce - 1 tablespoon honey - 1 tablespoon rice vinegar This sauce gives the stir fry a balanced taste. Soy sauce adds saltiness. Honey adds sweetness, while rice vinegar brings a touch of tang. - 2 green onions, thinly sliced - A sprinkle of sesame seeds Garnishes make your dish pop. Green onions add a fresh bite, and sesame seeds give a nice crunch. For the full recipe, check out the Zesty Chicken Stir-Fry Delight. First, gather your chicken. I use two boneless, skinless chicken breasts, sliced thin. For marinating, I drizzle one tablespoon of sesame oil over the chicken. Then, I season it lightly with salt and pepper. Mixing well is key. Let it marinate for about 10 minutes. This helps the chicken absorb the flavors, making it more tasty. Next, heat a large skillet or wok over medium-high heat. The skillet needs to be hot before adding the chicken. Once ready, add the marinated chicken. Stir-fry it for about 5 to 7 minutes. Look for a golden brown color and make sure it's fully cooked. The chicken should not be pink inside. Once done, take it out and set it aside on a plate. In the same skillet, pour in the remaining tablespoon of sesame oil. Add minced garlic and freshly grated ginger. Sauté these for about 30 seconds. You want them fragrant but not burnt. Then, toss in the sliced red and yellow bell peppers, fresh broccoli florets, and julienned carrot. Stir-fry these veggies for 3 to 4 minutes. They should be tender but still a bit crisp. This keeps the flavor and texture vibrant. Follow these steps for a delicious Easy Chicken Stir Fry. For a detailed guide, check out the Full Recipe. For stir-frying, use high heat. A wok or large skillet works best. This method cooks food quickly while keeping it tender. When adding chicken, spread it out in a single layer. This helps it brown evenly. To keep your veggies crisp, add them last. Stir-fry for just a few minutes. This keeps them colorful and crunchy. Always keep an eye on your cooking time. For extra flavor, try adding a splash of lime juice or a pinch of red pepper flakes. You can also mix in some chopped herbs, like cilantro or basil, before serving. When choosing sauces, think about what you enjoy. Teriyaki sauce adds sweetness, while oyster sauce gives a savory depth. You can mix and match to find your perfect blend. One mistake is overcooking the chicken. Cook until it is golden brown and no longer pink inside. This keeps it juicy. Another pitfall is adding all ingredients at once. Start with chicken, then veggies. This way, each component cooks properly. If you rush, you may end up with soggy stir-fry. {{image_4}} If you want to change up your protein, try tofu or shrimp. Tofu works well for a vegetarian option. Use firm tofu for the best texture. Just press it to remove excess water and cut it into cubes. For shrimp, choose raw shrimp and cook until they turn pink. Both options cook quickly and soak up flavor. You can mix and match vegetables based on what you like or what’s in season. Try snap peas for a sweet crunch or zucchini for a mild taste. Carrots and bell peppers add color, but feel free to use any veggies you enjoy. Broccoli and asparagus also work well. The key is to keep them crisp and vibrant. For a different taste, change the sauce. Add chili paste for some heat, or use lime juice for a tangy flavor. You can also try teriyaki sauce if you want something sweeter. Mixing in sesame oil can enhance the nutty taste. Experiment with sauces to find your favorite combination. For the full recipe, check out the Full Recipe section. To store your Easy Chicken Stir Fry, let it cool first. Place leftovers in an airtight container. This keeps the dish fresh for up to three days. Make sure to label the container with the date. When reheating, ensure the stir fry reaches a safe temperature of 165°F. If you want to freeze your stir fry, it's best to do this right away. Portion it into smaller containers. This way, you can thaw only what you need. Make sure to use freezer-safe containers to avoid freezer burn. Your stir fry can last in the freezer for up to three months. When you're ready to enjoy your frozen Easy Chicken Stir Fry, thaw it overnight in the fridge. Reheat in a skillet over medium heat. Stir frequently to keep the texture nice. You can also use the microwave, but be careful not to overheat. This helps maintain the crunch of the veggies and keeps the chicken juicy. To make chicken stir fry quickly, prep your ingredients first. Slice the chicken and chop the veggies in advance. This saves time while cooking. Use high heat for a faster cook. A hot skillet cooks chicken and vegetables evenly. Stir them often to avoid burning. Keep your sauce ready to pour in. This way, you finish cooking in about 25 minutes. Yes, you can use frozen vegetables. They are convenient and save prep time. Frozen veggies can be just as nutritious as fresh ones. However, they may lose some texture during cooking. Make sure to thaw them before use. If you add them directly, your stir fry might turn soggy. Overall, frozen vegetables can work well if used properly. Chicken stir fry pairs well with many sides. You can serve it with steamed rice or quinoa. These grains soak up the sauce nicely. Noodles are also a great choice. For a lighter option, try serving it with a fresh salad. You can add some crispy spring rolls for extra crunch. These sides enhance the meal and add variety. Absolutely! This chicken stir fry recipe is very customizable. You can swap chicken for tofu or shrimp. Change the vegetables based on what you like. Try adding snap peas, mushrooms, or bok choy. Adjust the sauce too. If you like it spicy, add chili flakes or sriracha. Personalizing your stir fry makes it fun and unique. For the full recipe, check the earlier section. This chicken stir fry is simple and fun to make. You learned about key ingredients, cooking methods, and tips for the best flavor. With the right mix of chicken, veggies, and sauce, you can create a delicious dish every time. Remember, you can adjust the recipe to suit your taste. Following these steps will help you avoid common mistakes and enjoy a great meal. Embrace your creativity, and have fun with it! Happy cooking!

Looking for a quick and tasty meal idea? You’re in the right place! My Easy Chicken Stir Fry is perfect for busy nights when you crave something delicious but don’t …

Read more

Categories Dinner Leave a comment

The Best Zucchini Brownies You’ll Ever Eat Delight

July 16, 2025 by Chef Evan
To make the best zucchini brownies, you need a few key ingredients: - 1 cup finely grated zucchini (about 1 medium zucchini; squeeze out excess moisture) - 1 cup all-purpose flour - 1/2 cup unsweetened cocoa powder These ingredients create a rich, moist brownie with a hint of sweetness. The zucchini adds moisture without changing the taste. You can enhance your brownies with these optional ingredients: - Chocolate chips - Chopped walnuts Adding chocolate chips gives a nice burst of chocolate. Walnuts add crunch and a nutty flavor. You can mix and match these add-ins based on your taste. For the full recipe, check out the details above! - Preheat the oven to 350°F (175°C). - Prepare a 9x9 inch baking dish. You can grease it lightly or line it with parchment paper. - In a medium bowl, combine: - 1 cup all-purpose flour - 1/2 cup unsweetened cocoa powder - 1/2 teaspoon baking soda - 1/4 teaspoon baking powder - 1/4 teaspoon salt - In a large bowl, blend: - 1/2 cup granulated sugar - 1/2 cup packed brown sugar - 1/2 cup vegetable oil - Mix these until smooth. - Crack in 2 large eggs and add 1 teaspoon vanilla extract. Whisk until combined and slightly frothy. - Gradually add the dry mixture to the wet mixture. Stir just enough to combine. Some lumps are okay! - Fold in: - 1 cup finely grated zucchini - Optional: 1/2 cup chocolate chips and/or 1/4 cup chopped walnuts. - Make sure the zucchini is well mixed into the batter. - Pour the batter into the prepared dish. - Spread it out evenly with a spatula. - Place the dish in the oven and bake for 25-30 minutes. Check for doneness by inserting a toothpick. It should come out with a few moist crumbs. This guide leads you to the best zucchini brownies you'll ever eat. For the full recipe, check the details above. To make the best zucchini brownies, start by checking the moisture of the zucchini. - Ensure the right zucchini moisture level: Use a medium zucchini and grate it finely. After grating, squeeze out the extra moisture. This step helps prevent the brownies from being too wet. Too much moisture can lead to a soggy texture. - Avoiding overmixing the batter: When you combine your wet and dry ingredients, mix just enough until they are blended. It's okay to have some lumps. Overmixing can make the brownies tough instead of soft. Once your brownies are baked and cooled, it’s time to serve them. - Presentation tips with powdered sugar: A light dusting of powdered sugar gives a nice finish. Use a small sieve to sprinkle it evenly over the brownies for a beautiful look. - Pairing with ice cream: Serve warm brownies with a scoop of vanilla ice cream. The warm chocolate and cold ice cream create a perfect mix for your taste buds. Drizzle some chocolate sauce over the top for extra fun. Let’s talk about some common mistakes that can ruin your brownies. - Using too much zucchini: Stick to one cup of finely grated zucchini. More can make your brownies soggy. - Overbaking the brownies: Keep an eye on your baking time. Overbaking can make them dry. Use a toothpick to check for doneness. If it comes out with a few moist crumbs, they're ready! Remember these tips, and you'll bake the best zucchini brownies ever! Check out the Full Recipe for all the details. {{image_4}} You can play with flavors in your zucchini brownies. One fun option is to add peppermint extract. Just a few drops can make your brownies taste like a minty treat. This twist is great for special occasions or a fresh take on a classic. Another exciting variation is swapping cocoa powder for white chocolate. This change gives the brownies a creamy flavor. You can melt white chocolate and mix it into the batter. It adds a new level of sweetness that pairs well with zucchini. If you need gluten-free zucchini brownies, you can easily make them. Just use gluten-free flour instead of all-purpose flour. This simple swap keeps the brownies soft and moist while meeting dietary needs. For vegan options, replace eggs with flaxseed meal. Mix one tablespoon of flaxseed meal with three tablespoons of water. Let it sit for a few minutes until it thickens. You can also use applesauce instead of oil. This makes the brownies moist and keeps them healthy. You can find the Full Recipe to try these ideas and more! Store your brownies at room temperature. Use an airtight container to keep them fresh. Place parchment paper between the layers to avoid sticking. This method helps them last about four days. If you need to keep them longer, consider refrigeration. Wrap the brownies in plastic wrap before placing them in the fridge. They can stay fresh for up to a week this way. Freezing brownies is a smart way to save leftovers. First, let the brownies cool completely. Then, cut them into squares. Wrap each square tightly in plastic wrap. Place the wrapped brownies in a freezer-safe bag. You can freeze them for up to three months. To thaw, remove them from the freezer and let them sit at room temperature. This method keeps their taste and texture intact. Enjoy your zucchini brownies anytime! For the full recipe, check out the Ultimate Zucchini Brownies You'll Savor! To keep your zucchini brownies moist, use fresh, finely grated zucchini. Squeeze out any extra water before adding it to the batter. This step helps balance moisture. Also, don’t overbake them! Check for doneness around 25 minutes. A toothpick should come out with a few moist crumbs, not dry. Yes, you can swap granulated sugar for other sweeteners. Options include honey, maple syrup, or coconut sugar. Just remember, if you use liquid sweeteners, you may need to adjust the other wet ingredients. This helps keep the right texture and flavor balance in your brownies. If you lack zucchini, you can use unsweetened applesauce instead. It adds moisture and sweetness. Alternatively, mashed bananas work well too. These swaps change the flavor but keep the brownies soft. Just remember that the texture may vary slightly. After baking, store your brownies in an airtight container. They last for about 3 to 4 days at room temperature. If you want them to last longer, you can refrigerate them for up to a week. Just remember to let them come to room temperature before serving. Zucchini brownies can be a healthier dessert choice. They include whole ingredients and provide some fiber. The zucchini adds moisture without too many calories. However, keep in mind that they still contain sugar and oil. Enjoy them as an occasional treat for balance in your diet. For a full recipe, check out The Ultimate Zucchini Brownies You'll Savor! Zucchini brownies are simple and fun to make. You need key ingredients and follow easy steps. Don’t forget to check for doneness and avoid common mistakes. You can add flavors and adjust for dietary needs. Storing and freezing these brownies keeps them fresh longer. Remember, perfecting them takes practice. Enjoy every delicious bite and have fun trying new variations. You’ll impress anyone who tries these tasty treats!

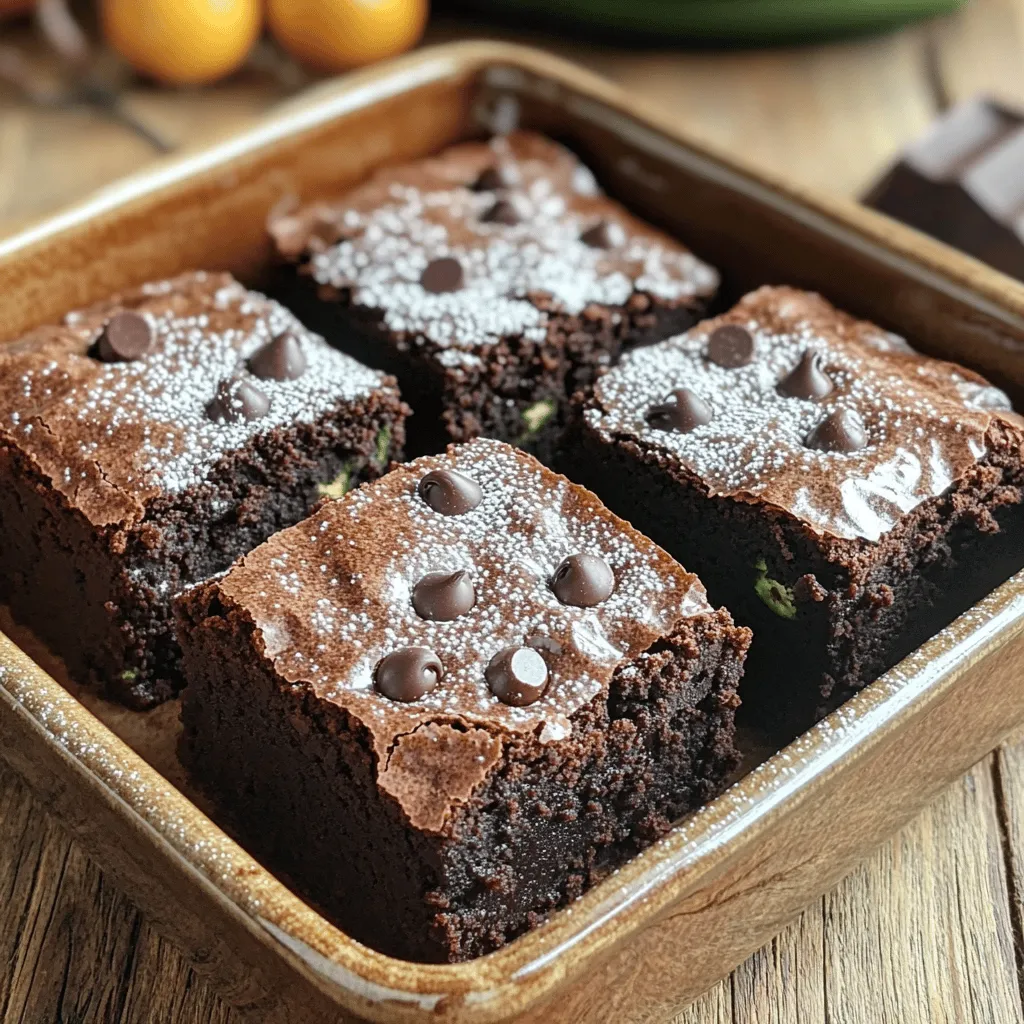
Want a delicious treat without the guilt? You’re in for a surprise with these zucchini brownies! I’ll show you how to turn simple ingredients into a rich, chocolatey delight that …

Read more

Categories Desserts Leave a comment

Easy Grilled Chimichurri Chicken Breast Recipe Guide

July 16, 2025 by Chef Evan
To make Easy Grilled Chimichurri Chicken Breast, you need fresh ingredients for a tasty dish. This recipe combines juicy chicken with a bright, herb-filled sauce. It’s quick and packed with flavor. - 4 boneless, skinless chicken breasts - 1 cup fresh parsley, finely chopped - 1/2 cup fresh cilantro, finely chopped - 4 cloves garlic, minced - 1/2 teaspoon red pepper flakes - 1/3 cup extra virgin olive oil - 3 tablespoons red wine vinegar (or substitute with lemon juice for a zesty twist) - Salt and freshly ground black pepper, to taste - Lemon wedges, for serving These ingredients create a fresh chimichurri sauce. The parsley and cilantro give it a vibrant taste. Garlic adds depth, while red pepper flakes bring a hint of heat. Olive oil and vinegar help bind the flavors together. This dish serves four and packs a punch with protein. Each serving has around 180 calories. The chicken is lean, making it a healthy choice. The chimichurri sauce adds healthy fats from the olive oil. It also provides vitamins from the fresh herbs. Overall, this meal is both nutritious and delicious. Enjoy it with a side of veggies or a simple salad for a complete feast! To make the chimichurri sauce, gather your ingredients. You need fresh parsley, cilantro, garlic, red pepper flakes, olive oil, and red wine vinegar. In a medium bowl, add the chopped parsley and cilantro. Next, add minced garlic and red pepper flakes. Pour in the olive oil and red wine vinegar. Stir until well mixed. Make sure to taste it and add salt and pepper. You can set aside some sauce for later. Take your chicken breasts and place them in a large zip-top bag or a dish. Pour half of the chimichurri sauce over the chicken. Make sure each piece is coated well. Save the rest of the sauce for later. Seal the bag or cover the dish with plastic wrap. Put the chicken in the fridge for at least 30 minutes. For more flavor, let it marinate for up to 4 hours. First, heat your grill to medium-high. Clean the grill grates and brush them with oil. Remove the chicken from the marinade, letting the excess drip off. Place the chicken on the grill. Cook for about 6-7 minutes on each side. The chicken should reach an internal temperature of 165°F (75°C). After grilling, move the chicken to a platter and let it rest for 5 minutes. This helps keep the chicken juicy. Drizzle with the reserved chimichurri sauce and serve with lemon wedges. Enjoy your meal! For the complete recipe, check out the Full Recipe section. To grill chicken perfectly, follow a few easy steps: - Use a meat thermometer. Check for an internal temperature of 165°F (75°C). - Preheat your grill. A hot grill helps to sear the chicken and lock in juices. - Don’t flip too soon. Wait until the chicken naturally releases from the grill. - Let it rest. After grilling, let the chicken sit for five minutes to keep it juicy. Chimichurri is bright and fresh. Here’s how to make it pop: - Add fresh herbs. Mix in mint or oregano for extra depth. - Include citrus zest. Grate some lemon or lime zest for zing. - Experiment with heat. Adjust red pepper flakes to match your spice level. - Use quality oil. Extra virgin olive oil adds richness and taste. Serve your chimichurri chicken with these ideas: - Pair with grilled veggies. Bell peppers and zucchini add color and taste. - Serve with rice or quinoa. These sides soak up the delicious sauce. - Add a salad. A fresh green salad balances the meal. - Offer crusty bread. Great for dipping in leftover chimichurri sauce. For the complete preparation steps, check the Full Recipe. {{image_4}} Chimichurri is flexible and fun to make. You can swap herbs to change the taste. Try using fresh oregano or mint for a twist. You may also mix in some chopped green onions for extra flavor. If you like heat, add more red pepper flakes or a dash of hot sauce. For a creamier version, blend in some avocado. Each change brings a new taste to your dish. Gas and charcoal grills each have their perks. Gas grills heat up fast and give you better control over the temperature. They are great for quick meals. Charcoal grills take longer to heat but add a smoky flavor. If you want that classic grilled taste, charcoal is the way to go. Choose the method that fits your cooking style and the flavor you want. Pairing the chicken with sides can make your meal special. Fresh salads go well with chimichurri chicken. Try a crunchy cucumber salad or a mixed greens salad with a light dressing. Grilled veggies, like zucchini or bell peppers, also complement the dish nicely. If you want something heartier, serve it with rice or quinoa. These sides balance the meal and add more colors to your plate. For a full experience, check the Full Recipe for more ideas! To store leftover chimichurri chicken, let it cool first. Place the chicken in an airtight container. Make sure to cover it well to keep moisture in. You can keep it in the fridge for up to 3 days. If you want to enjoy it later, consider freezing it. Reheating grilled chicken can be tricky. You want it warm but not dry. Here’s how to do it right: - Take the chicken out of the fridge. - Let it sit at room temperature for about 15 minutes. - Preheat your oven to 350°F (175°C). - Place the chicken on a baking sheet. - Cover it with foil to keep moisture in. - Heat for about 15-20 minutes, or until warm. You can also use a microwave, but be careful. Heat in short bursts to avoid drying it out. Freezing chimichurri chicken is a great way to save it for later. Here’s how: - After the chicken cools, wrap each piece in plastic wrap. - Place the wrapped chicken in a freezer bag. - Squeeze out as much air as possible before sealing. - Label the bag with the date and freeze it. You can freeze it for up to 3 months. To use, thaw it in the fridge overnight. Then, reheat as mentioned above. Enjoy your meal anytime! Yes, you can use other herbs for chimichurri. Fresh oregano is a great choice. You can also try mint or basil for a unique twist. Just keep in mind that these herbs will change the flavor. Adjust the amount based on your taste. Feel free to mix and match to find what you like best! To check if the chicken is fully cooked, use a meat thermometer. Insert it into the thickest part of the breast. The chicken should reach an internal temperature of 165°F (75°C). If you don't have a thermometer, cut into the chicken. The juices should run clear, not pink. Be sure to check in the thickest part to be safe. If you need a substitute for red wine vinegar, lemon juice works well. It adds a fresh, zesty flavor. You can also use apple cider vinegar for a milder taste. Both options will keep the dish bright and tasty. Adjust the amount to suit your taste. This post covered easy grilled chimichurri chicken breast from start to finish. We discussed key ingredients and shared simple steps for making the sauce and grilling the chicken. You learned tips for perfect chicken, flavor boosts for chimichurri, and meal variations. Lastly, we talked about storage options and answered common questions. With these insights, you can enjoy delicious grilled chicken that’s rich in flavor and quick to prepare. Happy cooking!

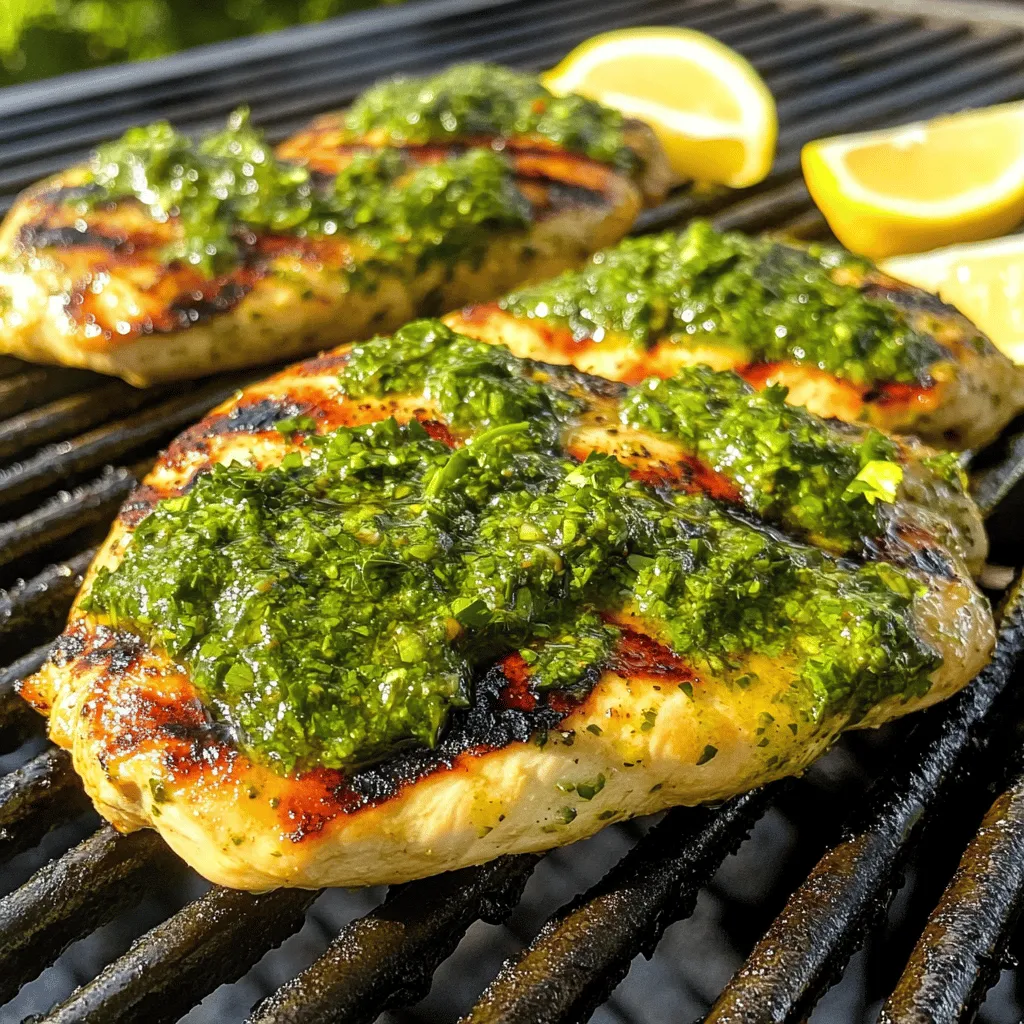
Ready to impress your taste buds? In this Easy Grilled Chimichurri Chicken Breast Recipe Guide, I’ll show you how to make juicy, flavorful chicken in just a few simple steps. …

Read more

Categories Dinner Leave a comment
Older posts
Newer posts
← Previous Page1 … Page32 Page33 Page34 … Page124 Next →

TOSSED FLAVORS

Where flavors are fresh, vibrant, and ready to toss! 🥗

PAGES

Home About Contact Privacy Policy Terms & Conditions Cookie Policy GDPR Policy Copyright Policy Disclaimer

CATEGORIES

Appetizers Desserts Salads Breakfast Dinner

Contact

  • Pinterest
  • Mail
Copyright © 2026 Tossed Flavors. All rights reserved.