Broccoli Cheese Pinwheels Healthy and Tasty Snack
![- Fresh broccoli florets - Sharp cheddar cheese - Cream cheese The main ingredients give these pinwheels their rich flavor and bright color. Fresh broccoli florets add a crunchy texture, making them fun to eat. Sharp cheddar cheese brings a bold, cheesy taste. Cream cheese makes the filling smooth and creamy. Together, these ingredients create a tasty mix that pairs well with the tortilla. - Shredded carrots - Olive oil for brushing You can add shredded carrots for extra crunch and color. They also boost nutrition. Brushing the pinwheels with olive oil before baking gives them a nice, golden finish. This step enhances the flavor and helps them get crispy. - Garlic powder - Salt and pepper Seasoning is key to great taste. Garlic powder adds a savory flavor that lifts the dish. A pinch of salt and freshly ground pepper balances all the ingredients. These simple seasonings let the flavors shine through without overpowering the dish. For the full recipe, check out the [Full Recipe]. 1. Preheat the oven and prepare the baking sheet Start by preheating your oven to 375°F (190°C). This step is key to getting a nice, crispy finish on your pinwheels. Line a baking sheet with parchment paper. This will help the pinwheels not stick and make clean up easy. 2. Steam the broccoli florets Take your fresh broccoli florets and chop them finely. Place them in a steaming pot. Steam the broccoli for about 3-4 minutes until they turn bright green and are just tender. After steaming, let them cool for a bit. 1. Combine cream cheese, cheddar, and Parmesan In a mixing bowl, add softened cream cheese, shredded sharp cheddar, and grated Parmesan cheese. Make sure your cream cheese is at room temperature. This helps in mixing everything smoothly. 2. Mix in steamed broccoli and optional ingredients Gently fold the cooled steamed broccoli into the cheese mixture. If you want extra crunch, add shredded carrots now. Ensure all the broccoli is coated in the cheese blend. 1. Spread the mixture on the tortilla Lay your tortilla flat on a clean surface. Use a spatula to spread the cheesy broccoli mixture evenly across the entire tortilla. Don’t leave any gaps! 2. Roll and slice the tortilla into pinwheels Start rolling the tortilla from one end to the other, keeping it tight. Once rolled, use a sharp knife to slice the tortilla into 1-inch thick pinwheels. Aim for about 12-15 pieces. 1. Arrange pinwheels on the baking sheet Place your pinwheels on the prepared baking sheet. Make sure there is space between each piece. This helps them cook evenly. 2. Bake and cool before serving Brush the tops with a little olive oil for added flavor. Bake in the oven for 10-12 minutes until the cheese melts and the edges are golden. After baking, let them cool for a few minutes. Serve warm for the best taste. For the full recipe, check out the details above. Enjoy your delicious Broccoli Cheese Pinwheels! To make sure your pinwheels cook evenly, use a preheated oven at 375°F. This hot oven helps the cheese melt and the tortilla brown nicely. Place the pinwheels on a baking sheet with parchment paper. This step keeps them from sticking and makes cleanup easy. When rolling the tortillas, start tightly at one end. This keeps the filling inside and helps the pinwheels hold their shape. If they are loose, the filling may spill out while baking. Use a sharp knife to slice them evenly into 1-inch pieces. This size allows each bite to be filled with delicious flavors. For a beautiful presentation, serve your pinwheels on a wide platter. Arrange them in a circle or fan shape for visual appeal. You can also stack them for a fun, layered look. Garnish your pinwheels with a sprinkle of fresh herbs, like parsley or basil. Add a few fresh broccoli florets for color. These small touches make the dish look fresh and inviting. To kick up the flavor, consider adding spices or herbs to the cheese mix. A dash of paprika or crushed red pepper can add a spicy kick. Fresh herbs like dill or chives can also brighten up the taste. You can explore different cheese combinations too. Try using mozzarella for a stretchy texture or feta for a tangy twist. Mixing cheeses can create a unique flavor profile that makes your pinwheels stand out. For the full recipe, check out the Cheesy Broccoli Delight Pinwheels. {{image_4}} You can switch up the veggies in your pinwheels. Try using spinach or bell peppers. Both add nice colors and flavors. Spinach gives a fresh taste, while bell peppers bring sweetness. You can mix them with broccoli for a fun twist. Just chop them small, like the broccoli. This way, they blend well with the cheese. If you need gluten-free choices, use gluten-free tortillas. They come in many flavors and can taste great too. Look for ones made from rice or corn. These will hold your filling just as well. Make sure to read the label to ensure they meet your needs. You won’t lose any flavor by going gluten-free. Different cheeses can change the whole taste of your pinwheels. Try mixing mozzarella for a milder flavor or pepper jack for a spicy kick. You can even use a blend of cheeses. This gives each bite a unique flavor. Mixing cheeses can surprise your taste buds and make this snack even more fun. To keep your broccoli cheese pinwheels fresh, store them in the fridge. Place them in an airtight container. They will stay tasty for 3 to 4 days. Make sure they cool down before sealing the container. This helps prevent moisture build-up. You can freeze pinwheels before or after baking. If freezing before baking, wrap them tightly in plastic wrap. Place them in a freezer-safe bag. They can stay good for up to 3 months. For freezing after baking, let them cool first. Then, wrap them and store in a bag. This way, they will retain their flavor and texture. Reheat your pinwheels for the best taste and texture. The oven works great for this. Preheat the oven to 350°F (175°C). Place the pinwheels on a baking sheet. Heat them for about 10-12 minutes. If you're in a hurry, you can use the microwave. Heat them in short bursts of 15-20 seconds. Just watch to avoid sogginess. Enjoy your delicious snack warm! Yes, you can prepare these pinwheels ahead of time. Simply follow the recipe steps up to slicing the rolled tortilla. Wrap the log tightly in plastic wrap. You can store it in the fridge for up to 24 hours. When you are ready to bake, slice and bake as directed. This saves time on busy days and makes delicious snacks ready to go. These pinwheels can last for about 3 to 4 days in the fridge. Store them in an airtight container to keep them fresh. If you notice any moisture, place a paper towel inside the container. This helps absorb extra moisture and keeps the pinwheels crisp. There are many great dips for these tasty pinwheels. Here are some options: - Ranch dressing adds a creamy, herby flavor. - Marinara sauce gives a nice, tangy contrast. - Garlic aioli offers a rich and savory touch. - Hummus brings a nice, nutty flavor. Feel free to try different dips to find your favorite combination. Enjoy experimenting with flavors! Broccoli cheese pinwheels are a fun and tasty treat. We covered the main ingredients like broccoli, sharp cheddar, and cream cheese. Optional additions like carrots can add extra flavor. I shared a step-by-step guide on preparation, assembly, and baking. You can even customize them with different veggies and cheeses. For storage, I gave tips on refrigerating, freezing, and reheating. Enjoy these pinwheels for any occasion! They are delicious and easy to make.](https://tossedflavors.com/wp-content/uploads/2025/07/021e23ee-904e-41fe-bb84-1f1117c07a01.webp)
Looking for a fun and healthy snack? Broccoli Cheese Pinwheels are perfect! These tasty bites blend fresh broccoli, creamy cheese, and simple spices. They are easy to make and full …
Looking for a fun and healthy snack? Broccoli Cheese Pinwheels are perfect! These tasty bites blend fresh broccoli, creamy cheese, and simple spices. They are easy to make and full …
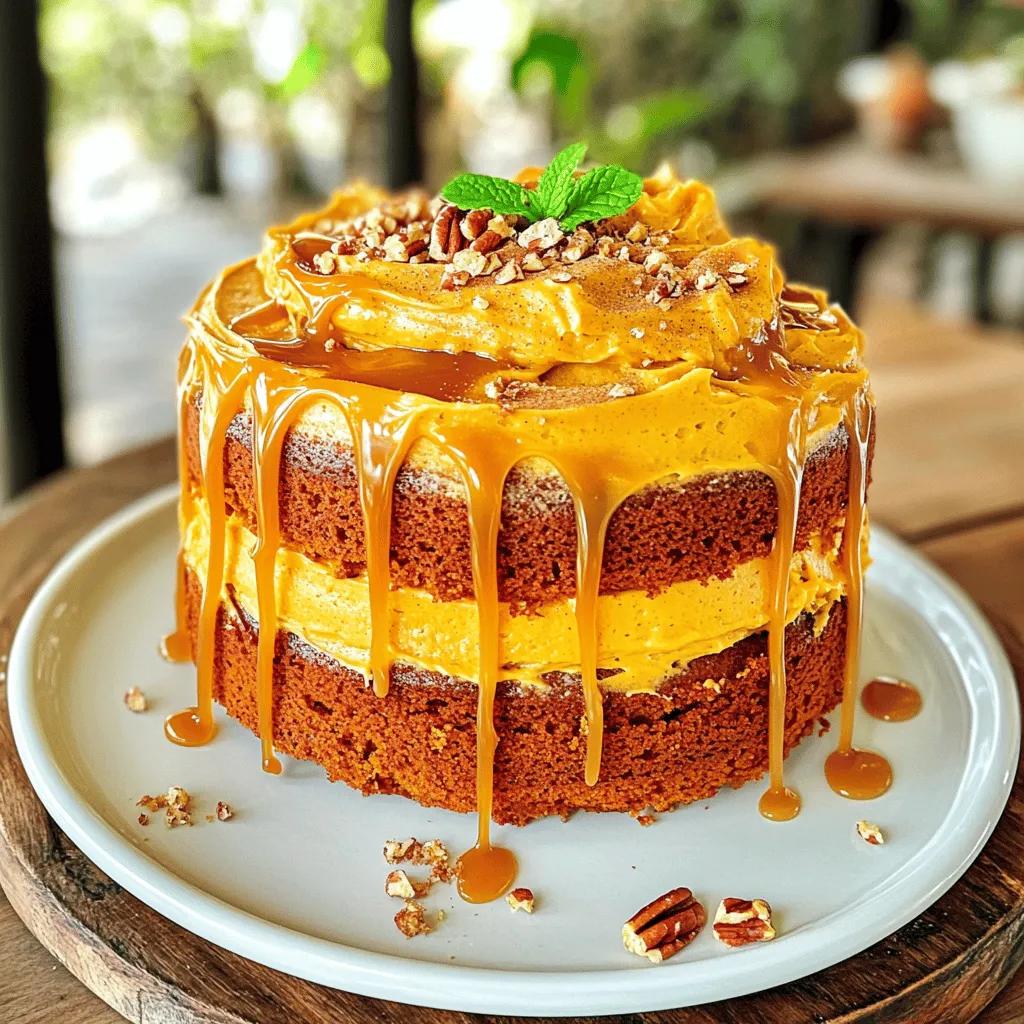
If you’re craving a sweet and spiced treat, you’ll love my Pumpkin Cake with Caramel Cream Cheese Frosting. This moist cake blends warm spices with rich pumpkin flavor. Topped with …
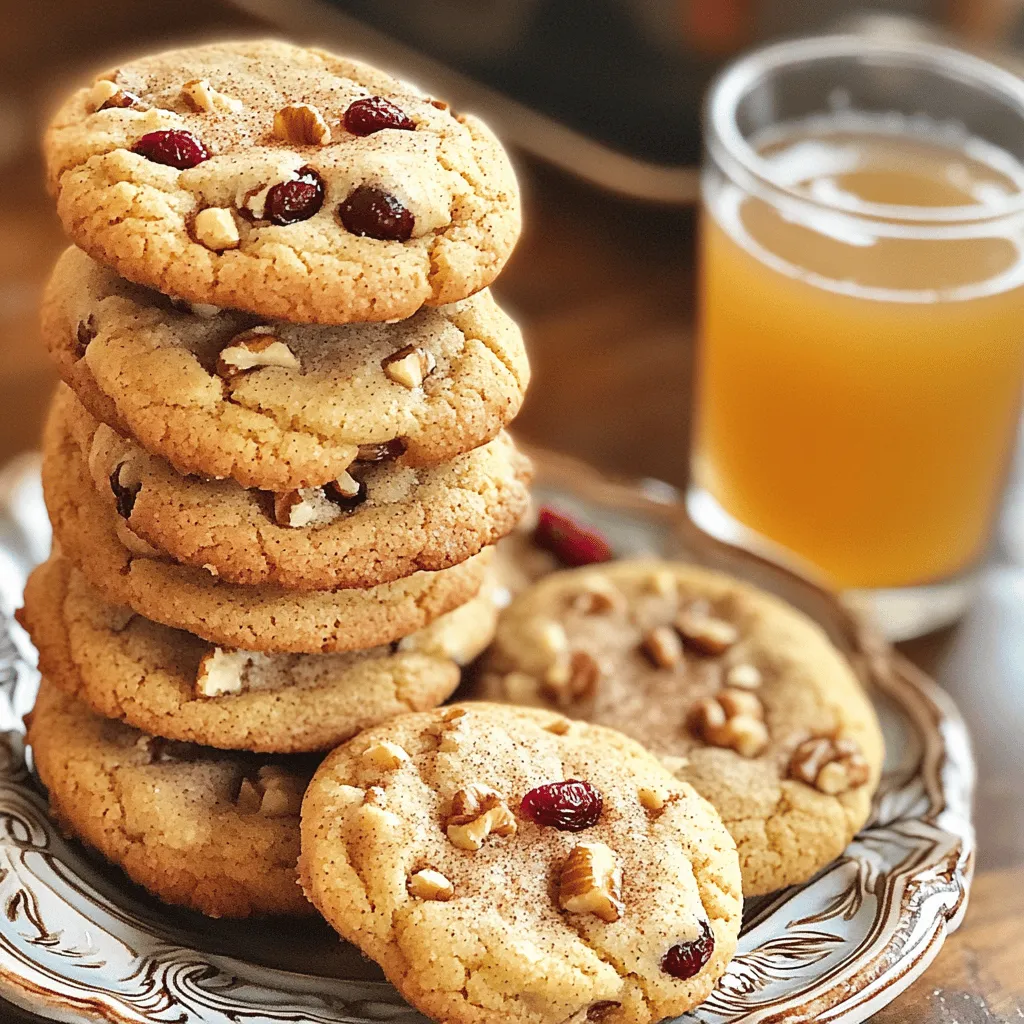
Fall is here, and what better way to celebrate than with warm, spiced Apple Cider Cookies? These delightful treats blend comforting flavors into each bite. Get ready for a cozy …
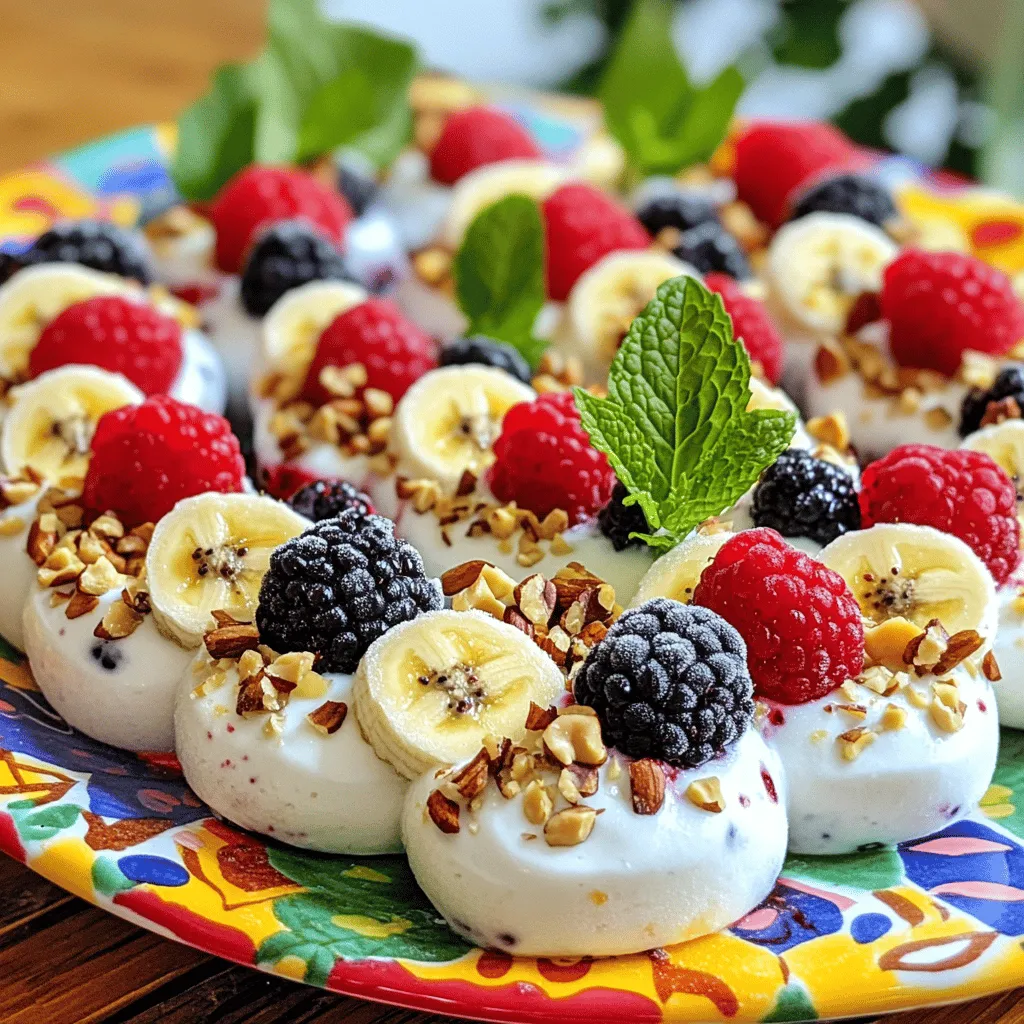
Looking for a simple and fun way to beat the heat? You’re in the right place! Easy Frozen Yogurt Bites are your perfect treat. With just a few ingredients, you …
![- 1 cup all-purpose flour - 1/2 cup old-fashioned oats - 1/2 teaspoon baking powder - 1/2 teaspoon baking soda - 1/4 teaspoon salt - 1/2 cup unsalted butter, softened - 1 cup packed brown sugar - 1/4 cup granulated sugar - 2 large eggs - 1/2 cup pure pumpkin puree - 1/4 cup pure maple syrup - 1 teaspoon vanilla extract - 1 teaspoon ground cinnamon - 1/4 teaspoon ground nutmeg - 1/4 teaspoon ground ginger - 1/2 cup chopped pecans - 1/4 cup powdered sugar for dusting - Mixing bowls - Electric mixer (or whisk) - 9x9-inch baking pan To make the Brown Sugar Maple Pumpkin Butter Bars, you need a few key ingredients. The base starts with brown sugar and pure maple syrup. These two ingredients create a sweet and rich flavor. Pumpkin puree adds a smooth and creamy texture. All-purpose flour binds everything together and gives the bars a nice structure. You can add optional ingredients for extra fun. Chopped pecans give a nice crunch and a nutty taste. A light dusting of powdered sugar on top makes the bars look fancy. For the best results, gather your equipment. Mixing bowls help you blend your ingredients. An electric mixer or a whisk is perfect for creaming the butter and sugars. A 9x9-inch baking pan is essential for baking the bars evenly. Check the [Full Recipe] for detailed steps and tips. 1. First, preheat your oven to 350°F (175°C). This step is key for even baking. 2. Next, prepare a 9x9-inch baking pan. You can grease it lightly or line it with parchment paper for easy removal. 3. In a medium bowl, mix the dry ingredients. Combine 1 cup of all-purpose flour, 1/2 cup of old-fashioned oats, 1/2 teaspoon of baking powder, 1/2 teaspoon of baking soda, and 1/4 teaspoon of salt. Whisk these together and set them aside for later. 1. Now, let’s cream the butter and sugars together. In a large bowl, use an electric mixer or a whisk to mix 1/2 cup of softened unsalted butter, 1 cup of packed brown sugar, and 1/4 cup of granulated sugar. Beat until creamy and light in color. 2. Add in 2 large eggs, one at a time. Mix well after each addition. Then stir in 1/2 cup of pure pumpkin puree, 1/4 cup of pure maple syrup, and 1 teaspoon of vanilla extract. Keep mixing until everything is smooth. 1. Gradually fold the dry mixture into the wet ingredients. Mix just until combined; a few lumps are okay for texture. 2. If you want a crunch, fold in 1/2 cup of chopped pecans at this stage. 3. Carefully pour the batter into your prepared pan. Use a spatula to spread it evenly. 4. Place the pan in the preheated oven and bake for 25-30 minutes. They are done when the edges are golden brown. A toothpick should come out clean from the center. 5. Once done, take the pan out and let the bars cool for about 10 minutes. After that, transfer them to a wire rack to cool completely. For the full experience, check out the Full Recipe. - Use a toothpick to check for doneness. Insert it in the center. If it comes out clean, the bars are ready. - Let the bars cool for about ten minutes before slicing. This helps them set and makes cutting easier. - Add spices for more depth. Try nutmeg, ginger, or even cloves for a kick. - Experiment with different sugars. Using brown sugar gives a rich flavor. You can mix in some granulated sugar for sweetness. - Arrange the bars elegantly on a platter. A rustic wooden platter works well. - Serve with maple syrup on the side. This adds a sweet touch and looks inviting. For the full recipe, check out Brown Sugar Maple Pumpkin Butter Bars. {{image_4}} You can easily switch things up with your Brown Sugar Maple Pumpkin Butter Bars. One simple change is to swap out pumpkin for sweet potato. This gives a unique taste and a lovely color. Sweet potatoes are just as creamy and sweet, making them a great choice. Another fun idea is to mix in chocolate chips or dried fruit. Chocolate adds a rich twist, while dried fruit can give a chewy texture. These choices make the bars even more delicious. If you need a gluten-free option, try using almond flour. It works well and keeps the bars moist. You can follow the full recipe and just replace all-purpose flour with almond flour. You might need to adjust the amount slightly, so keep an eye on the texture. For those looking for a vegan version, use egg replacements like flax eggs or applesauce. This keeps the bars light and fluffy without using eggs. The flavor stays rich and delightful, just like the original recipe. Adding seasonal ingredients can make these bars feel festive. For the holidays, consider mixing in cranberries or chopped pecans. These ingredients add a lovely touch and a burst of flavor. You can also sprinkle in some festive spices. Think about using nutmeg, allspice, or cloves. These spices give your bars a warm, cozy feel that’s perfect for any holiday gathering. After baking, let the bars cool completely. Place them in an airtight container. This helps keep them fresh. Store at room temperature for up to four days. If you want to keep them longer, try freezing them. To freeze the bars, wrap them tightly in plastic wrap. You can also use aluminum foil for extra protection. Place the wrapped bars in a freezer-safe bag. They will last for up to three months in the freezer. When ready to enjoy, thaw them in the fridge overnight. For the best taste, eat the bars within the first few days. They taste great fresh. If stored well, the bars still taste good for up to a week. I recommend enjoying them at room temperature. A light dusting of powdered sugar adds a nice touch too! If you want a warm treat, heat them in the oven for a few minutes. Enjoy your delicious Brown Sugar Maple Pumpkin Butter Bars! Look for a few key signs. First, check the edges. They should be a lovely golden brown. Next, insert a toothpick into the center. If it comes out clean or with a few crumbs, the bars are done. Finally, the top should feel set and not jiggle. You can use pumpkin pie filling, but it will change the taste. Pumpkin pie filling has added spices and sugar. This can make your bars sweeter and more spiced than intended. If you want to control the flavor, stick with pure pumpkin puree. These bars pair well with many treats. A scoop of vanilla ice cream adds creaminess. You can also serve them warm with whipped cream on top. For a cozy touch, drizzle maple syrup over the bars. A cup of spiced tea or coffee makes a great drink pairing too. For the full recipe, check the earlier section. You now have a clear path to making delicious Brown Sugar Maple Pumpkin Butter Bars. Start with essential ingredients like brown sugar and pumpkin puree. Follow the step-by-step instructions for baking and let your creation shine with tips and variations. Whether you choose to enhance flavors or adapt for dietary needs, your bars will impress. Store them properly, and enjoy them fresh. Baking these treats can bring joy to any occasion, so get started and make something special.](https://tossedflavors.com/wp-content/uploads/2025/07/7d096b71-ea8a-4525-a8ea-12f4a7717278.webp)
Are you ready to enjoy a mouthwatering treat that captures the essence of fall? Brown Sugar Maple Pumpkin Butter Bars are the perfect dessert for cozy gatherings or a sweet …
![To make Mexican Street Corn Soup, you need the following ingredients: - 4 ears of fresh corn, husked - 1 tablespoon olive oil - 1 medium onion, finely chopped - 2 cloves of garlic, minced - 1 bell pepper (choose red or yellow), diced - 4 cups vegetable broth - 1 cup heavy cream or coconut milk - 1 teaspoon chili powder - 1 teaspoon ground cumin - Salt and black pepper to taste - 1/2 cup cotija cheese, crumbled (feta can be used as an alternative) - 1/4 cup fresh cilantro, chopped - Juice of 1 lime You can enhance your soup with some tasty toppings: - Diced avocado - Extra cilantro - Your favorite hot sauce If you run out of any ingredients, here are some swaps: - Use frozen corn if fresh is not available. - Swap heavy cream for coconut milk to make it dairy-free. - For a different flavor, try a different cheese, like feta. - If you want less spice, reduce the chili powder. This list keeps your cooking simple and flexible. You can adapt it to your tastes and what you have on hand. Enjoy making your Mexican Street Corn Soup! For the complete recipe, check the Full Recipe section. How to Prep the Corn To start, you need to prep the corn. Take 4 ears of fresh corn. Use a sharp knife to cut the kernels off each cob. Slice down the sides carefully to catch all the kernels. Set the kernels aside for later. Sautéing Vegetables Next, grab a large pot and heat 1 tablespoon of olive oil over medium heat. Once the oil is hot, add 1 medium onion, chopped finely, and 1 diced bell pepper. Sauté these for about 5 minutes. Stir them often until they soften and become fragrant. Combining Corn and Broth Now it’s time to combine everything. Add the corn kernels you prepped into the pot. Pour in 4 cups of vegetable broth. Turn up the heat and bring this mix to a boil. Once boiling, reduce the heat. Let it simmer for 10 to 15 minutes to blend the flavors. Blending the Soup For a smooth texture, use an immersion blender. Blend the soup until you reach your desired consistency. If you like some texture, blend half the soup, leaving the rest chunky. After blending, stir in 1 cup of heavy cream or coconut milk. Let it simmer for another 5 minutes. Season with salt and black pepper to taste. Check out the Full Recipe for more details! - Seasoning Recommendations: Start with salt and black pepper. They enhance all flavors. Add chili powder for warmth and cumin for depth. Adjust to your taste. You can try smoked paprika for a different twist. - Boosting Creaminess: Use heavy cream for rich flavor. Coconut milk adds a nice twist for dairy-free eaters. If you want an extra touch, mix in a bit of cream cheese. This makes the soup even richer. - Best Pot for Cooking: A large, heavy-bottom pot works best. It helps heat evenly and prevents burning. Use a pot that holds at least 6 quarts. This ensures enough space for all ingredients. - Tools for Blending: An immersion blender is perfect for this soup. It allows you to blend right in the pot. If you don’t have one, a regular blender works too. Just be careful when transferring hot soup. These tips will help you make a flavorful and smooth Mexican street corn soup. For more detailed steps, check the Full Recipe. {{image_4}} To add heat, use more chili powder or fresh jalapeños. You can also stir in some diced chipotle in adobo for a smoky flavor. Blend these spicy ingredients into the soup to ensure even heat. Adjust based on your taste. Always remember, you can add heat but can't take it away! For vegetarian or vegan versions, you can easily swap ingredients. Here are two simple ideas: - Using Coconut Milk Substitute heavy cream with coconut milk. This adds a rich, creamy texture while keeping the dish vegan. Coconut milk brings a hint of sweetness that pairs well with the spices. It makes the soup feel indulgent without using dairy. - Substituting Vegetable Broth If you want a lighter version, use vegetable broth instead of chicken broth. This keeps everything plant-based while adding depth to the flavor. You can also use homemade broth for a fresher taste. Just simmer some veggies and herbs to create your broth before adding it to the soup. Explore these variations to find your perfect bowl of Mexican street corn soup. For the full recipe, check the earlier sections. After enjoying your Mexican Street Corn Soup, let it cool down. Pour the soup into an airtight container. Make sure to seal it well to keep it fresh. Store it in the fridge for up to 4 days. If you want to enjoy it later, freezing is a great option. When you're ready to eat, take the soup out of the fridge. Pour it into a pot. Heat it over medium heat. Stir often to ensure even warming. If the soup seems thick, add a little vegetable broth or water. You can also microwave it in a safe bowl. Heat it in short bursts, stirring in between, until it’s hot. To freeze your soup, use a freezer-safe container. Leave some space at the top for expansion. You can also use freezer bags to save space. When ready to eat, thaw it overnight in the fridge. You can also use the microwave on the defrost setting. Reheat as mentioned earlier, and enjoy your delicious soup! Mexican Street Corn Soup is a creamy and flavorful dish. It takes the classic street food, elote, and turns it into a soup. You get sweet corn, spices, and creamy goodness in every spoonful. The soup often has lime juice, cotija cheese, and fresh cilantro. It’s a warm and comforting meal, perfect for any day. Yes, you can use frozen corn. Frozen corn is just as good and saves time. It cooks quickly and adds sweetness to the soup. Just add it to the pot when you would add fresh corn. You may want to adjust cooking time as frozen corn may need less time to heat through. To make the soup spicier, add more chili powder or fresh jalapeños. You can mix in hot sauce to your taste. Another option is to add diced chipotle peppers for a smoky flavor. Adjust the spice level to suit your preference, and enjoy the heat! The main difference is the form. Elote is grilled corn on the cob, coated in toppings. This soup combines those flavors into a creamy blend. You still get the same sweet corn, lime, and cheese, but in a warm bowl. The soup is easier to share and enjoy on cool days. For the complete recipe, check out the [Full Recipe]. You learned about making Mexican Street Corn Soup. We discussed essential ingredients, optional toppings, and substitutions. I provided a clear cooking method from prepping corn to blending the soup. Tips on flavor and cooking gear will help you create the best dish. We also explored tasty variations and storage tips. Now, dive in and enjoy your warm, creamy soup! You have the tools to try new flavors and make it your own. Happy cooking!](https://tossedflavors.com/wp-content/uploads/2025/07/882ac8ea-b92d-446f-a315-344d12357a99.webp)
Are you ready to spice up your dinner routine? This Mexican Street Corn Soup brings bold flavors and comfort in every bowl. With fresh corn, zesty spices, and easy-to-follow steps, …
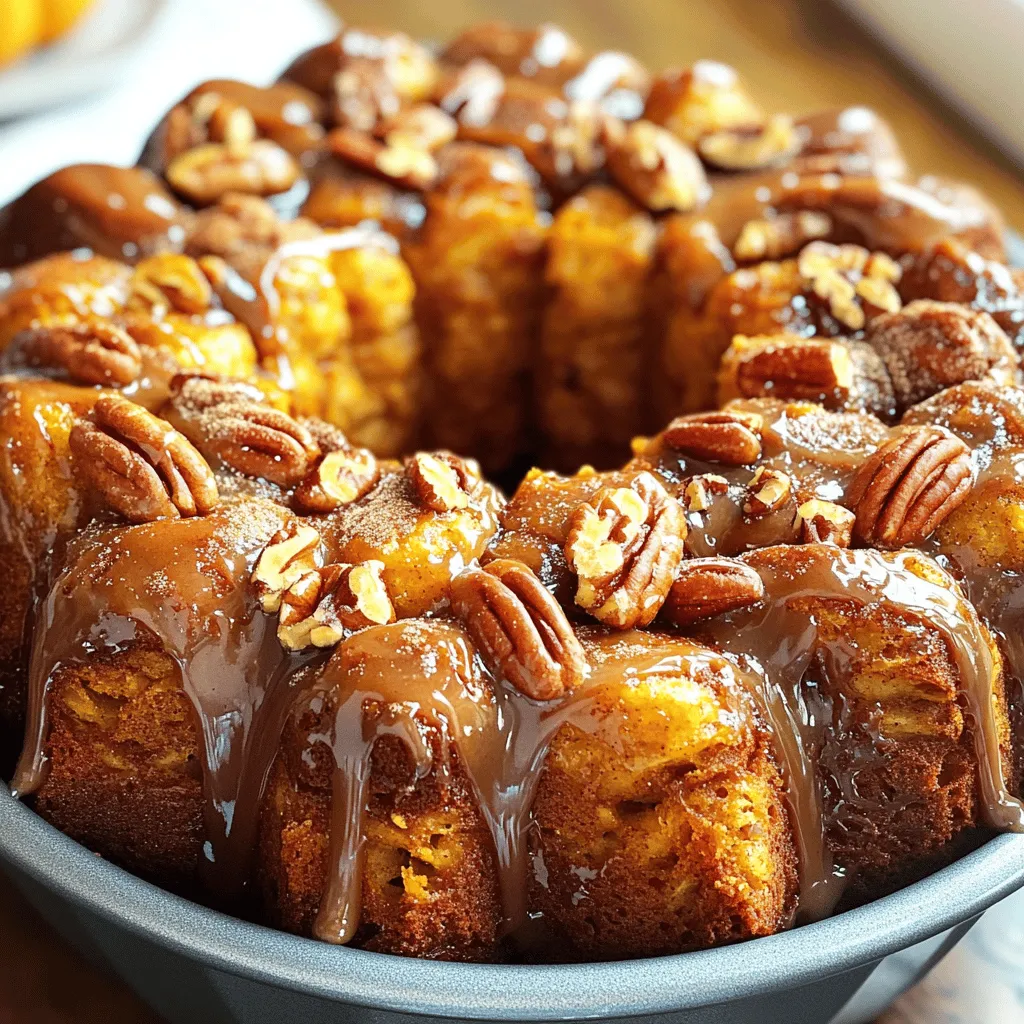
Fall is here, and that means it’s time to indulge in the warm, spicy flavors of the season. Imagine pulling a golden-brown Pumpkin Spice Monkey Bread from your oven—tender, sweet, …
![- 1/2 cup balsamic vinegar - 1/4 cup extra virgin olive oil - 1 tablespoon Dijon mustard - 1 tablespoon honey (or use maple syrup for a vegan alternative) - 1 clove garlic, finely minced - Sea salt and freshly ground black pepper, to taste - 1 teaspoon dried oregano - 1 teaspoon freshly chopped basil (optional, for extra freshness) When I create homemade balsamic dressing, I focus on fresh, high-quality ingredients. Balsamic vinegar is the star of this dressing. It brings a rich, sweet, and tangy flavor. I use extra virgin olive oil for its smoothness and healthy fats. Dijon mustard adds a nice kick and helps emulsify the dressing. For sweetness, honey works well, but maple syrup is a great vegan choice. A touch of garlic enhances the taste with its bold flavor. Sea salt and freshly ground black pepper balance the dressing. I also like to add dried oregano for a bit of earthiness. If you want a pop of freshness, use freshly chopped basil. Using quality ingredients makes a huge difference. This dressing is not just a topping; it elevates your salads and dishes. You can find the full recipe in the section above. To start, grab a medium-sized mixing bowl. First, pour in 1/2 cup balsamic vinegar. Then add 1 tablespoon Dijon mustard, 1 tablespoon honey, and 1 clove garlic, finely minced. Use a whisk to mix these ingredients. Keep whisking until the mixture is smooth. Next, slowly drizzle in 1/4 cup extra virgin olive oil while whisking. This helps to emulsify the dressing, creating a creamy texture. Keep whisking until the oil blends well with the vinegar mixture. Now, it's time to add flavor. Fold in 1 teaspoon dried oregano and 1 teaspoon freshly chopped basil if you want extra freshness. These herbs will enhance the taste of your dressing. Next, taste your dressing. Add sea salt and freshly ground black pepper to your liking. If you want a sweeter taste, add a bit more honey or maple syrup. For the best flavor, let your dressing rest for at least 15 minutes. This time allows the ingredients to meld together. If you have leftovers, transfer the dressing to an airtight container. Store it in the fridge. It can last up to a week. Just shake it before using to re-emulsify. For the full recipe, check out the link above. To get a creamy texture, whisk hard. Start with a steady hand. Add the olive oil slowly while whisking. This helps mix the oil with the vinegar. If you pour too fast, they won't blend well. A good trick is to use a bowl that is not too wide. This keeps the oil close to the vinegar for better mixing. Common mistakes to avoid include not whisking enough and adding oil too quickly. If the dressing separates, just whisk it again. Always taste as you go to ensure the right flavor. You can boost the flavor with fresh herbs. Try parsley, thyme, or rosemary. These will add a nice touch to your dressing. Adding a pinch of red pepper flakes gives a little heat too. Balancing flavors is key. Aim for sweet, tangy, and savory. If it's too tangy, add more honey. If it’s too sweet, add more vinegar. Adjusting these flavors makes the dressing perfect for your taste. Balsamic dressing pairs well with salads, grilled veggies, and roasted meats. It makes a great dip for bread too. Drizzle it over fresh greens or mix it into roasted vegetables for added flavor. When serving, drizzle lightly over your dish. A little goes a long way. Make sure to toss salads well to coat everything evenly. Enjoy your homemade dressing on various meals, and let its flavor shine! Check the [Full Recipe] for more details. {{image_4}} You can easily make this dressing vegan. Simply swap honey for maple syrup. This switch keeps the sweetness but fits a vegan diet. You can also add a touch of agave syrup if you prefer. Other vegan-friendly ingredients include nutritional yeast. This adds a cheesy flavor without dairy. Get creative with different herbs. Try adding thyme or parsley for a fresh twist. You can also experiment with sweet or savory profiles. For a sweet touch, add a bit of fruit puree, like raspberry or peach. If you want a savory flavor, try adding chopped shallots or minced onion. If you like heat, spice it up! Add chili flakes for a mild kick. You can also use sriracha for a bolder flavor. Start with a small amount and adjust to your taste. Mix well to ensure the spice distributes evenly throughout the dressing. Store your leftover balsamic dressing in a clean, airtight container. Glass jars are great for this. You can keep it in the fridge for up to a week. The flavors will deepen as it sits, making it even tastier. Don't let any dressing go to waste! You can use excess dressing on grilled veggies, as a marinade for chicken, or drizzled over roasted potatoes. If you see any signs of separation, just shake or stir it before use. Always check for any off smells or changes in color before using dressing that has been stored. If your homemade dressing has a strange smell or looks cloudy, it's best to toss it. Look out for any mold or significant changes in texture. To dispose of expired dressing, pour it down the sink and rinse the container before recycling. Always prioritize safety when consuming or storing food. For the full recipe and more tips, check out the Zesty Homemade Balsamic Dressing. Yes, you can use regular vinegar. However, it changes the flavor. Balsamic vinegar has a sweet and rich taste. Regular vinegar is more acidic and sharp. You can try red wine vinegar for a similar flavor. Apple cider vinegar is another option, but it will taste different. Adjusting the amount of sweetener may help balance the flavors. Making this dressing is quick and easy. It only takes about 10 minutes to prepare. Once you mix the ingredients, let it sit for 15 minutes. This resting time lets the flavors blend well. In total, you will spend about 25 minutes from start to finish. If you don’t have a whisk, don’t worry! You can use a fork or a small jar. When using a jar, add all the ingredients. Seal the lid and shake it well. This method works great for mixing and emulsifying. A blender is another option for a smooth texture. Just blend until combined. This blog post covered how to make a delicious balsamic dressing. I shared the ingredients, preparation steps, and helpful tips to create a tasty blend. You learned about flavor variations and storage tips, ensuring your dressing lasts longer. Now, you have the tools to make this dressing your own. Play with flavors and enjoy it on salads or veggies. With a few simple steps, you can create a restaurant-quality dressing at home. Enjoy your culinary creations!](https://tossedflavors.com/wp-content/uploads/2025/07/2cb775ce-4b28-4d75-abc9-0c40be789977.webp)
Are you ready to elevate your salads with a burst of flavor? This Homemade Balsamic Dressing recipe is fresh, easy, and requires just a few pantry staples. With rich balsamic …
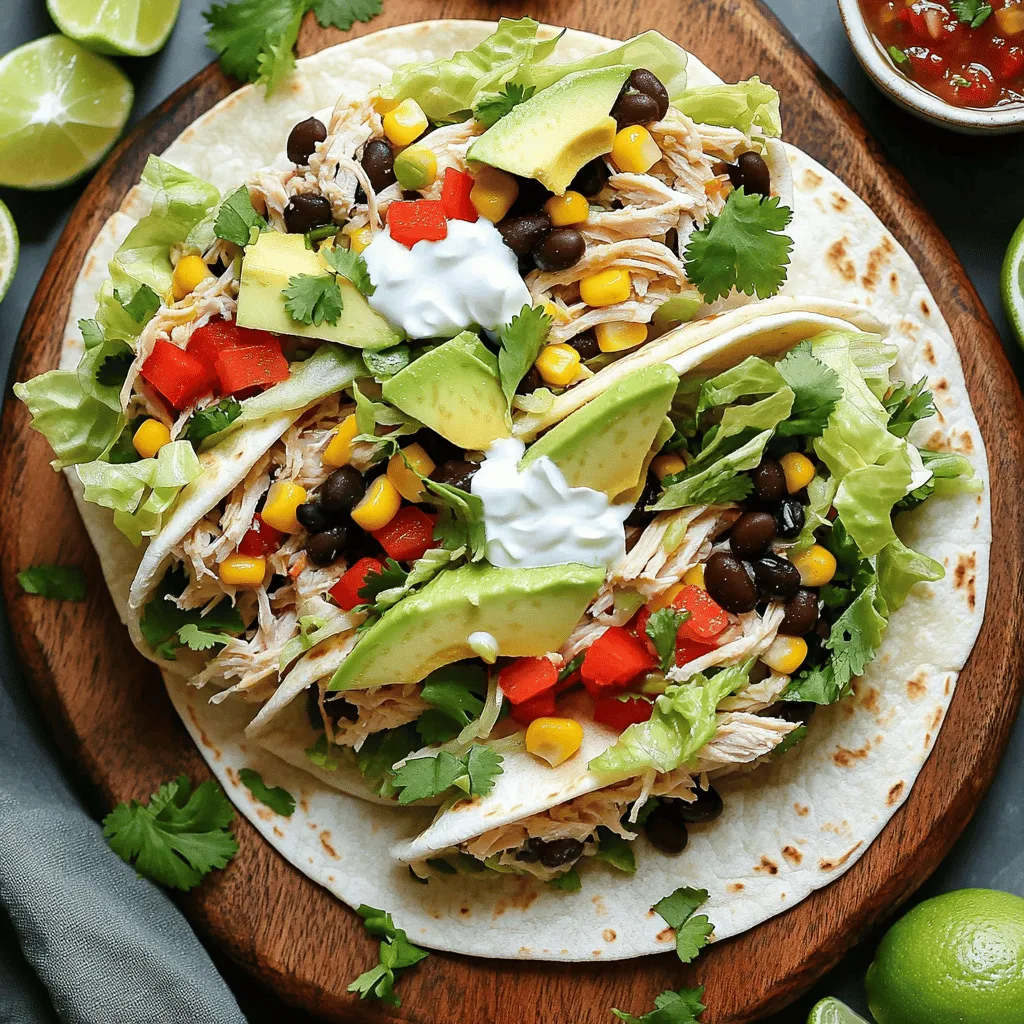
Looking for a quick and tasty meal? Chicken tortilla wraps are your answer! In this post, I’ll share a simple recipe bursting with flavor. You’ll learn all the key ingredients, …
![To make soft pumpkin cookies, you need: - 1 cup canned pumpkin puree - 1/2 cup unsalted butter, softened - 1 cup granulated sugar - 1/2 cup brown sugar, firmly packed - 1 large egg - 1 teaspoon vanilla extract - 2 cups all-purpose flour - 1 teaspoon baking soda - 1 teaspoon baking powder - 1 teaspoon ground cinnamon - 1/2 teaspoon ground nutmeg - 1/2 teaspoon salt - 1/4 teaspoon ground ginger These ingredients blend to give cookies their soft and moist texture. The pumpkin puree adds a lovely flavor and makes the cookies tender. For the cream cheese frosting, gather: - 8 oz cream cheese, softened - 1/2 cup unsalted butter, softened - 2 cups powdered sugar - 1 teaspoon vanilla extract This frosting is creamy and sweet, making it the perfect topping for your cookies. You can change some ingredients if needed: - Use coconut oil instead of butter for a dairy-free option. - Swap brown sugar with coconut sugar for a different flavor. - If you lack pumpkin puree, use mashed banana or applesauce. These substitutes can still give you great results while catering to different diets. For the full recipe, check the complete instructions. Start by preheating your oven to 350°F (175°C). This helps the cookies bake evenly. Line a baking sheet with parchment paper. This will keep the cookies from sticking. In a big bowl, beat the softened butter, granulated sugar, and brown sugar. Use an electric mixer at medium speed. Mix until the mixture is smooth and creamy. Next, add the canned pumpkin, egg, and vanilla extract. Mix until everything is blended well. In a separate bowl, whisk together the flour, baking soda, baking powder, cinnamon, nutmeg, salt, and ginger. This step ensures the spices and leavening agents are evenly spread throughout the cookies. Slowly add the dry mixture to the wet mixture. Use a spatula or wooden spoon. Mix gently until just combined. Be careful not to overmix. Overmixing can make the cookies tough. Scoop dollops of dough onto the prepared baking sheet. Leave about 2 inches of space between each scoop. Bake in the preheated oven for 12-15 minutes. The edges should be set, but the centers should stay soft. After baking, take the cookies out of the oven. Let them cool on the baking sheet for about 5 minutes. Then, move them to a wire rack to cool completely. This cooling step is key for the perfect texture. Enjoy the process and the delicious smell! For the complete recipe, check out the [Full Recipe]. To make soft pumpkin cookies, focus on mixing. Do not overmix your dough. Stir until just combined. This keeps your cookies tender and light. Make sure the butter is soft. Cold butter leads to tough cookies. Also, use the right amount of flour. Too much flour makes cookies dry. If your cookies spread too much, chill the dough for 30 minutes before baking. For the perfect cream cheese frosting, start with room temperature ingredients. If the frosting is too thick, add a splash of milk. If it’s too thin, add more powdered sugar. Beat the mixture until fluffy. This adds air and makes it light. Remember, a good frosting should spread easily but hold its shape. Serve your cookies on a colorful platter to catch the eye. Sprinkle cinnamon or nutmeg on top for flair. Add a few pumpkin seeds for a nice touch. You can also stack the cookies high for a fun look. Garnish with fresh mint leaves for a pop of color. These small touches make your cookies stand out. For the full recipe, check out the detailed instructions. {{image_4}} While cream cheese frosting is a classic choice, you can try other frostings too. A simple vanilla buttercream can add a sweet touch. You can also use chocolate ganache for a rich flavor. For a lighter option, consider whipped cream or a glaze made with powdered sugar and milk. Each option gives the cookies a new twist, keeping them fun and exciting. Want to make your cookies even better? Try adding mix-ins. Chopped nuts like pecans or walnuts add a nice crunch. You could also mix in chocolate chips for a sweet bite. Dried cranberries or raisins bring a fruity touch. Each addition enhances the taste and texture, creating a unique cookie every time. If you need gluten-free cookies, swap all-purpose flour for almond or oat flour. Check that your pumpkin puree is gluten-free too. For a dairy-free option, use coconut cream instead of cream cheese in the frosting. You can also use dairy-free butter for the cookies. These swaps ensure everyone can enjoy these tasty treats without worry. For the full details on making these cookies, check out the Full Recipe. To keep your soft pumpkin cookies fresh, store them in an airtight container. This method helps keep them moist. Place parchment paper between layers to prevent sticking. They can last for about five days at room temperature. If you want them to last longer, consider refrigerating them. Just ensure they are well-wrapped to avoid drying out. Freezing these cookies is easy and a great way to save them. First, let the cookies cool completely. Then, place them in a single layer on a baking sheet. Freeze until firm. Once frozen, transfer them to a freezer-safe bag or container. Label the bag with the date. They can last for up to three months in the freezer. When you're ready, just thaw them at room temperature. Reheating soft pumpkin cookies is simple. Preheat your oven to 350°F (175°C). Place the cookies on a baking sheet and heat for about 5-7 minutes. This warms them up nicely. If you prefer the microwave, heat them for about 10-15 seconds. Just be careful not to dry them out. Enjoy them warm with the cream cheese frosting for a delightful treat! Yes, you can use fresh pumpkin. To do this, roast the pumpkin first. Cut it in half, remove the seeds, and bake it at 400°F (200°C) for about 45 minutes. After it cools, scoop out the flesh and mash it. This gives a nice flavor to your cookies. Fresh pumpkin may need more water, so adjust your recipe if needed. To sweeten the cookies, add more sugar. Start with an extra 1/4 cup. For less sweetness, reduce the sugar by the same amount. You can also use different sweeteners. Brown sugar adds a deeper taste, while white sugar keeps it light. To soften cream cheese fast, cut it into small cubes. Place it in a bowl and microwave it in short bursts of 10 seconds. Check after each burst to avoid melting it. This helps it blend smoothly into the frosting. Look for the edges of the cookies to be set. The centers will look soft and slightly puffy. A toothpick inserted in the center should come out clean or with just a few crumbs. If they look too wet, bake them a few more minutes. Yes, you can make the dough ahead! Chill it in the fridge for up to 24 hours. This makes it easier to scoop and bake later. If you want to keep it longer, you can freeze the dough. Just wrap it well in plastic wrap and store it in a freezer bag. When ready to use, let it thaw in the fridge overnight. For the full recipe, check the details above. In this article, we explored the core elements of baking cookies. We covered key ingredients, from cookie dough to delicious cream cheese frosting. You learned step-by-step instructions to bake and cool your cookies perfectly. I shared tips for texture and presentation, along with fun variations for added flavor. Finally, we discussed storage methods to keep your treats fresh. Baking cookies can be fun and rewarding. Enjoy the process and share your tasty creations with others!](https://tossedflavors.com/wp-content/uploads/2025/07/aaef6ab2-b5b7-49ef-864e-d0fab853af20.webp)
Are you craving something sweet and cozy? Soft Pumpkin Cookies with Cream Cheese Frosting are here to satisfy that need! These cookies blend the warm flavors of fall with a …