Spicy Honey Garlic Meatballs Flavorful and Simple Dish

Are you ready to spice up your dinner routine? These Spicy Honey Garlic Meatballs are not just simple, but also bursting with flavor. Packed with ground chicken or beef, bread …
Are you ready to spice up your dinner routine? These Spicy Honey Garlic Meatballs are not just simple, but also bursting with flavor. Packed with ground chicken or beef, bread …
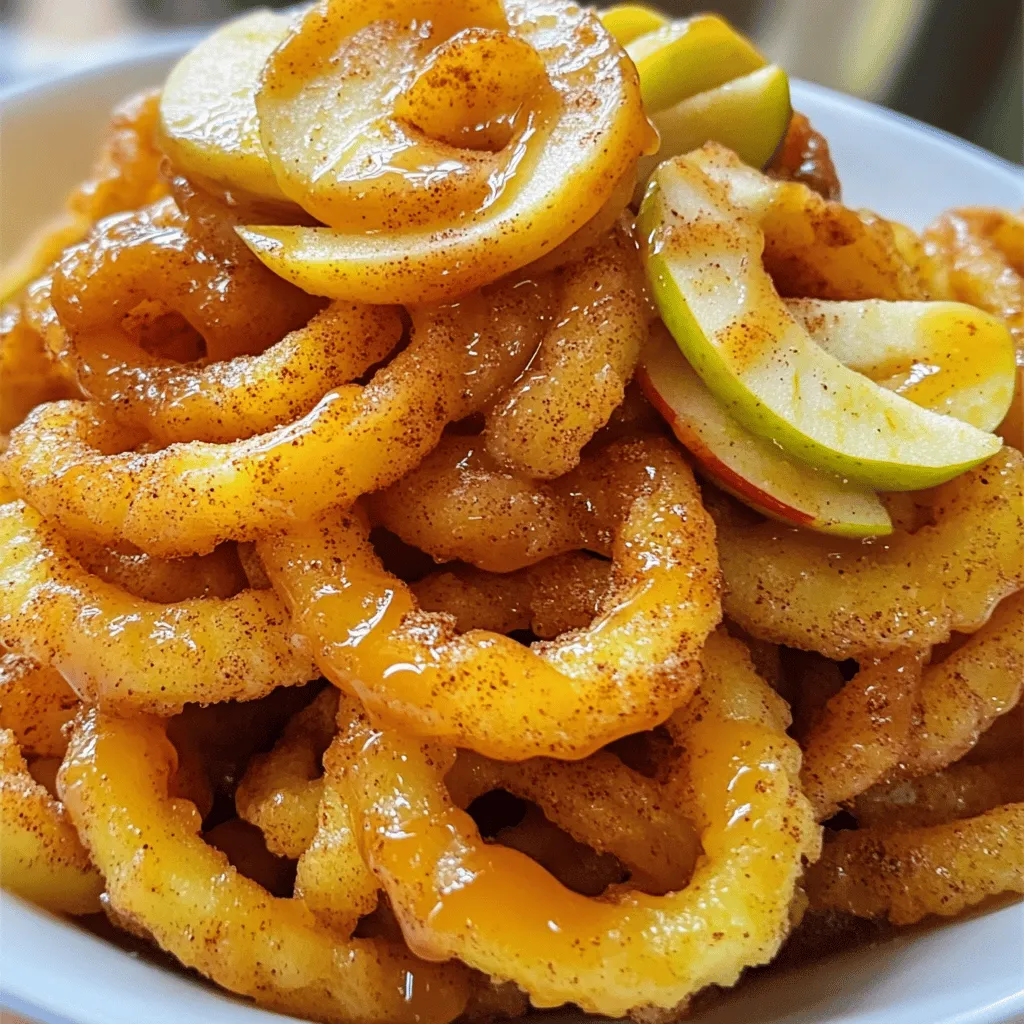
Ready for a sweet twist on a classic? You’ll love my Irresistible Apple Cinnamon Curly Fries recipe! These are not your average fries. With crispy, spiraled potatoes paired with warm …
![- 4 large Granny Smith apples - 2 cups granulated sugar - 1/2 cup corn syrup - 1 cup water - 1 teaspoon pure vanilla extract - Green food coloring (optional) - Edible glitter or black sprinkles - Lollipop sticks or wooden skewers You can swap Granny Smith apples for other tart apples like Fuji or Honeycrisp. These will still give you a nice balance of sweet and tart. If you want to use a different sweetener, you can try using coconut sugar or brown sugar instead of granulated sugar. For corn syrup, you can use agave syrup or honey, but keep in mind that these will change the flavor a bit. Just make sure that whatever you choose is thick enough to coat the apples well. These substitutions can help you tailor the recipe to your taste or dietary needs. You can still make great poison apples with these swaps! Start by washing and drying the apples. This step is key to a good candy coat. You want to remove dirt and wax. Use a clean cloth to ensure they are dry. Next, insert a lollipop stick into the top of each apple. Push it in about halfway. This gives you a sturdy handle for dipping. In a medium-sized saucepan, combine the sugar, corn syrup, and water. Stir the mixture over medium heat. Keep stirring until the sugar fully dissolves. This step is very important. If the sugar does not dissolve, your candy will not coat well. Once the sugar dissolves, turn up the heat. Let the mixture boil without stirring. Use a candy thermometer to check the temperature. You need it to reach the hard crack stage, which is 300°F. This takes focus, so stay nearby and watch closely. When the candy reaches the right temperature, quickly remove it from heat. Dip each apple into the hot candy coating. Tilt the saucepan if needed to coat fully. Rotate the apple to let any extra candy drip off. While the coating is still warm, add edible glitter or black sprinkles. This gives a spooky look perfect for Halloween! For the complete recipe, refer to the [Full Recipe]. To have a smooth and shiny finish on your poison apples, it’s key to work fast. Once you dip the apples, let the excess drip off. Don’t shake them too much; a gentle turn works best. To avoid crystallization, make sure your pan is clean. Any leftover sugar can cause issues. Always use fresh sugar and stir only until dissolved. When you handle hot sugar syrup, always be careful. It can cause burns. Use thick oven mitts when touching the pot. Keep kids away from the cooking area. For candy thermometers, clip them to your pot. This helps keep them in place. Make sure the bulb is in the syrup, but not touching the pot. For a fun display, arrange your candy apples on a spooky platter. Add fake spider webs or plastic bugs for extra flair. You can also serve them with Halloween-themed snacks. Try some ghost-shaped cookies or pumpkin cupcakes. This makes your table look festive and inviting. Your guests will love the creepy, yet tasty, treats! {{image_4}} You can make your Halloween poison apples even more fun by adding flavors. Try using different extracts like almond or peppermint. A few drops will change the taste in a fun way. You can also add spices like cinnamon for a warm twist. This adds a cozy feel to your spooky treat. Just remember to balance flavors so each bite is tasty! Color is key for Halloween fun. You can use food coloring to create different looks. A few drops of red or purple can make the apples extra spooky. Don’t stop there! Experiment with different sprinkles or toppings. Black sprinkles add a gothic feel, while colorful ones can bring a playful side. Mix and match to find your favorite look! If you want to switch things up, try using other fruits. Pears or strawberries work great for candy coating. Smaller fruits can make cute, bite-sized treats. This way, kids can enjoy a sweet snack that fits their hands. Just remember to adjust the candy coating time as needed. Each fruit has its own moisture level, so keep an eye on it! Store your candy apples in a cool, dry place. Use a cake box or a container to keep them safe. Make sure they are not touching each other, so the candy coating stays nice. If it’s warm or humid, put them in the fridge. This helps keep the candy coating firm. You can keep candy apples for about 2 to 3 days. After that, they may not taste as good. Watch for signs of spoilage. If the apples look slimy or the candy coating feels sticky, it’s best to throw them away. Always check before eating! You can freeze candy apples, but they might not be as good later. To freeze, wrap each apple in plastic wrap. Then, place them in a freezer bag. When you want to eat them, take them out and let them thaw in the fridge overnight. This helps keep them from getting too mushy. Can I use a different type of apple? Yes, you can use other apples. Red delicious or Fuji apples work well. Granny Smith apples are tart, which makes them great for this recipe. Choose what you like best! Why is my candy coating not hardening? If the candy coating is not hardening, it might be due to a low temperature. The candy needs to reach 300°F for the hard crack stage. Ensure you use a candy thermometer to check the temperature accurately. How do I know when the candy reaches hard crack stage? You know the candy is at hard crack stage when it reaches 300°F. At this point, the candy should look clear and shiny. A simple test is to drop a bit into cold water. If it forms hard, brittle threads, it’s ready! What if I don’t have a candy thermometer? If you don’t have a candy thermometer, you can use the cold water test. Boil the sugar mixture and drop a bit into cold water. If it forms a hard ball that breaks when you touch it, you’ve reached the right stage! How to incorporate poison apples into a Halloween party? Set up a spooky dessert table with poison apples as the main attraction. Use black tablecloths and add creepy decorations like fake spiders. You can even label them with fun names like "Witch's Treats." Suggestions for themes or pairings for serving guests Pair poison apples with other fun treats, like ghost cupcakes or bat-shaped cookies. You can create a haunted theme with dark colors and eerie sounds. This will make your party memorable and fun! To wrap up, we covered everything you need to create great candy apples. You learned about essential ingredients, tips for preparation, and even fun variations. Remember, the key is to monitor your candy's temperature and enjoy the process. Get creative with colors and toppings to make your treats extra special. With these handy tips, you can impress everyone at your next Halloween party. Enjoy making your spooky candy apples!](https://tossedflavors.com/wp-content/uploads/2025/07/7e1c62c8-34e3-47f8-883f-8e6c825dde42.webp)
Get ready to treat your taste buds with a spooky twist! My Halloween Poison Apples Recipe is not just a snack; it’s a showstopper for your Halloween party. Using simple …
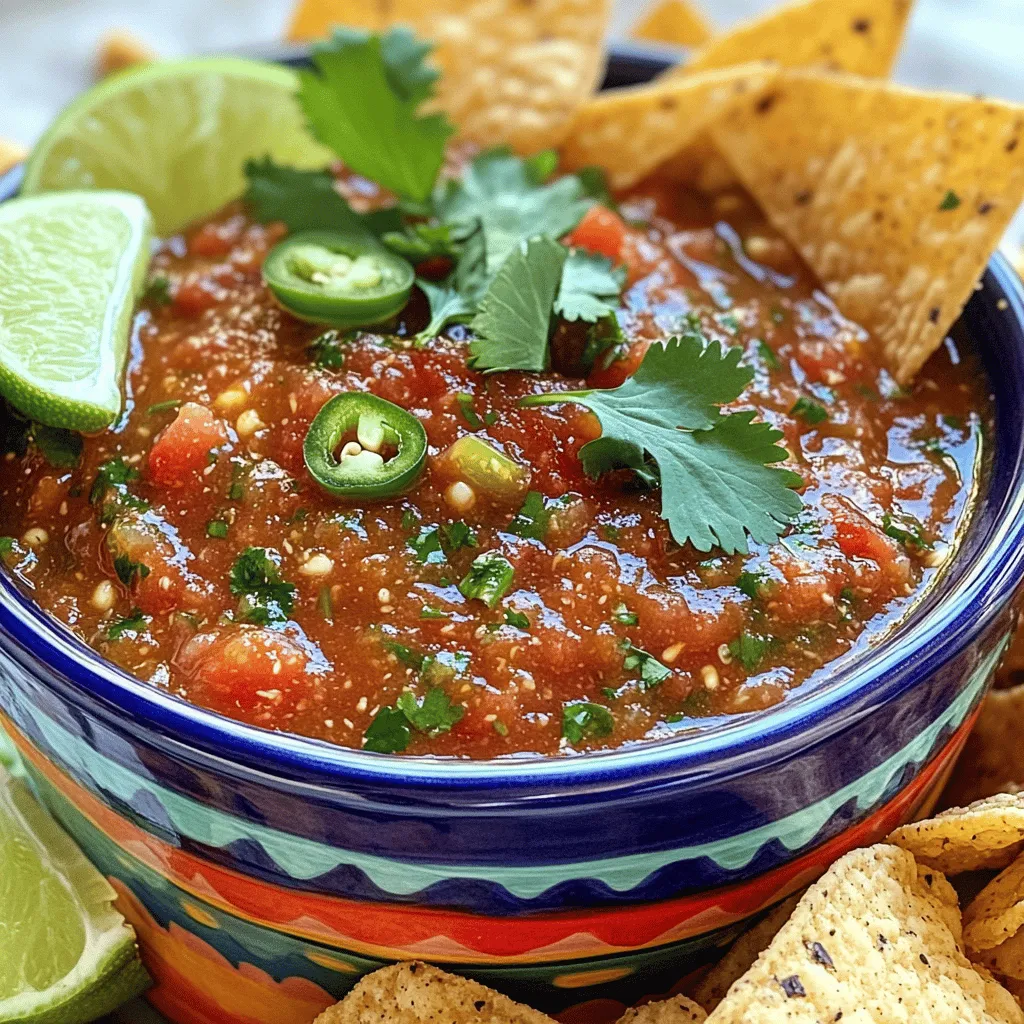
If you’re craving a fresh and zesty salsa, you’ve come to the right place! This Blender Salsa recipe is easy, quick, and packed with flavor. I’ll guide you through each …
![To make Harvest Pumpkin & Apple Soup, you need the following main ingredients: - 2 cups pumpkin puree (freshly roasted or canned) - 1 large Granny Smith apple, peeled and diced - 1 medium onion, finely chopped - 2 cloves garlic, minced - 4 cups vegetable broth - 1 cup coconut milk - 1 teaspoon ground cinnamon - 1/2 teaspoon freshly grated nutmeg - 2 tablespoons olive oil - Salt and freshly cracked black pepper to taste - Optional: toasted pumpkin seeds for garnish - Fresh parsley, finely chopped for garnish This soup shines with seasonal ingredients. The pumpkin brings a rich, earthy base. The Granny Smith apple adds a bright, tart note that contrasts beautifully with the pumpkin. Onions and garlic deepen the flavor. For extra flavor, consider adding fresh herbs like thyme or sage. They pair well with the sweetness of the pumpkin and apple. You can also use different types of apples, like Honeycrisp or Fuji, for a sweeter taste. Optional garnishes can enhance your soup's look and taste. Toasted pumpkin seeds add a nice crunch. Fresh parsley brightens the dish with color and flavor. If you want creaminess without coconut milk, use heavy cream or a nut-based milk. For substitutions, feel free to swap pumpkin with butternut squash or sweet potatoes. They work well and add their unique flavor. Adjust the spices to your taste. You can even try adding a pinch of cayenne for a kick! For the full recipe, check the details above. Enjoy creating this comforting fall soup! 1. Start with the base. In a large pot, heat 2 tablespoons of olive oil over medium heat. When the oil is warm, add 1 finely chopped onion. Sauté it for about 5 minutes. The onion should turn soft and clear. 2. Add flavor. Next, mix in 2 minced garlic cloves and 1 diced Granny Smith apple. Cook this for about 3 minutes. Stir often until the garlic smells great and the apple begins to soften. 3. Combine the main ingredients. Then, stir in 2 cups of pumpkin puree, 4 cups of vegetable broth, 1 teaspoon of ground cinnamon, and 1/2 teaspoon of grated nutmeg. Don’t forget a good pinch of salt and pepper. Mix everything well. 4. Bring to a boil. Turn up the heat to high until the soup bubbles gently. Once it boils, lower the heat and let it simmer for 15 minutes. This step helps all the flavors mix nicely. 5. Add creaminess. After the soup simmers, take it off the heat. Stir in 1 cup of coconut milk until it blends smoothly. 6. Blend until smooth. Use an immersion blender to puree the soup until it is creamy. If you don’t have one, pour the soup in batches into a regular blender. Blend each batch and then return it to the pot. 7. Taste and adjust. At this point, taste your soup. If it needs more flavor, add a bit more salt or pepper. 8. Serve hot. Ladle the soup into bowls. You can garnish it with toasted pumpkin seeds and fresh parsley. This adds a nice touch and some color. - Cut evenly. Make sure your onion and apple pieces are about the same size. This helps them cook evenly. - Don’t rush. Sautéing slowly brings out the sweet flavors in the onion and apple. - Stir often. This keeps the veggies from sticking and burning. - Immersion blenders are easy. They let you blend right in the pot, saving time and dishes. - Regular blenders work too. Just be careful when transferring hot soup. Blend in small batches to avoid spills. - Adjust the texture. If you like it chunky, blend less. If you want it smooth, blend more. Follow these steps to create your Harvest Pumpkin & Apple Soup with ease. Enjoy making this warm dish that will surely delight you! To make your Harvest Pumpkin & Apple Soup shine, consider these tips: - Spice Variations: Try adding a pinch of cayenne pepper for heat. You can also mix in ground ginger for warmth. A dash of smoked paprika adds a nice depth too. - Balancing Sweetness and Savory: The apple brings natural sweetness. Counter this with salt and spices. Add a bit of balsamic vinegar for tang. This helps create a delightful balance of flavors. - Achieving Creaminess Without Dairy: Coconut milk gives a rich, creamy texture. If you prefer, use cashew cream instead. To make cashew cream, blend soaked cashews with water until smooth. This adds a nutty flavor and keeps it dairy-free. These tips help you craft a soup that is full of flavor and comforting for fall. For a complete guide to making this soup, check out the [Full Recipe]. {{image_4}} You can switch up the squash in this soup. Try butternut or acorn squash for a new flavor. Each type brings its own taste and texture. Different apples can also change the soup's sweetness. Use Honeycrisp for a sweeter soup or Fuji for a more tart kick. For those who prefer plant-based meals, this recipe can easily adapt. Simply use vegetable broth and coconut milk, as shown in the Full Recipe. You can skip the honey or any animal-based ingredients to keep it vegan. Want to add protein? Beans work well in this soup. White beans or chickpeas can give it a hearty feel. If you prefer meat, try adding shredded chicken or sliced sausage. Both options add a nice savory depth to the dish. Experiment with these ideas to make the soup your own! How do you store leftovers properly? First, let the soup cool down. Once it’s cool, transfer it into an airtight container. Make sure to leave some space at the top. This space helps the soup expand if it freezes. Seal the container well to keep out air and moisture. How do you reheat soup for the best texture and flavor? To reheat, pour the soup into a pot. Warm it over medium heat, stirring often. This helps it heat evenly. If the soup seems too thick, add a splash of broth or water. Heat until it’s hot but not boiling. What are some tips for freezing soup for long-term storage? For freezing, use freezer-safe containers or bags. Pour the cooled soup into these containers, leaving space at the top. Label the containers with the date. Soup can last up to three months in the freezer. To thaw, place it in the fridge overnight or use the defrost setting on your microwave. Following these steps keeps your Harvest Pumpkin & Apple Soup fresh and tasty for days. Enjoy it whenever you need a warm and cozy meal! How can I make my soup thicker? To thicken your soup, you have a few options. You can blend part of the soup to create a creamy texture. You can also add more veggies like potatoes or carrots. Another way is to mix in some cornstarch or flour. Just remember to cook it for a bit longer to let the flavors blend. Can I use fresh pumpkin instead of canned? Yes, you can use fresh pumpkin! Just roast it first to bring out the flavor. Cut the pumpkin in half, remove the seeds, and roast it until soft. After it cools, scoop out the flesh and use it in your soup. Fresh pumpkin adds a nice, natural taste. What are the best side dishes to serve with soup? Great side dishes for soup include crusty bread, grilled cheese, or a fresh salad. You can also serve it with crackers or a savory scone. These sides complement the warmth of the soup and make your meal feel complete. For a delicious soup, try the Harvest Pumpkin & Apple Soup [Full Recipe]. It’s a perfect fit for fall! You learned how to make a delicious Harvest Pumpkin & Apple Soup. We covered the key ingredients, from seasonal flavors to tasty garnishes. I shared step-by-step instructions to ensure perfect texture and taste. Plus, we discussed how to enhance flavors and create variations. Remember, properly storing leftovers helps maintain freshness. Enjoy experimenting with this fall recipe, and let your creativity shine! Happy cooking!](https://tossedflavors.com/wp-content/uploads/2025/07/4c5840c1-2b1d-426d-8c66-cd6083faf9a7.webp)
As the leaves turn and the air cools, nothing soothes like a warm bowl of soup. In this article, I’ll share my favorite fall soup recipes that combine cozy flavors …
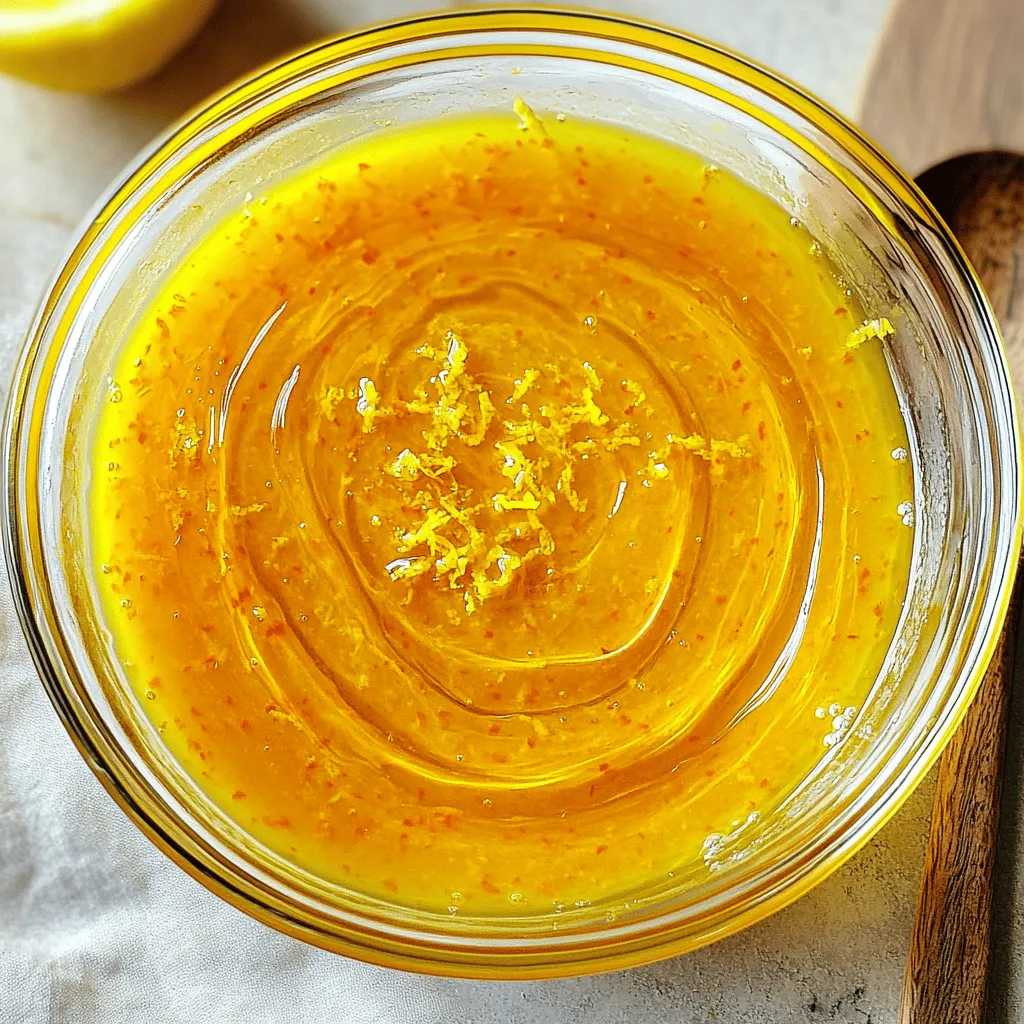
Are you tired of boring salads? I have the perfect solution! With my Easy Vinaigrette Salad Dressing recipe, you’ll add zest and flavor to every bite. This simple recipe uses …
![- 1 can of refrigerated biscuit dough - 1/2 cup pizza sauce - 1 cup shredded mozzarella cheese - 1/4 cup sliced pepperoni - 1/4 cup diced bell peppers - Fresh basil leaves for garnish - 1/4 teaspoon dried oregano - Salt and pepper to taste The main ingredients for these mini biscuit pizzas are simple and fun. You start with a can of refrigerated biscuit dough. This makes a great base that kids can help shape. Then, you need pizza sauce. You can use store-bought or make your own if you’re feeling creative. The cheese is the star here, so grab a cup of shredded mozzarella. It melts perfectly and tastes great! For optional ingredients, you can add sliced pepperoni for a classic touch. Diced bell peppers add color and nutrition. Fresh basil leaves on top give a nice finish and a fresh taste. Lastly, seasonings are key. A pinch of dried oregano gives a nice herb flavor. Don't forget salt and pepper to taste! These ingredients work together to create a fun and tasty snack for kids. If you want the full details, check out the Full Recipe. - Preheat the oven to 375°F (190°C). - Separate and flatten the biscuit dough. Start by opening the can of refrigerated biscuit dough. You will see eight biscuits inside. Take them out and place them on a baking sheet. Use parchment paper or grease the sheet lightly. Flatten each biscuit with your hands or a rolling pin. Aim for about 1/2 inch thick. This will create a nice base for your mini pizzas. - Bake the flattened biscuits for 10 minutes. - Allow to cool slightly before adding toppings. Now, place the baking sheet in the preheated oven. Bake the biscuits for about 10 minutes. They should become light golden brown. This step makes sure that the base is sturdy. After baking, carefully take them out and let them cool for a couple of minutes. This helps avoid burns when you add the toppings. - Spoon pizza sauce onto each biscuit. - Add mozzarella cheese and toppings. Once the biscuits are cool enough, grab a tablespoon. Spoon some pizza sauce onto each biscuit. Spread it out evenly. Then, take shredded mozzarella cheese and sprinkle it over the sauce. You want to cover it well. Next, add your favorite toppings like sliced pepperoni or diced bell peppers. These add great taste and color to your mini pizzas. - Bake until cheese is melted and bubbly. - Cool briefly before serving. After topping the pizzas, put the baking sheet back in the oven. Bake for another 5 to 7 minutes. The cheese should melt and get all bubbly. Keep an eye on them so they don’t burn. Once done, take them out and let them cool for about a minute. If you like, you can garnish with fresh basil leaves before serving. For the complete process, you can check the [Full Recipe]. Enjoy making these easy and fun mini biscuit pizzas! - Involve kids in the assembly process: Let your kids help spread sauce and add toppings. This makes cooking fun and teaches them skills. - Use colorful ingredients to attract attention: Bright veggies like bell peppers and olives make the pizzas pop. Kids love colorful food! - Add different cheeses for more flavor: Try cheddar, gouda, or even pepper jack. Each cheese brings a new taste. - Experiment with various toppings: Mix things up with toppings like pineapple, mushrooms, or even cooked chicken. Let kids choose their favorites! - Presentation ideas for fun and engagement: Serve mini pizzas on a vibrant plate. Arrange them in shapes, like a smiley face or a star. Kids enjoy creative plates! - Pairing ideas for side dishes and dips: Serve with carrot sticks, fruit skewers, or a side of ranch for dipping. These add fun and nutrition to the meal. {{image_4}} You can make mini biscuit pizzas healthier. One great way is to replace pepperoni with veggies. Try mushrooms, spinach, or even zucchini. These options add nutrients and flavor. Another smart choice is using whole wheat biscuit dough. This swap boosts fiber and makes them more filling. Get creative with mini biscuit pizzas. You can make BBQ chicken mini pizzas. Just use BBQ sauce instead of pizza sauce. Add cooked chicken, cheese, and red onions for a tasty twist. Another fun idea is taco-style mini pizzas. Top with seasoned ground beef, cheese, and salsa. Kids will love these different flavors. Let kids customize their mini pizzas. This makes it more fun for them. You can cater to dietary needs, too. If someone is gluten-free, use gluten-free biscuit dough. For dairy-free options, try dairy-free cheese. Encourage kids to pick their favorite toppings. This way, everyone gets a pizza they love. For more ideas, check the Full Recipe. To keep your mini biscuit pizzas fresh, store them in an airtight container in the fridge. This helps to lock in flavors and moisture. Enjoy them within 2-3 days for the best taste. If you store them longer, they may lose their crispness and flavor. For the best texture, reheat your mini pizzas in the oven. Set the oven to 350°F (175°C) and bake for about 5-10 minutes. This helps the crust regain its crunch. If you're short on time, the microwave is a quick option. Heat them for about 30-60 seconds, but know the crust may become soft. You can freeze mini pizzas for later fun! Freeze them either assembled or cooked. Wrap each pizza well in plastic wrap and then place them in a freezer bag. They are best used within 1-2 months. When you're ready to eat, thaw them in the fridge overnight and reheat as mentioned above. This way, you always have a tasty snack on hand! For the full recipe, check out Mini Biscuit Pizzas for Kids. Yes, you can use other types of dough. Pizza dough works great for mini pizzas. You can also try using pastry dough for a flakier base. Each option offers a different taste and texture. Just remember to adjust baking times based on the dough you choose. To make mini pizzas healthier, opt for low-fat cheese. You can also add more veggies like spinach or mushrooms. These options boost nutrition without losing flavor. Try using whole wheat biscuits for added fiber, too. Kids won’t even notice the difference! Mini pizzas taste great with marinara sauce. Ranch dressing adds a creamy touch. Garlic sauce also pairs well for a nice flavor kick. Offer a variety of dips for kids to explore. It makes snacking more fun and interactive. Yes, you can prepare these mini pizzas ahead of time. Assemble them and keep them in the fridge. Bake them fresh when you’re ready to eat. This way, you save time on busy days. Enjoy tasty snacks without the hassle! If you double the recipe, adjust the baking time slightly. Keep an eye on the mini pizzas as they bake. They might need an extra 2-3 minutes to cook through. Make sure the cheese is bubbly and slightly golden for the best results. These mini pizzas are simple to make and fun to eat. We explored the key ingredients, steps for preparation, and ways to customize your pizza. Remember, you can get creative with toppings and flavors. These pizzas will be a hit with kids and guests alike. Enjoy them fresh or store leftovers for later. Your next pizza night will be a tasty success!](https://tossedflavors.com/wp-content/uploads/2025/07/b456e780-5923-42b6-9fa3-1d180e94b81a.webp)
Looking for a fun and tasty snack for your kids? These Mini Biscuit Pizzas are a hit! Made with simple ingredients like biscuit dough and mozzarella, they’re quick to prep …
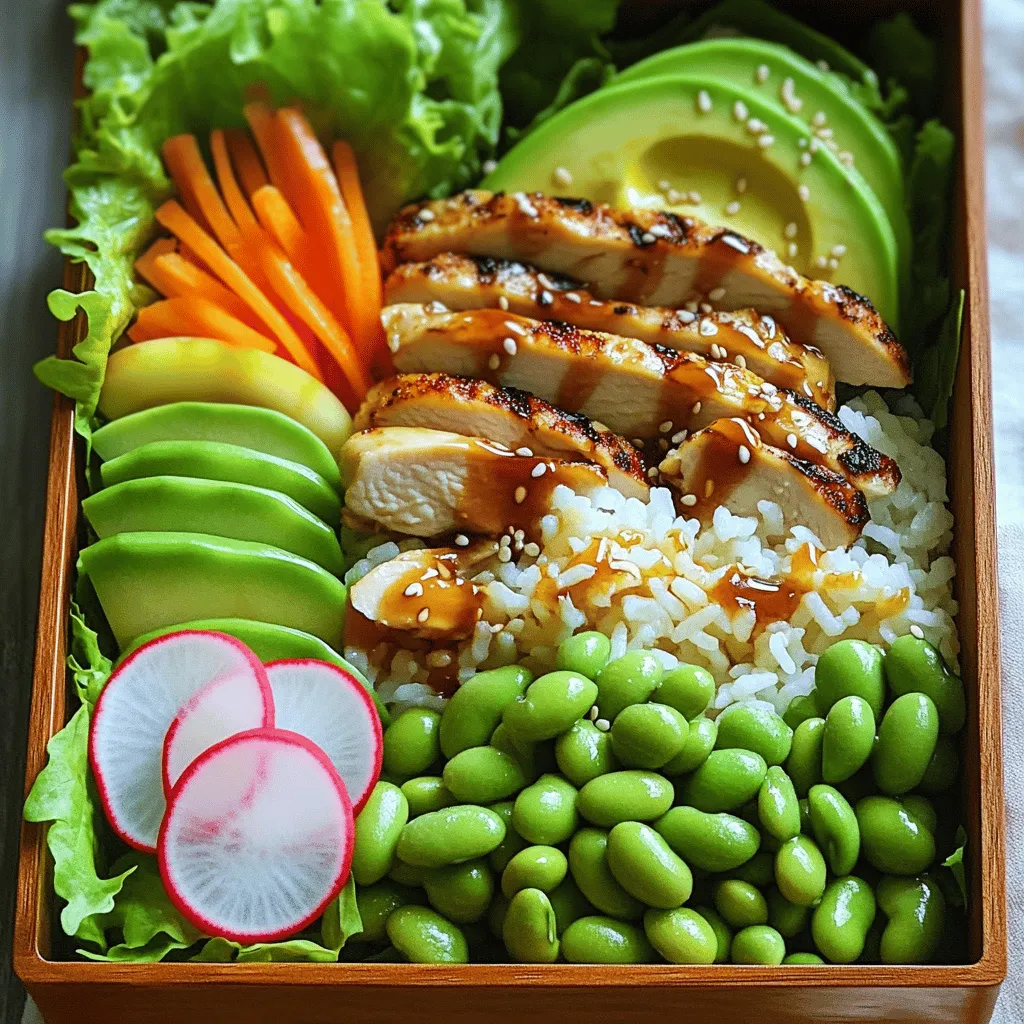
Want a fun and healthy lunch idea? Let me introduce you to the Bento Box! This simple recipe combines fresh veggies, rice, and grilled protein for a balanced meal. Plus, …

If you’re craving a crunchy and flavorful treat, look no further than my Honey Sesame Chicken Bites! This recipe combines tender chicken with a crispy coating and a sweet, savory …

Are you ready to dive into a deliciously simple treat? My Country Apple Fritter Bread recipe combines soft, fluffy bread with sweet, tender apples. You’ll love how easy it is …