Peach Honey Dijon Balsamic Vinaigrette Flavor Boost
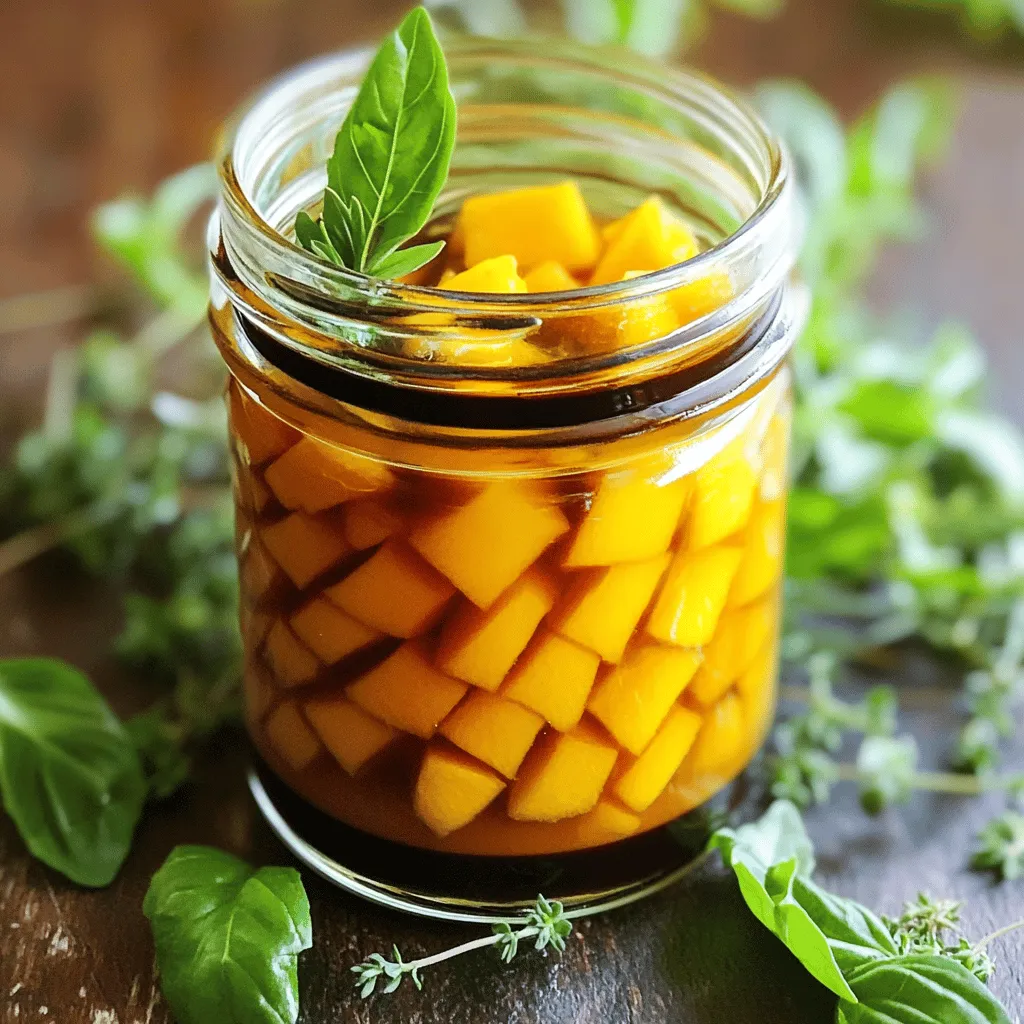
Looking to add a burst of flavor to your meals? Look no further than Peach Honey Dijon Balsamic Vinaigrette! This delicious dressing combines sweet peaches and tangy Dijon mustard, creating …

![To make this delicious Apple Fritter Monkey Bread, you will need the following ingredients: - 2 cups all-purpose flour - ½ cup granulated sugar - 1 tablespoon baking powder - 1 teaspoon ground cinnamon - ½ teaspoon salt - ⅔ cup whole milk - ¼ cup unsalted butter, melted and slightly cooled - 1 large egg, beaten - 2 cups Granny Smith apples, peeled and diced - 1 teaspoon pure vanilla extract - ½ cup light brown sugar, packed - ½ teaspoon ground nutmeg - 1 tablespoon fresh lemon juice - 1 cup powdered sugar - 2 tablespoons milk (for icing) You can adjust some ingredients based on your needs: - Flour: Use whole wheat flour for a healthier twist. - Sugar: Coconut sugar works well if you want a lower glycemic option. - Milk: Almond or oat milk can replace whole milk for dairy-free versions. - Butter: Use coconut oil for a dairy-free alternative. - Apples: Any tart apple variety works, like Fuji or Honeycrisp. These substitutions keep the integrity of the dish while catering to dietary needs. Choosing fresh, high-quality ingredients is key to great flavor. Fresh apples deliver crispness and sweetness. Quality flour ensures the dough has the right texture. Using pure vanilla extract enhances the overall taste. If you use good ingredients, your monkey bread will taste amazing. You can find the full recipe to guide you through this delightful treat. First, gather all your ingredients. You will need flour, sugar, baking powder, cinnamon, salt, milk, butter, egg, apples, vanilla, brown sugar, nutmeg, lemon juice, powdered sugar, and extra milk for icing. Preheat your oven to 350°F (175°C) and grease a bundt pan well. This helps the monkey bread come out easily after baking. Next, prepare the apples. Take diced Granny Smith apples and toss them with lemon juice, brown sugar, and nutmeg. Let this mix sit for about 10-15 minutes. This waiting time helps the apples soak up flavors, making them taste even better. In a large bowl, mix the dry ingredients: flour, granulated sugar, baking powder, cinnamon, and salt. Stir well with a whisk until everything is combined. In another bowl, whisk together the wet ingredients: milk, melted butter, beaten egg, and vanilla extract. Make sure the butter is cooled so it does not cook the egg. Now, combine the wet and dry mixes. Slowly pour the wet mix into the dry mix. Use a spatula to stir gently. Do not overmix; a few lumps are okay. Once mixed, take small pieces of dough, about the size of a golf ball. Flatten each piece in your hand. Place a spoonful of the apple mixture in the center, then wrap the dough around it and roll it into a ball. Repeat this until all dough and apples are used. Place these balls in the greased bundt pan, layering them evenly. Now, put the pan in the oven and bake for 30-35 minutes. Watch for a golden brown top. To check if it's done, insert a toothpick into the center; it should come out clean. After baking, let the monkey bread cool in the pan for about 10 minutes. This is important to ensure it holds its shape. Carefully invert the pan onto a serving platter. For icing, whisk together powdered sugar and 2 tablespoons of milk until smooth. While the monkey bread is still warm, drizzle the icing on top and let it soak into the cracks. This adds a sweet finish to the dish. Serve the warm apple fritter monkey bread on a large plate. A sprinkle of cinnamon or some diced apples makes it look extra special. Enjoy the warm, sweet flavors! For the full recipe, you can check out the section above. Making monkey bread can be simple, but some mistakes can ruin it. Here are a few to watch out for: - Overmixing the Dough: Mixing too much makes the bread dense. Stir just until combined. - Not Greasing the Pan: A well-greased pan helps the bread come out easily. Don’t skip this step! - Skipping the Apple Soaking: Letting the apples sit in lemon juice and spices is key. It adds flavor and keeps them from browning. You want your monkey bread to be soft and fluffy. Here’s how to get that perfect texture: - Use Room Temperature Ingredients: Make sure your milk and eggs are at room temperature. This helps the batter mix better. - Don’t Overbake: Check the bread at 30 minutes. It should be golden brown but not dry. - Cool It Right: Let the bread cool in the pan for 10 minutes. This helps it hold its shape. Serving monkey bread can be fun and creative. Here are some ideas: - Serve Warm: Warm monkey bread tastes best. It’s soft and gooey, perfect for sharing. - Add Extra Toppings: A sprinkle of cinnamon or nuts on top adds texture and flavor. - Pair with Ice Cream: A scoop of vanilla ice cream makes for a tasty treat. The warm bread and cold ice cream contrast perfectly. For the full recipe, check out the complete guide on how to make this delightful dish! {{image_4}} You can have fun with the classic apple fritter monkey bread. Try adding caramel sauce for a rich flavor. Mix in some chopped pecans for crunch. If you like spice, a dash of cayenne can add warmth. These small changes can really change the taste. Think beyond apples! You can use pears or peaches instead. For a berry twist, mix in blueberries or raspberries. If you crave chocolate, add mini chocolate chips. These fillings can surprise your taste buds and make this dish your own. Use fresh spices for an extra kick. In fall, try adding pumpkin spice or ginger. In winter, mix in some orange zest for brightness. In summer, fresh berries bring a burst of flavor. Each season offers new chances to make this dish special. For the full recipe, check out the [Full Recipe] link. To store leftover apple fritter monkey bread, let it cool first. Place it in an airtight container. This keeps it fresh for up to three days. You can also wrap it tightly in plastic wrap. This method works well if you want to keep it for a longer time. Reheating is key to enjoying your apple fritter monkey bread again. Preheat your oven to 350°F (175°C). Place the monkey bread on a baking sheet. Heat it for about 10-15 minutes. This helps restore its warm, soft texture. You can also use the microwave. Just heat it for 15-20 seconds. It won't be as crispy but will still taste great. If you want to freeze your monkey bread, wrap it tightly in plastic wrap. Then, place it in a freezer-safe bag. Make sure to remove as much air as possible. This keeps it fresh for up to three months. To enjoy it later, thaw it overnight in the fridge. Reheat it in the oven for best results. You’ll love having this treat ready whenever you want! For the full recipe, check out the detailed instructions above. Apple Fritter Monkey Bread can last up to three days when stored properly. Keep it in an airtight container at room temperature. If you want to store it longer, you can refrigerate it. Just remember, the texture may change slightly after a day or two. Yes, you can make this recipe ahead of time! Prepare the dough and apple filling, then assemble the monkey bread in the bundt pan. Cover it with plastic wrap and place it in the fridge for up to 24 hours. When you're ready, bake it straight from the fridge. You might need to add a few extra minutes to the baking time. Apple Fritter Monkey Bread pairs well with various sides. Here are some ideas: - A scoop of vanilla ice cream for a creamy touch. - Fresh whipped cream to add a light sweetness. - A side of coffee or tea for a warm drink. - Extra cinnamon or caramel sauce for drizzling on top. For more details, check the Full Recipe. Enjoy the fun of pulling apart this tasty treat! In this article, we explored the joys of making Apple Fritter Monkey Bread. We covered essential ingredients, tips for baking, and methods to elevate its flavor. Remember, using quality ingredients makes a big difference. Avoid common mistakes for the best texture. You can also add fun variations to keep things interesting. Store leftovers properly to enjoy them later. This recipe is simple and delicious. Enjoy your baking journey and share it with friends for a tasty treat!](https://tossedflavors.com/wp-content/uploads/2025/07/02337ce3-f7b9-4f7d-9f8b-fa8a3dd56167.webp)
![- 6 large Hatch chiles, roasted and peeled - 1 cup cooked shredded chicken or substitute with black beans for a vegetarian version - 1 cup corn kernels (frozen or fresh) - 1 cup black beans, rinsed and drained - 2 cups shredded Monterey Jack cheese - 1 cup salsa verde - 8 corn tortillas - 1 teaspoon ground cumin - 1 teaspoon garlic powder - ½ teaspoon salt - ½ teaspoon freshly cracked black pepper - Fresh cilantro for garnish - Sour cream for serving I love using Hatch chiles in my enchilada pie. Their unique flavor adds a nice kick. First, I roast and peel the chiles. This step brings out their sweet and smoky taste. You can find them fresh in late summer, or you can use canned chiles if needed. For protein, I often use shredded chicken. It blends well with other ingredients. If you prefer, you can swap it for black beans. This makes it a great vegetarian meal. Corn kernels add a pop of sweetness and texture. You can use frozen or fresh corn. Rinsed black beans bring more protein and fiber. They also help balance the dish. Cheese is key in this recipe. I use Monterey Jack cheese for its creamy melt. Salsa verde gives a burst of flavor and moisture. Corn tortillas hold everything together. Their mild taste lets the other flavors shine. Finally, I garnish with fresh cilantro and serve with sour cream. This adds freshness and creaminess to each bite. You can find the full recipe below for more details. - Preheat oven to 375°F (190°C). - Mix cooked shredded chicken (or black beans), corn, black beans, half of the cheese, and spices. First, you need to preheat your oven. Set it to 375°F. This step helps cook the enchilada pie evenly. Next, grab a large mixing bowl. In the bowl, combine your cooked shredded chicken or black beans. Add the corn and black beans. Stir in half of the shredded Monterey Jack cheese. Then, sprinkle in your spices—ground cumin, garlic powder, salt, and black pepper. Mix well until everything is combined. - Pour salsa verde in baking dish, layer tortillas, and spread chicken mixture. - Repeat layering process and finish with cheese. Now, take a 9x13-inch baking dish. Pour half a cup of salsa verde into the bottom. Spread it out evenly. Next, lay four corn tortillas over the salsa. Make sure the tortillas overlap slightly. This helps cover the dish. Now, take half of your chicken mixture and spoon it over the tortillas. Spread it evenly. Add half of the roasted Hatch chiles on top. Repeat this layering process. Place another four tortillas, the rest of the chicken mixture, and the rest of the chiles. Drizzle the remaining salsa verde on top. Finally, sprinkle the rest of the shredded cheese over everything. - Cover with foil and bake for 25 minutes, then uncover and bake until cheese is golden. Cover your baking dish with aluminum foil. This keeps moisture in while baking. Place it in your preheated oven. Bake for 25 minutes. After 25 minutes, carefully remove the foil. Bake for another 10 to 15 minutes. This helps the cheese melt and turn golden brown. Once done, take it out of the oven. Let it cool for about 5 minutes before slicing. This step helps the enchilada pie set. Enjoy! You can find the Full Recipe for more detailed instructions. To roast Hatch chiles, first, heat your oven to 450°F (232°C). Place the chiles on a baking sheet. Roast them for about 20 minutes. Turn them halfway through to get even char. The skin should be blistered and blackened. After roasting, place them in a paper bag for 10 minutes. This helps to steam off the skins. Once cool, peel and remove the seeds. When layering the ingredients, start with a thin layer of salsa verde. This prevents sticking. Use a spatula to spread the chicken mixture evenly. Make sure each layer has a good mix of flavors. This method ensures each bite is tasty. For a nice presentation, serve the enchilada pie in the baking dish. It gives a homey feel. You can also plate individual servings. Top with fresh cilantro for color. Add lime wedges on the side for a fresh kick. Pair your enchilada pie with simple sides like a green salad or Mexican rice. These sides balance the dish and add more flavor. You can also serve with guacamole or chips for a fun touch. {{image_4}} You can change this dish to fit your needs. For a vegetarian version, swap the chicken for black beans or tofu. Both options add protein and taste. If you need a gluten-free meal, use corn or rice tortillas. These tortillas work well and keep the flavors intact. Want to make it even tastier? Add spices like chili powder or smoked paprika. These spices bring out the heat and depth. You can also try different cheeses. Cheddar or pepper jack can add a nice twist to the flavor. Mixing cheeses gives you a fun taste adventure. For the full recipe, look here: [Full Recipe]. To store leftovers, let the enchilada pie cool down. Then, cover it tightly with plastic wrap or foil. This keeps it fresh and prevents it from drying out. You can also use an airtight container. In the fridge, the enchilada pie lasts for 3 to 4 days. Just remember to reheat only what you plan to eat. For freezing, you can do this before or after baking. If you freeze it before baking, wrap it well in plastic wrap and then foil. This helps to keep out air and moisture. If it’s already baked, let it cool first, then wrap it tightly. To reheat from frozen, place it in the oven at 350°F (175°C). Bake for about 45 minutes or until hot throughout. You might want to cover it with foil if the top browns too fast. Enjoy your meal later! Hatch chiles are a special type of green chile from New Mexico. They have a unique flavor that is smoky and sweet. I love using them in my Hatch Chile Enchilada Pie because they add depth and warmth. The summer harvest makes them fresh and vibrant, which enhances every bite. Yes, you can use other chiles if you cannot find Hatch chiles. Try poblano or Anaheim chiles for a similar taste. Remember, they may have a different heat level. Adjust the amount based on your spice preference. To make it spicier, add more chiles or use hotter varieties. You could also mix in some diced jalapeños or cayenne pepper. A little goes a long way, so start small and taste as you go. If you can't find Monterey Jack, you can use cheddar or pepper jack cheese. Both will melt well and add great flavor. Keep in mind that cheddar has a sharper taste, while pepper jack will add some heat. Yes! You can prepare the pie a day early. Just layer all the ingredients, cover it, and store it in the fridge. When you’re ready, bake it as directed. This makes serving easy and convenient. For the full recipe, check the earlier section. This recipe for Hatch Chile Enchilada Pie is simple and packed with flavor. You have fresh ingredients, easy steps, and fun variations. Remember to roast your chiles for the best taste. You can customize with beans or different cheese, making it your own. Whether serving it hot or saving leftovers, this dish remains tasty. Enjoy a dish that brings comfort, flavor, and satisfaction. Dive into making this pie and explore the joy of cooking.](https://tossedflavors.com/wp-content/uploads/2025/07/117469c2-82ae-45ec-8c9b-e2c88c118b8d.webp)