Skip to content
tossedflavors.com
  • Home
  • Appetizers
  • Desserts
  • Salads
  • Breakfast
  • Dinner
  • Privacy Policy
  • Contact
  • About

Chef Evan

Buffalo Chickpea Wraps for a Flavorful Meal

October 29, 2025January 12, 2025 by Chef Evan
- Chickpeas and Variations You need one can of chickpeas, rinsed and drained. Chickpeas give a great texture. You can also use cooked dried chickpeas if you prefer. - Optional Ingredients for Flavor To enhance the taste, include: - 2 tablespoons olive oil - 3 tablespoons hot sauce (adjust to taste) - 1 tablespoon apple cider vinegar - 1 teaspoon garlic powder - 1 teaspoon onion powder - 1 teaspoon smoked paprika - Salt and pepper to taste You can add blue cheese crumbles and fresh cilantro for extra flavor. - Tortilla Options Choose four whole wheat tortillas for a healthier wrap. You can also use spinach or gluten-free tortillas for different options. This choice adds color and nutrition to your meal. {{ingredient_image_1}} First, we need to prepare the chickpeas. Take a medium bowl and rinse the chickpeas. Drain them well. Use a fork to mash the chickpeas lightly. Leave some whole for texture. This gives a nice bite to the wrap. Next, we mix the sauce. In a small bowl, combine olive oil, hot sauce, apple cider vinegar, garlic powder, onion powder, smoked paprika, salt, and pepper. Stir well until everything blends. Pour this sauce over the mashed chickpeas. Mix gently until every chickpea is coated with the sauce. Now it's time to cook the chickpeas. Heat a non-stick skillet over medium heat. Add the chickpea mixture to the skillet. Cook for about 5 to 7 minutes. Stir occasionally to avoid sticking. We want them heated through and slightly crispy. This adds a great texture. Make sure the flavor spreads evenly. Stir well during cooking. This helps every bite be full of flavor. If you need more spice, add more hot sauce to the mix. Now, let’s assemble the wraps. Start with a whole wheat tortilla on a plate. Lay it flat. Place a layer of chopped lettuce on the tortilla. Then add cucumber slices and shredded carrots. This adds crunch and freshness. Next, scoop a portion of the buffalo chickpea mixture on top. If you like, sprinkle blue cheese crumbles over it. They add a nice flavor contrast. Roll the tortilla tightly. Fold in the sides as you go. This keeps the filling secure. Once wrapped, slice the wrap in half at an angle. You can garnish with fresh cilantro if you want. Repeat these steps with the remaining tortillas and filling. Adjusting Heat Levels You can easily adjust the heat in your Buffalo Chickpea Wraps. To make it milder, use less hot sauce. You can also add a touch of honey or brown sugar to balance the heat. If you love spice, try a hotter sauce or add red pepper flakes for more kick. Adding More Veggie Options Feel free to add more veggies to your wraps. Sliced bell peppers, diced tomatoes, or avocado work great. You could also toss in some spinach or kale for extra nutrients. Get creative with your favorite veggies! Pairing with Side Dishes These wraps taste great with simple sides. Try serving them with carrot sticks, celery, or a fresh salad. A side of coleslaw adds crunch and balances the flavors nicely. Serving Suggestions for Gatherings For parties, cut the wraps into smaller pieces. Serve them on a platter with a dipping sauce. You can use ranch or more hot sauce for dipping. This makes them easy for guests to grab and enjoy! Recommended Seasonings To boost the flavor, try adding extra seasonings. A sprinkle of cumin or chili powder can add depth. You can also mix in a bit of lemon juice for brightness. Alternatives to Blue Cheese If you want to skip blue cheese, try feta or goat cheese. You can also use a creamy avocado dressing for a rich flavor. Yogurt can offer a nice tang as well. Pro Tips Adjust the Heat: Feel free to modify the amount of hot sauce based on your heat preference. Start with less and add more to achieve your desired spice level. Mix in Some Greens: For added nutrition, consider mixing in some chopped spinach or kale with the chickpeas for an extra boost of vitamins. Make It Ahead: You can prepare the chickpea mixture a day in advance to save time. Just store it in an airtight container in the fridge until you're ready to assemble the wraps. Experiment with Toppings: Customize your wraps by adding other toppings like avocado, diced tomatoes, or your favorite type of cheese for a unique twist. {{image_2}} You can change the protein in your wraps. Try tofu for a different texture. - Tofu Buffalo Wraps: Use firm tofu instead of chickpeas. Press and cube the tofu. Cook it in the same sauce until crispy. This gives a great flavor and is fun to eat. - Lentil Versions: Lentils are another great choice. Cook them until soft, then mix with the sauce. They add a nice, earthy taste. Making changes for diets is easy and fun. You can adapt these wraps to meet your needs. - Gluten-Free Options: Use gluten-free tortillas or lettuce leaves. This way, everyone can enjoy the wraps without worry. - Vegan Substitutions: Skip the blue cheese for a vegan wrap. You can use avocado or a vegan cheese instead. This keeps the dish tasty and plant-based. Sauce can change the flavor of your wraps. Explore spicy or mild options to find what you like. - Spicy vs. Mild: Adjust the hot sauce to suit your taste. More sauce means more heat! If you want it mild, use less hot sauce and add more vinegar. - Homemade vs. Store-Bought: Making your sauce is fun! You can mix ingredients to create a unique flavor. Use your favorite hot sauce or buy one you love. Store-bought options save time, but homemade can wow your guests. After enjoying your Buffalo Chickpea Wraps, you may have some left. To store them safely, place them in an airtight container. Keep them in the fridge. They will stay fresh for about three days. Make sure to keep the filling and the tortillas separate. This keeps the wraps from getting soggy. If you want to save them for longer, freezing is a great option. Wrap each assembled wrap tightly in plastic wrap. Then, place them in a freezer-safe bag. You can freeze them for up to three months. When you are ready to eat them, just thaw them in the fridge overnight. To enjoy your wraps again, reheating is key. The best way to reheat them is in a skillet. Heat the skillet on medium heat. Place the wrap in the skillet and cover it with a lid. Cook for about 3-4 minutes on each side. This method keeps the wrap crispy and warm. You can also use a microwave, but this may make the wrap soggy. If you use a microwave, heat it for about 30 seconds. Then, check and heat more if needed. Knowing how long your wraps last is important. In the fridge, your Buffalo Chickpea Wraps can last for about three days. If you freeze them, they will last up to three months. Just remember to label your containers. This way, you know when to use them. Enjoy your tasty wraps while they are at their best! Yes, you can prep these wraps ahead of time. To save time, make the chickpea mixture a day before. Store it in the fridge. This helps the flavors blend well. When you're ready to eat, just warm it up. Then, assemble your wraps with fresh veggies. This keeps everything crunchy and tasty. If you want a fun twist, try these alternatives: - Lettuce leaves: Great for a low-carb option. - Pita bread: Adds a nice pocket for filling. - Rice paper wraps: For a light, fresh taste. - Naan bread: For a heartier wrap. These options let you enjoy the flavors in different ways. Yes, these wraps can be very healthy! Here’s why: - Chickpeas provide protein and fiber. - Whole wheat tortillas add complex carbs. - Fresh veggies like lettuce and cucumber boost vitamins. - Olive oil offers healthy fats. This meal gives you energy and keeps you full. Plus, you can adjust the hot sauce for your spice level. Enjoy these wraps as a tasty and nutritious choice! In this article, we explored how to create delicious Buffalo Chickpea Wraps. We discussed key ingredients, from chickpeas to tortilla choices. I shared detailed steps, tips for flavor, and how to customize your wraps. You can use various proteins like tofu or lentils, and even tweak it to fit dietary needs. Remember to store your leftovers properly and consider how to reheat them for the best taste. These wraps are healthy and fun to make. Enjoy trying them out in your kitchen!

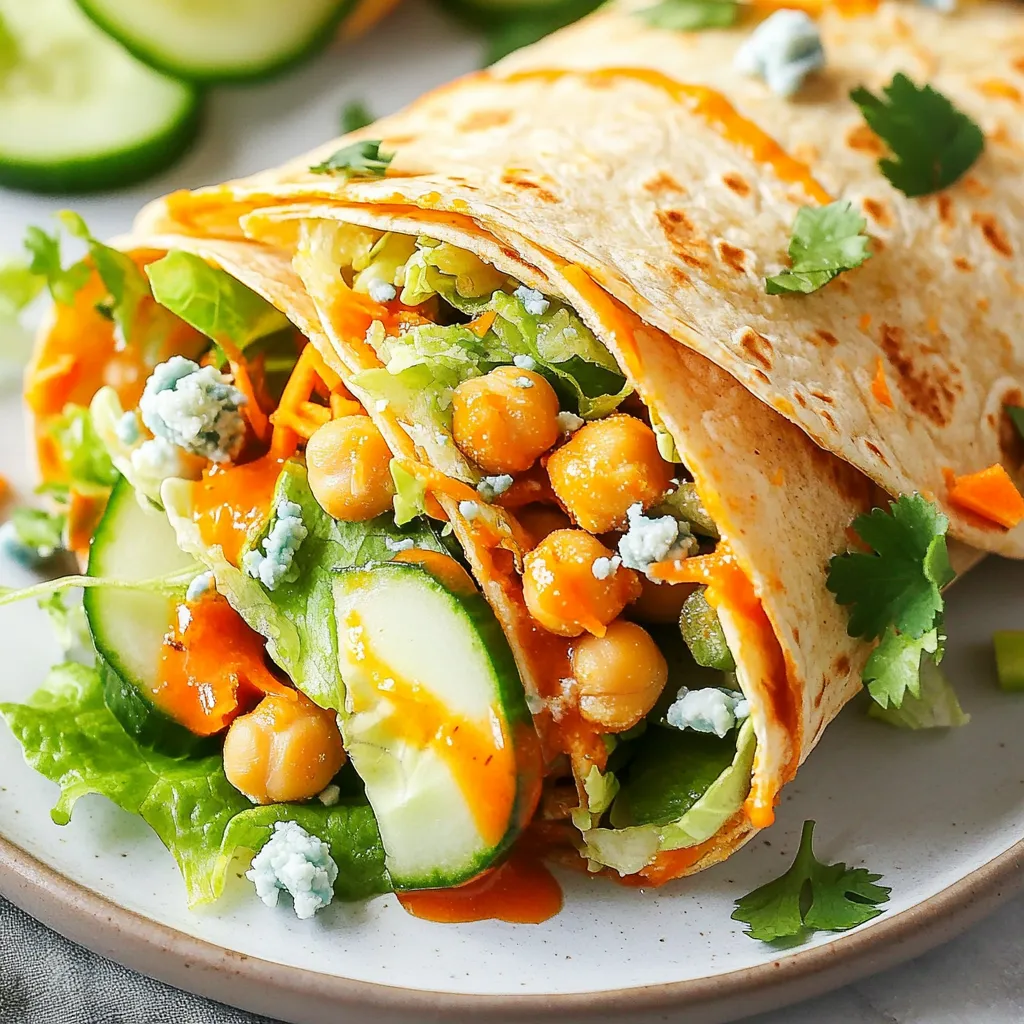
Looking for a meal that’s packed with flavor and easy to make? Buffalo Chickpea Wraps are the answer! These wraps combine hearty chickpeas and zesty sauce for a delicious treat. …

Read more

Categories Dinner Leave a comment

Parmesan Crusted Cod Flavorful and Easy Dinner Recipe

December 6, 2025January 12, 2025 by Chef Evan
- 4 cod fillets (about 6 oz each) - 1 cup panko breadcrumbs - 1/2 cup grated Parmesan cheese The cod fillets are the star of this dish. They are mild and flaky, perfect for the crunchy topping. Panko breadcrumbs give a light and crispy texture. Use fresh grated Parmesan for the best flavor. - 1/4 cup fresh parsley, chopped - 2 garlic cloves, minced - 1 teaspoon lemon zest Fresh parsley adds color and a bright taste. Minced garlic gives a warm, savory flavor. Lemon zest brightens the dish with its fresh aroma. - 1/2 teaspoon smoked paprika - 1/4 cup mayonnaise - 2 tablespoons Dijon mustard - 1 tablespoon olive oil - Salt and pepper to taste Smoked paprika adds a subtle smokiness. Mayonnaise and Dijon mustard create a creamy base for the topping. Olive oil brings richness and helps the crust brown. Season with salt and pepper to enhance all the flavors. Each ingredient plays a key role in making this dish flavorful and easy to prepare. This recipe is simple yet impressive, perfect for a cozy dinner. {{ingredient_image_1}} 1. Preheat your oven to 425°F (220°C). This high heat gives a great crust. 2. Line a baking sheet with parchment paper for easy cleanup. 3. In a bowl, mix these ingredients for the breadcrumb topping: - 1 cup panko breadcrumbs - 1/2 cup grated Parmesan cheese - 1/4 cup fresh parsley, chopped - 2 minced garlic cloves - 1 teaspoon lemon zest - 1/2 teaspoon smoked paprika - Salt and pepper to taste 1. Pat the cod fillets dry using a paper towel. This step helps the coating stick. 2. Season both sides with a sprinkle of salt and pepper. This enhances the flavor. 3. In a separate bowl, mix: - 1/4 cup mayonnaise - 2 tablespoons Dijon mustard Stir until they blend well. This mixture keeps the cod moist. 1. Spread a thin layer of the mayonnaise mixture on each fillet. This helps the crumbs stick. 2. Press the breadcrumb mixture onto the mayonnaise side of the fillets. Make sure they are well covered. 3. Drizzle a little olive oil on top of the crust for added richness and flavor. 4. Place the cod on the lined baking sheet. Bake for about 12-15 minutes. Check for doneness by ensuring the fish is opaque and flakes easily with a fork. To get the best crust, use panko breadcrumbs. They are light and crispy. Mix them with grated Parmesan cheese, fresh parsley, minced garlic, lemon zest, and smoked paprika. This mix gives a great flavor and crunch. Tips for breadcrumb consistency: - Use fresh panko for the best texture. - Avoid over-mixing; keep it light and fluffy. How to avoid sogginess: - Pat the cod dry before adding the mayonnaise. - Don’t skip the olive oil drizzle; it helps the crust stay crisp. You can bake or broil your cod. Baking is easier and gives even heat. Broiling cooks faster but needs close watch. Suggestions for baking vs. broiling: - Bake at 425°F for a golden crust and juicy fish. - Broil for 5-7 minutes for a faster cook, but stay nearby. Monitoring fish for perfect doneness: - Cook until the fish flakes easily with a fork. - The internal temperature should reach 145°F. Pair your Parmesan crusted cod with bright, fresh sides. This adds color and balance to the meal. Ideal side dishes: - Serve on a bed of sautéed spinach. - Add roasted vegetables for more flavor. Garnishes for enhanced presentation: - Use lemon wedges for a pop of color. - Drizzle olive oil over the plate for a nice finish. Pro Tips Fresh Ingredients: Use fresh cod fillets for the best flavor and texture. Frozen cod can also be used, but ensure it is fully thawed and pat it dry before seasoning. Customize the Crust: Feel free to add other herbs or spices to the breadcrumb mixture, such as thyme or cayenne pepper, to suit your taste preferences. Check for Doneness: To ensure your cod is perfectly cooked, use a fork to check if it flakes easily. The internal temperature should reach 145°F (63°C). Let it Rest: Allow the cod to rest for a few minutes after baking. This helps the juices redistribute, resulting in a more flavorful and moist fish. {{image_2}} Using different types of breadcrumbs can change the taste and texture of your dish. Traditional panko gives a light and crispy crust. If you want a gluten-free option, use gluten-free breadcrumbs. They work well and still provide a nice crunch. You can also try crushed cornflakes or even ground nuts for a unique twist. Each option adds its own flavor and texture to the cod. You can boost the flavor of your Parmesan crusted cod by adding herbs and spices. Fresh herbs like thyme or dill can add a bright taste. Just chop them finely and mix them into your breadcrumb mixture. Spices can also make your dish pop. A pinch of cayenne pepper adds heat and depth. Experiment with these additions to find your perfect blend of flavors. While cod is delicious, you can use other fish too. Tilapia and haddock are great substitutes. They both have mild flavors that pair well with the Parmesan crust. Just make sure to adjust the cooking time based on the thickness of the fish. This way, you can enjoy a variety of tastes while keeping the same crispy crust! Store leftover Parmesan crusted cod in an airtight container. This keeps it fresh. It lasts for about 2-3 days in the fridge. Label your container with the date. This helps you track how long it has been stored. To reheat, use the oven for best results. Preheat your oven to 350°F (175°C). Place the cod on a baking sheet. Cover it loosely with foil to keep it moist. Heat for about 10-15 minutes or until warmed through. Avoid using the microwave, as it can dry out the fish. You can freeze cooked cod for later use. Wrap each piece tightly in plastic wrap. Then place the wrapped cod in a freezer bag. Squeeze out as much air as you can. It keeps well for up to 2 months. When ready to eat, thaw it in the fridge overnight before reheating. The best side dishes for Parmesan crusted cod include: - Sautéed spinach: The greens add brightness. - Roasted vegetables: Carrots or zucchini work well. - Rice pilaf: It complements the flavors nicely. - Mashed potatoes: Creamy potatoes balance the dish. - Simple salad: A light salad adds freshness. These sides enhance the meal's taste and create a color-rich plate. Yes, you can prep Parmesan crusted cod in advance. Here’s how: 1. Prepare the cod: Follow the recipe up to the baking step. 2. Store: Place the coated fillets on a baking sheet and cover with plastic wrap. 3. Refrigerate: You can keep them for up to 24 hours. When ready to cook, just bake them straight from the fridge. This saves time on busy nights. To check if the cod is done, look for: - Internal temperature: It should reach 145°F (62.8°C). - Color change: The flesh should turn opaque and flaky. - Crust: The top should be golden and crispy. Use a fork or knife to check the fish's center. If it flakes easily, it’s ready to eat. This blog post covers how to make delicious Parmesan crusted cod. We discussed the main ingredients, flavor enhancers, and seasonings needed for this dish. You learned step-by-step instructions for preparation, baking, and tips for a perfect crust. Variations allow you to explore different breadcrumbs and fish types. Finally, we shared best practices for storage and reheating. Now, you're ready to enjoy a tasty meal that’s simple and satisfying. Try it yourself and impress your family!

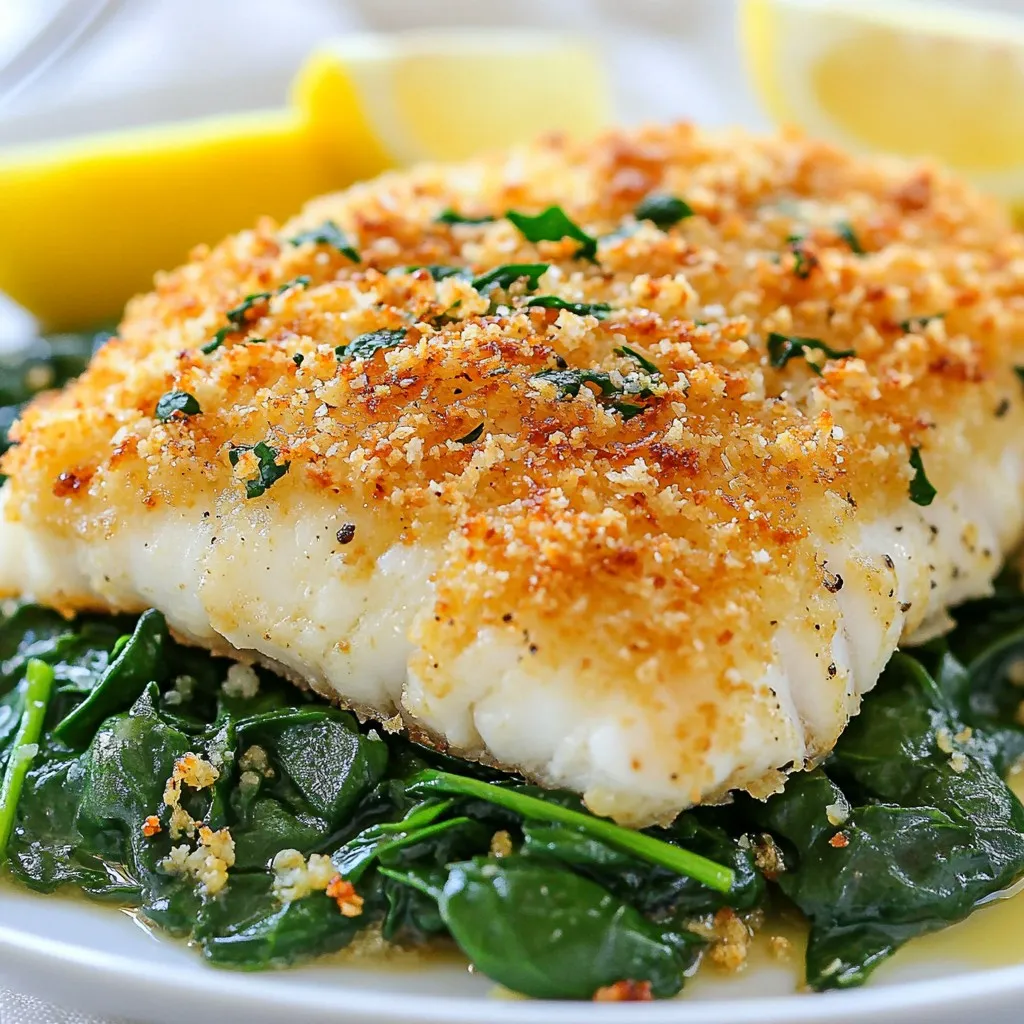
Looking for a quick and tasty dinner idea? This Parmesan Crusted Cod will become your new favorite. With a crunchy crust and juicy fish, it’s simple yet impressive. You’ll use …

Read more

Categories Dinner Leave a comment

Chocolate Chip Pumpkin Bread Moist and Simple Recipe

November 8, 2025January 10, 2025 by Chef Evan
To make a delicious chocolate chip pumpkin bread, gather these simple ingredients: - 1 cup canned pumpkin puree - 1/2 cup brown sugar - 1/2 cup granulated sugar - 1/3 cup vegetable oil - 2 large eggs - 1 1/2 cups all-purpose flour - 1 teaspoon baking powder - 1/2 teaspoon baking soda - 1/2 teaspoon salt - 1 teaspoon ground cinnamon - 1/2 teaspoon ground nutmeg - 1/2 teaspoon vanilla extract - 1 cup semi-sweet chocolate chips - 1/2 cup chopped walnuts (optional) Canned pumpkin puree gives a rich flavor and moist texture. The mix of brown and granulated sugar provides sweetness and depth. The vegetable oil keeps the bread tender. Eggs help bind the ingredients together. All-purpose flour is the base of the bread. Baking powder and baking soda work together for a good rise. Salt balances the sweetness and brings out flavors. Ground cinnamon and nutmeg add warmth and spice. You can add semi-sweet chocolate chips for that melty goodness. Chopped walnuts add crunch and taste, but they are optional. Feel free to mix and match according to your taste! {{ingredient_image_1}} First, preheat your oven to 350°F (175°C). This step is key for even baking. While the oven heats, grab a 9x5-inch loaf pan. Grease it well with cooking spray or butter. This helps the bread release easily after baking. In a large bowl, mix 1 cup of canned pumpkin puree with 1/2 cup of brown sugar and 1/2 cup of granulated sugar. Stir until it is smooth. Next, add 1/3 cup of vegetable oil. Mix until blended. Now, beat in 2 large eggs, one at a time. Make sure to mix well after each egg. Finally, stir in 1/2 teaspoon of vanilla extract for added flavor. In another bowl, whisk together 1 1/2 cups of all-purpose flour, 1 teaspoon of baking powder, 1/2 teaspoon of baking soda, 1/2 teaspoon of salt, 1 teaspoon of ground cinnamon, and 1/2 teaspoon of ground nutmeg. Gradually add this dry mix to the pumpkin mixture. Stir gently until just combined. Be careful not to overmix; this keeps the bread light. Now, fold in 1 cup of semi-sweet chocolate chips. If you like, add 1/2 cup of chopped walnuts for crunch. Pour the batter into your prepared loaf pan and spread it evenly. Bake for about 55-60 minutes. Check for doneness by inserting a toothpick into the center. If it comes out clean, your bread is ready. Let it cool in the pan for 10 minutes. After that, transfer it to a wire rack to cool completely. Enjoy your delicious chocolate chip pumpkin bread! To get the right texture, always measure your ingredients carefully. Use a kitchen scale if you have one. This helps you avoid dry or gooey bread. The canned pumpkin gives moisture, so don't add too much liquid. Also, make sure your baking powder and soda are fresh. Old leavening agents can lead to flat bread. Avoiding overmixing is key. When you mix the wet and dry ingredients, stir gently. Stop as soon as you see no dry flour. Overmixing makes the bread tough. You want it light and fluffy! For chocolate and nut variations, try different types of chocolate. Dark chocolate can add a rich flavor. You can also swap the walnuts for pecans or almonds. Each will bring a unique taste to your bread. Optional spices for extra flavor include ginger or allspice. A pinch of cloves can add warmth too. Feel free to experiment with these spices. They can make your bread even more special. When serving, slice the bread and dust it with powdered sugar. This simple touch makes it look fancy. You can add a dollop of whipped cream on top. A scoop of vanilla ice cream beside it offers a nice treat too. For garnishing, sprinkle with chocolate chips or nuts on top. It adds a nice visual appeal. You can also serve the slices on a colorful plate to make them pop. These small details can impress your guests! Pro Tips Use Fresh Pumpkin: If possible, use fresh pumpkin instead of canned for a richer flavor. Roast and puree your own pumpkin for the best results. Don’t Overmix: When combining the wet and dry ingredients, mix until just combined. Overmixing can result in a dense bread. Chocolate Chip Variations: Experiment with different types of chocolate chips, such as dark or milk chocolate, to customize the flavor to your liking. Storage Tips: Store the bread in an airtight container at room temperature for up to 3 days or refrigerate for up to a week. {{image_2}} You can change up the flavor of your chocolate chip pumpkin bread easily. One fun option is to add pumpkin spice. This spice mix can boost the warm, cozy taste. You can also try adding different flavors like caramel or maple. If you want a nutty crunch, toss in some chopped pecans or almonds. If you want a healthier version, you can lower the sugar. Use half the brown and granulated sugars. You can also swap out regular flour for whole wheat flour. This adds fiber and nutrients. If you need gluten-free options, try using almond flour or a gluten-free baking mix. Both work well and keep the bread moist. Using fresh pumpkin can take your bread to the next level. Roasting a pumpkin gives a richer taste. You can also add seasonal fruits like cranberries or raisins. These fruits add a nice tartness that pairs well with the sweet bread. Try mixing in a cup of these fruits for extra flavor and texture. To keep your chocolate chip pumpkin bread fresh, use an airtight container. This type of container keeps moisture in and air out. A zip-top bag also works well if you remove as much air as possible. Store it at room temperature for up to three days. If you want to store it longer, the fridge is fine but may dry it out. To freeze the bread, first, let it cool completely. Wrap it in plastic wrap tightly, then place it in a freezer bag. This double layer helps prevent freezer burn. You can freeze it for up to three months. When you're ready to enjoy it, take the bread out and place it in the fridge overnight to thaw. For best results, let it sit at room temperature for a bit before slicing. This keeps the bread moist and tasty! Can I use fresh pumpkin instead of canned? Yes, you can use fresh pumpkin. Start by roasting a small pumpkin. Cut it in half, scoop out the seeds, and roast it until soft. Then, mash it into a smooth puree. Use this in place of canned pumpkin. Fresh pumpkin adds a great flavor and texture. How can I make it vegan? To make this bread vegan, replace the eggs with unsweetened applesauce or flaxseed meal. Use 1/4 cup of applesauce for each egg. For flaxseed, mix 1 tablespoon of flaxseed with 2.5 tablespoons of water and let it sit for 5 minutes. This helps bind the ingredients without eggs. What are the best ways to serve this bread? This chocolate chip pumpkin bread tastes great on its own. You can slice it and add a dusting of powdered sugar. A dollop of whipped cream or a scoop of vanilla ice cream makes it extra special. Serve it warm for a delightful treat. You can make delicious chocolate chip pumpkin bread using simple ingredients and easy steps. We covered everything, from mixing wet and dry ingredients to baking tips for great results. Remember to try different flavors and store your bread properly for the best taste. Enjoy your baking adventure, and share your yummy creations with friends and family! This bread is perfect for any time of year, so have fun with it!

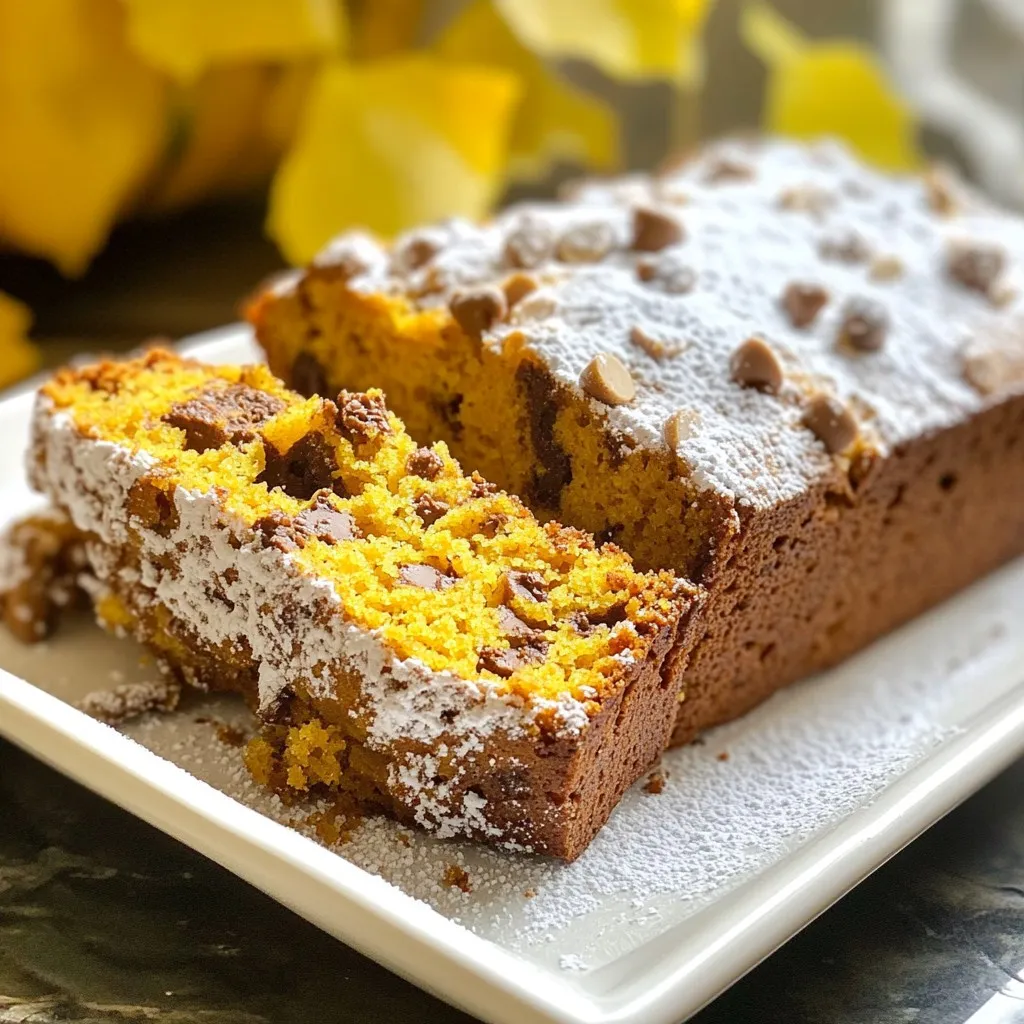
Are you ready for a delicious fall treat? This moist Chocolate Chip Pumpkin Bread is simple to make and bursting with flavor. With just a few key ingredients like pumpkin …

Read more

Categories Desserts Leave a comment

Creamy Pumpkin Alfredo Rich and Flavorful Recipe

November 29, 2025January 8, 2025 by Chef Evan
To make a great Creamy Pumpkin Alfredo, gather these key items: - 12 oz fettuccine pasta: This pasta gives the dish its rich texture and holds the sauce well. You can use fresh or dried fettuccine, but I love the way dried fettuccine absorbs the sauce. - 1 cup pumpkin puree: You can use canned pumpkin or make your own. If you choose fresh, roast a pumpkin, scoop the flesh, and blend it until smooth. Canned puree is convenient and saves time. - 1 cup heavy cream: This is what makes the sauce creamy and rich. If you want a lighter version, you can use half-and-half, but it won’t be as thick. - 1/2 cup grated Parmesan cheese: Freshly grated cheese melts better. It adds a salty flavor that balances the sweetness of the pumpkin. - 2 tablespoons unsalted butter: This adds richness to the sauce and enhances the flavor. - 2 cloves garlic, minced: Fresh garlic brings a lovely aroma and depth. - 1/4 teaspoon nutmeg: Nutmeg adds warmth and a hint of spice that complements the pumpkin. - Salt and pepper to taste: These help enhance all the flavors. - Fresh parsley, chopped: This is for garnish. It adds color and freshness to the dish. To make your Alfredo even better, consider adding: - Pinch of cayenne pepper: This adds a slight kick and warmth to the dish. - Sautéed mushrooms or spinach: These veggies lend extra flavor and nutrients. - Crushed red pepper flakes: If you like it spicy, this is a perfect choice. You can adjust the recipe to fit your needs: - Pasta: Use gluten-free pasta if you have a gluten allergy. - Cream: For a dairy-free option, try coconut cream or cashew cream. - Cheese: Nutritional yeast can replace cheese for a vegan twist. This recipe is flexible, so feel free to get creative! {{ingredient_image_1}} To start, boil a large pot of salted water. The salt adds great flavor to the pasta. Cook the fettuccine until it is al dente. This means it should still have a bit of firmness when you bite it. Al dente pasta holds up better when mixed with the sauce. Tips for saving pasta water: - Before you drain the pasta, scoop out about 1 cup of the cooking water. - This starchy water is great for adjusting your sauce later. - It helps make the sauce cling to the pasta. Next, grab a large skillet and melt the butter over medium heat. Once it melts, add the minced garlic. Sauté the garlic for about 1 minute. You want it fragrant but not browned. Burnt garlic can taste bitter. Now, stir in the pumpkin puree and heavy cream. Mix them well until they blend smoothly. This forms the base of your creamy sauce. Then, add the grated Parmesan cheese, nutmeg, salt, and pepper. Stir until the cheese melts into the sauce. Incorporation methods: - If your sauce seems too thick, add some reserved pasta water. - Do this a little at a time until you reach the desired creaminess. Once your sauce is ready, it’s time to mix it with the pasta. Add the cooked fettuccine directly into the skillet. Gently toss the pasta and sauce together. Use tongs to help coat every strand evenly. This ensures each bite is rich and flavorful. Serve this dish right away. Garnish with chopped fresh parsley for a bright touch. Enjoy your creamy pumpkin Alfredo! To make your sauce super creamy, use reserved pasta water. When you cook the fettuccine, save a cup of that starchy water. If the sauce seems thick, add a little pasta water. Stir it in slowly until you reach the creaminess you like. This water helps blend the flavors and keeps the sauce smooth. You can boost the flavor with spices and herbs. A pinch of cinnamon or a dash of cayenne pepper adds warmth and depth. Fresh herbs like sage or thyme bring a fresh taste. Mix these in while you combine the pumpkin and cream. This gives your dish a unique twist that makes it stand out. Garnishing is key for a beautiful dish. After serving, sprinkle fresh parsley on top. This adds a pop of color and freshness. You can also add extra Parmesan cheese for a rich finish. Serve it in a nice bowl to show off the creamy sauce. A great presentation makes your meal even more enjoyable! Pro Tips Use Fresh Pumpkin: For a more vibrant flavor, consider using fresh pumpkin instead of canned puree. Roast or steam the pumpkin, then blend until smooth. Perfect Pasta Texture: To achieve the best texture, ensure you cook the fettuccine just until al dente. It will continue to cook slightly when mixed with the sauce. Adjust the Creaminess: If your sauce is too thick, gradually add reserved pasta water to reach your desired creaminess. This also helps the sauce adhere better to the pasta. Garnish Wisely: Fresh herbs, like parsley or sage, add a wonderful contrast to the rich sauce. Sprinkle them on just before serving for the best flavor and presentation. {{image_2}} You can make Creamy Pumpkin Alfredo even better with veggies. Try adding spinach, kale, or roasted bell peppers. These add color and nutrients. You can also include mushrooms for a nice texture. Just sauté them with the garlic. This keeps the dish tasty and healthy! To make this dish heartier, add protein. Cooked chicken breast works well. Shrimp also adds a nice touch. Just sauté them until they turn pink. If you want something richer, consider adding Italian sausage. Cook it first, then mix it into the sauce. Each option boosts flavor and fills you up! Feel free to switch up the ingredients based on the season. In fall, add sage or thyme for a warm taste. In spring, consider asparagus or peas for brightness. Using seasonal ingredients keeps the dish fresh and exciting. Each change can bring a new twist to your Alfredo! To store leftovers, let the Creamy Pumpkin Alfredo cool down. Place it in an airtight container. This keeps the dish fresh and tasty. Make sure to use a container that fits the amount you have left. If you have extra sauce, separate it from the pasta. This helps prevent the pasta from getting too soggy. You can freeze Creamy Pumpkin Alfredo for later. First, cool the dish completely. Then, use freezer-safe containers or bags. Try to remove as much air as possible. This helps prevent freezer burn. When you want to eat it, thaw it in the fridge overnight. Reheat it slowly on the stove or in the microwave. If the sauce seems thick, add a splash of water or cream. In the fridge, Creamy Pumpkin Alfredo lasts for about 3 to 5 days. If you freeze it, it can stay good for up to 2 months. Just remember, the sooner you eat it, the better it tastes! When reheating, always check for any signs of spoilage before enjoying your dish. Yes, you can! If you want gluten-free pasta, use rice or chickpea pasta. Both work well with the sauce. Other options are whole-grain or penne pasta. Each choice adds its own texture and flavor. To make this dish dairy-free, swap heavy cream for coconut milk or almond milk. For cheese, use nutritional yeast for a cheesy flavor. You can also try dairy-free cream cheese to keep it rich and creamy. These substitutes will still give you a tasty meal. This dish pairs great with fresh salad or garlic bread. For a heartier meal, add roasted vegetables like broccoli or Brussels sprouts. Grilled chicken or shrimp also makes a nice addition. These sides balance the creamy sauce and add more flavor. In this blog post, we explored making a creamy pumpkin Alfredo. We covered essential ingredients like fettuccine, pumpkin puree, and cheese. You learned cooking tips for the perfect pasta and sauce. I shared ways to enhance flavor and substitute ingredients for your needs. Remember to store leftovers properly and try variations for different diets. Enjoy your creamy pumpkin Alfredo, and let your creativity shine in the kitchen!

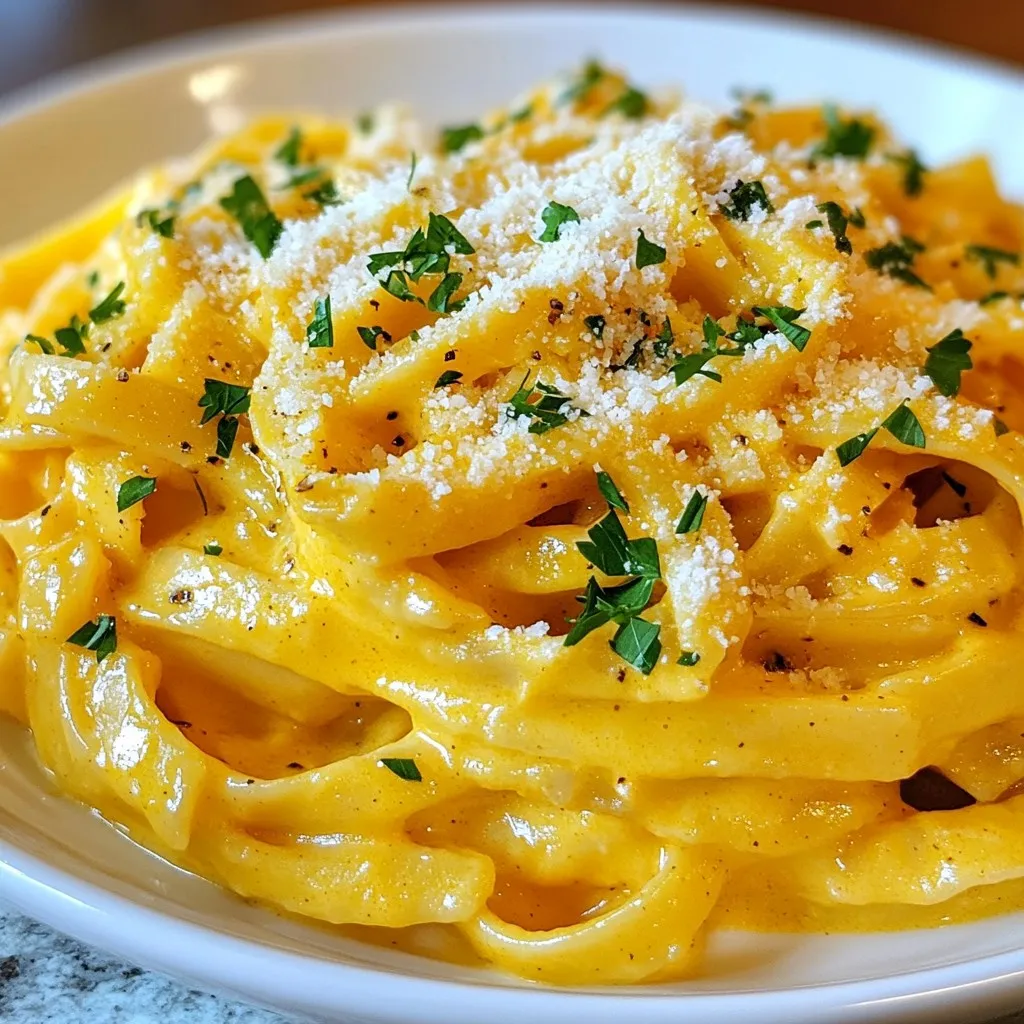
Are you ready to make a dish that’s both cozy and delicious? My Creamy Pumpkin Alfredo recipe brings warm flavors to your table. This dish uses simple ingredients like fettuccine, …

Read more

Categories Dinner Leave a comment

Sriracha Honey Glazed Meatballs Flavorful and Easy Dish

October 19, 2025January 7, 2025 by Chef Evan
- 1 pound ground beef or turkey - 1/2 cup breadcrumbs - 1/4 cup grated Parmesan cheese - 1/4 cup chopped green onions - 1 egg - 2 cloves garlic, minced - 1 teaspoon ginger, grated - Salt and pepper to taste For these meatballs, you can choose ground beef for a richer taste or turkey for a lighter option. The breadcrumbs help bind the meatballs, while Parmesan adds flavor. Green onions give a fresh crunch, and garlic adds depth. Don't forget the ginger for that extra zing! - 1/4 cup honey - 1/4 cup Sriracha sauce - 1 tablespoon soy sauce - Sesame seeds for garnish The glaze is where the magic happens. Honey adds sweetness, while Sriracha brings heat. Soy sauce adds a rich umami flavor. Once you mix these, you'll have a sticky, shiny glaze that will coat the meatballs perfectly. For a finishing touch, sprinkle sesame seeds on top for a nice crunch and look. {{ingredient_image_1}} First, set your oven to 400°F (200°C). This heat helps the meatballs cook evenly. Next, line a baking sheet with parchment paper. This step makes cleaning easy and keeps the meatballs from sticking. In a large bowl, add the ground beef or turkey. Then, mix in the breadcrumbs and grated Parmesan cheese. Add the chopped green onions, minced garlic, and grated ginger for flavor. Crack the egg into the bowl, then sprinkle in salt and pepper. Use your hands to mix everything until it is well combined. Be sure not to overmix; just combine until it holds together. Now it’s time to form the meatballs. Roll the mixture into small balls, about 1 inch wide. Place them on the lined baking sheet, leaving some space between each meatball. Bake in the oven for 20-25 minutes. Look for a nice golden color, and make sure they are cooked through. While the meatballs bake, prepare your glaze. In a small saucepan, whisk together the honey, Sriracha sauce, and soy sauce. Heat this mixture over medium heat. Let it simmer for about 3-5 minutes. You want it to thicken slightly but not too much. Stir it often to keep it from burning. When the meatballs are done, take them out of the oven. Toss them in the Sriracha honey glaze until they are fully coated. If you want them extra caramelized, put them back in the oven. Broil them for 2-3 minutes. This step adds more flavor and a nice finish. Finally, sprinkle sesame seeds on top and add more green onions for a pop of color. Enjoy your tasty meatballs! You can make simple swaps for a lighter meal. - Choose ground turkey instead of beef for fewer calories. - Use gluten-free breadcrumbs if you want to avoid gluten. These changes keep the dish tasty while making it healthier. Texture and flavor matter. Follow these tips: - Mix the meatballs gently. Over-mixing makes them tough. - Use grated cheese for flavor and moisture. - Bake for 20 to 25 minutes until golden brown. Check with a meat thermometer; they should reach 165°F. Adjust baking time if your meatballs are larger or smaller. Getting the glaze just right is key. - Cook the glaze on medium heat. This helps it thicken nicely. - Simmer it for 3 to 5 minutes until it coats the back of a spoon. - Toss the meatballs in the glaze right after baking. This gives them a nice, even coat. For a shiny finish, broil the glazed meatballs for a few minutes. Pro Tips Use Fresh Ingredients: Fresh garlic and ginger will enhance the flavor of your meatballs significantly. Avoid using pre-minced versions for the best taste. Adjust Spice Levels: If you prefer a milder glaze, reduce the amount of Sriracha or add a bit more honey to balance the heat. Rest Before Serving: Allow the meatballs to rest for a few minutes after glazing to let the sauce set and intensify the flavors. Experiment with Proteins: Try substituting ground beef with ground chicken, turkey, or even plant-based meat alternatives for a healthier or vegetarian option. {{image_2}} You can make Sriracha honey glazed meatballs even more exciting. Try adding spices or herbs. For a twist, mix in some cumin or smoked paprika. This adds warmth and depth to the flavor. Fresh herbs like cilantro or basil can brighten the dish. These small changes can transform your meatballs into something unique. You do not have to stick with beef. You can use chicken or turkey for a lighter meal. Ground pork adds a nice richness too. For a plant-based option, use lentils or chickpeas. Just mash them and mix them with the other ingredients. This makes a delicious and hearty meatball. How you serve these meatballs can change the meal. You can pair them with rice or noodles for a filling dish. Serve with a side of steamed veggies for a healthy touch. Dipping sauces like sweet chili or soy sauce add extra flavor. You can also use them in a sandwich for a fun twist. To store leftovers, let the meatballs cool first. Place them in an airtight container. You can keep them in the fridge for up to three days. If you want to save them longer, freeze the meatballs. Use freezer-safe bags or containers. They will last for about three months in the freezer. Label the bags with the date. This way, you won’t forget when you made them. For reheating, the best method is the oven. Preheat it to 350°F (175°C). Place the meatballs on a baking sheet. Cover them with foil to keep them moist. Heat for about 10-15 minutes. You can also use a microwave if you’re in a hurry. Place the meatballs on a microwave-safe plate. Heat in short bursts of 30 seconds, checking in between. Add a splash of water to keep them from drying out. Sriracha honey glazed meatballs stay safe in the fridge for three days. If frozen, they are good for three months. After that, they may lose flavor and texture. Always check for any off smell or color before eating. Enjoy your meatballs while they're fresh for the best taste! Yes, you can prepare these meatballs ahead of time. Just mix and shape the meatballs, then store them in the fridge for up to 24 hours. When you are ready to cook, place them on the baking sheet and bake as directed. If you want to freeze them, do so before baking. Just thaw them in the fridge overnight before cooking. This way, you can enjoy fresh meatballs with less effort on busy days. The spice level of these meatballs can vary based on your taste. Sriracha is hot, but you can adjust the amount. If you prefer milder meatballs, start with less Sriracha, maybe just a tablespoon. You can always add more glaze after cooking. For those who love spice, feel free to add more Sriracha to the glaze. This dish is all about your preference! There are many fun ways to serve Sriracha honey glazed meatballs. You can place them on a platter and sprinkle sesame seeds on top. They pair well with rice, noodles, or even a fresh salad. You can also serve them as party snacks with toothpicks. For a fun twist, try them in a sandwich or on a slider. The glaze makes them shine, making any plate look great! Sriracha honey glazed meatballs are tasty and easy to make. You learned about key ingredients, how to prepare and bake them, and ways to modify the recipe. I shared tips for healthy swaps and storing leftovers. Experimenting with flavors and proteins can add fun to your meals. These meatballs are not just a snack; they pair well with many sides. Now, it’s time to try making them yourself! Enjoy delicious meatballs that will impress your family and friends.

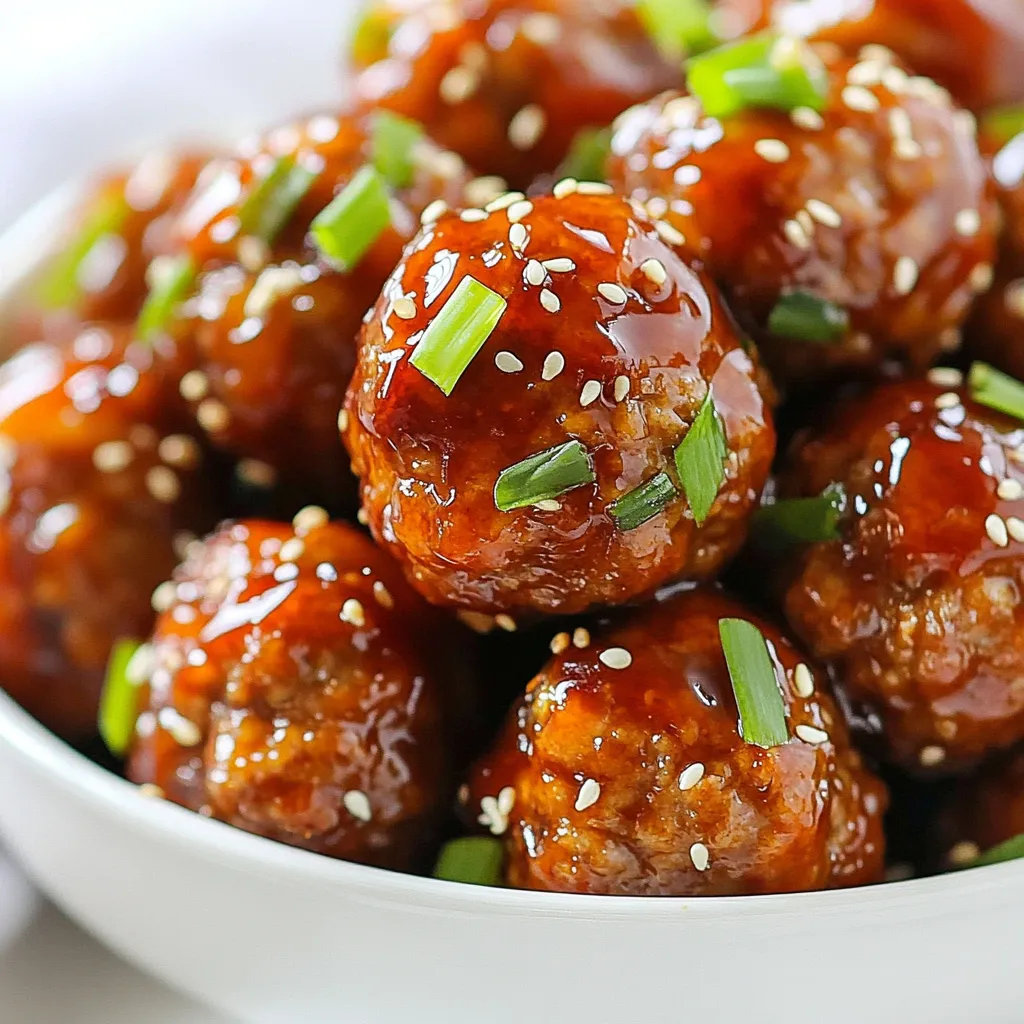
Are you ready to spice up your dinner routine? Sriracha Honey Glazed Meatballs offer a delightful mix of sweet and spicy flavors that you can whip up in no time. …

Read more

Categories Appetizers Leave a comment

One Pot Enchilada Rice Flavorful and Easy Meal Solution

November 2, 2025January 7, 2025 by Chef Evan
Gather the following items for your One Pot Enchilada Rice: - 1 cup long-grain rice - 1 tablespoon olive oil - 1 small onion, diced - 2 cloves garlic, minced - 1 bell pepper (red or green), diced - 1 can (15 oz) black beans, drained and rinsed - 1 can (15 oz) corn, drained - 1 can (10 oz) enchilada sauce - 2 cups vegetable broth - 1 teaspoon ground cumin - 1 teaspoon chili powder - 1 teaspoon smoked paprika - Salt and pepper to taste - 1 cup shredded cheese (cheddar or Mexican blend) - Fresh cilantro, for garnish Each ingredient adds depth and flavor. The long-grain rice serves as the base, soaking up all the tasty juices. Olive oil helps sauté the veggies, while onion and bell pepper give a sweet crunch. Black beans and corn add protein and sweetness, making every bite satisfying. The enchilada sauce and vegetable broth create a rich, savory flavor. The spices—cumin, chili powder, and smoked paprika—bring warmth and a hint of smoke that perfectly complements the dish. Finally, cheese melts into a creamy layer, and cilantro adds a fresh touch. This mix makes a meal that is both hearty and delicious. {{ingredient_image_1}} - Sautéing the onion and bell pepper Start by heating the olive oil in a large pot over medium heat. Add the diced onion and bell pepper. Cook for 4 to 5 minutes until they soften. The smell will fill your kitchen. - Adding garlic and rice Next, stir in the minced garlic. Cook it for about 1 minute. Then, add the long-grain rice to the pot. Mix it well to coat the rice with the oil and veggies. - Toasting the rice Toast the rice in the pot for 2 to 3 minutes. Stir it often. This step adds a nice depth of flavor to the dish. - Combining all ingredients Pour in the enchilada sauce and vegetable broth. Add the drained black beans and corn along with the spices: ground cumin, chili powder, smoked paprika, salt, and pepper. Stir everything together until mixed well. - Boiling and simmering the mixture Bring the mixture to a boil. Once boiling, lower the heat and cover the pot. Let it simmer for about 20 minutes. The rice should become tender and absorb most of the liquid. - Melting the cheese Remove the pot from heat. Stir in half of the shredded cheese until it melts. Sprinkle the rest of the cheese on top. Cover the pot again for a few minutes to let the cheese melt completely. This adds a creamy finish to your dish. To make your One Pot Enchilada Rice burst with flavor, use the right spices. I suggest adding: - 1 teaspoon ground cumin - 1 teaspoon chili powder - 1 teaspoon smoked paprika These spices bring a warm taste and depth to your dish. If you want a unique twist, try using homemade enchilada sauce. It can elevate the flavor and make your meal even more special. Just mix tomatoes, chili powder, and garlic for a quick version. When cooking in one pot, I have some best practices to share. First, always heat your oil and sauté your veggies first. This step builds great flavor. Next, avoid overcooking the rice. Keep an eye on the simmering time. After about 20 minutes, check the rice for tenderness. If you see extra liquid, let it sit covered for a few minutes. The rice will soak up that moisture and become fluffy. Pro Tips Rinse Your Beans: Always rinse canned beans to remove excess sodium and preservatives for a fresher taste. Cheese Variations: Experiment with different cheeses like Monterey Jack or Pepper Jack for added flavor and heat. Make It Spicy: Add sliced jalapeños or a pinch of cayenne pepper for an extra kick if you enjoy spicy food. Leftovers Storage: Store leftover rice in an airtight container in the fridge for up to 3 days; reheat gently to maintain texture. {{image_2}} You can change the beans or grains in this dish. Try pinto beans or kidney beans for a different taste. If you want more texture, use quinoa instead of rice. It cooks well and adds protein. Using fresh vegetables can also boost flavor. Swap the bell pepper for zucchini or mushrooms. They will add a nice twist. You can even toss in some spinach for extra nutrients. To make this meal gluten-free, choose a gluten-free enchilada sauce. Most brands offer this option. You can also use gluten-free grains like rice or quinoa. If you're looking for vegan options, skip the cheese or use a plant-based cheese. You can also add more veggies to enhance the meal. Cauliflower or sweet potatoes work great in this dish. To keep your enchilada rice fresh, use airtight containers. Glass or plastic containers work well. Divide the rice into smaller portions. This makes it easy to heat just what you need. Store the rice in the fridge. It stays good for up to three days. When reheating, avoid drying out the rice. Use a microwave or stove. If you choose the microwave, add a splash of water. Cover the dish with a damp paper towel. Heat in short bursts, stirring in between. If you use the stove, add a little broth. Heat gently over low heat while stirring. This keeps the rice moist and tasty. Can I use brown rice instead of long-grain rice? Yes, you can use brown rice. Just remember, brown rice takes longer to cook than long-grain rice. Adjust the cooking time to about 40-45 minutes. You may need to add a bit more broth to help it cook fully. How can I make my enchilada rice spicier? To spice it up, add chopped jalapeños or a pinch of cayenne pepper. You can also mix in a bit of hot sauce while cooking. Taste as you go to find your perfect heat level. What side dishes pair well with One Pot Enchilada Rice? Some great sides include a fresh salad, guacamole, or tortilla chips with salsa. You can also serve it with a dollop of sour cream or a side of refried beans to make the meal even heartier. This blog post covered how to make One Pot Enchilada Rice. You learned about the key ingredients, preparation steps, and cooking process. I shared tips to boost flavor and techniques for perfect cooking. We also explored ingredient variations and storage tips. In conclusion, this dish is easy to adapt and perfect for everyone. Enjoy experimenting in your kitchen!

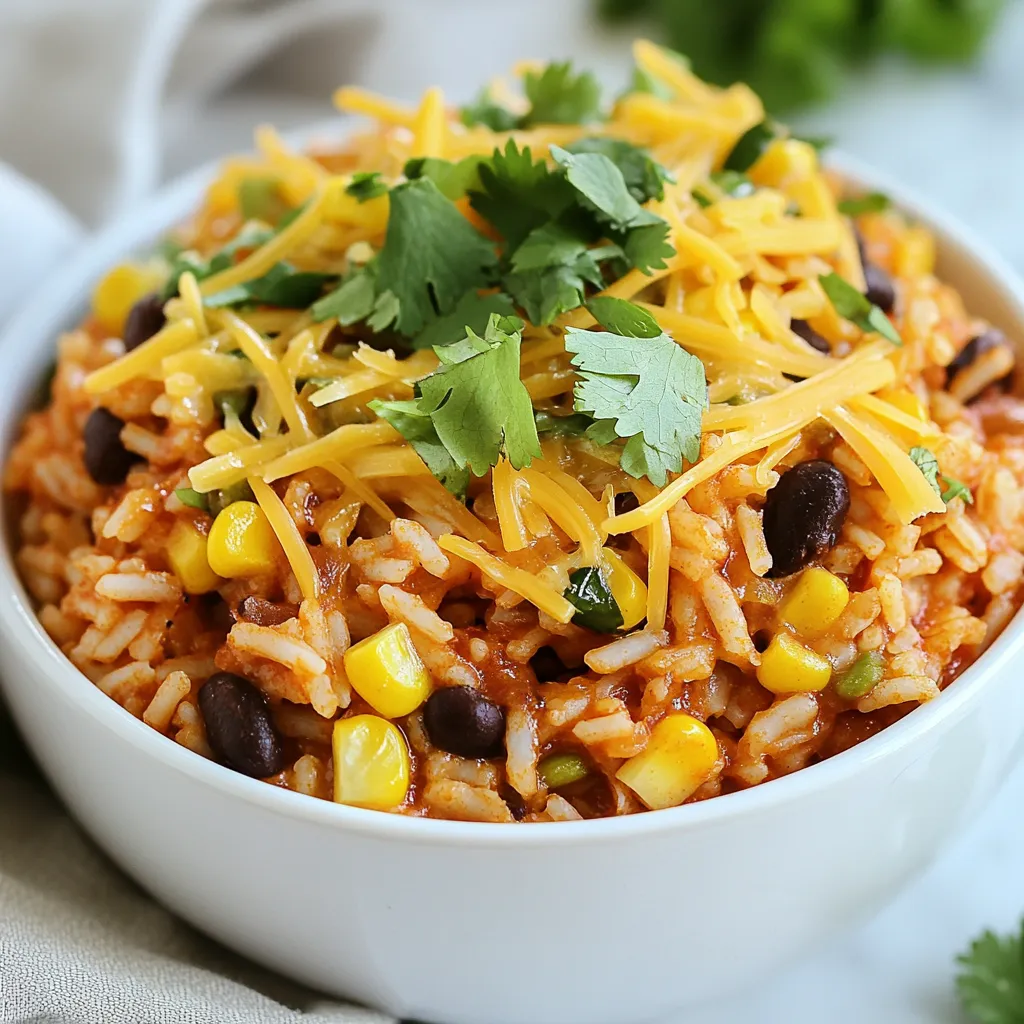
Craving a tasty meal without the mess? One Pot Enchilada Rice is your answer! This dish combines savory flavors and simple steps for an easy, delicious dinner. Just throw in …

Read more

Categories Dinner Leave a comment

Avocado Egg Salad Lettuce Wraps Tasty and Healthy Snack

October 19, 2025January 4, 2025 by Chef Evan
To make avocado egg salad lettuce wraps, gather the following items: - 4 hard-boiled eggs, chopped - 1 ripe avocado, mashed - 1 tablespoon Greek yogurt - 1 tablespoon Dijon mustard - 1 tablespoon lemon juice - 1 green onion, finely chopped - 1/4 teaspoon garlic powder - Salt and pepper to taste - 1 head of romaine or butter lettuce, leaves separated This dish is not only tasty but also packed with health benefits. Here’s what each ingredient offers: - Hard-boiled eggs provide protein and essential vitamins. - Avocado is rich in healthy fats, fiber, and potassium. - Greek yogurt adds creaminess and probiotics for gut health. - Dijon mustard offers flavor with low calories. - Lemon juice boosts vitamin C and aids digestion. - Green onion adds flavor and contains antioxidants. - Garlic powder may help boost your immune system. - Lettuce is low in calories and high in water content, keeping you hydrated. When picking your ingredients, freshness is key. Here are some tips: - Eggs: Choose eggs with no cracks. Check the sell-by date for freshness. - Avocado: Look for avocados with a slight give when gently pressed. - Greek yogurt: Check the expiration date and ensure it’s creamy and smooth. - Mustard: Ensure it’s from a trusted brand without added preservatives. - Lemon: Pick firm lemons with smooth skin for juiciness. - Green onions: Choose firm green onions with fresh green tops. - Garlic powder: Ensure it’s stored in a cool, dry place for freshness. - Lettuce: Select crisp leaves without brown spots or wilting. These tips help ensure your avocado egg salad wraps taste great and stay healthy! {{ingredient_image_1}} 1. Start by chopping the four hard-boiled eggs into small pieces. 2. Next, mash the ripe avocado in a bowl until it's smooth. 3. Add the chopped eggs to the mashed avocado. 4. Mix in one tablespoon of Greek yogurt and one tablespoon of Dijon mustard. 5. Squeeze in one tablespoon of lemon juice for a fresh taste. 6. Chop one green onion finely and add it to the bowl. 7. Sprinkle in 1/4 teaspoon of garlic powder. 8. Season with salt and pepper to taste. 9. Stir the mixture gently, being careful not to mash the eggs too much. 10. Once well combined, take a lettuce leaf and spoon on the avocado egg salad. 11. Fold the sides of the lettuce over the filling. Serve right away! While I can't provide visuals, you can find many helpful videos online. Search for “Avocado Egg Salad Lettuce Wraps” for step-by-step guides. Watching a video can show you how to fold the wraps perfectly. - Over-mixing: Mixing too much can turn the eggs into mush. - Ignoring freshness: Use fresh ingredients for the best flavor. - Skipping seasoning: Always taste and adjust salt and pepper. - Wrong lettuce choice: Romaine or butter lettuce works best for wraps. - Letting it sit: Serve immediately to keep the lettuce crisp. To get a creamy texture for your avocado egg salad, use ripe avocados. They should feel soft but firm when you press them. Mash the avocado well, but mix gently with the hard-boiled eggs. This way, you keep some chunks of eggs for nice bites. You can add more flavor with fresh herbs. Chopped dill or cilantro works great. For a spicy kick, try a dash of hot sauce or a sprinkle of red pepper flakes. If you enjoy tanginess, mix in a bit more lemon juice. Taste as you go to find your perfect blend. For a beautiful presentation, arrange the lettuce wraps on a bright platter. Garnish with extra chopped green onions or lemon slices. This adds a pop of color. Serve the wraps right after you fill them to keep the lettuce crisp. Enjoy your tasty and healthy snack! Pro Tips Perfectly Boil Your Eggs: For the best hard-boiled eggs, place them in cold water, bring to a boil, cover, and remove from heat. Let them sit for 12 minutes before transferring to an ice bath. Choose Ripe Avocados: Ensure your avocados are ripe for a creamy texture. They should yield slightly to gentle pressure when squeezed. Customize Your Seasoning: Feel free to add spices like paprika or cayenne pepper for an extra kick, or fresh herbs like dill or cilantro for added flavor. Serve Fresh: Assemble the lettuce wraps just before serving to maintain crunch. If making in advance, store the egg salad mixture in the refrigerator and fill the lettuce leaves right before eating. {{image_2}} If you have dietary needs, you can change the recipe. For a dairy-free version, skip the Greek yogurt and use avocado alone. You can also try using a vegan mayo for creaminess. If you're allergic to eggs, you can swap in chickpeas. Mash them well for a similar texture. You can make this avocado egg salad even more exciting. For a spicy kick, add a pinch of cayenne pepper or a splash of hot sauce. If you like herbs, try fresh dill or cilantro. Both add a great taste and freshness. Lemon zest can also enhance the flavor, giving it a nice brightness. You can serve the avocado egg salad in many ways. Wrap it in lettuce leaves for a fun snack. You can also spread it on whole-grain toast for a meal. If you want a light lunch, place it in a bowl with mixed greens. This adds crunch and makes it more filling. To keep your avocado egg salad fresh, store it in an airtight container. Use a bowl that seals tightly. This helps prevent air from getting in. It keeps the salad creamy and tasty. If you have extra lettuce wraps, wrap them in plastic wrap or foil. Place your container in the fridge right after you make it. The cool temperature slows spoilage. Make sure to eat the salad within three days. Avocado can brown quickly, so check for color change. If it turns brown, mix it well before eating. It still tastes great! You don't need to reheat avocado egg salad. It’s best served cold in lettuce wraps. If you want to warm it, use low heat. Heat for just a few minutes until slightly warm. Avoid cooking it too long, or the eggs may dry out. Avocado egg salad lasts about 1 to 2 days in the fridge. Keep it in an airtight container. The avocado may darken, but it’s still safe to eat. Yes, you can prepare this recipe ahead of time. Make the salad and store it in the fridge. Just keep the lettuce wraps separate until you are ready to serve. This keeps the lettuce crisp. You can use romaine or butter lettuce for wraps. Both types are sturdy and hold the filling well. Romaine adds a nice crunch, while butter lettuce is tender and sweet. Yes, you can replace eggs with chickpeas for a vegan version. Mash the chickpeas and mix with avocado, vegan yogurt, mustard, and lemon juice. This keeps the creamy texture and flavor. In this article, we covered key ingredients for a tasty dish, their health perks, and how to pick the best ones. I shared step-by-step instructions, a visual guide, and tips to avoid common mistakes. You learned tricks for a creamy texture and ways to present your meal nicely. We also explored variations to fit dietary needs and how to store leftovers for later meals. Remember, simple meals can be fun and good for you. Enjoy creating and sharing this dish!

Looking for a snack that’s both tasty and healthy? You’ve found it! My Avocado Egg Salad Lettuce Wraps are a delicious twist on classic flavors. They’re quick to make and …

Read more

Categories Salads Leave a comment

Lemon Garlic Butter Scallops Quick and Flavorful Meal

October 28, 2025January 4, 2025 by Chef Evan
To make Lemon Garlic Butter Scallops, you need a few simple ingredients. Here’s what you’ll need: - 1 pound sea scallops, patted dry - 4 tablespoons unsalted butter - 3 cloves garlic, minced - Juice and zest of 1 lemon - 2 tablespoons fresh parsley, chopped - Salt and pepper to taste - Lemon wedges for serving Each ingredient plays a key role in creating a rich taste. The sea scallops are the star. They should be fresh and dry to get that perfect sear. The unsalted butter adds a creamy flavor, while garlic gives it a nice kick. Lemon juice and zest bring brightness, balancing the richness. Fresh parsley adds color and a fresh taste. Don’t forget salt and pepper; they enhance all the flavors. Serve with lemon wedges to add a zesty touch at the end. Gathering these ingredients is easy. You can find them in any grocery store. Having everything ready makes cooking smooth and fun. Enjoy the process, and get ready for a tasty meal! {{ingredient_image_1}} Start by ensuring the scallops are dry. This step is key for a good sear. I pat them dry with a paper towel. Next, I season the scallops with salt and pepper. A light sprinkle on both sides is enough. In a large skillet, I melt 2 tablespoons of butter over medium-high heat. Once the butter sizzles and foams, I add the scallops. I make sure not to overcrowd the pan. I cook them for 2-3 minutes without moving them. This helps form a golden crust. Then, I flip them carefully and check for doneness. They should cook for another 2-3 minutes until they are opaque. Once done, I transfer the scallops to a plate and cover them to keep warm. In the same skillet, I add the remaining 2 tablespoons of butter and minced garlic. I sauté the garlic for about 1 minute until it gets fragrant. I am careful not to burn it. Then, I add the lemon juice and zest, stirring to combine. I let the sauce simmer for 1-2 minutes to blend the flavors. Finally, I return the scallops to the skillet. I gently coat them in the lemon garlic butter sauce. This adds a bright, zesty flavor to the dish. To sear scallops well, start with dry scallops. Pat them with a paper towel. Dry scallops will get a nice crust. If they are wet, they will steam instead of sear. Space is key too. Do not overcrowd the pan. This way, the heat stays high, and your scallops cook evenly. To boost the flavor, try adding fresh herbs. Thyme or basil works great. You can also sprinkle in some red pepper flakes for heat. A dash of smoked paprika adds depth. Feel free to experiment with your favorite spices. When serving, use a nice plate. Arrange the scallops in a circle or in a line. Drizzle the sauce over them for a glossy look. Garnish with fresh parsley and lemon wedges. This adds color and freshness to your dish. Enjoy your beautiful creation! Pro Tips Dry Scallops for Perfect Sear: Ensure your scallops are patted dry before cooking. Moisture will prevent them from searing properly and developing a golden crust. Use High Heat: Cooking scallops on medium-high heat is essential. This helps achieve that beautiful caramelization on the outside while keeping the inside tender. Don’t Overcrowd the Pan: Give your scallops space in the skillet. Overcrowding will lower the temperature of the pan and lead to steaming instead of searing. Finishing Touch with Parsley: Stir in fresh parsley at the end for a burst of color and flavor. It enhances the dish and adds a fresh, aromatic note. {{image_2}} You can swap butter for olive oil for a lighter option. Olive oil adds a nice flavor, too. For a dairy-free choice, avocado oil works well. Try different seasonings like thyme or rosemary for a twist. You can also add red pepper flakes for some heat. If you want to serve more people, it’s easy to scale up this dish. Just double or triple the ingredients. Keep the same cooking time, but you may need a bigger pan. Cook in batches if your skillet can’t hold all the scallops at once. This helps them sear nicely. Pair your scallops with fresh sides. A simple green salad adds a nice crunch. You can also serve them with garlic bread to soak up the sauce. Roasted asparagus or sautéed spinach make great sides, too. For a heartier meal, try them with creamy risotto or pasta. To keep your lemon garlic butter scallops fresh, store them in an airtight container. Place the container in the fridge within two hours of cooking. They will stay good for up to two days. Make sure to separate the scallops from the sauce if possible. This way, they won’t get too soggy. When reheating scallops, the goal is to keep them tender. You can use a skillet or microwave. For the skillet, add a little butter or oil and heat on low. Cook for about 2-3 minutes until warmed through. In the microwave, heat them in short bursts of 30 seconds, checking often. This keeps them from overcooking. While I recommend eating scallops fresh, you can freeze them if needed. Place the scallops in a single layer on a baking sheet. Freeze until solid, then transfer them to a freezer-safe bag. They can last for up to three months. To thaw, place them in the fridge overnight or run them under cold water. Avoid using a microwave for thawing, as it may cook them unevenly. Scallops should cook for about 4 to 6 minutes total. Start with 2 to 3 minutes on one side. When they turn golden brown, flip them. Cook for another 2 to 3 minutes. You want them opaque and firm. If they are overcooked, they become rubbery. Yes, you can use frozen scallops. Make sure to thaw them first. Place them in the fridge overnight or run cold water over them. Frozen scallops need a little more cooking time. They might also release more water, so dry them well before cooking. Lemon Garlic Butter Scallops pair well with many sides. Try serving them with: - Garlic mashed potatoes - Steamed asparagus - Fresh salad with lemon vinaigrette - Crusty bread to soak up the sauce For drinks, a crisp white wine or sparkling water enhances the meal. This post gave you a clear guide to making Lemon Garlic Butter Scallops. We covered the ingredients, cooking steps, and tips for perfect scallops. I shared ideas for variations and storage methods too. Now, you can impress your family and friends with this dish. Follow these steps, and enjoy the fresh flavors. Cooking can be fun and easy with the right tools and tips! Enjoy your meal!

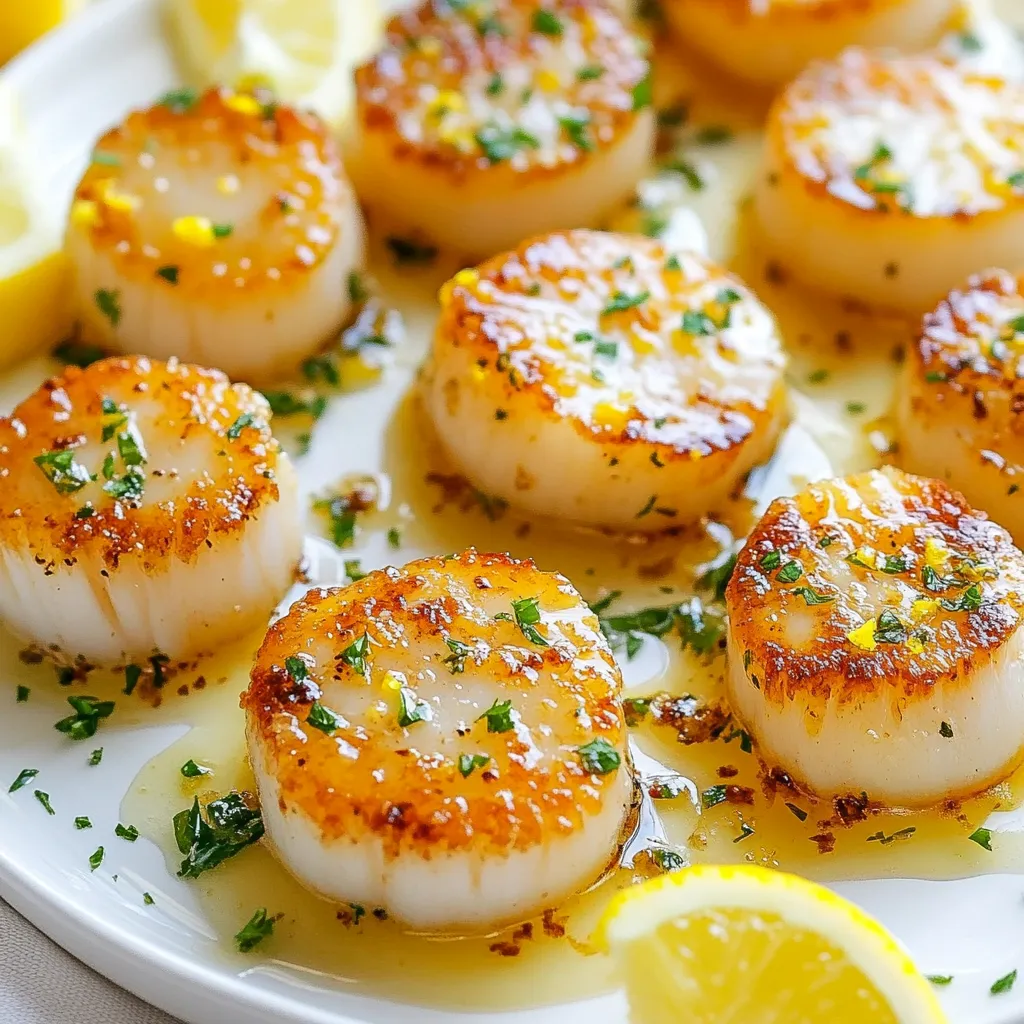
Are you ready to impress your taste buds? Lemon Garlic Butter Scallops are quick, easy, and full of flavor. With just a few ingredients, you can create a dish that’s …

Read more

Categories Appetizers Leave a comment

Spicy Mango Guacamole Flavors That Amaze Your Tastebuds

December 26, 2025January 3, 2025 by Chef Evan
- 2 ripe avocados - 1 ripe mango, diced - 1 small red onion, finely chopped - 1-2 small jalapeños, deseeded and minced - 2 tablespoons fresh lime juice - 1 garlic clove, minced - Salt and pepper to taste - 2 tablespoons fresh cilantro, chopped - Optional: tortilla chips for serving The key to amazing Spicy Mango Guacamole lies in its fresh ingredients. Start with two ripe avocados. They should be slightly soft to the touch. Next, choose a ripe mango. It adds sweetness and a lovely texture. The red onion adds a nice crunch. Use a small one for a milder flavor. For heat, use one or two small jalapeños. Be sure to remove the seeds to control the spice. The fresh lime juice brightens the dish. It also helps keep the avocado from browning. Minced garlic brings in a strong, savory taste. Make sure to season with salt and pepper. This step enhances all the flavors. Finally, fresh cilantro adds a burst of freshness. You can serve this guacamole with crispy tortilla chips. They make a great pairing to scoop up all that flavor! {{ingredient_image_1}} 1. Cutting and scooping avocados: Start by cutting the avocados in half. Remove the pit carefully. Use a spoon to scoop the flesh into a mixing bowl. You want to get every bit of that creamy avocado goodness. 2. Mashing to desired creaminess: Grab a fork or a potato masher. Mash the avocado to your liking. If you want it smooth, keep mashing. If you prefer chunks, stop when you get small pieces. 3. Mixing in additional ingredients: Now it’s time to add flavor! Toss in the diced mango, chopped red onion, and minced jalapeños. Make sure to mix it well but gently, so the mango stays nice and chunky. - How to fold ingredients without over-mashing: Use a spatula to gently fold in the ingredients. This keeps everything combined without turning the mango mushy. You want to see those bright yellow mango pieces! - Adjusting seasoning as needed: After mixing, give it a taste. Add salt and pepper to your liking. If you want it zesty, squeeze in more lime juice. Adjust until it sings with flavor! - Presentation tips for serving: Serve your spicy mango guacamole in a fun bowl. A colorful dish can make it pop! - Garnishing suggestions: Top it off with extra chopped cilantro for a fresh look. You can also add a few thin slices of jalapeño for a spicy kick. Serve with crispy tortilla chips on the side for the perfect crunch! When making guacamole, the right avocados are key. Look for avocados that yield slightly when pressed. This means they're ripe and ready to use. Avoid hard ones, as they won’t mash well. For the mango, pick one that is soft but not mushy. A ripe mango should feel gentle when you press it. This will add a sweet touch to your guacamole. To change the heat of your guacamole, adjust the jalapeño amount. Start with one jalapeño if you want less heat. You can always add more if needed. If you prefer a different heat source, consider using diced serrano peppers or a splash of hot sauce. Want to jazz up your guacamole? Add extra ingredients like diced tomatoes or corn for crunch. You can also mix in a dash of cumin for warmth. Balancing sweetness and spice is key. The mango's sweetness should shine but not overpower the other flavors. Taste often and adjust as needed. Pro Tips Choose Ripe Avocados: Make sure your avocados are ripe for the best flavor and creaminess. They should yield slightly to gentle pressure when squeezed. Adjust Spice to Taste: Start with one jalapeño and taste before adding more. You can always add extra heat, but it's hard to take it out! Fresh Lime Juice is Key: Use fresh lime juice instead of bottled for a brighter and more vibrant flavor in your guacamole. Store Properly: If you need to store leftover guacamole, press plastic wrap directly onto the surface to minimize oxidation and browning. {{image_2}} You can switch up the fruits in your guacamole. Try using pineapple for a tropical twist. Blueberries add a nice pop of flavor, too. Consider adding diced peaches for a sweet touch. For herbs, you can use parsley instead of cilantro. Mint gives a fresh note. If you want more spice, add a pinch of cayenne or smoked paprika. These swaps keep your guacamole exciting. This recipe is already vegan and gluten-free. Use fresh lime juice for flavor without added sodium. For low-sodium adjustments, skip the salt or use a salt substitute. You can also add diced bell peppers for crunch. They are low in sodium and add color. This makes your guacamole healthy and tasty. Spicy mango guacamole pairs well with many dishes. Serve it with grilled chicken or fish for a burst of flavor. It also goes great with tacos or burritos. You can use guacamole as a topping for salads or baked potatoes. It makes any meal special. Try it on toast for a quick snack. The options are endless! To keep your guacamole fresh, use an airtight container. Glass or plastic containers both work well. Press plastic wrap directly on the guacamole's surface. This helps keep air out and stops browning. Guacamole lasts about 2 to 3 days in the fridge. Look for signs of spoilage. If it turns brown or develops a sour smell, it’s time to let it go. You can freeze guacamole! Use a freezer-safe container for best results. When you’re ready to eat it, thaw it in the fridge overnight. Stir well before serving to restore its creamy texture. What is the best avocado for guacamole? Hass avocados are the best choice for guacamole. They are creamy and rich. Their flavor is smooth and buttery. Look for ones that yield slightly when you press them. Can I make this recipe in advance? Yes, you can make it ahead of time. Store it in an airtight container. Add a layer of lime juice on top to help prevent browning. It stays fresh for about one day. How can I make it less spicy? To reduce heat, use fewer jalapeños. You can also remove the seeds and membranes. These parts contain most of the spice. Another option is to add more mango for sweetness. Caloric content per serving Each serving of Spicy Mango Guacamole contains about 150 calories. This may vary based on ingredient amounts. Key nutritional benefits of ingredients - Avocados offer healthy fats and fiber. - Mango adds vitamins A and C. - Red onion provides antioxidants. - Jalapeños can boost metabolism. - Cilantro has detoxifying properties. Other ways to enjoy guacamole You can use guacamole as a sandwich spread. It also makes a great topping for tacos or burritos. Try it in salads for a fresh twist. Creative serving ideas beyond tortilla chips Serve guacamole with veggie sticks like carrots or cucumbers. You can also pair it with pita chips or crackers. For a fun treat, use it as a dip for sweet potato fries. In summary, we explored how to make spicy mango guacamole with fresh ingredients. We found tips for preparation, mixing, and serving to boost flavor. You can adjust spice levels and make variations to suit your taste. Storage tips help keep your guacamole fresh longer. Overall, this recipe offers a fun, healthy option for snacks or meals. Enjoy your culinary adventure and impress friends with your tasty guacamole!

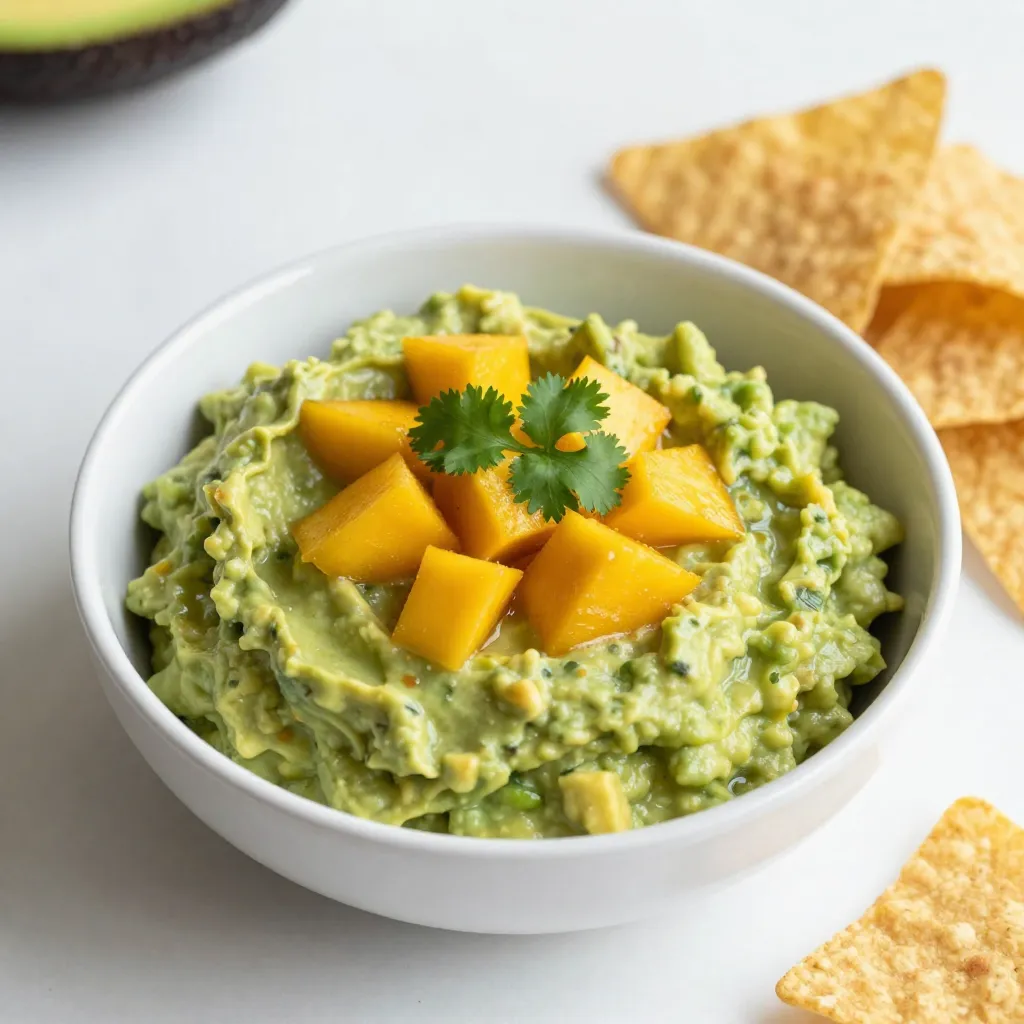
Ready for a flavor explosion? My Spicy Mango Guacamole combines creamy avocados with sweet mango and a kick of heat. This fresh dip will take your taste buds on a …

Read more

Categories Appetizers Leave a comment

Caramel Pecan Turtle Brownies Irresistible Sweet Treat

November 15, 2025December 29, 2024 by Chef Evan
To make Caramel Pecan Turtle Brownies, gather these ingredients: - 1 cup unsalted butter (2 sticks), melted - 2 cups granulated sugar - 4 large eggs - 1 teaspoon vanilla extract - 1 cup all-purpose flour - 1/2 cup unsweetened cocoa powder - 1/2 teaspoon salt - 1 cup chocolate chips - 1 cup pecans, chopped - 1 cup caramel sauce (store-bought or homemade) - Sea salt for topping (optional) Each ingredient plays a role in making these brownies rich and tasty. The butter adds moisture, while the sugar brings sweetness. Eggs help bind everything together, and flour gives structure. Cocoa powder gives that deep chocolate flavor, and chocolate chips add melty goodness. Pecans provide a crunch, and caramel adds a sweet, sticky layer. You can swap ingredients if needed: - Butter: Use coconut oil or margarine for a dairy-free option. - Sugar: Try brown sugar for a deeper flavor or a sugar substitute for lower calories. - Pecans: Walnuts or almonds work well if you prefer different nuts. - Caramel Sauce: Homemade caramel can replace store-bought. These substitutions can change the taste but still keep the brownies delicious. Choosing the right ingredients makes a big difference: - Chocolate: Look for high-quality chocolate chips with at least 60% cocoa. This ensures a rich flavor. - Caramel: If you pick store-bought, check for natural ingredients without too many additives. - Pecans: Fresh pecans are key. Buy them whole and chop them yourself for better taste. Good quality ingredients will enhance every bite of your brownies. Enjoy the process of choosing the best! {{ingredient_image_1}} First, preheat your oven to 350°F (175°C). This step is key for even baking. Next, grease a 9x13-inch baking pan with butter or line it with parchment paper. This makes removing the brownies easy later. In a large bowl, combine melted butter and granulated sugar. Whisk them together until smooth. Next, add the eggs one at a time. Mix well after each egg. Then stir in the vanilla extract for flavor. In a separate bowl, sift together the all-purpose flour, cocoa powder, and salt. Slowly add this dry mix to the wet mix. Stir just until the two mixtures come together. Now, fold in the chocolate chips and chopped pecans. Remember to save a handful of pecans for the top. Pour half of the brownie batter into the prepared pan. Spread it evenly across the bottom. Next, drizzle half of the caramel sauce over the batter. Use a knife to swirl it gently for a marbled look. Add the rest of the brownie batter on top and spread it out. Drizzle the rest of the caramel sauce over this layer. Swirl it again to combine slightly. Finally, sprinkle the reserved pecans and a pinch of sea salt on top if you like. Bake in the preheated oven for 30 to 35 minutes. Check for doneness by inserting a toothpick into the center. It should come out with moist crumbs, not wet batter. Let the brownies cool in the pan for at least 30 minutes before cutting them into squares. To get perfect brownie texture, use room-temperature eggs. Cold eggs can make the batter too thick. Always melt the butter gently, so it stays smooth. Mix the sugar and butter well until creamy. This helps create a light texture. Bake at 350°F for even cooking. A toothpick should come out with moist crumbs, not wet batter. If your brownies puff up too much, you may need less flour next time. For the best marbled effect with caramel, drizzle it slowly. Use a spoon or squeeze bottle for control. Start with a zigzag pattern over the brownie batter. Then, take a knife and swirl gently. Do not mix too much; you want to see the caramel swirls. If you want extra flavor, heat the caramel slightly. This makes it easier to swirl and blend. Serve these brownies warm for a gooey treat. A scoop of vanilla ice cream adds a nice touch. Drizzle more caramel sauce on top to enhance the flavor. You can also sprinkle sea salt for a sweet-salty combo. Cut them into small squares for easy sharing. They are great for parties or as a special dessert at home. Pro Tips Use Room Temperature Eggs: Allow your eggs to come to room temperature for better incorporation into the batter, resulting in a smoother texture. Don’t Overmix: Mix the batter until just combined to keep your brownies fudgy and avoid a cake-like texture. Check for Doneness: Insert a toothpick into the center; it should come out with moist crumbs, indicating the brownies are perfectly baked. Cool Before Cutting: Allow the brownies to cool completely in the pan to ensure clean cuts and a better presentation. {{image_2}} If you want to change up the nuts, try using walnuts or almonds. Walnuts add a nice crunch and a rich taste. They work well with the chocolate and caramel. Almonds bring a light, sweet flavor that pairs nicely too. You can chop them or leave them whole for a fun look. Just remember to adjust the amount to keep the balance in your brownies. You can also add some extra flavor to your brownies. A dash of espresso powder can give a deep, rich taste. It enhances the chocolate flavor in a great way. You might also try using vanilla bean paste. It adds a lovely aroma and a hint of sweetness. Just mix it in with your wet ingredients for the best results. To make gluten-free brownies, swap the all-purpose flour for a gluten-free blend. Many blends work well, so pick one you like. For a dairy-free option, use vegan butter and dairy-free chocolate chips. This way, everyone can enjoy these delicious treats! Just keep an eye on the baking time, as it might vary a little. To keep your brownies fresh, store them in an airtight container. Make sure they cool completely first. You can place parchment paper between layers to avoid sticking. Store the brownies at room temperature for the best taste. If you want to freeze brownies, cut them into squares first. Wrap each square tightly in plastic wrap. Then, place the wrapped brownies in a freezer-safe bag. They can stay frozen for up to three months. To thaw, take them out and let them sit at room temperature for about an hour. When stored properly, brownies can last up to a week at room temperature. If refrigerated, they may last up to two weeks. However, cold storage can change their texture. Always check for any signs of spoilage before eating. To cut brownies well, let them cool down first. Use a sharp knife for clean cuts. Dip the knife in hot water, and dry it off for even better results. This helps prevent sticking. Cutting into squares or rectangles works best. Yes, you can make the brownie batter ahead of time. Store it in the fridge for up to 24 hours. Just cover it tightly with plastic wrap. When you are ready to bake, let it sit at room temperature for about 30 minutes. Then pour it into your pan and bake as normal. To check if brownies are done, insert a toothpick into the center. If it comes out with moist crumbs, they are ready. If wet batter sticks to the toothpick, bake longer. Remember, overbaking can make them dry, so check often after 25 minutes. Absolutely! Homemade caramel sauce adds a special touch. Just make sure it's thick enough to swirl into the batter. If it’s too runny, it may not create that lovely marbled effect. Use your favorite recipe or a simple one with sugar, cream, and butter. Caramel Pecan Turtle Brownies are a delightful treat. We covered each ingredient, including substitutions. You learned how to select high-quality items and followed step-by-step baking instructions. Tips helped you achieve the perfect brownie texture and create stunning caramel swirls. Variations allow for personalized flavors or dietary needs. Finally, you now know how to store and freeze your brownies for freshness. Enjoy making these delicious brownies and impress everyone with your skills!

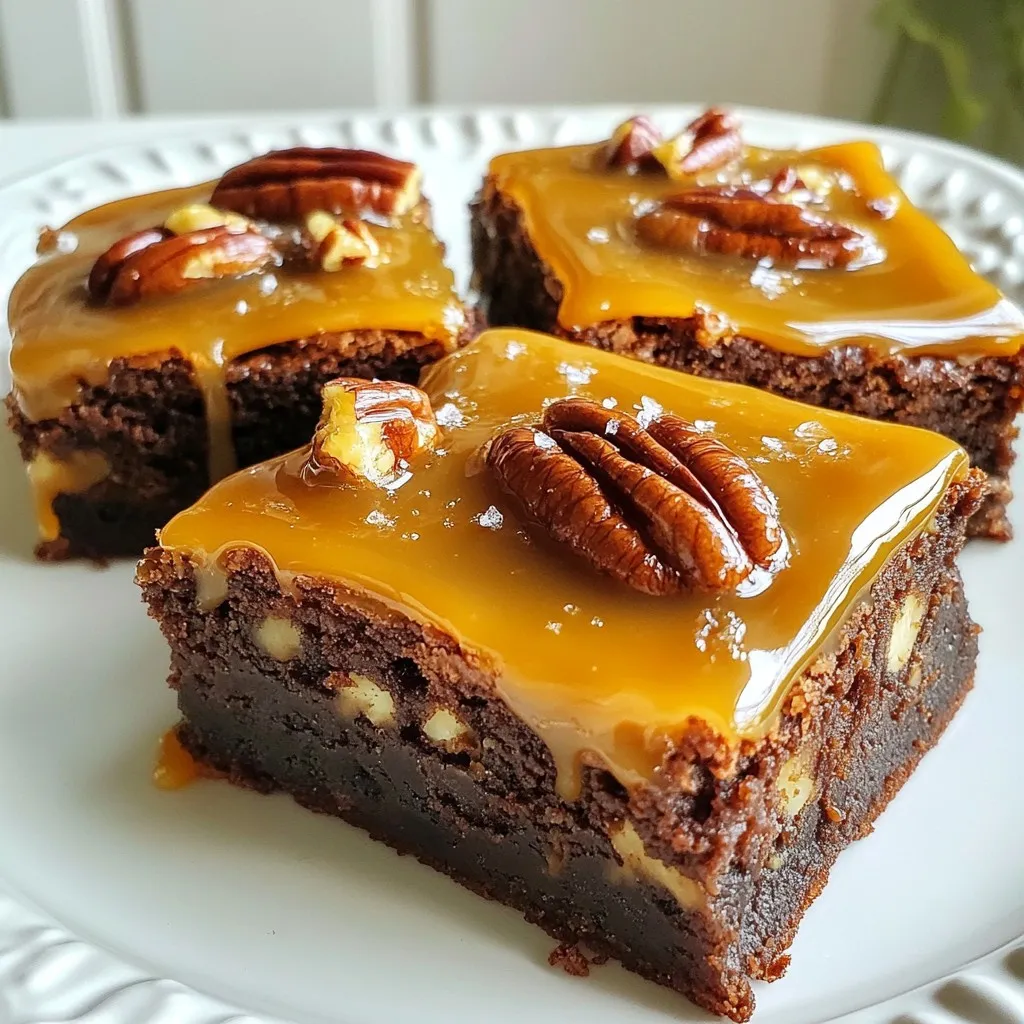
Get ready to indulge in the ultimate sweet treat: Caramel Pecan Turtle Brownies! Imagine rich chocolate brownies loaded with creamy caramel and crunchy pecans. This dessert is not just a …

Read more

Categories Desserts Leave a comment
Older posts
Newer posts
← Previous Page1 … Page120 Page121 Page122 … Page124 Next →

TOSSED FLAVORS

Where flavors are fresh, vibrant, and ready to toss! 🥗

PAGES

Home About Contact Privacy Policy Terms & Conditions Cookie Policy GDPR Policy Copyright Policy Disclaimer

CATEGORIES

Appetizers Desserts Salads Breakfast Dinner

Contact

  • Pinterest
  • Mail
Copyright © 2026 Tossed Flavors. All rights reserved.