Skip to content
tossedflavors.com
  • Home
  • Appetizers
  • Desserts
  • Salads
  • Breakfast
  • Dinner
  • Privacy Policy
  • Contact
  • About

Chef Evan

Creamy Herb Chicken Gnocchi Soup Comforting Delight

November 24, 2025February 16, 2025 by Chef Evan
- 1 tablespoon olive oil - 1 pound boneless, skinless chicken breasts, diced - 1 medium onion, diced - 3 cloves garlic, minced - 3 carrots, sliced - 2 celery stalks, sliced - 6 cups chicken broth - 1 teaspoon dried thyme - 1 teaspoon dried oregano - 1 bay leaf - 1 pound potato gnocchi - 1 cup heavy cream - 1 cup kale or spinach, chopped - Salt and pepper to taste - Fresh parsley, chopped for garnish Using boneless, skinless chicken breasts makes this soup lean and tasty. Chicken is high in protein, helping to keep you full. The onion and garlic add a strong flavor and health benefits. Garlic may help your heart health, while onions support your immune system. Carrots and celery give crunch and color, plus they are good sources of vitamins. Kale or spinach adds nutrients and a pop of green, making the soup more vibrant. If you want a lighter soup, you can use half-and-half instead of heavy cream. For a vegetarian version, try using vegetable broth and swap the chicken for chickpeas or tofu. You can also add some mushrooms for extra flavor. If you do not have potato gnocchi, regular pasta works well too. Just cook it according to the package directions. {{ingredient_image_1}} To start, gather all your ingredients. You need olive oil, chicken, onion, garlic, carrots, celery, chicken broth, thyme, oregano, a bay leaf, gnocchi, heavy cream, kale or spinach, salt, pepper, and parsley. First, dice the chicken into small pieces. Then, chop the onion, garlic, carrots, and celery. This makes cooking easier. In a large pot, heat one tablespoon of olive oil over medium heat. Add the diced chicken and sauté it. Cook until it turns brown, about 5-7 minutes. Once done, remove the chicken and set it aside. Next, in the same pot, add the onion, garlic, carrots, and celery. Sauté these for about 5 minutes until they soften. This adds great flavor to your soup. Now, pour in 6 cups of chicken broth. Add one teaspoon each of dried thyme and oregano, plus one bay leaf. Bring this mixture to a boil. Once boiling, add one pound of potato gnocchi. Cook it according to the package instructions, usually about 3-5 minutes. After the gnocchi is ready, lower the heat. Stir in one cup of heavy cream, the cooked chicken, and one cup of chopped kale or spinach. Let this simmer for about 5 minutes. This step is key to meld the flavors together. Before serving, season with salt and pepper to taste. Remember to remove the bay leaf; it’s not meant to be eaten. Ladle the soup into bowls and garnish with fresh parsley. Your creamy herb chicken gnocchi soup is now ready to enjoy! To boost the flavor of your creamy herb chicken gnocchi soup, consider adding more herbs. Fresh herbs like thyme and parsley elevate the taste. If you want more zing, add a squeeze of lemon juice. A pinch of red pepper flakes can also add a hint of heat. Experiment with flavors to find the perfect balance for your taste buds. Avoid overcooking the gnocchi. Gnocchi cooks quickly, usually in just 3-5 minutes. If you cook them too long, they can turn mushy. Also, watch the cream. Add it at the end to keep the soup rich and smooth. Skipping the bay leaf can lessen the depth of flavor, so don’t leave it out! This soup is great on its own, but pairing it with bread makes it even better. A crusty baguette or warm rolls soak up the creamy broth nicely. You can also serve it with a simple salad for a balanced meal. Try to sprinkle some extra parsley on top for a fresh touch before serving. Pro Tips Use Fresh Herbs: Fresh herbs can elevate the flavor of your soup. Add chopped parsley or dill just before serving for a burst of freshness. Perfect Gnocchi Texture: Avoid overcooking the gnocchi; they should float to the top when done. This usually takes about 3-5 minutes. Chicken Options: For a richer flavor, consider using bone-in chicken thighs instead of breasts. Just ensure to remove the skin and bones before serving. Thickening the Soup: If you prefer a thicker soup, you can blend a portion of the soup and then stir it back in to create a creamier texture. {{image_2}} You can easily swap the chicken in this recipe. Turkey makes a great choice if you want a leaner option. Shrimp can also work well, adding a nice seafood twist. Just cook shrimp until pink, then add it to the soup near the end. This keeps the shrimp tender and juicy. Don't hesitate to add more veggies for extra flavor and nutrition. Peas can add sweetness and color. Asparagus offers a nice crunch; just chop it into small pieces. You could also toss in zucchini or bell peppers. These veggies will cook quickly and infuse the soup with vibrant taste. If you want a lighter soup, swap heavy cream for half-and-half or whole milk. For a dairy-free option, use coconut milk or almond milk. Both options provide a creamy texture without the dairy. Adjust the amount to your taste, adding more for a richer flavor or less for a lighter soup. This soup is best when fresh, but you can store it in the fridge. It lasts about three days. Make sure to place it in an airtight container. This keeps it safe and tasty for later. You can freeze this soup too. Just let it cool first. Pour it into freezer-safe bags or containers. Leave some space for the soup to expand. It can stay in the freezer for up to three months. When ready to eat, just thaw it overnight in the fridge. To reheat, place the soup in a pot over low heat. Stir often to keep it smooth. If it seems too thick, add a splash of broth or cream. This helps maintain the creamy texture. You can also microwave it, but stir every minute for even warming. Enjoy your warm bowl of comfort! To thicken the soup, you can use a few methods. One way is to add more heavy cream. This makes the soup rich and creamy. You can also mash some of the gnocchi in the soup. This gives it body without changing the flavor. Another option is to mix a bit of cornstarch with cold water. Add this mixture to the soup while it simmers. It will help thicken the broth quickly. Yes, you can use frozen gnocchi. It is very convenient and saves time. Just add the frozen gnocchi directly to the boiling soup. Cook it according to the package instructions. Usually, it takes about 3-5 minutes. Frozen gnocchi holds its shape well and still tastes great in the soup. Making this soup in a slow cooker is easy. Start by cooking the chicken in a pan. Sauté it until it is browned. Then, add it to the slow cooker along with the veggies and spices. Pour in the chicken broth and set the slow cooker on low for about 4 hours. Add the gnocchi and cream during the last 30 minutes of cooking. This keeps the gnocchi soft and the soup creamy. Enjoy your slow-cooked meal! In this blog post, we explored the key ingredients for making a delicious soup. We covered the complete ingredient list, showcased highlights like the health benefits of kale, and shared useful substitutions. You learned step-by-step instructions for preparation and cooking, along with helpful tips to enhance flavor and avoid common mistakes. To wrap it up, remember that small changes in ingredients or cooking methods can transform a dish. Enjoy experimenting and have fun while cooking!

Are you ready to warm your soul with a bowl of creamy herb chicken gnocchi soup? This comforting delight is perfect for chilly nights or a cozy dinner. Packed with …

Read more

Categories Dinner Leave a comment

Creamy Mushroom Spinach Orzo Flavorful Dinner Dish

December 8, 2025February 15, 2025 by Chef Evan
To make Creamy Mushroom Spinach Orzo, you need these main ingredients: - 1 cup orzo pasta - 2 tablespoons olive oil - 1 medium onion, finely chopped - 3 garlic cloves, minced - 8 ounces mushrooms, sliced (button or cremini) - 4 cups fresh spinach - 1 cup vegetable broth - 1 cup heavy cream - 1 teaspoon dried thyme - 1 teaspoon dried oregano - Salt and pepper to taste - ¼ cup grated Parmesan cheese (optional) - Fresh parsley for garnish You can swap some ingredients if you want. Here are a few options: - Use whole wheat orzo for a healthier twist. - Replace heavy cream with coconut milk for a lighter version. - Try adding kale instead of spinach for a different flavor. For seasonings and garnishes, keep it simple. You can use: - Extra herbs like basil or rosemary for more flavor. - A sprinkle of red pepper flakes for heat. - Lemon zest to add brightness to the dish. These ingredients come together to create a creamy, savory meal that's easy to make and full of flavor. {{ingredient_image_1}} To cook orzo pasta, first bring salted water to a boil in a large pot. Once boiling, add 1 cup of orzo. Cook it until al dente, following the package instructions. This usually takes about 8 to 10 minutes. Drain the orzo in a colander and set it aside. For the perfect texture, make sure not to overcook the orzo. It should remain slightly firm when bitten. In the same pot, heat 2 tablespoons of olive oil over medium heat. Add 1 medium chopped onion and sauté it for about 3 to 4 minutes. You want it soft and translucent. Next, stir in 3 minced garlic cloves and 8 ounces of sliced mushrooms. Cook them until the mushrooms are browned and have released their moisture. This should take about 5 to 7 minutes. After that, add 4 cups of fresh spinach. Cook this for about 2 minutes until it wilts down. This not only adds flavor but also a nice green color to the dish. Now it's time to bring everything together. Pour in 1 cup of vegetable broth and let it simmer. Reduce the heat and add 1 cup of heavy cream, along with 1 teaspoon each of dried thyme and oregano. Season with salt and pepper to taste. Stir well and let the sauce simmer for about 5 minutes until it thickens slightly. Finally, toss in the cooked orzo. Mix everything well until the orzo is fully coated in the creamy mixture. If you like, add ¼ cup of grated Parmesan cheese. Stir until it melts into the dish. Taste it and adjust the seasoning if needed. Serve it warm, garnished with fresh parsley for a nice touch. To boost the taste of your creamy mushroom spinach orzo, try adding a splash of lemon juice. This brightens the dish and adds a fresh note. You can also sprinkle in a pinch of red pepper flakes for a little heat. For extra creaminess, use full-fat cream. If you want a lighter option, try half-and-half. Add the cream slowly while stirring for even mixing. Cook the orzo until it is al dente, which takes about 8-10 minutes. Check it often to avoid overcooking. When cooking mushrooms, let them brown well. This gives the dish a rich flavor. If you notice the mushrooms starting to stick, add a bit of broth to loosen them up. Serve your orzo with a side salad or garlic bread. A light vinaigrette pairs well with the creamy dish. For presentation, top the orzo with fresh parsley and a sprinkle of Parmesan cheese. This makes it look vibrant and adds a nice touch. Use a large serving bowl to showcase the colorful ingredients. Pro Tips Use Fresh Ingredients: Always opt for fresh mushrooms and spinach for the best flavor and texture in your dish. Don't Overcook the Orzo: Make sure to cook the orzo until al dente to prevent it from becoming mushy in the creamy sauce. Customize the Creaminess: Adjust the amount of heavy cream based on your preference for a richer or lighter sauce. Experiment with Herbs: Feel free to add other herbs like basil or parsley for an extra burst of flavor. {{image_2}} For those who want a vegan or dairy-free version, swap the heavy cream with coconut milk or cashew cream. You can also skip the Parmesan cheese, or use a vegan cheese alternative. This keeps the dish creamy and tasty without animal products. If you need a gluten-free option, use gluten-free orzo. Many brands offer great substitutes that taste similar. Always check labels to ensure they fit your diet. Feel free to get creative with the vegetables. You can add bell peppers, zucchini, or even kale for extra flavor. Fresh herbs like basil or dill can brighten the dish too. For protein, consider adding cooked chicken, shrimp, or chickpeas. This turns your orzo into a heartier meal. Adjust the spices to match your mood. If you love heat, add some red pepper flakes. For a more earthy taste, try adding smoked paprika or nutmeg. You can also mix in different cheeses. Goat cheese or feta can add a tangy twist. Cream cheese can make it even richer. Just remember to melt it well into the dish for a smooth texture. To store your Creamy Mushroom Spinach Orzo, let it cool first. Place it in an airtight container. This keeps it fresh. Make sure to seal the container tightly. It can last in the fridge for up to three days. When reheating, use the stove or microwave. For the stove, place it in a pan over low heat. Add a splash of vegetable broth or water to keep it moist. Stir often to prevent sticking. In the microwave, heat in short bursts. Stir every 30 seconds to ensure even warmth. To freeze your orzo dish, let it cool completely. Use a freezer-safe container, leaving space for expansion. It can last up to three months in the freezer. When ready to eat, thaw it in the fridge overnight. Reheat using the stovetop method, adding a little broth for smoothness. How can I make Creamy Mushroom Spinach Orzo gluten-free? To make this dish gluten-free, use gluten-free orzo. Many brands offer this option. Check the package for cooking instructions. The rest of the ingredients, like vegetables and broth, are often gluten-free too. Can I prepare this dish in advance? Yes, you can make this dish ahead of time. Cook the orzo and sauce separately. Store them in the fridge for up to two days. When ready to eat, warm the sauce and mix in the orzo. What can I substitute for heavy cream? You can use coconut cream or cashew cream for a lighter option. Both will add creaminess without dairy. Another option is using Greek yogurt mixed with a little milk for a tangy twist. How to adjust the recipe for more servings? To make more servings, simply double or triple the ingredients. Keep the same cooking times for each step. Just ensure your pot is large enough to hold everything. This dish holds well, so it's perfect for gatherings. You learned how to make Creamy Mushroom Spinach Orzo step by step. We covered the key ingredients, cooking methods, and tips to enhance flavor. Don't forget the variations that fit your diet. Store leftovers properly and reheat them to keep the taste. Enjoy this dish with a twist based on your cravings. Cooking should be fun, and this recipe makes it easy! You'll impress your family and friends with your delicious and creamy creation.

If you’re craving comfort food with a twist, Creamy Mushroom Spinach Orzo is the answer. This dish combines tender orzo with savory mushrooms and fresh spinach, all in a rich, …

Read more

Categories Dinner Leave a comment

BBQ Pulled Chicken Sliders Irresistible and Tasty Treat

October 17, 2025February 14, 2025 by Chef Evan
- 2 pounds boneless, skinless chicken thighs - 1 cup BBQ sauce (store-bought or homemade) - 12 slider buns - 1 tablespoon olive oil - 1 onion, finely chopped - 2 cloves garlic, minced - 1 teaspoon smoked paprika - 1 teaspoon onion powder - 1 teaspoon garlic powder - 1 teaspoon cumin - Salt and pepper to taste - 1 cup coleslaw (store-bought or homemade) - Fresh cilantro, for garnish To make BBQ pulled chicken sliders, start with quality ingredients. Chicken thighs give a juicy and tender texture. You can use your favorite BBQ sauce, whether it's homemade or store-bought. The sauce adds rich flavor and moisture. For seasoning, olive oil helps to sauté the onions and garlic. The onion gives sweetness, while garlic adds depth. Smoked paprika gives a touch of smokiness, while onion powder, garlic powder, and cumin round out the flavors. Salt and pepper are essential for taste. When it comes to toppings, coleslaw provides a crunchy contrast to the tender chicken. You can buy it or make your own. Fresh cilantro adds a pop of color and a fresh taste that brightens the sliders. These ingredients come together to create a delicious meal that’s perfect for gatherings or a cozy night in. Each bite is a mix of flavors and textures that you and your guests will love. {{ingredient_image_1}} To start, heat 1 tablespoon of olive oil in a large skillet over medium heat. Once hot, add 1 finely chopped onion. Cook the onion for about 5 minutes until it turns soft and clear. Now, stir in 2 minced garlic cloves and cook for another minute. This will create a nice base for your chicken. Next, add 2 pounds of boneless, skinless chicken thighs to the skillet. Season the chicken with 1 teaspoon of smoked paprika, 1 teaspoon of onion powder, 1 teaspoon of garlic powder, 1 teaspoon of cumin, and a pinch of salt and pepper. This mix of spices will give your chicken great flavor. Now, it's time to sear the chicken thighs. Cook each side for about 3-4 minutes until they get a nice brown color. After searing, pour in 1 cup of your favorite BBQ sauce. Make sure the chicken is well-coated. Lower the heat to a gentle simmer, cover the skillet, and let it cook for 30-35 minutes. This slow cooking will make the chicken tender and juicy. Once the chicken is cooked, take it out and place it on a cutting board. Use two forks to shred the chicken into bite-sized pieces. Return the shredded chicken to the skillet and mix well with the BBQ sauce. While the chicken simmers, preheat your oven to 350°F (175°C). Slice 12 slider buns in half and place them on a baking sheet. Toast them in the oven for about 5-7 minutes until they are golden brown. Now it’s time to assemble! Spread a good amount of pulled chicken on the bottom half of each slider bun. Top it with a spoonful of coleslaw and place the top half of the bun on each slider. Enjoy your delicious BBQ pulled chicken sliders! Choosing the best BBQ sauce Pick a BBQ sauce that matches your taste. A tangy sauce adds zest. A sweet sauce gives a rich flavor. You can even mix sauces for a unique taste. Recommended seasoning adjustments Feel free to tweak the spices. Add more smoked paprika for a deeper flavor. A pinch of cayenne can bring some heat. Experiment until you find what you love. Ensuring chicken tenderness To keep the chicken tender, cook it low and slow. This method helps break down the meat fibers. Always check that the internal temperature reaches 165°F. Recommended cooking methods You can use various methods to cook the chicken. Slow-cook in a crockpot for ease. Grill it for a smoky flavor. Each method brings a different taste. How to layer the sliders Start with the bottom bun. Add a generous scoop of pulled chicken. Next, add a spoonful of coleslaw for crunch. Finally, place the top bun gently on top. Ensuring less soggy buns To avoid soggy buns, toast them lightly. This creates a barrier against moisture. You can also serve the coleslaw on the side. This keeps the buns crisp longer. Pro Tips Choose the Right Chicken: Using boneless, skinless chicken thighs ensures that your pulled chicken remains juicy and flavorful. Avoid chicken breasts, which can dry out during cooking. Homemade BBQ Sauce: For a unique flavor, consider making your own BBQ sauce. This allows you to customize the sweetness and spiciness to your liking. Coleslaw Variations: Experiment with different types of coleslaw, like spicy or vinegar-based, to add a twist to your sliders. This can enhance the overall flavor profile. Keep it Warm: If serving at a gathering, keep the pulled chicken warm in a slow cooker to maintain its temperature and moisture until it's time to serve. {{image_2}} You can change up the meat in this recipe. Pulled pork works great, too. If you want a plant-based option, try jackfruit. It shreds like chicken and takes on flavors well. You can also switch up the coleslaw. A vinegar-based slaw brings a bright taste. Try adding apples or nuts for a twist. Customize to fit your taste! Want more heat? Make spicy BBQ pulled chicken! Add hot sauce or cayenne pepper to the BBQ sauce. You can also mix in some chopped chipotle peppers for a smoky kick. Don’t forget toppings! Cheese adds creaminess, and jalapeños bring heat. Choose your favorite toppings to make each slider unique. Buns are key for sliders. Try brioche for a sweet touch or whole wheat for a healthy option. You can also use lettuce leaves for a low-carb version. For sides, fries and chips are classic. You could also serve with a fresh salad or some crunchy pickles. These sides balance the rich flavors of the sliders perfectly. To store BBQ pulled chicken, let it cool first. Place it in a sealed container. You can keep it in the fridge for up to four days. This helps keep the chicken tender and tasty. Always check for any off smell before eating. To freeze leftover sliders, wrap them tightly in plastic wrap. Place them in a freezer bag to avoid freezer burn. You can freeze them for up to three months. When you're ready to eat, take them out and let them thaw in the fridge overnight. For reheating, preheat your oven to 350°F (175°C). Unwrap the sliders and place them on a baking sheet. Heat for about 15 minutes, or until warm. This keeps the buns nice and soft. To keep flavor and texture, store the chicken and buns separately. This way, the buns do not get soggy. You can also add fresh coleslaw just before serving. This adds crunch and freshness. You can use several options for pulled chicken. Here are some great choices: - Chicken breasts: They are lean but can dry out. Cook them gently for best results. - Pulled pork: Use slow-cooked pork for a richer flavor. - Turkey: Ground turkey works well too. It’s lean and tasty. - Jackfruit: This plant-based option is great for a vegan version. It shreds nicely like meat. Yes, you can prepare the chicken ahead of time. Here are some tips: - Cook and store: You can cook the pulled chicken and keep it in the fridge for up to 3 days. - Freezing: Freeze the shredded chicken in airtight bags. It lasts for up to 3 months. - Reheat: When ready, reheat in a skillet or microwave until hot. If you want to add heat, try these simple ideas: - Hot sauce: Mix your favorite hot sauce into the BBQ sauce. - Jalapeños: Add sliced jalapeños to the sliders for fresh heat. - Spicy seasoning: Use cayenne pepper or chili powder when cooking the chicken. - Pepper jack cheese: Add a slice for a creamy, spicy kick. These tips will help you make BBQ pulled chicken sliders that fit your taste! This blog post guides you through making delicious BBQ pulled chicken sliders. You learned about key ingredients, step-by-step cooking, and tasty toppings. I also shared tips for better flavor and variations to suit your taste. Don’t forget proper storage for any leftovers. Try these sliders at your next gathering. They are easy to make and sure to impress everyone. Enjoy the fun of cooking, and please share your results!

Get ready for a treat with BBQ Pulled Chicken Sliders! These tasty bites are perfect for game day, parties, or a family dinner. With juicy chicken drenched in rich BBQ …

Read more

Categories Appetizers Leave a comment

Triple Chocolate Fudge Cookies Irresistibly Decadent Treat

October 8, 2025February 13, 2025 by Chef Evan
- 1 cup unsalted butter, softened - 1 cup brown sugar, packed - 1/2 cup granulated sugar - 2 large eggs - 2 teaspoons vanilla extract - 2 cups all-purpose flour - 1/2 cup cocoa powder - 1 teaspoon baking soda - 1/2 teaspoon salt - 1 cup semi-sweet chocolate chips - 1/2 cup white chocolate chips - 1/2 cup dark chocolate chunks Using quality chocolate makes a big difference. Good chocolate adds rich flavor. I recommend using semi-sweet, white, and dark chocolate for depth. For butter, make sure it's at room temperature. Softened butter mixes well with sugars. This creates a smooth base for your cookies. Cold butter will not blend properly, and your cookies may be dense. Always check your ingredients before starting. Fresh, quality ingredients lead to the best results. Use this list to gather everything you need. It will save you time and keep your baking smooth. {{ingredient_image_1}} 1. Preheat your oven to 350°F (175°C). This helps the cookies bake evenly. 2. Line two baking sheets with parchment paper. This will keep cookies from sticking. 3. In a large bowl, cream together 1 cup of softened butter, 1 cup of brown sugar, and 1/2 cup of granulated sugar. Mix until the mixture is light and fluffy. 4. Add 2 large eggs, one at a time. Mix well after each egg. Stir in 2 teaspoons of vanilla extract for flavor. 1. In a separate bowl, whisk together 2 cups of all-purpose flour, 1/2 cup of cocoa powder, 1 teaspoon of baking soda, and 1/2 teaspoon of salt. This will make sure all dry ingredients are mixed well. 1. Gradually add the dry ingredients to the wet mixture. Mix until just combined. Do not overmix. 2. Fold in 1 cup of semi-sweet chocolate chips, 1/2 cup of white chocolate chips, and 1/2 cup of dark chocolate chunks. Make sure the chocolate is evenly spread in the dough. 1. Use a cookie scoop or tablespoon to drop rounded balls of dough onto the prepared baking sheets. Space them about 2 inches apart. This gives them room to spread. 2. Bake for 10-12 minutes. The edges should be set while the centers remain soft. They will firm up as they cool. 3. Allow the cookies to cool on the baking sheets for 5 minutes. Then, transfer them to a wire rack to cool completely. To keep your cookies soft, don’t bake them too long. Bake them for 10 to 12 minutes. They should look set on the edges but still soft in the middle. They will continue to cook a bit after you take them out. Always let them cool on the baking sheet for at least five minutes. This helps them firm up without drying out. When measuring your ingredients, use the right tools. Use dry measuring cups for flour and cocoa powder. Avoid packing them down, as this adds too much. Also, don’t overmix the dough once you add the dry ingredients. This can make cookies tough. Mix just until combined for the best texture. To serve your cookies, arrange them on a nice plate. Dust them with powdered sugar for a beautiful look. This small touch adds charm. These cookies taste great with milk or coffee. Enjoy them warm for the best experience! Pro Tips Chill the Dough: For thicker cookies, chill the dough for at least 30 minutes before baking. This helps prevent spreading and enhances the flavor. Use Quality Chocolate: Opt for high-quality chocolate chips and chunks for a richer taste. The better the chocolate, the better the cookies! Don’t Overbake: To achieve a soft and chewy texture, remove the cookies from the oven when the edges are set but the centers are still slightly underbaked. Experiment with Mix-Ins: Feel free to add nuts, dried fruits, or even a sprinkle of sea salt on top for a unique twist on these cookies. {{image_2}} You can add nuts to give the cookies a nice crunch. I recommend using walnuts or pecans. They add great flavor and texture. Use about 1 cup of chopped nuts. Toasting them first can boost their taste. Simply bake them at 350°F for about 5-7 minutes. This step enhances the nuttiness and makes the cookies even better. You can change the chocolate types for unique flavors. Try using dark chocolate for a rich taste. Milk chocolate adds sweetness if you prefer that. You can mix semi-sweet, dark, and milk chocolates together. This creates a great blend of flavors and textures. Experiment to find your favorite combination! If you need gluten-free cookies, try using almond flour or oat flour instead of all-purpose flour. This keeps the cookies soft and chewy. For dairy-free options, use dairy-free chocolate chips. They melt well and taste great. These simple swaps let everyone enjoy this treat! To keep your cookies fresh, store them in an airtight container. This helps maintain their soft texture. You can also add a slice of bread to the container. The bread keeps the cookies moist. For the best taste, eat them within a week. If you have a lot, consider using a larger container. You can freeze both cookie dough and baked cookies. For dough, scoop it into balls and freeze on a baking sheet. Once frozen, transfer them to a zip-top bag. This way, you can bake fresh cookies anytime! For baked cookies, let them cool completely. Then, place them in an airtight container or a freezer bag. To thaw, leave the cookies out at room temperature for about 30 minutes. If you want a warm cookie, pop them in the oven for a few minutes. Enjoy the taste of fresh cookies even after freezing! Perfect cookies have a few signs. First, check the edges. They should look set and slightly firm. The centers will look soft and a bit shiny. If they are too dry, they may overbake. Take them out when they look slightly underdone, as they will continue to cook on the tray. Yes, you can use other sugars. Brown sugar gives cookies chewy texture and deep flavor. White sugar makes cookies crispier. You can mix both for balance. If you want to try alternatives, coconut sugar or maple sugar work well. Just keep the same amounts for the best results. If your cookies are too soft, there are a few fixes. First, check the baking time. If they are underbaked, give them a few more minutes. If they still stay soft, chill the dough for 30 minutes before baking. This helps the cookies hold their shape better while baking. In this post, we explored the magic of cookie making. We covered the key ingredients and why quality matters. You learned how to mix, bake, and achieve the perfect texture. We shared tips on avoiding common mistakes and enhancing your cookie's look. You can also try fun variations, store cookies for freshness, and tackle FAQs with confidence. Remember, great cookies need attention and care. Enjoy baking a batch, and don't forget to share them with friends!

If you’re craving a treat that’s rich and chocolaty, look no further! My Triple Chocolate Fudge Cookies are the ultimate indulgence, combining semi-sweet, dark, and white chocolate for a truly …

Read more

Categories Desserts Leave a comment

Creamy Sun Dried Tomato Gnocchi Rich and Flavorful Dish

October 15, 2025February 13, 2025 by Chef Evan
- 16 oz package potato gnocchi - 1 cup sun dried tomatoes in oil - 2 cloves garlic - 1 cup heavy cream - 1 cup freshly grated Parmesan cheese - Salt and pepper - 1 cup fresh spinach - 1 teaspoon dried basil - Crushed red pepper flakes (optional) - Fresh basil leaves for garnish When making creamy sun dried tomato gnocchi, you need to gather a few key items. First, the potato gnocchi is the star of the dish. It gives a soft, pillowy texture that pairs well with the sauce. You will need a 16 oz package. Next, sun dried tomatoes add a rich, tangy flavor. Make sure to get a cup of these in oil. Garlic is essential for a great taste. You will use 2 cloves, minced finely. Heavy cream brings the dish together. You will need a whole cup. Finally, Parmesan cheese offers a cheesy kick. Freshly grated is best, so grab a cup of that too. To season and garnish, you should have salt and pepper for taste. Fresh spinach adds color and nutrients, so get a cup of it. Dried basil gives a lovely aroma, while crushed red pepper flakes can add heat if you like. Lastly, fresh basil leaves make a nice touch on top. With these ingredients, you will create a rich and flavorful dish that impresses everyone at the table. {{ingredient_image_1}} To cook the gnocchi, start by boiling a large pot of salted water. Once the water is boiling, add the gnocchi. Watch closely as they cook. They will float to the top in about 2-3 minutes. This means they are done! Carefully drain them and set them aside. In a large skillet, heat one tablespoon of olive oil over medium heat. Add two cloves of minced garlic and sauté for about a minute until it smells great. Next, stir in one cup of chopped sun-dried tomatoes. Cook this mix for another 2-3 minutes to let the flavors blend well. Now, reduce the heat to low. Pour in one cup of heavy cream and stir it all together. Let it simmer for 2-3 minutes. After that, add one cup of freshly grated Parmesan cheese. Stir constantly until the cheese melts and the sauce is creamy. Now, it’s time to mix everything. Gently fold in the cooked gnocchi and one cup of roughly chopped spinach. Add one teaspoon of dried basil, along with salt and pepper to taste. Stir until the spinach wilts and everything is coated in that creamy sauce. Taste it and adjust the flavors as needed. If you like a kick, add some crushed red pepper flakes. Now, you're ready to serve! To ensure the sauce has a smooth, creamy texture, stir it gently. A good sauce should coat the gnocchi without being too runny. If it feels too thick, add a splash of pasta water to adjust the consistency. You can also try different cooking methods. Instead of boiling, you can pan-fry gnocchi for a crispy edge. This adds a fun texture and flavor to your dish. If you want a lighter dish, use half-and-half instead of heavy cream. It still gives a nice creaminess but cuts some calories. For herbs, try using fresh parsley or thyme. They can change the dish's flavor profile while keeping it tasty. You can also swap spinach for kale or arugula. These greens add a different taste and texture, making your gnocchi unique each time. Pair your gnocchi with a light salad. A simple arugula salad with lemon dressing works well. It adds a fresh crunch that balances the creaminess. Wine lovers will enjoy a glass of Chardonnay. Its creamy notes match perfectly with the sun-dried tomatoes and cheese. A light red, like Pinot Noir, can also complement the flavors if you prefer. Pro Tips Use Quality Ingredients: The flavor of your dish relies heavily on the quality of your sun dried tomatoes and cheese. Choose high-quality brands for the best results. Don't Overcook the Gnocchi: Gnocchi should only be cooked until they float to the top of the boiling water. Overcooking can make them mushy. Add Protein: For a heartier meal, consider adding grilled chicken or shrimp to the gnocchi before serving. Customize the Spice: Adjust the amount of crushed red pepper flakes to your preference. You can also use fresh chili or hot sauce for a different flavor profile. {{image_2}} For a vegan twist, swap the heavy cream with coconut cream or cashew cream. You can make cashew cream by blending soaked cashews with water until smooth. For cheese, use nutritional yeast or a vegan cheese alternative. Sun-dried tomatoes are often vegan, but check the label to be sure. Some brands might add dairy products. By using these swaps, you can enjoy a creamy dish that fits your diet. You can boost this dish with proteins like chicken, shrimp, or tofu. If using chicken, cook it in the skillet first until golden. Then, remove it and add it back later with the gnocchi. For shrimp, sauté them until pink before adding the sauce. Tofu can be cubed and sautéed until crispy. This way, you keep the creamy sauce's flavor while adding protein. Want a spicier dish? Add crushed red pepper flakes during the sauce-making step. You can also include a pinch of cayenne pepper or some chili powder. Fresh herbs like oregano or thyme can add a nice kick too. Adjust these spices to your taste for the perfect heat level. To keep your creamy sun dried tomato gnocchi fresh, use a tight container. Glass or plastic containers work well. Make sure to cool the dish before sealing. Store it in the fridge right away. This dish lasts about 3 days in the fridge. After that, the flavors may fade. When you want to enjoy your leftovers, reheat them gently. The best way is to use a skillet. Add a splash of heavy cream or water to keep the sauce creamy. Heat it over low heat. Stir often to prevent sticking. You can also use a microwave, but check it every 30 seconds. This way, it warms evenly and stays fresh. You cook potato gnocchi for about 2-3 minutes. Boil it in salted water. When the gnocchi floats, it is done. This quick process keeps the gnocchi soft and light. Just keep an eye on it. Overcooking can make it mushy. Yes, you can make parts of this dish ahead of time. You can cook the gnocchi and store it. Keep it in a container with some oil to prevent sticking. For the sauce, prepare it and store it separately. Just heat it up when you're ready to eat. Combine everything before serving for the best taste. This dish pairs well with various sides. You can serve a fresh green salad. A simple arugula salad with lemon dressing works great. Garlic bread is also a fantastic option. If you like, add grilled chicken or shrimp for extra protein. These sides enhance the meal and make it even more satisfying. This blog post guides you through making creamy sun-dried tomato gnocchi. You learned about the key ingredients and seasonings, plus easy steps to cook the dish to perfection. I shared tips to enhance flavor and variations for different diets. Remember, storing leftovers correctly keeps your dish fresh longer. Enjoying gnocchi can be a simple, delicious adventure. You can impress your family and friends with this recipe. Get cooking, and savor every bite!

Get ready to indulge in a delicious dish! My Creamy Sun Dried Tomato Gnocchi is rich, flavorful, and easy to make. With simple ingredients, you can create a meal that …

Read more

Categories Dinner Leave a comment

No-Bake Chocolate Mint Bars Easy and Delicious Treat

November 24, 2025February 12, 2025 by Chef Evan
- 1 cup rolled oats - 1 cup almond flour - 1/2 cup maple syrup - 1/2 cup natural peanut butter (or almond butter) - 1/4 cup cocoa powder - 1/4 teaspoon salt - 1/2 teaspoon peppermint extract - 1/2 cup dark chocolate chips - 1 tablespoon coconut oil To make No-Bake Chocolate Mint Bars, gather these ingredients. You will need rolled oats, almond flour, and maple syrup. Peanut butter adds creaminess, while cocoa powder gives rich chocolate flavor. A pinch of salt enhances all tastes, and peppermint extract adds that fresh mint kick. You can choose dark chocolate chips for a more intense flavor. The coconut oil helps the chocolate melt smoothly. When you mix these ingredients, you create a tasty, no-bake dessert that is sure to please. - Calories per serving: About 150 - Nutritional breakdown: - Carbs: 20g - Fats: 8g - Proteins: 4g - Potential allergens: Contains nuts (almond flour, peanut butter), and may have traces of gluten if not labeled gluten-free. Knowing the nutritional facts helps you enjoy these bars while keeping health in mind. Each bar gives a nice balance of carbs, fats, and proteins. Remember to check for allergens before serving. {{ingredient_image_1}} 1. Mixing dry ingredients Start by taking a large bowl. Add 1 cup of rolled oats, 1 cup of almond flour, 1/4 cup of cocoa powder, and 1/4 teaspoon of salt. Mix these dry ingredients well. Make sure there are no clumps. 2. Preparing the wet mixture In a separate bowl, combine 1/2 cup of maple syrup, 1/2 cup of peanut butter, and 1/2 teaspoon of peppermint extract. Stir this mixture until it is smooth and creamy. This will give our bars a rich flavor. 3. Combining wet and dry ingredients Pour the wet mixture into the bowl with the dry ingredients. Mix everything together until the dry ingredients are fully coated. You want it to form a sticky dough that holds together. 1. Lining the baking dish Grab an 8x8-inch baking dish. Line it with parchment paper, leaving some paper hanging over the edges. This will help you lift the bars out later. 2. Pressing down the mixture Transfer the sticky mixture into the lined dish. Use a spatula or your hands to press it down firmly. Make sure it is even and packed tightly. This helps the bars hold their shape. 3. Melting the chocolate and coconut oil In a microwave-safe bowl, add 1/2 cup of dark chocolate chips and 1 tablespoon of coconut oil. Microwave this in 30-second intervals. Stir in between until it is fully melted and smooth. 1. Refrigeration time Pour the melted chocolate over the pressed mixture in the baking dish. Spread it evenly with a spatula. Place the dish in the fridge for at least 2 hours. This time allows the bars to set completely. 2. Cutting and serving suggestions Once set, lift the bars from the dish using the parchment paper. Cut them into squares or bars. This is the fun part, and you can make them any size you like. 3. Optional garnishes For an extra touch, drizzle some melted dark chocolate on top. You could also sprinkle some crushed mint leaves for added flavor. These garnishes make the bars look even more tempting. To create perfect no-bake chocolate mint bars, I suggest adjusting the sweetness and flavors to suit your taste. You can add more maple syrup if you want it sweeter. For a stronger mint flavor, add an extra drop of peppermint extract. Just remember, a little goes a long way. Ensure the right consistency by mixing the wet and dry ingredients well. The dough should be sticky but not too wet. If it feels too dry, you can add a splash of water or more maple syrup. One common mistake is overmixing the ingredients. This can change the texture of your bars. Mix just until everything is combined. Another mistake is not pressing the mixture firmly into the dish. Pressing down helps the bars hold together better. Use your hands or a spatula to press it evenly. For this recipe, you need a few kitchen tools. A large mixing bowl is essential for combining the dry and wet ingredients. A spatula helps with mixing and pressing down the mixture. You should also have a microwave-safe bowl for melting the chocolate and coconut oil. For storage, an airtight container is best. A baking dish lined with parchment paper makes it easy to lift out your bars later. Pro Tips Store in the Fridge: These bars are best kept in the refrigerator to maintain their firmness and freshness. They can last up to a week when stored properly. Experiment with Nut Butters: Feel free to substitute peanut butter with almond butter or any nut butter of your choice for different flavor profiles. Add Texture: For added crunch, mix in some chopped nuts or seeds into the base before pressing it into the baking dish. Customize the Toppings: Get creative with your toppings! Consider adding crushed peppermint candies, coconut flakes, or even a sprinkle of sea salt for a unique touch. {{image_2}} You can change the taste of these bars in fun ways. Adding nuts or seeds can give a nice crunch. Chopped walnuts or sunflower seeds work great. You can also try different extracts. Vanilla or orange extract can add a new twist. If you want vegan bars, swap the honey for maple syrup. Use almond butter for a nut-free option. For gluten-free bars, check that the oats are certified gluten-free. Almond flour is naturally gluten-free and works well. These bars taste great with ice cream. A scoop of vanilla or mint chocolate chip pairs perfectly. You can also serve them with fresh fruits like strawberries or bananas. The fruit adds a nice balance to the rich chocolate. To keep your No-Bake Chocolate Mint Bars fresh, store leftovers in the fridge. Use an airtight container to prevent moisture loss. You can also wrap the bars in plastic wrap before placing them in the container. This extra layer helps keep them safe. These bars last about one week in the fridge. If you want to keep them longer, you can freeze them. They can stay good in the freezer for up to three months. Just cut them into squares first, wrap each piece in plastic wrap, and place in a freezer bag. If you want to soften the bars, take them out of the fridge. Let them sit at room temperature for about ten minutes. You can also use the microwave for a few seconds. Make sure not to heat them too long, or they may melt. Avoid reheating in the oven, as it will change their texture. Making these bars is quick and fun. The prep time is just 15 minutes. After that, you need to chill them for at least 2 hours. So, the total time is 2 hours and 15 minutes. This makes it easy to whip up a tasty treat without much waiting. Yes, you can choose other sweeteners! If you want to swap out maple syrup, try honey or agave syrup. These options work well and add a unique taste. Just make sure to use the same amount for the best results. This way, you can enjoy the bars while staying true to your flavor preferences. Cutting the bars can be tricky. To avoid crumbling, chill them until they are firm. Use a sharp knife for clean cuts. For best results, warm the knife slightly before cutting. This makes slicing easier. You can also use a ruler to mark out even squares. Enjoy your neat, tasty bars! In this blog post, we covered how to make no-bake chocolate mint bars. You learned about the simple ingredients, detailed preparation steps, and useful tips for success. I shared common mistakes to avoid and how to store your bars for later enjoyment. These delicious treats are easy to customize and perfect for any occasion. Enjoy your creation and share it with friends. You’ll love these bars, and so will others!

Craving a sweet treat but don’t want to turn on the oven? You’re in luck! These No-Bake Chocolate Mint Bars are a simple, delicious way to satisfy your sweet tooth …

Read more

Categories Desserts Leave a comment

Caprese Chicken Skillet Delightful and Easy Recipe

October 21, 2025February 9, 2025 by Chef Evan
Here’s what you need for Caprese chicken skillet: - 4 boneless, skinless chicken breasts - 1 tablespoon olive oil - Salt and pepper to taste - 2 cups cherry tomatoes, halved - 1 cup fresh mozzarella balls (bocconcini), sliced or halved - 1 cup fresh basil leaves, roughly chopped - 2 tablespoons balsamic glaze - 1 teaspoon garlic powder - 1 teaspoon dried oregano You can mix it up with these ideas: - Add crushed red pepper for heat. - Use fresh garlic instead of garlic powder. - Try Italian seasoning for an added flavor boost. To make this dish, gather these tools: - A large skillet for cooking. - A sharp knife for chopping. - A cutting board for prep work. - A spatula for flipping the chicken. - Measuring spoons for precise amounts. These simple ingredients and tools make it easy to whip up a tasty meal. Enjoy cooking! {{ingredient_image_1}} First, take the chicken breasts out of the package. Pat them dry with paper towels. This step helps the chicken brown better. Next, sprinkle salt, pepper, garlic powder, and dried oregano on both sides of each chicken breast. This seasoning adds great flavor. Heat 1 tablespoon of olive oil in a large skillet over medium heat. Once the oil is hot, carefully place the chicken in the skillet. Cook each side for about 6-7 minutes. Look for a nice golden brown color. Use a meat thermometer to check the chicken’s temperature. It should reach 165°F or 75°C. After cooking, remove the chicken from the skillet and place it on a plate. Let it rest for a moment. In the same skillet, add 2 cups of halved cherry tomatoes. Cook for about 3-4 minutes until they soften. This step brings out the tomatoes' sweetness. Lower the heat and return the chicken to the skillet. Top each chicken piece with the cooked tomatoes and 1 cup of fresh mozzarella. Cover the skillet with a lid for 2 minutes. This helps the cheese melt nicely. After 2 minutes, remove the lid and add 1 cup of roughly chopped fresh basil on top. Finally, drizzle 2 tablespoons of balsamic glaze over the chicken and serve hot. To make your chicken juicy, start with good quality meat. I prefer boneless, skinless chicken breasts for this dish. Before cooking, season both sides well with salt, pepper, garlic powder, and oregano. This adds flavor and helps keep moisture in. Cook the chicken on medium heat for 6-7 minutes on each side. This allows the chicken to brown nicely while cooking through. Always check the internal temperature; it should be 165°F or 75°C. Rest the chicken for a few minutes after cooking to lock in juices. For that gooey, melty mozzarella, add it at the right time. After cooking the chicken and tomatoes, place mozzarella on top of the chicken. Cover the skillet with a lid to trap heat. This helps the cheese melt without burning. Keep the heat low to avoid overcooking. The mozzarella should be soft and slightly gooey in about 2 minutes. Fresh ingredients make a big difference in flavor. Choose ripe cherry tomatoes for sweetness and juiciness. Look for smooth, firm mozzarella balls; they should feel slightly springy. Fresh basil adds a bright taste. Cut or tear the leaves just before serving to keep them vibrant. Always wash your produce well. Using high-quality, fresh ingredients ensures a tasty dish every time. Pro Tips Use Fresh Ingredients: Fresh basil and high-quality mozzarella can elevate the flavor of your dish significantly. Opt for fresh ingredients whenever possible for the best results. Don’t Overcook the Chicken: To keep the chicken juicy, make sure you do not overcook it. Use a meat thermometer to check for doneness at 165°F (75°C). Customize the Toppings: Feel free to add other toppings like sautéed spinach or roasted red peppers for extra flavor and nutrition. Get creative! Serve with a Side: This dish pairs wonderfully with a simple green salad or garlic bread to soak up the juices. Make it a complete meal! {{image_2}} If you're watching carbs, you can still enjoy this dish. Swap the cherry tomatoes for zucchini noodles or spiralized cucumber. This keeps the dish light and fresh. You can also replace the balsamic glaze with vinegar. It adds flavor without the extra sugar. This Caprese Chicken Skillet is naturally gluten-free. Just make sure your balsamic glaze is gluten-free as well. Most brands are safe, but check the label. You can serve this dish with a side of rice or quinoa for a hearty meal. For a vegetarian version, replace the chicken with eggplant or portobello mushrooms. They have a nice texture and soak up flavors well. Cook the vegetables the same way as you would the chicken. Add the mozzarella and basil for that classic Caprese taste. After you finish your meal, let the Caprese chicken cool. Then, place it in an airtight container. Store it in the fridge for up to four days. This helps keep the flavors fresh. If you need to separate the chicken from the toppings, do it. This way, the tomatoes and cheese stay tasty. When you want to eat your leftovers, reheat them gently. Use a skillet on low heat. This helps keep the chicken juicy. You can also use a microwave. Heat in short bursts, around 30 seconds. Check often so you don’t overcook it. If you want to save some for later, freezing works well. Wrap the chicken tightly in plastic wrap, then place it in a freezer bag. Make sure to remove as much air as possible. You can freeze it for up to three months. When you’re ready to eat, thaw it in the fridge overnight before reheating. You can serve Caprese Chicken Skillet with various sides. A fresh green salad pairs nicely. Garlic bread is also a great option. You might like to add some pasta. The flavors mix well with a light sauce. If you want something simple, steamed veggies work too. These sides will enhance the meal's taste and feel. Yes, you can use different cheeses. Provolone or gouda adds a nice twist. Feta cheese gives a tangy flavor. If you want a creamier texture, try ricotta. Each cheese will change the dish's taste. Stick with mild flavors to complement the tomatoes and basil. Cooking chicken in a skillet takes about 12 to 14 minutes. Cook for 6-7 minutes on each side. Make sure the chicken is golden brown. Check the internal temperature; it should be 165°F or 75°C. This ensures your chicken is safe to eat. Cooking times may vary with different chicken sizes. This blog post covered how to make a Caprese Chicken Skillet. We discussed the key ingredients, options for seasoning, and tools you might need. You learned step-by-step instructions for prepping and cooking the chicken, plus adding tasty Caprese elements. We shared tips for juicy chicken, melting cheese, and using fresh ingredients. You saw variations for low-carb, gluten-free, and vegetarian diets. We also looked at storage tips for leftovers and answered common questions. Enjoy making this dish your own!

If you’re looking for a quick and tasty dinner, the Caprese Chicken Skillet is your answer. This dish combines juicy chicken with fresh tomatoes, mozzarella, and basil for a burst …

Read more

Categories Dinner Leave a comment

Spicy Honey Garlic Shrimp Irresistible Flavor Twist

October 18, 2025February 7, 2025 by Chef Evan
- 1 pound large shrimp, peeled and deveined - 4 tablespoons honey - 3 cloves garlic, minced - 2 tablespoons soy sauce - 1 tablespoon sriracha (adjust according to spice preference) - 1 tablespoon olive oil - 1 teaspoon freshly grated ginger - 1 tablespoon lime juice - Salt and pepper to taste The main ingredients create a sweet and spicy mix. The honey adds sweetness, while sriracha brings heat. Garlic and ginger enhance the dish with their rich flavors. Fresh shrimp soak up these tasty notes, making every bite special. - 2 green onions, thinly sliced - Sesame seeds Garnishes elevate your dish. Green onions add a fresh crunch. Sesame seeds provide a nutty flavor and pretty look. These extras make your meal pop on the plate. If you lack sriracha, use chili paste or red pepper flakes. For a gluten-free option, swap soy sauce for tamari. If you need a different sweetener, try maple syrup or agave instead of honey. These swaps keep the dish flavorful while catering to your needs. {{ingredient_image_1}} Start by making the marinade. In a medium bowl, mix together 4 tablespoons of honey, 3 cloves of minced garlic, and 2 tablespoons of soy sauce. Add 1 tablespoon of sriracha for some heat. If you want it spicier, add more sriracha. Then, include 1 teaspoon of freshly grated ginger and 1 tablespoon of lime juice. Whisk all ingredients until blended. Next, add 1 pound of peeled and deveined shrimp. Make sure each shrimp gets coated well. Let the shrimp sit in the marinade for 15-20 minutes. This time will help the shrimp soak up all the great flavors. Heat 1 tablespoon of olive oil in a large skillet over medium-high heat. Once the oil is hot, add the marinated shrimp along with the marinade. Cook the shrimp for about 2-3 minutes on one side. You will know they are ready to flip when they turn pink. Then, flip the shrimp and cook for another 2-3 minutes. Be careful not to overcook them. They should look pink and opaque when done. Season with salt and pepper to taste, adding just the right touch of flavor. After cooking, take the skillet off the heat. Transfer the shrimp to a serving dish. Drizzle any leftover sauce from the skillet on top of the shrimp. This adds extra flavor. For a lovely finish, garnish with thinly sliced green onions and a sprinkle of sesame seeds. These final touches make the dish look great and taste even better. Enjoy your spicy honey garlic shrimp! To make the best marinade, mix honey, garlic, soy sauce, sriracha, ginger, and lime juice. Whisk them well until they blend smoothly. The honey adds sweetness, while sriracha gives heat. Adjust the sriracha if you like it milder or spicier. Always let the shrimp sit in the marinade for 15-20 minutes. This step helps the flavors soak into each shrimp. Use a large skillet and heat olive oil over medium-high heat. This makes the shrimp cook evenly. Add the shrimp along with the marinade to the skillet. Cook them for 2-3 minutes on each side. Look for a pink, opaque color to know they are done. Avoid overcooking; this keeps them juicy. Season with salt and pepper for extra taste. Serve your shrimp on a bed of jasmine rice or a fresh green salad. This adds a nice crunch. Drizzle any leftover sauce from the skillet over the shrimp for more flavor. Garnish with sliced green onions and sesame seeds for a pop of color. Lime wedges on the side add a fresh, zesty twist. Enjoy your tasty creation! Pro Tips Marinate for Maximum Flavor: Allow the shrimp to marinate for at least 30 minutes, or even up to an hour, to really absorb the flavors of the honey, garlic, and spices. Use Fresh Ingredients: Fresh shrimp and freshly minced garlic will make a significant difference in taste compared to frozen shrimp and pre-minced garlic. Adjust Spice Level: If you prefer a milder dish, reduce the amount of sriracha or replace it with a milder hot sauce. Perfect Cooking Time: Keep an eye on the shrimp while cooking; they should be cooked just until they turn pink and opaque to avoid becoming tough. {{image_2}} You can add veggies to your Spicy Honey Garlic Shrimp for extra flavor. Bell peppers, snap peas, or broccoli work great. Start by sautéing the vegetables in olive oil before adding the shrimp. This way, you get a full meal with added crunch and nutrients. Not everyone loves heat, so you can adjust the spice. If you want less spice, use less sriracha. You can also replace it with a milder sauce, like sweet chili sauce. For more heat, add fresh chili slices or increase the sriracha. Taste as you go to find your perfect balance. You can switch up the sauce for a new twist. Try teriyaki sauce for a sweet touch. Or use a mix of soy sauce and lime for brightness. Each sauce brings a unique flavor to your dish. Experiment with what you have on hand to keep things exciting! Store any leftover Spicy Honey Garlic Shrimp in an airtight container. Keep it in the fridge for up to three days. This helps keep the shrimp fresh and tasty. If you want to keep it longer, freezing is a great option. To reheat the shrimp, use a skillet on low heat. Add a splash of water or broth to keep it moist. Cook for about five minutes until warmed through. You can also use a microwave. Just cover it and heat for one to two minutes. Stir halfway for even heating. To freeze, place the shrimp in a freezer-safe bag. Remove as much air as possible before sealing. Label the bag with the date. The shrimp will stay good for up to three months. When ready to eat, thaw in the fridge overnight before reheating. To reduce the heat, use less sriracha. You can also skip it entirely. If you want some heat, choose chili flakes instead. Adding more honey can balance the spice, making it sweeter. If you like mild flavors, use sweet soy sauce. This will keep the dish tasty without the heat. Yes, you can use frozen shrimp. Just make sure to thaw them first. Place the shrimp in cold water for about 15 minutes. This helps them thaw evenly. Drain and pat them dry before marinating. The flavor will still be great, so don't worry! Cook shrimp until they turn pink and opaque. This usually takes about 2-3 minutes per side. If they curl into a C shape, they are done. Be careful not to overcook them, or they will become rubbery. Keep an eye on them as they cook! This blog post shared a simple recipe for Spicy Honey Garlic Shrimp. You learned about key ingredients, marinating techniques, and cooking steps. There were also tips for flavor, variations with veggies, and storage information. Keep experimenting with spiciness and sauces to make this dish your own. Enjoy cooking and sharing these tasty shrimp with friends or family. You’ll impress them with your skills!

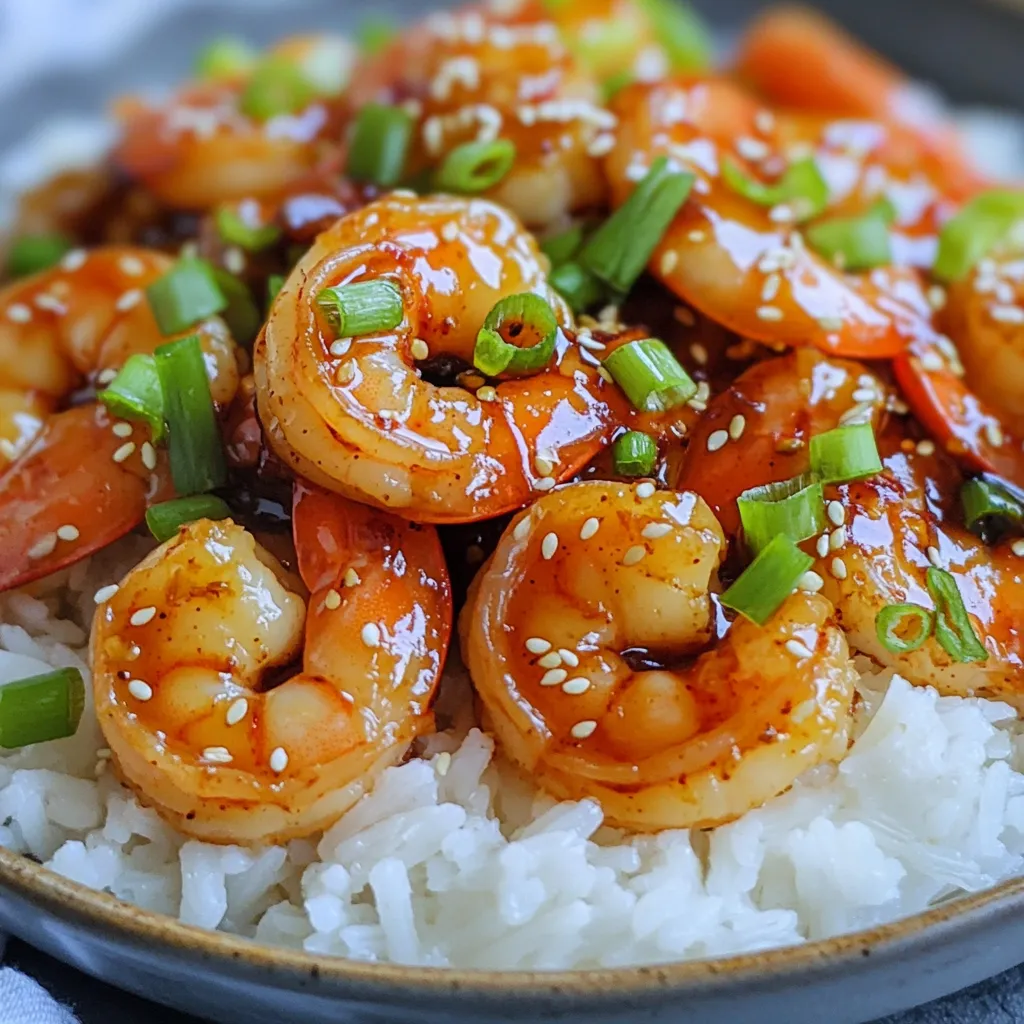
Are you ready to elevate your dinner game? This Spicy Honey Garlic Shrimp serves up an irresistible flavor twist that you won’t forget. I’ll walk you through each step to …

Read more

Categories Appetizers Leave a comment

One-Pan Creamy Tomato Spinach Chicken Delight

October 23, 2025February 4, 2025 by Chef Evan
- 4 boneless, skinless chicken breasts - 2 tablespoons olive oil - 1 teaspoon garlic powder - 1 teaspoon onion powder - Salt and pepper to taste - 1 can (14 oz) crushed tomatoes - 1 cup heavy cream - 2 cups fresh spinach - 1 teaspoon dried basil - 1 teaspoon Italian seasoning - Grated Parmesan cheese for garnish Each ingredient in this dish plays a key role. The chicken is the star, providing protein and texture. Olive oil adds richness and helps cook the chicken. Garlic and onion powders give depth and warmth to the flavor. Crushed tomatoes bring acidity and sweetness, balancing the cream. Heavy cream makes the sauce rich and smooth. Fresh spinach adds color and a slight earthiness. Dried basil and Italian seasoning infuse herbs into the dish. Finally, Parmesan cheese adds a salty finish that ties everything together. You can easily adjust ingredients to fit your needs. For a lighter version, use chicken thighs instead of breasts. To avoid dairy, swap heavy cream for coconut milk. If you're vegan, replace chicken with tofu and use plant-based cream. For a gluten-free option, this recipe is naturally gluten-free. Always check labels to ensure no hidden gluten in canned products. Enjoy making this dish your own while still capturing its essence! {{ingredient_image_1}} Start by gathering all your ingredients. You need chicken, olive oil, spices, and tomatoes. The heavy cream and spinach will make the dish creamy and rich. This recipe is easy and quick. You will spend about 10 minutes prepping and 30 minutes cooking. 1. Heat 2 tablespoons of olive oil in a large skillet over medium-high heat. 2. Season 4 boneless, skinless chicken breasts with 1 teaspoon of garlic powder, 1 teaspoon of onion powder, salt, and pepper. 3. Place the seasoned chicken in the skillet. Sear it for 6-7 minutes on each side. The chicken should turn golden brown and be fully cooked. Remove the chicken and set it aside. 4. In the same skillet, add 1 can of crushed tomatoes. Bring it to a gentle simmer for 3-4 minutes, stirring now and then. 5. Turn the heat down to medium-low. Stir in 1 cup of heavy cream until the sauce is creamy. 6. Add 2 cups of fresh spinach, 1 teaspoon of dried basil, and 1 teaspoon of Italian seasoning to the sauce. Stir until the spinach wilts, which takes about 2-3 minutes. 7. Return the chicken breasts to the skillet. Coat them in the creamy tomato sauce. Let everything cook together for 2-3 minutes to meld the flavors. 8. Serve hot and sprinkle grated Parmesan cheese on top for garnish. To make sure your chicken is cooked, use a meat thermometer. The inside should reach 165°F (75°C). If you don’t have a thermometer, cut into the chicken. The meat should be white, not pink. Always check both thick and thin parts of the chicken. Cook it longer if needed. This will keep your meal safe and tasty. To make the sauce creamy, use heavy cream. This adds richness and smoothness. Stir it in slowly to avoid curdling. Adding crushed tomatoes first gives the sauce a nice base. Don’t forget to season with salt and pepper. Taste as you go, and adjust the flavors to your liking. For tender chicken, start with boneless, skinless breasts. Sear them well on medium-high heat. This gives a nice color and locks in the juices. Cook for about 6-7 minutes on each side. Make sure they reach an internal temperature of 165°F (74°C) for safety. This dish pairs well with several sides. Consider serving it with garlic bread for a classic touch. A simple green salad adds freshness and crunch. You could also serve it over rice or pasta to soak up the creamy sauce. For a low-carb option, try zucchini noodles or cauliflower rice. Pro Tips Perfectly Seasoned Chicken: Ensure to season your chicken breasts generously with salt and pepper to enhance their flavor before cooking. Fresh Spinach Alternative: If fresh spinach is unavailable, you can substitute it with frozen spinach. Just make sure to thaw and drain it before adding to the sauce. Customize the Creaminess: For a lighter version, you can use half-and-half instead of heavy cream, but the sauce will be less rich. Garnish for Extra Flavor: Besides Parmesan cheese, feel free to add fresh basil or a squeeze of lemon juice before serving for an added burst of freshness. {{image_2}} You can boost this dish with more veggies. Try adding bell peppers, mushrooms, or zucchini. Just chop them and add them to the skillet. Sauté them for a few minutes before adding the spinach. If you want to use other proteins, shrimp or tofu work well. Cook shrimp until they turn pink. For tofu, use firm or extra-firm. Cut it into cubes and sauté until golden. If you like spice, add red pepper flakes or diced jalapeños. This will give the dish a nice kick. For a low-carb version, swap heavy cream with coconut cream. You can also use cauliflower rice instead of regular rice. This keeps your meal light and full of flavor. To make this dish dairy-free, use coconut milk instead of heavy cream. It keeps the creaminess without dairy. For cheese, use nutritional yeast for a cheesy flavor. You can also try vegan Parmesan for a great topping. These swaps let everyone enjoy this tasty meal. After your meal, let the chicken cool. Place it in an airtight container. This keeps your dish fresh. Store it in the fridge for up to three days. Make sure to cover the sauce well to avoid drying out. To reheat, use a skillet over medium heat. Add a splash of water or cream. This helps keep the sauce creamy. Stir often, and heat until warm. You can also use a microwave. Heat in short bursts, stirring in between for even warmth. If you want to freeze this dish, let it cool fully. Use a freezer-safe container. Remember to leave room for expansion. It can last up to three months in the freezer. To use, thaw it in the fridge overnight. Reheat gently, as mentioned earlier. This way, you enjoy a tasty meal later! Yes, you can use frozen chicken. However, it’s best to thaw it first. If you cook it from frozen, the chicken will take longer to cook. Make sure the center reaches 165°F for safety. The chicken is fully cooked when it is no longer pink inside. Use a meat thermometer to check the thickest part. It should read 165°F. This ensures the chicken is safe to eat. This dish pairs well with many sides. You can serve it with rice, pasta, or crusty bread. A fresh salad also makes a great side. Enjoy your meal with something that complements the creamy sauce. This blog post covered key ingredients and their roles in flavor, plus smart substitutions. We went through step-by-step cooking instructions to ensure your chicken is perfect every time. I shared tips for a creamy sauce and the best chicken texture. You also learned fun variations and proper storage methods for leftovers. Remember, good cooking is about creativity and balance. Use these insights to make your dish your own. Enjoy your cooking journey!

Are you ready to make dinner simpler and more delicious? I’ve got just the recipe for you! This One-Pan Creamy Tomato Spinach Chicken combines tender chicken with vibrant spinach and …

Read more

Categories Dinner Leave a comment

Cinnamon Roll French Toast Casserole Easy and Tasty

October 15, 2025February 4, 2025 by Chef Evan
- 2 cans (8 oz each) refrigerated cinnamon roll dough - 4 large eggs - 1 cup milk - 1/2 cup heavy cream - 1 teaspoon vanilla extract - 1 teaspoon ground cinnamon - 1/4 teaspoon nutmeg - 1/2 cup maple syrup (plus extra for serving) The main star of this dish is the cinnamon roll dough. It provides a soft, sweet base. The eggs and dairy products create a creamy, rich texture. Milk and heavy cream work together to add depth and flavor. The vanilla extract brings warmth and sweetness to the mix. Ground cinnamon and nutmeg add extra spice, making each bite special. Maple syrup sweetens the dish and adds a lovely caramel flavor. - Powdered sugar - Whipped cream - Fresh berries Optional toppings can elevate your casserole. Dusting powdered sugar adds a touch of sweetness. Whipped cream gives a light and fluffy finish. Fresh berries add color and a burst of freshness. You can mix and match these toppings to suit your taste. Adding these extras makes the dish even more enjoyable. {{ingredient_image_1}} First, you need to preheat your oven to 350°F (175°C). This step makes sure the casserole bakes evenly. While the oven heats, grease a 9x13-inch baking dish. You can use cooking spray or butter. This helps the casserole come out easily after baking. Now it’s time to cut and place the cinnamon rolls. Open the two cans of refrigerated cinnamon roll dough. Separate the rolls and cut each roll into four pieces. Spread them evenly in the greased baking dish. This forms the base of your casserole. Next, prepare the egg mixture. In a large mixing bowl, whisk together four large eggs, one cup of milk, and half a cup of heavy cream. Add one teaspoon of vanilla extract, one teaspoon of ground cinnamon, and a quarter teaspoon of nutmeg. Finally, stir in half a cup of maple syrup. Mix well until it looks smooth. Pour the egg mixture over the cut cinnamon rolls in the baking dish. Make sure all pieces are coated. Gently press down with a spatula. This helps the rolls absorb the liquid. Let it sit for about 10 minutes to soak up all the flavors. Now, it’s time to bake. Place the dish in the preheated oven. Bake for 25 to 30 minutes. You want it to be golden brown and cooked through in the center. While it bakes, you can prepare the icing from the cinnamon roll packages if you like. Once the casserole is baked, take it out of the oven. Drizzle it with the icing. Let it cool slightly before serving. Enjoy your warm, tasty Cinnamon Roll French Toast Casserole! To get the best results, adjust the soaking time. You can soak the cinnamon rolls for 10 minutes. If you want a softer texture, let them soak for 20 minutes. This extra time allows the rolls to absorb more of the egg mixture. To check for doneness, look for a golden brown color on top. The center should be firm but not jiggly. Use a toothpick to test it. If it comes out clean, the casserole is ready. Serve the casserole warm for the best flavor. You can cut it into squares and place it on plates. Drizzle with extra maple syrup for a sweet touch. Pair this dish with coffee or hot chocolate. A glass of cold milk also works well. For a fresh twist, add fresh berries on the side. They add color and a burst of flavor. Pro Tips Use Day-Old Bread: If you have leftover cinnamon rolls from the previous day, they work great for this casserole, absorbing the liquid better for a richer flavor. Customize the Toppings: Feel free to add nuts, chocolate chips, or your favorite fruits to the casserole for added texture and flavor. Check for Doneness: Use a toothpick to check if the center is set; it should come out clean when the casserole is fully cooked. Make Ahead Option: Prepare the casserole the night before, cover it, and refrigerate. Bake it in the morning for an easy breakfast. {{image_2}} You can make your Cinnamon Roll French Toast Casserole even better with fun twists. One great idea is to add chocolate chips. Just sprinkle them over the cinnamon rolls before pouring the egg mixture. This gives a rich and sweet flavor. Another tasty option is to add nuts or dried fruits. Chopped walnuts or pecans add a nice crunch. Dried cherries or cranberries give a sweet and tangy taste. Mix these in with the cinnamon rolls for added texture and taste. If you need gluten-free options, look for gluten-free cinnamon roll dough. Many brands offer this choice at stores. You can use the same method with the gluten-free dough. For a dairy-free version, swap regular milk and cream for almond or oat milk. Use coconut cream instead of heavy cream. These swaps keep the dish tasty without dairy. Enjoy all these variations while making this recipe your own! To keep your Cinnamon Roll French Toast Casserole fresh, use these storage tips: - Refrigeration guidelines: After serving, let the casserole cool for about 30 minutes. Cover it tightly with plastic wrap or foil. Store it in the fridge for up to 3 days. The cold will help it stay safe and tasty. - Freezing recommendations: If you want to save leftovers for later, you can freeze the casserole. Cut it into portions and wrap each piece in plastic wrap. Then, place them in a freezer-safe bag. It will stay good in the freezer for up to 2 months. When you’re ready to eat it, just thaw it in the fridge overnight. When it's time to enjoy your casserole again, follow these reheating methods: - Best methods for reheating: The oven is best for reheating. Preheat your oven to 350°F (175°C). Place the casserole in an oven-safe dish. Cover it with foil to keep it moist. Heat for about 15-20 minutes, or until it’s warm all the way through. You can also use the microwave. Heat one portion at a time for about 1-2 minutes, checking to see if it's hot. - Maintaining texture and flavor: To keep the casserole soft, avoid reheating it for too long. If it feels dry, add a splash of milk before heating. This will help keep it moist and tasty. Enjoy your delicious breakfast treat! Can I make this casserole ahead of time? Yes, you can. Prepare the casserole the night before. Follow the steps up to soaking the rolls. Cover it and place it in the fridge. Bake it in the morning. This saves you time and keeps it fresh. What to do if I don’t have all the ingredients? You can swap some items. Use milk instead of cream if needed. If you lack eggs, try using a banana or applesauce. For maple syrup, honey or agave can work too. Be creative and adjust based on what you have. What if the casserole is too dry? If your casserole turns out dry, pour a bit of milk over the top. Let it sit for a few minutes so it absorbs the milk. You can also top it with extra syrup or whipped cream for moisture. How to fix an undercooked casserole? If your casserole is undercooked, return it to the oven. Bake it for an extra 5 to 10 minutes. Check for doneness with a toothpick. It should come out clean when it’s ready. Make sure to cover it with foil if it browns too quickly. This blog post explored the tasty world of Cinnamon Roll French Toast Casserole. We discussed the main ingredients needed, including cinnamon roll dough and eggs, along with optional toppings like fresh berries. The step-by-step instructions showed how to prepare, assemble, and bake the casserole. In conclusion, making this dish is simple and fun. You can easily customize it to fit your taste or dietary needs. Enjoy your delicious casserole, and don’t forget to share it with family and friends!

Are you ready to elevate your breakfast game? With this Cinnamon Roll French Toast Casserole recipe, you’ll combine two favorites into one delicious dish. It’s easy to make and perfect …

Read more

Categories Breakfast Leave a comment
Older posts
Newer posts
← Previous Page1 … Page118 Page119 Page120 … Page124 Next →

TOSSED FLAVORS

Where flavors are fresh, vibrant, and ready to toss! 🥗

PAGES

Home About Contact Privacy Policy Terms & Conditions Cookie Policy GDPR Policy Copyright Policy Disclaimer

CATEGORIES

Appetizers Desserts Salads Breakfast Dinner

Contact

  • Pinterest
  • Mail
Copyright © 2026 Tossed Flavors. All rights reserved.