Skip to content
tossedflavors.com
  • Home
  • Appetizers
  • Desserts
  • Salads
  • Breakfast
  • Dinner
  • Privacy Policy
  • Contact
  • About

Chef Evan

Baked Sweet Potato Fries Crispy and Flavorful Treat

December 1, 2025March 27, 2025 by Chef Evan
- 2 large sweet potatoes - 3 tablespoons olive oil - 1 teaspoon ground cinnamon - 1/2 teaspoon paprika - 1/2 teaspoon garlic powder - Salt and pepper to taste - 1 tablespoon honey (optional) When making baked sweet potato fries, choose large sweet potatoes. They provide more fries and a better taste. The olive oil helps the fries crisp up in the oven. Ground cinnamon adds a warm touch that pairs well with sweet potatoes. Paprika gives a mild kick, while garlic powder adds depth to the flavor. You can adjust the salt and pepper to fit your taste. If you want a hint of sweetness, drizzle honey over the fries before serving. This option can make them extra special. Gather these ingredients so you’re ready to create a crispy and flavorful treat. {{ingredient_image_1}} To start, peel your sweet potatoes. Use a sharp peeler to remove the skin. Then, cut them into thin strips. Aim for uniform thickness. This helps them cook evenly. If some pieces are thick, they will cook slower. If you cut them all the same size, they will bake perfectly. Next, grab a large bowl. Add the sweet potato strips into the bowl. Pour in three tablespoons of olive oil. This oil helps the fries crisp up. Now, sprinkle one teaspoon of ground cinnamon, half a teaspoon of paprika, and half a teaspoon of garlic powder over the sweet potatoes. Don’t forget salt and pepper to taste! Use your hands to toss them well. Make sure every strip gets coated. The oil and spices should cover all the fries. Now it's time to bake! First, preheat your oven to 425°F (220°C). This step is key for crispy fries. While the oven heats up, line a large baking sheet with parchment paper. Spread the sweet potato strips on the sheet in a single layer. Avoid overcrowding; this ensures they crisp up well. Bake your fries for 25 to 30 minutes. Halfway through, flip them over for even browning. When they turn golden brown, they are ready to eat! If you like, drizzle honey on top for a sweet touch before serving. Spacing is key when baking sweet potato fries. If you crowd them on the pan, they will steam instead of crisp up. Make sure each fry has space to breathe. This helps hot air circulate and creates a nice crunch. Different ovens heat in different ways. If your oven runs hot, reduce the heat slightly. For ovens that don't get hot enough, you might need to bake a bit longer. Keep an eye on your fries, so they don’t burn. You can change the seasoning to match your taste. Try using chili powder for some heat or cumin for a deeper flavor. You can also mix in herbs like rosemary or thyme for a fresh twist. To adjust flavors, taste before cooking. If you love garlic, add more garlic powder. If you prefer sweeter fries, drizzle more honey on top. This is your chance to get creative! Dipping sauces can take your fries to the next level. Try ranch, honey mustard, or spicy ketchup. Each adds a fun flavor that pairs well with sweet potatoes. For main dishes, serve these fries with grilled chicken or fish. They also go great with a fresh salad. Mixing and matching makes every meal special! Pro Tips Cut Evenly: Ensure that all sweet potato strips are cut to the same thickness for even cooking and crispiness. Soak for Extra Crisp: Soaking the sweet potato strips in cold water for 30 minutes before baking can help remove excess starch and enhance crispiness. Don’t Overcrowd: Spread the fries out on the baking sheet in a single layer, leaving space between them to allow hot air to circulate and make them crispier. Adjust Seasoning: Feel free to adjust the spices to your taste; a pinch of cayenne pepper can add a nice heat to balance the sweetness. {{image_2}} You can change the flavor of sweet potato fries to suit your taste. For a spicy kick, add cayenne pepper. Just a sprinkle can make a big difference. It gives the fries a nice heat that you will enjoy. If you prefer something sweet, try maple syrup. Drizzle it on the fries before baking. This adds a rich flavor that complements the sweet potatoes perfectly. You can boost the nutrition of your fries by adding other vegetables. Try mixing in carrots or zucchini strips. This not only adds color but also gives more vitamins to your meal. Incorporating herbs can also enhance the flavor. Fresh rosemary or thyme works well. Just chop them finely and mix them in with the sweet potato strips. This adds a delicious aroma and taste. An air fryer is a great way to cook sweet potato fries. It makes them crispy without using a lot of oil. Set your air fryer to 400°F (200°C) and cook for about 15-20 minutes. Shake the basket halfway through for even cooking. Grilling is another fun option. Preheat your grill and place the fries in a grill basket. Cook them for about 10-15 minutes, turning often. This gives the fries a nice smoky flavor that is hard to beat. To keep your leftover sweet potato fries fresh, let them cool first. Once cooled, place them in an airtight container. This will help prevent sogginess. You can also use a zip-top bag, but remove as much air as you can. Store them in the fridge for up to three days. If you have a lot of fries, divide them into smaller portions. This makes it easier to reheat only what you need. For the best result, reheat your fries in the oven. Preheat your oven to 400°F (200°C). Spread the fries on a baking sheet in a single layer. Bake them for about 10-15 minutes. This method helps regain their crispiness. You can also use an air fryer if you have one. Set it to 350°F (175°C) and cook for about 5-8 minutes. Make sure to check often to avoid burning. Yes, you can make sweet potato fries without oil. Try baking them in an air fryer or oven. Coat the fries with spices and a bit of water. This helps them crisp up without adding fat. You can also use parchment paper to prevent sticking. Baked sweet potato fries last about 3-5 days in the fridge. Store them in an airtight container. If you see any mold or an off smell, throw them away. These signs mean the fries are spoiled. You can freeze baked sweet potato fries! Let them cool completely first. Then, place them in a freezer-safe bag. Make sure to remove as much air as possible. For reheating, bake them at 425°F for about 15-20 minutes. This helps restore their crispiness. You now know how to make amazing baked sweet potato fries. We covered key ingredients, step-by-step instructions, helpful tips, and different variations. Remember, the right seasoning and cooking method can elevate your dish. Don’t forget to store leftovers properly for freshness. With a few simple tweaks, you can make these fries fit any taste. Enjoy your cooking journey and impress everyone with your delicious fries!

Looking for a tasty snack that’s both healthy and fun? Baked Sweet Potato Fries are your go-to treat! These fries are crispy, flavorful, and easy to make right at home. …

Read more

Categories Appetizers Leave a comment

Blackened Cajun Chicken Salad Fresh and Flavorful Dish

October 20, 2025March 27, 2025 by Chef Evan
- 2 boneless, skinless chicken breasts - 2 tablespoons Cajun seasoning - 1 tablespoon olive oil I love starting with the chicken. It’s the star of this dish. I use two boneless, skinless chicken breasts. This keeps the salad lean and tasty. The Cajun seasoning adds a nice kick. I use two tablespoons for a rich flavor. A tablespoon of olive oil helps the seasoning stick and adds moisture. - 6 cups mixed salad greens - 1 cup cherry tomatoes, halved - 1/2 red onion, thinly sliced - 1 avocado, diced - 1/2 cup corn - 1/4 cup feta cheese Now for the salad parts! I like a mix of greens, like romaine and spinach. Six cups give a good base. I add a cup of halved cherry tomatoes for sweetness. A half red onion, thinly sliced, gives a nice crunch. I toss in a diced avocado for creaminess. Corn adds a sweet pop, and the feta cheese brings a salty touch. - Juice of 1 lime - Salt and pepper to taste For dressing, I use the juice of one lime. It brightens the flavors. I also add salt and pepper to taste, which you can adjust to your liking. This part is simple but makes a big difference. {{ingredient_image_1}} - Preheat the grill to medium-high heat. This helps the chicken cook evenly. - Pat the chicken breasts dry with paper towels. This step is key for a good sear. - Rub the Cajun seasoning on both sides of the chicken. Make sure to cover it well. - Drizzle olive oil on the chicken. This keeps it moist and prevents sticking. - Place the chicken on the hot grill. Cook for 6-7 minutes without moving it. This creates a nice blackened crust. - Flip the chicken and grill for another 6-7 minutes. Use a meat thermometer to check that it hits 165°F (75°C). - Once cooked, remove the chicken from heat and let it rest for 5 minutes. This helps keep it juicy. - In a large bowl, place the mixed salad greens. Add cherry tomatoes, sliced red onion, diced avocado, and corn. - Toss everything gently to mix the salad ingredients well. This ensures each bite is full of flavor. - Slice the grilled chicken into strips and arrange it on top of the salad. - Squeeze fresh lime juice over the salad. Season with salt and pepper to taste. - Toss gently again to combine all the flavors. Serve right away or chill for 15 minutes. This allows the flavors to meld. Seasoning is key to great flavor. Use enough Cajun seasoning to coat the chicken well. This spice mix adds heat and depth. Don’t be shy with it! A good crust comes from dry chicken. Pat the chicken dry before seasoning. This helps the spices stick better and gives that crisp texture. To ensure a crispy crust, let the chicken sit after seasoning. This helps the spices meld into the meat. When grilling, don’t move the chicken around. This allows the crust to form nicely. You can add more toppings to your salad for extra flavor. Consider adding sliced bell peppers or cucumbers. Nuts like almonds or walnuts can add crunch. If you want a different cheese, try goat cheese or leave it out for a dairy-free option. For a vegan dish, swap the chicken with grilled tofu. You can also use a plant-based cheese for added flavor. You can prepare many elements ahead of time. Grill the chicken in advance and store it in the fridge. This makes meal time quick and easy. Always check the chicken's internal temperature. It should reach 165°F (75°C) for safety. Let the chicken rest after cooking for about five minutes. This keeps the juices inside and makes it tender. Pro Tips Season Generously: Don’t be shy with the Cajun seasoning! A generous coating will enhance the flavor of the chicken and give it that signature blackened taste. Rest the Chicken: Allowing the grilled chicken to rest for 5 minutes before slicing helps retain its juices, resulting in a more flavorful and moist chicken. Fresh Ingredients Matter: Use the freshest salad greens and vegetables for the best flavor and texture. Fresh ingredients will make your salad vibrant and delicious. Customize Your Salad: Feel free to add or substitute ingredients based on your preferences. Nuts, seeds, or different cheeses can elevate the salad even further! {{image_2}} You can swap chicken for other proteins. Shrimp makes a tasty choice. Just season and grill it for about 3-4 minutes per side. Tofu is another option. Press it to remove water, then cube and season. Sauté it until golden brown, about 8-10 minutes. Adjust cooking times based on what you choose. Feel free to mix in seasonal veggies. Try bell peppers in summer or roasted squash in fall. For a vegan salad, skip the feta. Instead, use a vegan cheese or chickpeas. They add protein and flavor. You can also add nuts like almonds or walnuts for crunch. Adding nuts or seeds gives your salad a nice texture. Try sunflower seeds or sliced almonds. They add a nutty taste. You can also change up the dressing. Use ranch for a creamy twist or a balsamic vinaigrette for a tangy kick. This keeps your salad fresh and exciting every time you make it. Store your Blackened Cajun Chicken Salad in an airtight container. This keeps it fresh and tasty. Leftovers can last in the fridge for three to four days. If you see any signs of spoilage, like a bad smell or color change, throw it away. To reheat chicken, use the oven or stovetop. The oven helps keep it juicy. Preheat the oven to 350°F (175°C) and heat for about 15 minutes. On the stovetop, heat in a skillet over low heat, adding a bit of water to help steam it. For leftover salad, enjoy it cold or let it come to room temperature. For meal prep, store the chicken and salad components separately. This keeps everything fresh. When you're ready to eat, quickly assemble the salad. Just slice the chicken, toss it with the greens, and add the other toppings. This makes for easy on-the-go meals. Cajun seasoning has bold and spicy flavors. It usually includes: - Paprika - Cayenne pepper - Garlic powder - Onion powder - Oregano - Thyme - Black pepper - Salt These spices mix well to create a zesty kick. You can find many blends at the store. You can also make your own at home for freshness. Yes, you can prep this salad ahead. Here are some tips: - Cook the chicken and cool it down. Slice it when ready to serve. - Mix the salad greens and veggies, but keep them separate from the chicken and dressing. - Store everything in airtight containers to keep flavors fresh. - Add lime juice just before serving to keep the salad crisp. This way, you can enjoy a quick and tasty meal later. If you want a cheese swap, here are some options: - Goat cheese for a creamy texture - Cotija cheese for a salty flavor - Vegan cheese for a dairy-free option - Olives for added saltiness These alternatives fit different diets and still taste great in the salad! In this article, we explored how to make a delicious blackened chicken salad. We covered the main ingredients, step-by-step cooking, and helpful tips for perfecting your dish. Remember, the key is great seasoning and cooking the chicken right. Feel free to get creative with toppings and protein swaps. With the right storage and meal prep, this salad can work for any day. Enjoy making this tasty and healthy meal that can please anyone.

Are you ready to spice up your lunch? This Blackened Cajun Chicken Salad is a fiesta of flavors that combines juicy, seasoned chicken with fresh, crisp veggies. It’s not just …

Read more

Categories Salads Leave a comment

Creamy Broccoli Cheddar Soup Rich and Nourishing Dish

November 8, 2025March 22, 2025 by Chef Evan
- 4 cups fresh broccoli florets - 1 medium onion, diced - 2 cloves garlic, minced - 3 cups vegetable broth - 1 cup heavy cream - 2 cups sharp cheddar cheese, shredded - 1 tablespoon olive oil - 1 teaspoon mustard powder - 1/2 teaspoon black pepper - Salt to taste To make this creamy broccoli cheddar soup, gather these ingredients first. The fresh broccoli gives a vibrant color and taste. The onion and garlic add sweetness and depth. Vegetable broth acts as the soup's base, while heavy cream and cheddar cheese create that rich, creamy finish. - Croutons - Extra cheese - Fresh herbs (like parsley or chives) Garnishes can elevate your soup. Croutons add crunch. Extra cheese makes it even cheesier. Fresh herbs give a pop of color and fresh flavor. - Use almond or oat milk instead of heavy cream for a lighter option. - Swap sharp cheddar with vegan cheese for a dairy-free version. - If you need gluten-free, croutons can be left out or made with gluten-free bread. These substitutions keep the spirit of the dish while catering to dietary needs. You can enjoy this soup in many ways. Always adjust the flavors to suit your taste! {{ingredient_image_1}} To start, gather your ingredients. You will need: - 4 cups fresh broccoli florets - 1 medium onion, diced - 2 cloves garlic, minced - 3 cups vegetable broth - 1 cup heavy cream - 2 cups sharp cheddar cheese, shredded - 1 tablespoon olive oil - 1 teaspoon mustard powder - 1/2 teaspoon black pepper - Salt to taste - Croutons for garnish (optional) Chop the onion and mince the garlic. The broccoli should be in small florets, so it cooks well. In a large pot, heat the olive oil over medium heat. Add the diced onion. Sauté for about 5 minutes until it turns soft. Then, add the minced garlic. Sauté for another minute until you smell the garlic. Next, stir in the broccoli florets and vegetable broth. Bring this mixture to a boil. Once it boils, reduce the heat. Let it simmer for 10 to 15 minutes. The goal is to make the broccoli tender. Now it’s time to blend. Use an immersion blender to mix the soup until it’s smooth. If you don’t have one, pour the soup in batches into a regular blender. Be careful; the soup is hot! After blending, return the soup to the pot on low heat. Stir in the heavy cream, cheddar cheese, mustard powder, black pepper, and salt. Mix until the cheese melts. Taste the soup and adjust the seasoning if needed. Serve it hot. If you like, add croutons on top for a nice crunch. To make this soup taste amazing, use fresh broccoli. Fresh veggies give the best flavor. Add a pinch of nutmeg for warmth. It pairs well with the cheese. A squeeze of lemon juice brightens the dish too. You can also try different cheeses. Gruyère or Monterey Jack can add a nice twist. If you love spice, toss in some red pepper flakes. One big mistake is overcooking the broccoli. Cook it just until tender, so it stays bright green. Blending too much can make your soup too thin. Blend only until smooth. If you add the cheese too fast, it might clump. Add it slowly, mixing well to melt it evenly. Don't skip tasting before serving. Adjust salt and pepper for the best flavor. Using an immersion blender makes blending easy. It saves you from transferring hot soup. A sharp knife helps chop the onion and garlic finely. A heavy-bottomed pot is great for even cooking. This prevents burning the bottom. Finally, a good measuring cup is key for accuracy. It helps keep your ingredients balanced for perfect results. Pro Tips Fresh Broccoli is Key: Use fresh broccoli florets for the best flavor and texture. Frozen broccoli can become mushy when cooked. Blending Techniques: If using a traditional blender, allow the soup to cool slightly before blending to avoid hot splashes. Blend in smaller batches for safety. Cheese Variations: Experiment with different types of cheese like Gruyère or Monterey Jack for a unique flavor twist. Seasoning Adjustments: Taste the soup before serving and adjust the seasoning as necessary. A squeeze of lemon juice can brighten the flavors! {{image_2}} You can easily make a vegan version of this soup. Just swap the heavy cream with coconut cream or cashew cream. For cheese, use vegan cheese or skip it altogether. The soup still tastes great without cheese. The vegetable broth adds rich flavor, which makes it satisfying and creamy. This recipe is already gluten-free! The ingredients do not contain any gluten. Just make sure the vegetable broth you choose is gluten-free. This way, you can enjoy the soup without any worries. You can add more fun flavors to the soup! Here are some ideas: - Spices: Try adding a pinch of cayenne pepper for heat. - Herbs: Stir in fresh thyme or basil for a fresh taste. - Veggies: Add carrots or potatoes for extra texture and flavor. - Protein: Toss in cooked chickpeas or beans for a hearty meal. These options make your creamy broccoli cheddar soup more exciting and tasty. Enjoy experimenting! To store your creamy broccoli cheddar soup, let it cool first. Once cool, pour it into an airtight container. This helps keep the soup fresh. You can store it in the fridge for up to three days. Just make sure to label the container with the date. If you want to keep it longer, freezing is a great option. Freezing this soup is simple. Use a freezer-safe container or bags. Leave some space at the top for expansion. It’s best to freeze the soup without croutons. They can get soggy when thawed. Your soup will stay good in the freezer for up to three months. When ready to eat, just thaw it in the fridge overnight. To reheat, pour the soup into a pot. Warm it over medium heat, stirring often. This keeps it from sticking to the bottom. If the soup is too thick, add a little vegetable broth or cream. Heat until it’s hot, but don’t boil. You can also use the microwave for quick reheating. Just cover it and heat in short bursts, stirring in between. Enjoy your warm soup again! Yes, you can use frozen broccoli. Frozen broccoli is convenient and saves time. Just add it directly to the pot with the broth. The cooking time may be slightly shorter since it's already blanched. To thicken the soup, you have a few options. First, blend more broccoli until smooth. You can also add a bit of cornstarch mixed with cold water. Stir this mix into the soup and cook until it thickens. Lastly, adding more cheese will also help to make the soup creamier. Yes, you can make this soup ahead of time. Just prepare the soup, let it cool, and store it in the fridge. It will stay fresh for about three days. When you're ready to eat, warm it on the stove until hot. You may need to add a splash of cream or broth to restore its creamy texture. In this post, I shared key details about making a delicious soup. You learned about the right ingredients, cooking steps, and helpful tips. I covered substitutions for special diets, variations, and how to store leftovers. Each section aimed to make your soup-making process easier and more fun. Remember, cooking is all about experimenting, so don’t be afraid to try new flavors! Dive into this soup adventure and enjoy every bite.

Warm your heart and soothe your soul with my creamy broccoli cheddar soup! This rich and nourishing dish brings comfort and flavor to your table. In this post, I’ll share …

Read more

Categories Dinner Leave a comment

Sautéed Veggie Medley Flavorful and Simple Recipe

November 20, 2025March 19, 2025 by Chef Evan
To make a tasty sautéed veggie medley, gather these ingredients: - 1 cup bell peppers (red, yellow, and green), sliced - 1 cup zucchini, sliced into half-moons - 1 cup broccoli florets - 1 cup cherry tomatoes, halved - 1 medium onion, thinly sliced - 2 cloves garlic, minced - 2 tablespoons olive oil - 1 tablespoon balsamic vinegar - Salt and pepper to taste - 1 teaspoon dried oregano - 1 teaspoon fresh basil, chopped for garnish Fresh vegetables give the best flavor and texture. They look bright and taste crisp. If you use frozen veggies, they are quick and easy. They may lose some crunch. Choose fresh when you can, but frozen works in a pinch. Seasonings make your dish pop! Use salt and pepper to taste. Dried oregano adds nice flavor. Fresh basil gives a bright touch. You can also try other spices, like thyme or paprika, to mix it up. Remember, always taste as you go. This helps you find your perfect flavor. {{ingredient_image_1}} Start by washing all your veggies. This step is key. Slice the bell peppers, zucchini, and onion. Cut the cherry tomatoes in half. Break the broccoli into small florets. Use a sharp knife for safety and ease. Set each type of veggie aside in bowls. This makes cooking easier and more fun. Heat your skillet over medium-high heat. Pour in the olive oil. Once the oil is warm, add the sliced onion. Cook for 2-3 minutes until the onion is clear. Then, add the minced garlic and stir it for 30 seconds. Be careful not to burn it. Next, toss in the bell peppers and zucchini. Cook them for 4-5 minutes until they soften a bit. Add the broccoli and cook another 3-4 minutes. Finally, stir in the cherry tomatoes and balsamic vinegar. Cook for 2 more minutes. Make sure your pan is hot before adding oil. This helps the veggies cook evenly. If you add them too soon, they may steam instead of sauté. Keep an eye on cooking times. Each vegetable cooks at a different rate. You want them all to be tender but still crisp. Stir gently to mix flavors. Always taste as you go. This way, you can adjust seasonings like salt and pepper. To get the best sautéed veggies, start with a hot pan. Heat the olive oil first. You want it to shimmer but not smoke. Add the onions and cook them until soft. Then, add garlic to bring out flavor. Add vegetables in stages. Start with those that take longer to cook. Bell peppers and zucchini go in first. Then, add broccoli and cherry tomatoes last. This way, they stay crisp and bright. One mistake is overcrowding the pan. If you add too many veggies, they won't cook well. They will steam instead of sauté. To fix this, cook in batches if needed. Also, don't skip the seasoning. Salt, pepper, and oregano enhance flavor. Finally, watch the heat. Too high can burn the garlic and veggies. Keep it medium-high for best results. For the best experience, serve your veggie medley warm. Use a colorful platter to make it pop. Garnish with fresh basil for a nice touch. If you want, add crumbled feta cheese on top. It gives a nice salty kick. Pair this medley with grains or protein for a full meal. Enjoy your healthy and tasty dish! Pro Tips Use Seasonal Veggies: Opt for vegetables that are in season for the best flavor and nutritional value. Experiment with Spices: Don’t hesitate to add different spices or herbs to create your unique flavor profile. Cooking Time Matters: Be mindful of the cooking time for each vegetable to ensure they maintain a tender-crisp texture. Presentation is Key: Serve the dish in a colorful platter and garnish with fresh herbs for an eye-catching presentation. {{image_2}} You can mix in many veggies for your medley. Try adding carrots for sweetness. Kale adds a nice crunch too. Snap peas give a lovely snap. Consider adding asparagus for a gourmet touch. You can even toss in mushrooms for an earthy flavor. Each veggie brings its own taste and texture. You can change the flavor by using different spices. For an Asian twist, add soy sauce and ginger. This makes the dish savory and bright. For a Mediterranean vibe, use lemon juice and fresh herbs. Oregano and thyme work well here. These changes will take your veggie medley to new heights. Want to make your medley heartier? Add some protein! Tofu is a great plant-based choice. Cut it into cubes and sauté until golden. You can also use chicken for a classic option. Cook it first, then add your veggies. This gives a satisfying meal that keeps you full. To keep your sautéed veggie medley fresh, place it in an airtight container. Make sure it cools down before sealing. Store it in the fridge for up to 3 days. If you want to enjoy it later, freezing is a great option. When reheating, use a skillet for the best results. Heat it over medium heat. Add a splash of olive oil to prevent sticking. Stir the veggies gently until they are heated through. You can also use the microwave, but be cautious. Microwaving may make the veggies soggy. For freezing, let the medley cool completely. Then, portion it into freezer bags. Remove as much air as possible before sealing. Label the bags with the date. You can freeze the veggie medley for up to 3 months. To eat, thaw it in the fridge overnight before reheating. Sautéed vegetables last about 3 to 5 days in the fridge. Store them in an airtight container. This keeps them fresh and tasty. Always check for any signs of spoilage before eating. Yes, you can use different oils for sautéing. Olive oil is great, but you can try avocado or coconut oil too. Each oil adds a unique flavor. Just make sure the oil can handle high heat. The best way to reheat sautéed veggies is on the stove. Use a non-stick pan over medium heat. Add a splash of water or oil to keep them moist. Stir occasionally until they are warm. Yes, you can prepare the veggie medley in advance. Cook it, let it cool, and store it in the fridge. This makes meal prep easy. Just reheat when you are ready to eat. Yes, this dish is great for meal prep! It stores well and offers good nutrition. You can pair it with grains or proteins for a complete meal. Enjoy it throughout the week! You now know how to make delicious sautéed vegetables. We covered key steps like prepping veggies, choosing fresh or frozen options, and using tasty spices. I shared tips for perfect sautéing and what to avoid. You can mix up flavors, add proteins, and learn storage tricks for leftovers. Take this knowledge into your kitchen. Enjoy cooking and exploring new tastes!

Are you ready to elevate your meals with a tasty and easy dish? My Sautéed Veggie Medley is packed with flavor and nutrition, making it a winner for any table. …

Read more

Categories Salads Leave a comment

Creamy Ranch Turkey Casserole Simple and Savory Dish

October 20, 2025March 16, 2025 by Chef Evan
For this tasty dish, you'll need: - 1 lb ground turkey - 1 cup uncooked elbow macaroni - 1 can (10.5 oz) cream of chicken soup - 1 cup ranch dressing - 1 cup shredded cheddar cheese - 1 cup frozen mixed vegetables (peas, carrots, corn) - 1/2 cup milk - 1 teaspoon garlic powder - 1 teaspoon onion powder - Salt and pepper to taste - 1/2 cup breadcrumbs (optional, for topping) - 2 tablespoons olive oil This list gives you a great start. Each ingredient brings flavor and comfort to the dish. You can make your casserole even better with some fun toppings: - Extra shredded cheddar cheese for a cheesy top - Breadcrumbs for a crunchy layer - Chopped fresh parsley for a pop of color These toppings add texture and look nice on the table. Don’t have all the ingredients? No worries! Here are some easy swaps: - Ground turkey can be replaced with ground chicken or beef. - Elbow macaroni can switch to any pasta type you love, like penne or rotini. - Cream of chicken soup can be swapped for cream of mushroom soup for a different flavor. - Ranch dressing can be exchanged for a homemade ranch mix or any creamy dressing. These substitutions keep the recipe flexible and fun, so you can make it your own. {{ingredient_image_1}} Start by preheating your oven to 350°F (175°C). This step is key for even cooking. Next, bring a large pot of salted water to a boil. Add 1 cup of uncooked elbow macaroni and cook it until it's al dente. This usually takes about 8 minutes. Once done, drain the macaroni and set it aside. In a large skillet, heat 2 tablespoons of olive oil over medium heat. Add 1 pound of ground turkey. Cook it for about 5-7 minutes, breaking it into small crumbles. Make sure the turkey is browned. Season it with 1 teaspoon each of garlic powder and onion powder. Add salt and pepper to your taste. After the turkey is cooked, stir in 1 can (10.5 oz) of cream of chicken soup, 1 cup of ranch dressing, and 1/2 cup of milk. Mix it well. Toss in 1 cup of frozen mixed vegetables and cook for another 5 minutes. Now, add the cooked macaroni and half of the shredded cheddar cheese into the skillet. Mix everything until combined. Transfer the mixture to a greased 9x13 inch baking dish. Top it with the remaining cheese and, if you like, sprinkle 1/2 cup of breadcrumbs on top for a crunchy finish. Bake in the preheated oven for 25-30 minutes. Look for bubbly, golden cheese as a sign it’s ready. Enjoy serving it hot! To make a great creamy casserole, use a good mix of flavors. I like to blend different textures. This adds interest to each bite. Always cook your pasta al dente. This keeps it firm while baking. Remember to season your turkey well. Garlic powder and onion powder bring out great tastes. Don’t skip the cheese; it adds creaminess and flavor. One mistake is overcooking the pasta. It will turn mushy in the oven. Another error is using too much broth or milk. This can make your casserole watery. Be careful with the salt. The ranch dressing and cheese already add saltiness. Lastly, don’t forget to preheat your oven. A hot oven helps everything cook evenly. To boost flavor, try adding fresh herbs like parsley or thyme. They brighten the dish. You can also mix in some crushed red pepper for heat. If you want a smoky taste, add some paprika or smoked cheese. A sprinkle of lemon juice can also freshen up the flavors. Make it your own by adjusting the spices and toppings! Pro Tips Use Lean Turkey: Opt for lean ground turkey to keep the dish lighter and healthier while still delivering on flavor. Add Fresh Herbs: Enhance the flavor by adding fresh herbs like parsley or chives to the mixture before baking. Customize Vegetables: Feel free to swap in your favorite vegetables, such as broccoli or bell peppers, to suit your taste. Make Ahead: Prepare the casserole in advance and store it in the refrigerator. Bake it just before serving for an easy meal. {{image_2}} You can easily make a vegetarian version of this casserole. Instead of ground turkey, use 1 pound of plant-based meat or cooked lentils. This keeps the texture similar. For the cream of chicken soup, choose a vegetable-based soup. This swap maintains creaminess without meat. The ranch dressing can also be found in a vegetarian version. This way, you keep all the delicious flavors without using meat. If you prefer a different protein, try shredded chicken or cooked sausage. Both options work well with the ranch flavor. You can also use canned tuna or chickpeas for a new twist. Each option brings its own taste and texture. Just make sure to season your choice to match the rich flavors in the recipe. Feel free to get creative with the ingredients. Swap out elbow macaroni for whole wheat pasta or gluten-free pasta. This change adds nutritional value and can cater to dietary needs. For veggies, consider using broccoli, bell peppers, or spinach. These options not only add color but also boost nutrition. Instead of cheddar cheese, you might use mozzarella or pepper jack for a kick. These swaps help you customize the dish to your taste. To store your leftover creamy ranch turkey casserole, let it cool first. Then, place it in an airtight container. This helps keep it fresh. You can store it in the fridge for up to three days. If you want to enjoy it later, freezing is a great option. To freeze the casserole, wrap it tightly in plastic wrap. Then, cover it with aluminum foil. This prevents freezer burn. It can last in the freezer for up to three months. When you're ready to eat it, thaw it in the fridge overnight. When reheating, use the oven for the best results. Preheat the oven to 350°F (175°C). Place the casserole in a baking dish and cover it with foil. Bake for about 20-25 minutes until it is hot throughout. You can also microwave it, but stir it halfway for even heating. Yes, you can prepare this casserole ahead of time. Just follow the recipe steps but stop before baking. Cover and chill it in the fridge. When you're ready to cook, bake it straight from the fridge. Add a few extra minutes to the baking time to ensure it's hot all the way through. This casserole pairs well with many sides. Here are some ideas: - Fresh green salad - Steamed broccoli - Garlic bread - Roasted vegetables These sides add color and texture to your meal. This casserole lasts about 3 to 4 days in the fridge. Store it in an airtight container. Make sure it cools down before sealing. This keeps it fresh and tasty for your next meal. Yes, you can use different cheeses! Mozzarella, pepper jack, or even a blend works well. Each cheese gives a new flavor and texture. Choose what you like best, and enjoy experimenting! We explored how to make a creamy ranch turkey casserole that delights. I shared key ingredients, cooking steps, and smart tips. You can even try fun variations and learn storage tips for leftovers. Remember, with simple swaps and choices, you can make this dish your own. Enjoy creating a meal your family will love!

Looking for a tasty, easy meal? My Creamy Ranch Turkey Casserole is both simple and delicious. This dish brings comfort to your table with minimal prep. You’ll love how creamy …

Read more

Categories Dinner Leave a comment

Strawberry Pretzel Salad Delightful and Easy Recipe

December 23, 2025March 16, 2025 by Chef Evan
To make this Strawberry Pretzel Salad, you need some simple and tasty ingredients. Here's what you'll need: - 2 cups pretzel twists - ½ cup unsalted butter, melted - ¾ cup granulated sugar, divided - 8 oz cream cheese, softened - 1 cup powdered sugar - 1 cup whipped topping - 2 cups fresh strawberries, hulled and sliced - 1 cup strawberry gelatin mix - 2 cups boiling water Each ingredient plays a key role in balancing flavors. The pretzel twists add a nice crunch and saltiness. The butter helps bind the pretzels together. Granulated sugar sweetens the mix, while cream cheese adds creaminess. Powdered sugar gives a light texture, and whipped topping adds fluff. Fresh strawberries bring bright flavor and color. Strawberry gelatin ties everything together with sweetness. Finally, boiling water dissolves the gelatin for that perfect layer. Gather these items, and you're ready to create a delightful dessert! {{ingredient_image_1}} 1. Start by preheating your oven to 350°F (175°C). This step is key for the crust. 2. Take 2 cups of pretzel twists and crush them into coarse pieces. You can use a rolling pin or a food processor. 3. In a bowl, mix the crushed pretzels, ½ cup melted unsalted butter, and ¼ cup granulated sugar. Stir until everything is well combined. 4. Press this mixture into the bottom of a 9x13-inch baking dish. Make it even. 5. Bake the crust in the oven for 10 minutes. When it's done, take it out and let it cool completely. 1. In a clean bowl, beat 8 oz of softened cream cheese with an electric mixer. Mix until smooth. 2. Gradually add ½ cup granulated sugar and 1 cup powdered sugar. Keep mixing until it is well blended and fluffy. 3. Gently fold in 1 cup of whipped topping. Be careful not to deflate it. 4. Spread this creamy mixture evenly over the cooled pretzel crust. 1. In a small bowl, dissolve 1 cup of strawberry gelatin mix in 2 cups of boiling water. Stir until it's fully dissolved. 2. Let the gelatin cool for a few minutes. 3. Add 2 cups of hulled and sliced fresh strawberries to the cooled gelatin. Mix well. 4. Pour this strawberry mixture over the cream cheese layer in your baking dish. 5. Refrigerate for at least 2 hours. This helps the gelatin set properly. 6. Once set, cut the salad into squares and enjoy this sweet and salty treat! To make the best pretzel crust, focus on two key points. First, avoid sogginess. After baking, let the crust cool completely. This step helps keep the crust crunchy. If you skip this, the cream cheese layer can make it soggy. Second, ensure an even crust. Press the pretzel mix firmly into the bottom of your dish. This creates a solid base for your salad. For a smooth cream cheese layer, make sure your cream cheese is softened. I recommend letting it sit out for 30 minutes before mixing. This helps prevent lumps. When adding the whipped topping, fold it in gently. This keeps the mixture light and fluffy. For a great whipped topping, choose one that is stable and not too sweet. This balances the flavors perfectly. Cooling the gelatin is important. After dissolving it in boiling water, let it sit for about 10 minutes. This helps it cool without setting too quickly. To enhance the flavor, you can add extra fruits. Try mixing in blueberries or raspberries for a fun twist. This adds color and taste to your salad. Pro Tips Crust Consistency: Ensure the pretzel crust is pressed firmly into the baking dish to create a solid base that holds the layers together. Cooling Time: Allow the gelatin to cool to room temperature before adding strawberries, ensuring they don’t cook or become mushy. Make Ahead: This dessert can be made a day in advance; just keep it refrigerated until you're ready to serve for the best texture. Strawberry Substitutes: If strawberries are out of season, feel free to use other berries like blueberries or raspberries for a delicious twist! {{image_2}} You can easily change the fruit in this dish. Instead of strawberries, try blueberries or raspberries. Both fruits add a nice twist. You can also mix fruits for a colorful treat. For gelatin flavors, use peach or cherry. Each flavor gives a unique taste to the salad. If you need gluten-free options, look for gluten-free pretzels. Many stores sell these now. You can also make this dish vegan. Substitute cream cheese with a plant-based version. For the whipped topping, use coconut cream. These swaps keep your dish tasty and friendly for all diets. Make your dish stand out with creative serving. Try using clear cups for individual servings. This way, everyone can see those lovely layers. You can also garnish with fresh mint leaves or extra fruit. It adds color and freshness to your dish. Another idea is to drizzle chocolate sauce on top. This will appeal to chocolate lovers and make it even more special. You should store your Strawberry Pretzel Salad in the fridge. Use an airtight container to keep it fresh. This salad stays good for about 3 to 5 days. Make sure to cover it well to avoid any odors from the fridge. You can freeze Strawberry Pretzel Salad, but it may change texture. To freeze, cut it into squares and wrap each piece tightly in plastic wrap. Then, place them in a freezer bag or container. When you want to enjoy it, take it out and let it thaw in the fridge. This way, it will retain more flavor and freshness. Serve it chilled for the best taste! Strawberry Pretzel Salad is a fun dessert. It combines salty pretzels, sweet cream cheese, and fresh strawberries. The dish has three main layers. The bottom layer is a crunchy pretzel crust. The middle layer is a creamy cheese mixture. The top layer is a vibrant strawberry gelatin with fruit. This salad is colorful and perfect for gatherings. Yes, you can make Strawberry Pretzel Salad a day in advance. Prepare the pretzel crust and cream cheese layer first. Let them cool completely. Then, add the gelatin layer with fresh strawberries. Cover the dish tightly and refrigerate. This way, the flavors blend well overnight. Just remember to cut and serve it chilled. If your gelatin did not set, it might be too warm. Ensure the boiling water is cooled before adding it to the strawberries. Another reason could be using the wrong amount of gelatin. Always measure carefully. If you notice it is still liquid, refrigerate it longer. Sometimes, patience is key! You can use frozen strawberries, but it can change the texture. Frozen strawberries may become mushy when thawed. They also release more liquid into the gelatin. If you decide to use them, drain any excess juice. You can add some fresh strawberries for crunch, too. This mix can keep your salad delicious. If you need a substitute for powdered sugar, use granulated sugar. Blend it in a blender until it’s fine. Another option is to mix granulated sugar with cornstarch. This mix can mimic powdered sugar’s texture. Keep in mind that it may alter the flavor slightly. Adjust the amount to taste to keep it sweet. Strawberry Pretzel Salad combines sweet and salty flavors in a fun dessert. You start with a crunchy pretzel crust, add a smooth cream cheese layer, and finish with a vibrant strawberry gelatin topping. Remember, variations make this dish your own, with options for different fruits or dietary needs. Store leftovers properly or freeze them for later enjoyment. This recipe is easy to make ahead, ensuring you have a tasty treat ready whenever you want it. Enjoy your creation!

Are you ready to impress your friends and family with a refreshing dessert? Strawberry Pretzel Salad is a sweet and salty treat that’s simple to make. With a crunchy pretzel …

Read more

Categories Desserts Leave a comment

Teriyaki Glazed Salmon Flavorful Dinner Delight

October 29, 2025March 16, 2025 by Chef Evan
To make teriyaki glazed salmon, gather these key ingredients: - 2 salmon fillets (about 6 ounces each) - 1/4 cup soy sauce (low-sodium) - 2 tablespoons honey - 1 tablespoon rice vinegar - 1 teaspoon sesame oil - 1 tablespoon fresh ginger, grated - 2 cloves garlic, minced - 1 teaspoon cornstarch mixed with 1 tablespoon water (for thickening) - 1 tablespoon sesame seeds (for garnish) - 2 green onions, finely chopped (for garnish) - Cooked jasmine rice (for serving) - Steamed broccoli (optional, for serving) These ingredients create a sweet and savory glaze that pairs perfectly with salmon. While the recipe shines with jasmine rice and broccoli, feel free to mix it up! You can serve the salmon with: - Quinoa for a nutty flavor - Stir-fried vegetables for added crunch - Sautéed spinach for a healthy boost - A side salad to freshen the plate These options make the dish more colorful and fun. Using fresh ingredients makes a big difference. Look for: - Wild-caught salmon for better taste and texture - Fresh ginger instead of powdered for a bright flavor - Low-sodium soy sauce to control saltiness - Organic honey for a pure sweetness Choosing high-quality ingredients elevates your dish and makes it even more enjoyable. {{ingredient_image_1}} To make the teriyaki sauce, grab a small saucepan. Add 1/4 cup of low-sodium soy sauce. Next, mix in 2 tablespoons of honey, 1 tablespoon of rice vinegar, and 1 teaspoon of sesame oil. Then, add 1 tablespoon of grated fresh ginger and 2 minced garlic cloves. Stir all the ingredients well. Heat the mixture over medium heat until it simmers gently. Once it simmers, mix 1 teaspoon of cornstarch with 1 tablespoon of water. Stir this mixture into the sauce to thicken it. Cook for 1-2 more minutes until the sauce coats the back of a spoon. Remove it from heat and set it aside. Now, let’s cook the salmon. Preheat your grill or non-stick skillet over medium-high heat. Lightly oil the surface to keep the salmon from sticking. Season the salmon fillets with a pinch of salt and pepper. Place the fillets skin-side down. Let them cook for about 4-5 minutes. Carefully flip the salmon and brush half of the teriyaki sauce on top. Cook for another 4-5 minutes. The salmon is done when it flakes easily with a fork. In the last minute, brush the remaining glaze over the salmon for extra flavor. After cooking, let the salmon rest for a minute on a plate. Serving teriyaki glazed salmon is easy and fun! Place the salmon on a colorful plate. Serve it over a mound of jasmine rice. If you like, add steamed broccoli on the side for color and nutrition. Drizzle any extra teriyaki sauce over the salmon. For a beautiful touch, sprinkle sesame seeds and chopped green onions over the top. This simple presentation makes your dish look gourmet and inviting! For a perfect teriyaki glaze, you need balance. The mix of soy sauce, honey, and rice vinegar creates a sweet and savory taste. Make sure to simmer the sauce until it thickens. This helps it stick to the salmon better. Don't rush this step. Patience pays off! Brush the glaze on the salmon twice while cooking. This adds layers of flavor. You can grill or pan-sear salmon for the best results. Grilling gives a smoky flavor, while pan-searing offers a nice crust. Preheat your grill or skillet well. This helps the salmon cook evenly. Always start with the skin-side down. This keeps the fish moist. Flip it carefully to avoid breaking the fillet. Avoid cooking salmon at too high a heat. This can lead to burnt edges and raw centers. Also, don’t forget to season the salmon before cooking. A little salt and pepper make a big difference. Lastly, don’t overcook the salmon. It should flake easily with a fork when done. If it feels tough, it’s likely overcooked. Pro Tips Fresh Ingredients: Always use fresh salmon and high-quality ingredients for the best flavor. Freshness enhances the overall taste of your teriyaki glaze. Marinate for Flavor: For an extra flavor boost, consider marinating the salmon in the teriyaki sauce for 30 minutes before cooking. This allows the flavors to penetrate the fish. Don’t Overcook: Salmon is best when it’s just cooked through and still moist. Keep an eye on the cooking time to avoid dry fish. Versatile Glaze: This teriyaki glaze is not just for salmon! Try it on chicken or grilled vegetables for a delicious alternative. {{image_2}} You can use chicken or tofu for a tasty twist on teriyaki. Chicken thighs work well because they stay juicy. Just follow the same cooking steps. For tofu, press it first to remove extra water. Cut it into cubes and sauté until golden. Then glaze it with the teriyaki sauce. If you want a meat-free meal, try vegetables instead. Grilled eggplant or zucchini absorbs the teriyaki flavor nicely. Slice them thick, brush with the sauce, and grill until soft. You can also use mushrooms for a hearty option. Portobello mushrooms are perfect because they have a meaty texture. Want to boost the flavor? Add pineapple juice to the teriyaki glaze for sweetness. You can also mix in some chili paste for heat. Fresh herbs like cilantro or basil add a nice touch too. Try sprinkling sesame seeds or chopped nuts on top for crunch. These small changes can make a big difference in taste. After enjoying your teriyaki glazed salmon, let it cool. Place the salmon in an airtight container. Make sure to store it in the fridge. It will stay fresh for up to two days. If you have leftover rice, store it in a separate container. Keeping it separate helps maintain its texture. To reheat your salmon, use the microwave or a skillet. For the microwave, cover the salmon with a damp paper towel. Heat it on medium power for about one minute. Check it to avoid overcooking. If using a skillet, add a tiny bit of water and cover it. Warm it on low heat for a few minutes. This keeps the salmon moist. You can freeze teriyaki glazed salmon for later meals. Wrap each fillet tightly in plastic wrap, then in aluminum foil. This prevents freezer burn. It can last for up to three months in the freezer. When ready to eat, thaw it in the fridge overnight. Reheat as described earlier for the best taste. Teriyaki sauce is a mix of simple ingredients. It has soy sauce, honey, and rice vinegar. You add sesame oil, ginger, and garlic for more flavor. You can also thicken it with cornstarch and water. This sauce gives the salmon its sweet and savory taste. Yes, you can bake Teriyaki glazed salmon in the oven. Preheat your oven to 400°F (200°C). Place the salmon fillets on a lined baking tray. Brush them with half of the teriyaki glaze. Bake for about 12-15 minutes. Make sure to check if they flake easily with a fork. Salmon is perfectly cooked when it flakes easily. Use a fork to gently test it. The inside should be a light pink color, not raw or overly dry. A good rule is to cook it for 4-6 minutes per half-inch of thickness. Teriyaki glazed salmon pairs well with jasmine rice. You can add steamed broccoli for crunch and color. Other great sides are stir-fried vegetables or a fresh salad. These sides balance the rich flavors of the salmon and sauce. In this post, we explored how to make teriyaki glazed salmon. We covered the main ingredients and tips for quality. I shared step-by-step instructions for cooking the salmon and making the sauce. You learned about variations, storage tips, and common mistakes. Teriyaki glazed salmon is easy and tasty. Feel free to play with flavors or proteins. Enjoy your cooking and make it your own.

Looking for a dinner that bursts with flavor and impresses everyone? Teriyaki Glazed Salmon is your answer! This dish combines tender salmon with a sweet and savory glaze that’ll have …

Read more

Categories Dinner Leave a comment

Chocolate Chip Zucchini Bread Simple and Tasty Recipe

December 25, 2025March 10, 2025 by Chef Evan
- 1 medium zucchini, grated - 1 cup all-purpose flour - 1/2 cup whole wheat flour - 1 teaspoon baking soda - 1/2 teaspoon baking powder - 1/2 teaspoon salt - 1 teaspoon ground cinnamon - 1/2 cup granulated sugar - 1/4 cup brown sugar, packed - 1/3 cup vegetable oil - 2 large eggs - 1 teaspoon vanilla extract - 1/2 cup semi-sweet chocolate chips - 1/4 cup chopped walnuts (optional) I love using fresh ingredients in my baking. The zucchini adds moisture and nutrition to the bread. You can grate it quickly using a box grater. Just remember to squeeze out the extra water. It keeps the bread from getting too soggy. The mix of all-purpose and whole wheat flour gives the bread a nice texture. The all-purpose flour keeps it light, while the whole wheat flour adds a bit of heartiness. When it comes to sugar, I use both granulated and brown sugar. Granulated sugar gives sweetness, while brown sugar adds a little depth and moisture. If you want to mix it up, use coconut sugar or maple sugar for a fun twist. You can also add some fun mix-ins. I love adding nuts for crunch. Walnuts work great, but feel free to try pecans or even seeds. Dried fruits like raisins or cranberries can add a nice chew too. This recipe is flexible. It allows you to make it your own while still keeping that classic chocolate chip flavor. {{ingredient_image_1}} 1. Preheat the oven and grease the loaf pan. Set your oven to 350°F (175°C). Use some oil or butter to grease a 9x5 inch loaf pan. This helps the bread come out clean. 2. Prepare the zucchini. Grate one medium zucchini. Sprinkle it with a pinch of salt. Let it sit for about 10 minutes. This step draws out excess moisture. Squeeze out the water before adding it to your mix. 1. Combine dry and wet ingredients. In a large bowl, whisk together these dry ingredients: - 1 cup all-purpose flour - 1/2 cup whole wheat flour - 1 teaspoon baking soda - 1/2 teaspoon baking powder - 1/2 teaspoon salt - 1 teaspoon ground cinnamon In another bowl, mix: - 1/2 cup granulated sugar - 1/4 cup brown sugar - 1/3 cup vegetable oil - 2 large eggs - 1 teaspoon vanilla extract Beat until smooth. Add the drained zucchini to the wet mix and fold it in gently. 2. Folding in chocolate chips and walnuts. Gradually add the dry mix to the wet mix. Stir just until combined. Be careful not to overmix. Then, fold in: - 1/2 cup semi-sweet chocolate chips - 1/4 cup chopped walnuts (optional) 1. Recommended baking time and temperature. Pour your batter into the greased loaf pan. Smooth the top. Bake for 50-60 minutes. Keep the oven at 350°F (175°C). 2. How to check if the bread is fully baked. Insert a toothpick into the center. If it comes out clean, the bread is done. Let it cool in the pan for about 10 minutes. Then, transfer it to a wire rack to cool completely. To get the best texture, grate your zucchini finely. Use a box grater or a food processor. This helps the zucchini blend well with the batter. To prevent excess moisture, salt the grated zucchini first. Let it sit for ten minutes, then squeeze out the water. This keeps your bread from becoming soggy. Spices can enhance your bread. Try adding nutmeg or ginger for warmth. You can also mix in some vanilla or almond extract for a twist. To achieve a moist bread, don’t overmix your batter. Stir just until combined. This keeps your loaf tender and fluffy. For a fun touch, slice the loaf and drizzle it with chocolate sauce. A dollop of whipped cream on the side makes it special, too. Pair your bread with coffee or a cold glass of milk. The flavors work well together, making every bite enjoyable. Pro Tips Grate Zucchini Finely: A finer grate will help the zucchini blend seamlessly into the bread, ensuring a moist texture without large chunks. Use Fresh Spices: For the best flavor, use fresh ground cinnamon rather than pre-ground. It enhances the aroma and taste of your bread. Cool Before Slicing: Allow the bread to cool completely on a wire rack before slicing. This ensures cleaner slices and prevents the bread from becoming gummy. Experiment with Mix-Ins: Feel free to substitute or add additional mix-ins like dried fruits or other nuts to customize the flavor profile of your bread. {{image_2}} You can make this chocolate chip zucchini bread healthier. Start by using whole grain flours. They add more fiber and nutrients. Try using half whole wheat and half all-purpose flour. You can also swap sugar for a sugar substitute. Options like coconut sugar or stevia work well. You can add other fruits or vegetables too. Mashed bananas or applesauce add sweetness and moisture. Carrots can give a nice flavor and texture. Adding flavored chocolate chips can change the taste. Try using dark chocolate or mint chocolate chips. You can also use peanut butter chips for a fun twist. Don’t forget to add spices! Nutmeg or ginger can enhance the flavor. A little cinnamon can make it even better. If you want a nut-free option, leave out the walnuts. You can add seeds like pumpkin or sunflower seeds instead. They give a nice crunch and are nutritious. Dried fruits like cranberries or raisins can add sweetness too. They pair well with the chocolate and zucchini. To keep your chocolate chip zucchini bread fresh, follow these steps: - Let the bread cool completely before storing. - Wrap it tightly in plastic wrap or foil. - Place it in an airtight container. - Store it at room temperature for up to three days. This way, you can enjoy the bread without it drying out. If you want to keep it longer, consider freezing it. Freezing your chocolate chip zucchini bread is simple: - First, wrap the cooled loaf in plastic wrap. - Then, place it in a freezer bag. - Squeeze out as much air as you can. You can freeze the bread for up to three months. When ready to eat, thaw it in the fridge overnight. Reheating your bread is easy and keeps it tasty: - Preheat your oven to 350°F (175°C). - Place slices on a baking sheet. - Heat for about 10 minutes. For best results, you can also use a microwave. Just warm a slice for about 15-20 seconds. This keeps the bread soft and moist. Enjoy your delicious treat! Yes, you can use frozen zucchini. Just thaw it first and drain any extra water. This helps keep your bread from getting soggy. I often use frozen zucchini when I have extra from summer. It works just as well! Chocolate chip zucchini bread lasts about 3 to 4 days at room temperature. Store it in an airtight container to keep it fresh. You can also refrigerate it for up to a week. Just remember to wrap it well! You can use applesauce or mashed banana as an egg substitute. Use 1/4 cup of either for each egg. This keeps the bread moist and adds a nice flavor. It’s a great option for vegan diets too. Yes, you can make this recipe dairy-free. Just use a dairy-free milk like almond or coconut. You can also use dairy-free chocolate chips. This way, everyone can enjoy the bread without worry! Absolutely! You can make mini loaves if you prefer. Just adjust the baking time to about 25-30 minutes. Check for doneness with a toothpick, just like with the large loaf. Mini loaves are perfect for sharing or gifting! You now have all the tools to make delicious chocolate chip zucchini bread. We discussed ingredients, preparation, and variations that can enhance your baking. Remember, you can adjust sugars and mix-ins to suit your taste. Don’t forget to store your bread properly to keep it fresh. Whether you’re a beginner or pro, this recipe lets you create something tasty. Enjoy baking and sharing your new creation with friends and family! Keep experimenting to make the recipe uniquely yours. Happy baking!

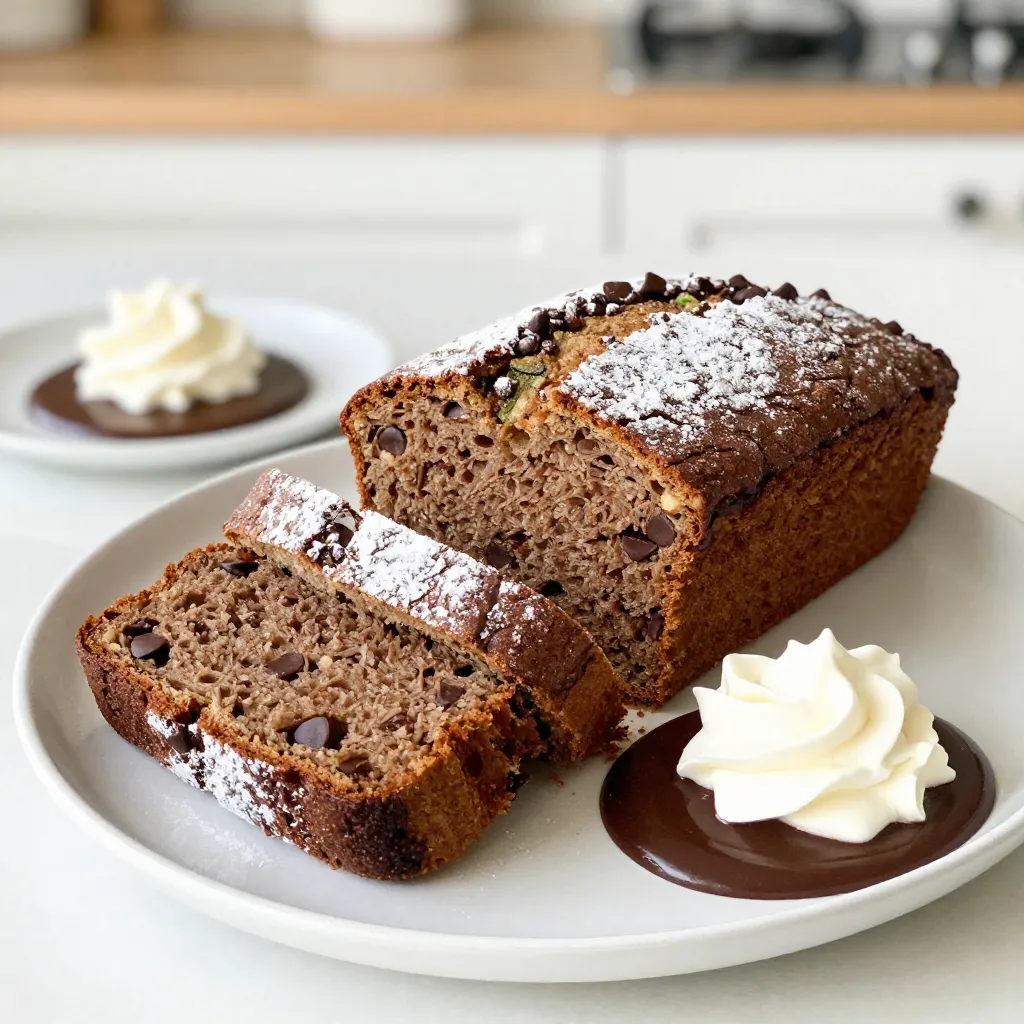
Are you ready to make a delicious treat that combines veggies and chocolate? In this post, I’ll guide you through a simple and tasty Chocolate Chip Zucchini Bread recipe. You …

Read more

Categories Desserts Leave a comment

Savory Sweet Potato Kale Curry Easy and Flavorful Dish

November 26, 2025March 6, 2025 by Chef Evan
To make a delicious sweet potato kale curry, gather these simple ingredients: - 2 medium sweet potatoes, peeled and diced - 1 tablespoon coconut oil - 1 onion, finely chopped - 3 cloves garlic, minced - 1 tablespoon fresh ginger, grated - 1 tablespoon curry powder - 1 teaspoon cumin - 1 teaspoon turmeric - 1 can (400ml) coconut milk - 2 cups vegetable broth - 4 cups kale, stems removed and leaves roughly chopped - Salt and pepper to taste - Juice of 1 lime - Fresh cilantro for garnish These ingredients create a warm and comforting dish. Sweet potatoes give it a natural sweetness, while kale adds a nutritious boost. The spices bring a rich flavor that makes the curry special. Coconut milk adds creaminess, tying everything together. This curry is not just easy to make; it also offers a great way to enjoy healthy ingredients in one bowl. {{ingredient_image_1}} 1. Sautéing onion and spices Start by heating the coconut oil in a large pot over medium heat. Add the finely chopped onion. Cook for about five minutes until the onion turns soft and clear. This step builds a great base for your curry. Next, stir in the minced garlic and grated ginger. Cook for two more minutes. The smell will be amazing! Now, add the curry powder, cumin, and turmeric. Mix well and toast the spices for one to two minutes. This enhances their flavor. 2. Incorporating sweet potatoes Now it's time to add the diced sweet potatoes. Make sure they mix well with the onion and spices. This will coat them with flavor. 3. Cooking with coconut milk and broth Pour in the coconut milk and vegetable broth. Stir everything together. Bring the mixture to a gentle boil. This step helps the sweet potatoes cook evenly. 1. Reducing heat and simmering time Once boiling, reduce the heat to low. Cover the pot and let it simmer for about 15 minutes. This allows the sweet potatoes to become tender. 2. Adding kale After 15 minutes, stir in the chopped kale. This adds color and nutrients. Cook for another five minutes until the kale wilts and softens. 3. Seasoning and serving suggestions Finally, season the curry with salt, pepper, and lime juice to taste. This brightens the dish! Serve the curry hot, and don’t forget to garnish with fresh cilantro. Enjoy this flavorful and healthy dish! To cook sweet potatoes for the best texture, use fresh ones. Chop them into uniform pieces. This helps them cook evenly. Boil them for about ten minutes first. This speeds up the cooking process in the curry. Adjusting spice levels is key. If you like it hot, add more curry powder or a pinch of cayenne pepper. For milder flavors, reduce the curry powder. You can also add a dollop of yogurt for creaminess. Substituting ingredients can make this dish unique. Instead of kale, use spinach or Swiss chard. You can swap coconut milk for almond milk if you want a lighter taste. Pair your curry with rice or warm naan bread. The rice soaks up the sauce. Naan adds a nice texture to each bite. For presentation, garnish with fresh cilantro. This adds color and flavor. You can also squeeze lime juice on top. It brightens the dish and adds freshness. Pro Tips Use Fresh Ingredients: Fresh garlic, ginger, and spices will elevate the flavor of your curry significantly compared to dried or pre-packaged options. Adjust the Spice Level: If you prefer a spicier curry, consider adding a chopped chili pepper or a pinch of cayenne pepper when cooking the onions. Customize Your Greens: Feel free to mix in other leafy greens like spinach or Swiss chard for added nutrition and variety in texture. Let It Rest: Allow the curry to sit for a few minutes after cooking; this helps the flavors meld together for a more delicious dish. {{image_2}} You can easily change the greens in this recipe. Instead of kale, try spinach or Swiss chard. Both options bring a nice flavor and color. They cook fast, so stir them in at the end. Want to add protein? Chickpeas are a great choice. They add fiber and a nice texture. You can also use tofu. Just press it to remove water, then cube it. Add it when you cook the sweet potatoes. To boost flavor, consider adding nuts or seeds. Toasted cashews or sunflower seeds add crunch. They also enhance the dish's nutrition. You can try other spices too. A pinch of cinnamon or chili powder can add warmth. Feel free to explore! If you want a different cooking method, try a slow cooker. Just mix all the ingredients and cook on low for about 6 hours. A pressure cooker is also great. It cuts the cooking time to about 10 minutes. These variations make the sweet potato kale curry fun and unique! To keep your sweet potato kale curry fresh, use airtight containers. Glass or plastic containers work well. Make sure they seal tightly. This keeps moisture in and air out. Your curry will last up to four days in the fridge. If you want to store it longer, consider freezing it. In the freezer, it can last for about three months. When reheating your curry, you have two good options: the stovetop or the microwave. For the stovetop method, pour the curry into a pot. Heat it over low to medium heat. Stir it often to avoid burning. For the microwave, place the curry in a microwave-safe dish. Cover it and heat for one minute, then stir. Repeat until hot. To keep the texture and flavor, add a splash of water or coconut milk while reheating. This will help maintain its creamy goodness. Enjoy your warm and tasty curry again! Can I make this curry vegan? Yes, this curry is vegan by default. It uses coconut milk and vegetable broth. Both are plant-based. You can use any vegetable broth you like. Just check the labels to be sure. How do I make it spicier? To add heat, stir in some red pepper flakes or diced jalapeños. You can also use a spicier curry powder. Adjust the amount to fit your taste. Start with a little and add more if needed. What can I serve with sweet potato kale curry? This curry pairs well with rice or quinoa. You can also serve it with naan bread. For a fresh touch, add a side salad. Each option brings out the flavors of the curry. Enjoy experimenting with your favorites! This recipe for sweet potato kale curry is rich in flavor and simple to make. You learned how to prepare, cook, and serve it. I shared tips for perfect texture and spice levels. I also suggested fun ingredient swaps and storage ideas for leftovers. Enjoy this dish as is, or tweak it to your taste. Happy cooking!

If you’re craving a warm, comforting meal, this Savory Sweet Potato Kale Curry is perfect for you. Made with sweet potatoes, coconut milk, and fresh kale, this dish packs flavor …

Read more

Categories Dinner Leave a comment

Strawberry Spinach Poppy Seed Salad Fresh and Tasty

October 14, 2025March 6, 2025 by Chef Evan
- Spinach: Use 4 cups of fresh spinach, washed and dried. Spinach adds a crisp texture and vibrant color. - Strawberries: You need 1 cup of strawberries, hulled and sliced. Strawberries bring sweetness and a pop of flavor. - Red onion: Use 1/4 cup of thinly sliced red onion. It adds a nice bite and balances the sweetness. - Feta cheese: You’ll need 1/2 cup of crumbled feta cheese. Feta adds creaminess and a salty kick. - Sunflower seeds: Add 1/4 cup of sunflower seeds. They give a crunchy texture and nutty flavor. - Poppy seeds: You also need 1/4 cup of poppy seeds. They add a delicate crunch and visual appeal. - Olive oil: Use 1/2 cup of olive oil. It acts as the base for your dressing and adds richness. - Apple cider vinegar: You’ll need 1/4 cup of apple cider vinegar. It gives a tangy contrast to the sweet elements. - Honey: Add 2 tablespoons of honey for sweetness. It helps balance the vinegar's tartness. - Salt and pepper: Use salt and pepper to taste. They enhance all the flavors in the salad. These ingredients come together to create a fresh and tasty salad. Enjoy the bright colors and flavors! {{ingredient_image_1}} First, you need to make the dressing. In a small bowl, add the olive oil, apple cider vinegar, honey, salt, and pepper. Use a whisk to mix the ingredients well. Whisking blends the flavors and keeps the dressing smooth. After mixing, set it aside. Letting it sit allows the flavors to blend for a better taste. Next, grab a large mixing bowl. Add the fresh spinach, sliced strawberries, crumbled feta cheese, and thinly sliced red onion. These ingredients work together to create a fresh and tasty salad. Drizzle the prepared dressing over the salad mix. Gently toss everything together. This step coats all the ingredients evenly with dressing. For the final touches, sprinkle the sunflower seeds and poppy seeds over the top. These seeds add a nice crunch to your salad. Toss lightly again to mix in the seeds. Serve the salad right away for the best taste. Enjoy the fresh flavors and vibrant colors! To make your salad shine, serve it in a large glass bowl. This lets the bright colors pop. You can add a few whole strawberries on top for a nice touch. This makes the dish look fresh and inviting. For added elegance, consider using a platter instead of a bowl. If you want to swap the spinach, try kale or arugula. Both add a different taste, yet still taste great. For those avoiding feta, you can use goat cheese or omit cheese entirely. If you need a vegan dressing, mix olive oil, lemon juice, and maple syrup. This keeps it light and tasty without dairy. Add fresh herbs like basil or mint for a burst of flavor. These herbs pair well with strawberries and add depth. You can also sprinkle in some cracked pepper for a bit of heat. If you want protein, try adding grilled chicken or chickpeas. These options make your salad more filling and satisfying. Pro Tips Use Fresh Ingredients: For the best flavor and texture, make sure to use the freshest spinach and strawberries available. Fresh produce not only enhances the taste but also adds vibrant color to your salad. Make Ahead Dressing: Prepare the dressing in advance and store it in the refrigerator. This allows the flavors to meld beautifully. Just give it a good shake before drizzling it on the salad. Customize Your Nuts: Feel free to swap the sunflower seeds with your favorite nuts like almonds or walnuts for a different crunch and flavor profile. This customization can make the salad more unique to your taste. Chill Before Serving: For a refreshing experience, chill the salad in the refrigerator for about 10 minutes before serving. This enhances the flavors and ensures a crisp bite! {{image_2}} You can change this salad with seasonal fruits. In summer, try adding blueberries or peaches. These fruits add a sweet touch. In fall, consider using sliced apples or pears. Both options keep the salad fresh and tasty. You can also mix in different nuts or seeds. For crunch, walnuts or almonds work well. They add flavor and texture. To turn this salad into a meal, add grilled chicken. It gives protein and makes it filling. You can also pair the salad with a whole grain. Quinoa or brown rice makes a great choice. This adds fiber and keeps you full longer. You can serve it as a main dish or a side. Try different vinegars or sweeteners in your dressing. Balsamic vinegar adds a rich taste. Maple syrup is a nice swap for honey if you prefer. You can also experiment with creamy poppy seed dressings. These can bring a smooth, rich flavor to the salad. Mix and match to find your perfect dressing! To keep your salad fresh, store it in an airtight container. This helps prevent wilting. I recommend using glass or plastic containers with tight lids. They work well for keeping air out. If you can, add the toppings just before serving. This keeps everything crispy and crunchy. The salad lasts about 3 days in the fridge. If you see any signs of spoilage, like brown spinach or mushy strawberries, toss it out. Always check for an off smell too. Freshness is key for the best taste. You can make parts of this salad ahead of time. Chop the spinach and slice the strawberries the night before. Store them in separate containers. Keep the dressing in a small jar in the fridge. This way, you can mix everything just before serving. It saves time and keeps the flavors bright. Yes, you can! To make a salad in advance, follow these tips: - Prep the ingredients: Wash and slice your spinach and strawberries. - Keep the dressing separate: Store the dressing in a jar. This keeps the salad fresh. - Assemble just before serving: Combine everything only when you are ready to eat. - Add crunchy toppings last: Sprinkle sunflower and poppy seeds right before serving for best texture. This way, your salad stays crisp and tasty! You can make this salad a complete meal easily! Here are some ideas: - Grilled chicken: Add sliced grilled chicken for protein. - Chickpeas: Toss in canned chickpeas for a plant-based option. - Quinoa: Stir in cooked quinoa for carbs and protein. - Avocado: Add avocado slices for healthy fats and creaminess. These additions will help fill you up while keeping the salad fresh and vibrant. Yes, this salad is gluten-free! Here’s what you need to check: - Ingredients: All ingredients like spinach, strawberries, and feta cheese are gluten-free. - Dressing components: Olive oil, apple cider vinegar, honey, salt, and pepper do not contain gluten. Always read labels if you use packaged products to ensure they are gluten-free. Enjoy this salad worry-free! This salad blends fresh produce with tasty ingredients for a satisfying meal. We started by discussing key components like spinach, strawberries, and feta cheese. You learned how to make a simple dressing and combine everything for a delightful dish. As you explore variations and tips, remember each ingredient adds its charm. Experiment with flavors and make it your own. This salad is not just a side—it's a chance to create something delicious. So, enjoy every bite and share your new favorite recipe!

Looking for a fresh and tasty salad that’s simple to make? Let me introduce you to my Strawberry Spinach Poppy Seed Salad. This vibrant dish combines spinach, sweet strawberries, and …

Read more

Categories Salads Leave a comment
Older posts
Newer posts
← Previous Page1 … Page116 Page117 Page118 … Page124 Next →

TOSSED FLAVORS

Where flavors are fresh, vibrant, and ready to toss! 🥗

PAGES

Home About Contact Privacy Policy Terms & Conditions Cookie Policy GDPR Policy Copyright Policy Disclaimer

CATEGORIES

Appetizers Desserts Salads Breakfast Dinner

Contact

  • Pinterest
  • Mail
Copyright © 2026 Tossed Flavors. All rights reserved.