Blueberry Crumble Pie Simple and Tasty Dessert
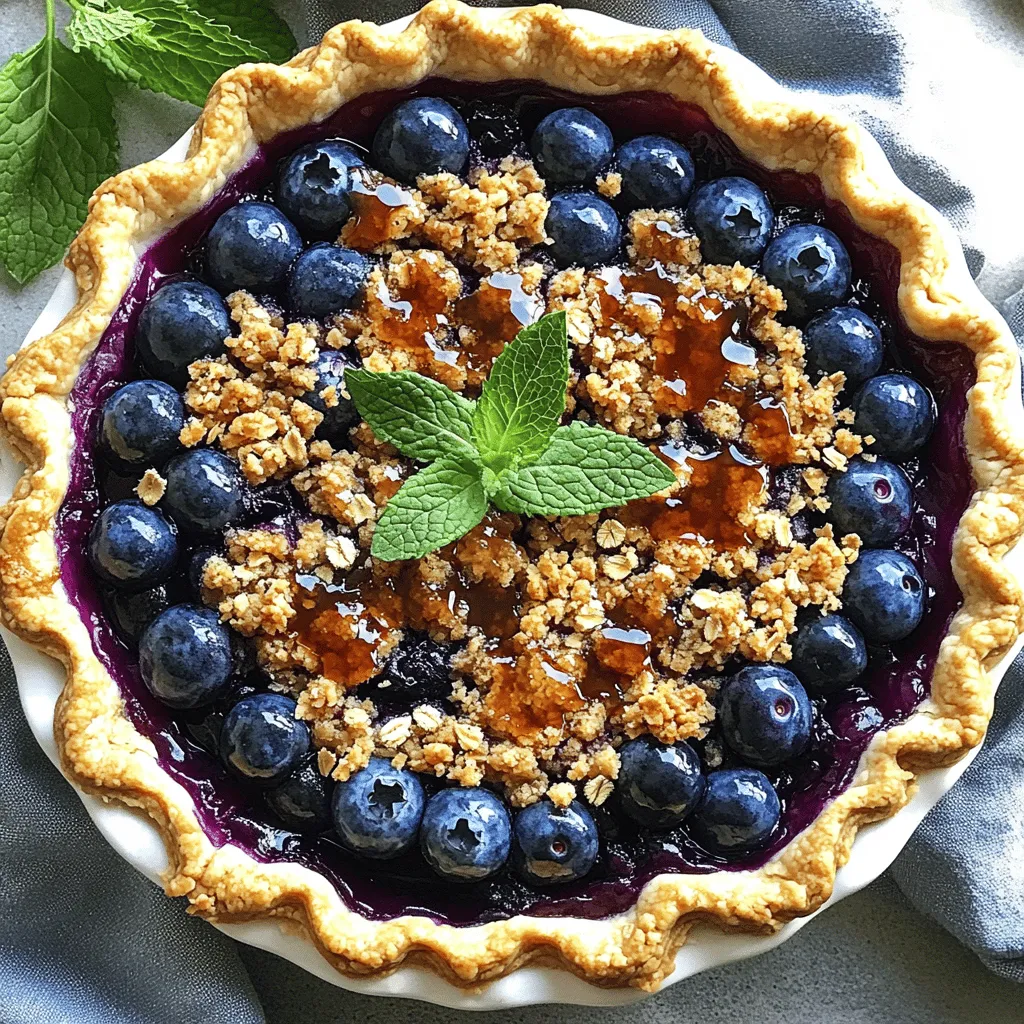
Are you ready to impress your family with a delicious dessert that’s easy to make? Blueberry crumble pie is a simple, tasty treat that combines sweet, juicy berries with a …
Are you ready to impress your family with a delicious dessert that’s easy to make? Blueberry crumble pie is a simple, tasty treat that combines sweet, juicy berries with a …
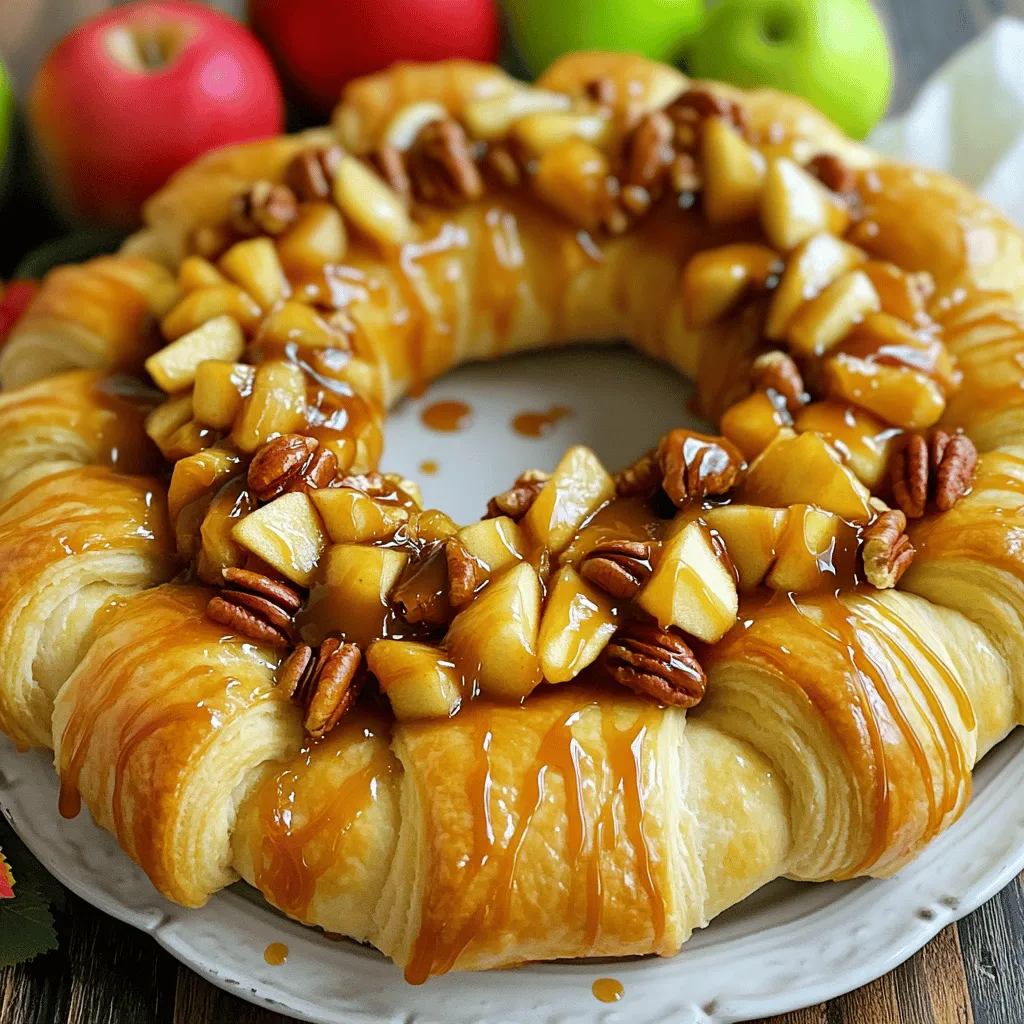
Are you ready to delight your taste buds? This Caramel Apple Cream Cheese Crescent Ring is an easy and tasty treat that everyone will love. With flaky crescent rolls, sweet …

If you love Harry Potter and sweet treats, you’ll adore these Butterbeer Cupcakes! This recipe captures the magic of the famous drink with a rich butterscotch flavor and creamy frosting. …

Lasagna roll ups are a fun twist on a classic Italian dish. They are simple to make and perfect for family meals. You can mix and match flavors with different …
. To keep Runza casserole fresh, store it in an airtight container. This prevents it from drying out. You can also cover it tightly with plastic wrap or aluminum foil. If stored correctly, leftovers stay fresh for about 3 to 4 days in the fridge. Just make sure to let it cool down first before placing it in the fridge. This helps keep the texture nice. You can freeze Runza casserole before or after baking. If you freeze it before baking, assemble it in a dish, cover it well, and place it in the freezer. When you’re ready to cook it, thaw it in the fridge overnight, then bake as usual. If you bake it first, let it cool completely. Then wrap it tightly and place it in the freezer. It will stay good for about 2 to 3 months. To reheat, thaw overnight in the fridge if frozen. Then, warm it in the oven at 350°F (175°C) until heated through. You may also use the microwave, but the oven keeps the crust crispy. Enjoy your delicious Runza casserole anytime! A Runza is a tasty pocket filled with seasoned beef and cabbage. It started in Nebraska, where it became a local favorite. Many people enjoy it as a quick meal or snack. The dough is usually soft and flaky, making it comforting and fun to eat. This dish shows how simple ingredients can create great flavor. Yes, you can prep Runza Casserole ahead. Just follow these steps: - Prepare the beef and cabbage mixture. - Layer it in the baking dish with dough and cheese. - Cover it and store it in the fridge for up to 24 hours. When you're ready, bake it straight from the fridge. This saves time on busy days! Runza Casserole is not gluten-free as it uses crescent roll dough. However, you can make it gluten-free with these options: - Use gluten-free crescent roll dough. - Choose a gluten-free bread or biscuit mix for the base. Always check labels for hidden gluten in other ingredients. Customizing your Runza Casserole is easy and fun. Here are some ideas: - Add diced bell peppers or mushrooms for extra flavor. - Swap ground beef for turkey or chicken. - Mix in different cheeses like mozzarella or pepper jack. Feel free to get creative and make it your own! You can find the Full Recipe for more details. In this article, we covered making a delicious Runza casserole. You learned about main and additional ingredients, like ground beef and crescent roll dough. I provided step-by-step instructions to guide you in cooking and assembling the dish. You found tips, variations, and storage options to keep your casserole fresh and tasty. My final thought: Enjoy this hearty meal any way you like it. Get cooking and make it your own!](https://tossedflavors.com/wp-content/uploads/2025/04/c54d3d7f-decf-446e-9859-b4063e679028.webp)
If you’re looking for a heartwarming meal that brings comfort and joy, you’re in the right place! This Runza Casserole combines savory ground beef, fresh cabbage, and gooey cheese in …
![- 3 large sweet onions, thinly sliced - 1 tablespoon olive oil - 1 teaspoon sugar - 1 teaspoon salt - 1 tablespoon fresh thyme leaves (or 1 teaspoon dried thyme) - 1 cup heavy cream - 2 large eggs - ½ cup grated Gruyère cheese (or Swiss cheese) - 1 pre-made pie crust (store-bought or homemade) - Freshly cracked black pepper, to taste When choosing sweet onions, look for firm ones with smooth skin. The best sweet onions should feel heavy for their size and have no soft spots. Vidalia and Walla Walla are great choices. For cream, use heavy cream for a rich texture. If you want a lighter option, half-and-half works well too. Gruyère cheese adds depth, but Swiss cheese is a fine substitute. Both melt beautifully in the pie. If you wish to make more or fewer servings, you can easily adjust the amounts. For example, to make four servings, use two onions and half the other ingredients. If you have dietary needs, you can substitute eggs with flaxseed meal mixed with water for a vegan option. Use almond milk or coconut cream instead of heavy cream for a dairy-free version. This recipe is flexible and can fit many diets! For the full recipe, check out the details above. Preheating the oven Start by preheating your oven to 375°F (190°C). This ensures even cooking for your pie. Caramelizing sweet onions In a large skillet, pour 1 tablespoon of olive oil over medium heat. Add 3 thinly sliced sweet onions. Sprinkle with 1 teaspoon of sugar and 1 teaspoon of salt. Cook for 15-20 minutes, stirring often. You want the onions to be soft and fragrant. Their natural sweetness will shine as they caramelize. Stir in 1 tablespoon of fresh thyme leaves and cook for 2 more minutes. Remove them from heat and let them cool slightly. Whisking cream and eggs Grab a mixing bowl and whisk together 1 cup of heavy cream and 2 large eggs. Blend them until smooth and fully combined. Combining onion mixture and cheese Gently fold in the caramelized onions and ½ cup of grated Gruyère cheese. Make sure to add freshly cracked black pepper to taste. This combination will create a rich, flavorful filling for your pie. Preparing the pie crust Take 1 pre-made pie crust and place it in a pie dish. If you made your own crust, roll it out and transfer it to the dish. Pouring and spreading the filling Pour your delicious filling into the crust. Use a spatula to spread it out evenly. This step is important for a nice, even bake. Optimal baking time and temperature Place your pie in the preheated oven. Bake it for 35-40 minutes. Keep an eye on the top; it should turn golden brown. How to check if the pie is done To check if the pie is done, insert a knife into the center. If it comes out clean, the filling is set. Let the pie cool for 10-15 minutes before slicing. This helps the filling firm up for clean cuts. Enjoy your sweet onion pie! For full details on this recipe, check the Full Recipe section. To avoid a soggy bottom, you can use blind baking. This means pre-baking your crust before adding the filling. Simply line your pie crust with parchment paper and fill it with pie weights or dried beans. Bake it for about 10-15 minutes at 375°F (190°C). This helps create a crisp crust that won’t get soggy from the filling. To elevate your sweet onion pie, consider adding herbs and spices. Fresh herbs like rosemary or parsley can add depth. You can also try spices like nutmeg or cayenne for a kick. If you want to switch up the cheese, Gruyère is great, but cheddar or feta can provide a unique twist. Each cheese brings its own flavor profile, so feel free to experiment. For a beautiful presentation, garnish your pie with a sprig of fresh thyme. It adds color and freshness. When serving, cut the pie into eight slices for a perfect portion. Serve it warm, perhaps alongside a light salad for a balanced meal. This will impress your guests and make for a delightful dining experience. {{image_4}} You can switch up the cheese in your sweet onion pie for a new twist. Try cheddar for a sharp flavor or feta for a creamy bite. Mozzarella works well too, adding a nice stretch. Each cheese brings its own taste, making the pie unique. Cheese choice can change the whole vibe of your dish. Adding veggies can enhance your sweet onion pie. Spinach is a great option; it adds color and nutrients. Mushrooms also blend nicely, bringing an earthy flavor. Both choices add depth and make each slice exciting. Mix and match to find your perfect blend! If you need a gluten-free pie, it's easy to adapt. You can use almond or coconut flour to make a gluten-free crust. This will keep the pie tasty while meeting dietary needs. Just follow the same steps for filling and baking. Your gluten-free guests will love this dish too! Don’t forget to check the [Full Recipe] for more details on making the perfect sweet onion pie. To keep your sweet onion pie fresh, store it in an airtight container. You can also cover it tightly with plastic wrap. This will help maintain its flavors and moisture. Place the pie in the fridge if you plan to eat it within a few days. It should last about 4 to 5 days. When you're ready to enjoy your leftovers, reheat them in the oven. Set your oven to 350°F (175°C) and warm the pie for about 15 to 20 minutes. This method keeps the crust crispy and the filling warm. If you want to save your sweet onion pie for later, freezing is a great option. First, let the pie cool completely. Wrap it tightly in plastic wrap, then in aluminum foil. This helps prevent freezer burn. You can freeze the pie for up to 3 months. When you are ready to eat it, take it out of the freezer and place it in the fridge overnight to thaw. Once thawed, reheat it in the oven at 350°F (175°C) for about 30 minutes. This way, your pie stays tasty and delicious. For more instructions, check the Full Recipe. Sweet onion pie is a rich, savory dish. It features caramelized sweet onions baked in a creamy filling. This pie has roots in Southern cooking, where sweet onions grow in abundance. The blend of flavors creates a comforting and satisfying meal. Yes, you can prepare sweet onion pie ahead of time. Make the filling and pour it into the crust. Cover it well and store it in the fridge. You can freeze the pie too. Just wrap it tightly and keep it for up to three months. To make your pie more savory, try these tips: - Add cooked bacon or sausage for a meaty twist. - Mix in sautéed mushrooms to deepen the flavor. - Use sharper cheese, like aged cheddar, for more bite. These adjustments can change the taste and make it uniquely yours. Pair your sweet onion pie with simple side dishes. A fresh green salad adds crunch and color. Roasted vegetables bring out the pie's sweetness. A light soup can also be a great match. These sides balance the richness of the pie and enhance your meal. This blog post showed how to make a delicious sweet onion pie. You learned about the key ingredients, like sweet onions and Gruyère cheese. I provided tips for selecting the best ingredients and converting measurements. You also got step-by-step instructions for preparing, mixing, and baking your pie. In the end, this savory dish is versatile and great for sharing. Try adding different cheeses or veggies to make it your own. Enjoy the tasty results and impress your friends!](https://tossedflavors.com/wp-content/uploads/2025/04/7c837ff8-2afc-4199-9d59-fefe19dac698.webp)
Craving a dish that’s both comforting and packed with flavor? Let me introduce you to Sweet Onion Pie! This savory delight combines sweet onions, creamy Gruyère, and fresh herbs, all …
![- 1 medium head of green cabbage, chopped into bite-sized pieces - 1 lb ground beef, ideally 80/20 for rich flavor - 1 cup cooked rice, preferably long-grain for better texture - 1 large onion, diced into small pieces - 2 cloves garlic, minced finely - 1 can (15 oz) diced tomatoes, drained to reduce excess moisture - 1 cup beef broth, low-sodium recommended - 1 tablespoon Worcestershire sauce for depth of flavor - 1 teaspoon smoked paprika for a subtle smokiness - 1 teaspoon dried oregano to add a herby note - Salt and black pepper to taste - 1 cup shredded mozzarella cheese for a gooey topping - Fresh parsley, chopped, for garnishing Cabbage Beef Bake is a dish that brings warmth and comfort to any table. The main ingredients, like cabbage and ground beef, work well together. Cabbage adds crunch, while ground beef gives rich flavor. The rice makes it hearty and filling. You will need cooking essentials like onion and garlic to build flavor. The diced tomatoes add moisture and a hint of sweetness. Flavor enhancers like beef broth and Worcestershire sauce deepen the taste. Smoked paprika and oregano bring out the best in this dish. Don’t forget salt and pepper to balance all the flavors. The topping is where it gets exciting. Shredded mozzarella melts over the bake, creating a creamy layer. Fresh parsley adds a pop of color and freshness. For the full recipe, check the detailed steps provided. This dish is not only easy to make but also a delight to share with family. - Preheat the Oven: Start by preheating your oven to 350°F (175°C). This ensures it’s hot and ready when you finish preparing the dish. - Cook the Ground Beef: In a large skillet over medium heat, add 1 pound of ground beef. Cook for about 5-7 minutes. Break it apart with a spatula until it turns brown. Drain any extra fat to keep the dish light. - Sauté Aromatics: Add 1 large diced onion and 2 cloves of minced garlic to the skillet. Cook for 3-4 minutes. Stir often until the onion is soft and fragrant. - Stir in Cooked Rice and Tomatoes: Add 1 cup of cooked rice and 1 can of drained diced tomatoes. Mix well so everything blends together. - Season the Mixture: Pour in 1 tablespoon of Worcestershire sauce, 1 teaspoon of smoked paprika, and 1 teaspoon of dried oregano. Add salt and black pepper to taste. Mix well and let it simmer for about 5 minutes. - Layer Cabbage and Beef Mixture: In a large baking dish, spread half of the chopped cabbage evenly at the bottom. Spoon the beef mixture over the cabbage. Then, add the rest of the cabbage on top. - Add Broth: Carefully pour 1 cup of beef broth over the layers. This keeps the bake moist and helps the cabbage cook nicely. - Cover and Bake: Cover the dish tightly with aluminum foil. Place it in the preheated oven and bake for 45 minutes. This allows the flavors to come together and the cabbage to soften. - Add Cheese and Bake Uncovered: After 45 minutes, take out the foil. Sprinkle 1 cup of shredded mozzarella cheese evenly on top. Bake uncovered for an extra 15 minutes. The cheese should be bubbly and golden brown. - Serving Suggestions: Once it’s done, let it cool for a few minutes. Slice it into portions, and serve warm. A sprinkle of chopped fresh parsley on top adds a nice touch. For the full recipe, check out [Full Recipe]. - Alternatives for Ground Beef: You can use ground turkey or chicken instead of beef. They are leaner and still give great flavor. For a vegetarian option, try lentils or textured vegetable protein. These swaps keep your bake hearty and delicious. - Rice Variations: If you want a change from white rice, use brown rice for more fiber. Quinoa is a great choice too. It adds a nice nutty flavor and packs a protein punch. Don't worry; these grains fit right into the bake. - How to Achieve Perfectly Cooked Cabbage: To cook cabbage well, make sure to chop it into even pieces. This helps it cook uniformly. Steaming it in the broth keeps it tender and moist. Avoid overcooking, or it can turn mushy. You want it soft but still with a bit of bite. - Browning Ground Beef Tips: Browning beef is key for flavor. Use a large skillet over medium heat. Break the meat apart as it cooks. This helps it brown evenly. Don't crowd the pan; cook in batches if needed. Drain excess fat for a healthier dish. - Additional Seasoning Suggestions: Besides the listed spices, consider adding a pinch of red pepper flakes for heat. A splash of hot sauce can also boost flavor. Experiment with different spices like cumin or Italian seasoning to find your favorite mix. - Using Fresh Herbs: Fresh herbs like thyme or basil can elevate your dish. Add them during the last few minutes of cooking for the best taste. They brighten the dish and add a fresh aroma. A sprinkle of fresh parsley before serving makes it pop visually and tastefully. {{image_4}} You can easily make a vegetarian version of Cabbage Beef Bake. Start by swapping out the ground beef for textured vegetable protein (TVP). TVP absorbs flavors well and has a great texture. To prepare it, rehydrate the TVP with warm water or broth. Add extra veggies like bell peppers, zucchini, or mushrooms for more flavor and nutrition. This version still holds the comfort of the original dish but caters to plant-based diets. Cheese can change the whole dish. You can use shredded cheddar, Parmesan, or even a mix for more flavor. Each cheese gives a different taste and texture. If you prefer dairy-free options, there are great cheese alternatives available. Look for products made from nuts or soy. These can melt nicely and add a creamy touch to your bake. You can add a fun twist by using spices that reflect different cuisines. Try adding cumin for a Mexican flair or curry powder for an Indian touch. These spices bring warmth and depth to the dish. You can also experiment with herbs like cilantro or basil to freshen things up. This way, you make Cabbage Beef Bake your own, while still keeping it comforting and delicious. For the full recipe, check the [Full Recipe]. To keep your Cabbage Beef Bake fresh, store it in airtight containers. This will prevent it from drying out. Place it in the fridge within two hours of serving. It will stay good for three to four days. When stored properly, leftovers last about three to four days in the fridge. If you want to keep it longer, freezing is a great option. You can reheat your Cabbage Beef Bake in the oven or microwave. For the oven, set it to 350°F (175°C). Cover the dish with foil to keep it moist. Heat for about 20 minutes or until warmed through. For the microwave, place a portion on a microwave-safe plate. Heat on high for two to three minutes, stirring halfway. When reheating, the oven keeps the texture better. Avoid overcooking in the microwave, as it can make the cabbage mushy. To freeze, let the dish cool completely. Transfer it to a freezer-safe container, leaving space at the top. Seal it well to avoid freezer burn. Thaw your Cabbage Beef Bake in the fridge overnight. For a quicker method, use the microwave on the defrost setting. After thawing, reheat in the oven or microwave as mentioned above. For the full recipe with all the ingredients, check out the Cabbage Beef Bake Delight! To make Cabbage Beef Bake, follow these steps: 1. Preheat your oven to 350°F (175°C). 2. Cook 1 lb of ground beef in a skillet until browned. 3. Add 1 diced onion and 2 minced garlic cloves. Sauté until the onion is clear. 4. Mix in 1 cup of cooked rice, 1 can of diced tomatoes, Worcestershire sauce, smoked paprika, oregano, salt, and pepper. Simmer for 5 minutes. 5. Layer half of 1 chopped cabbage in a baking dish, then add the beef mixture, and top with the rest of the cabbage. 6. Pour 1 cup of low-sodium beef broth over the dish. 7. Cover it tightly with foil and bake for 45 minutes. 8. Remove the foil, sprinkle 1 cup of shredded mozzarella on top, and bake for an extra 15 minutes. This recipe is simple and gives a hearty meal. You can find the Full Recipe for more details. Yes, you can make Cabbage Beef Bake ahead of time. Prepare the dish up to the baking step, then cover and store it in your fridge. It will stay fresh for about 2 days. When you are ready to bake, simply follow the cooking instructions, adding extra time if baking from cold. To complement Cabbage Beef Bake, consider serving: - A simple green salad with vinaigrette. - Mashed potatoes for extra comfort. - Crusty bread to soak up flavors. - Steamed vegetables for a touch of color and nutrition. These sides will make the meal even better and more filling. Cabbage Beef Bake has many healthy elements. Cabbage is low in calories and high in fiber. Ground beef provides protein and iron. To make it healthier, choose lean ground beef, like 90/10, and add more vegetables. You can also use brown rice for added nutrients. Yes, you can adapt this recipe for a slow cooker! Brown the ground beef first. Then layer the ingredients in the slow cooker. Start with cabbage, then the beef mixture, and top with the rest of the cabbage. Pour in the beef broth and cook on low for 6-8 hours or high for 3-4 hours. The best ground beef ratio for Cabbage Beef Bake is 80/20 or 85/15. This means 80% lean meat to 20% fat. This ratio gives great flavor and keeps the meat moist during cooking. Avoid using very lean beef, as it can become dry. This blog post detailed how to make a tasty Cabbage Beef Bake. We covered the key ingredients, such as cabbage, ground beef, and rice. You learned step-by-step instructions for preparation, layering, and baking. We also discussed tips for flavor and ingredient substitutions, plus storage methods for leftovers. In conclusion, this dish is versatile and easy. You can adapt it to fit your taste and needs. Enjoy making and sharing this comforting meal with others.](https://tossedflavors.com/wp-content/uploads/2025/04/1407ef42-b7d1-4df4-bf63-ca63e76ee8cb.webp)
If you’re looking for a warm, tasty dish that the whole family will love, you’re in the right place! Cabbage Beef Bake brings juicy ground beef, tender cabbage, and savory …

If you’re craving a sweet treat that’s quick and easy, look no further! This One Bowl Apple Cake is the perfect solution. Using simple ingredients, you can whip up a …
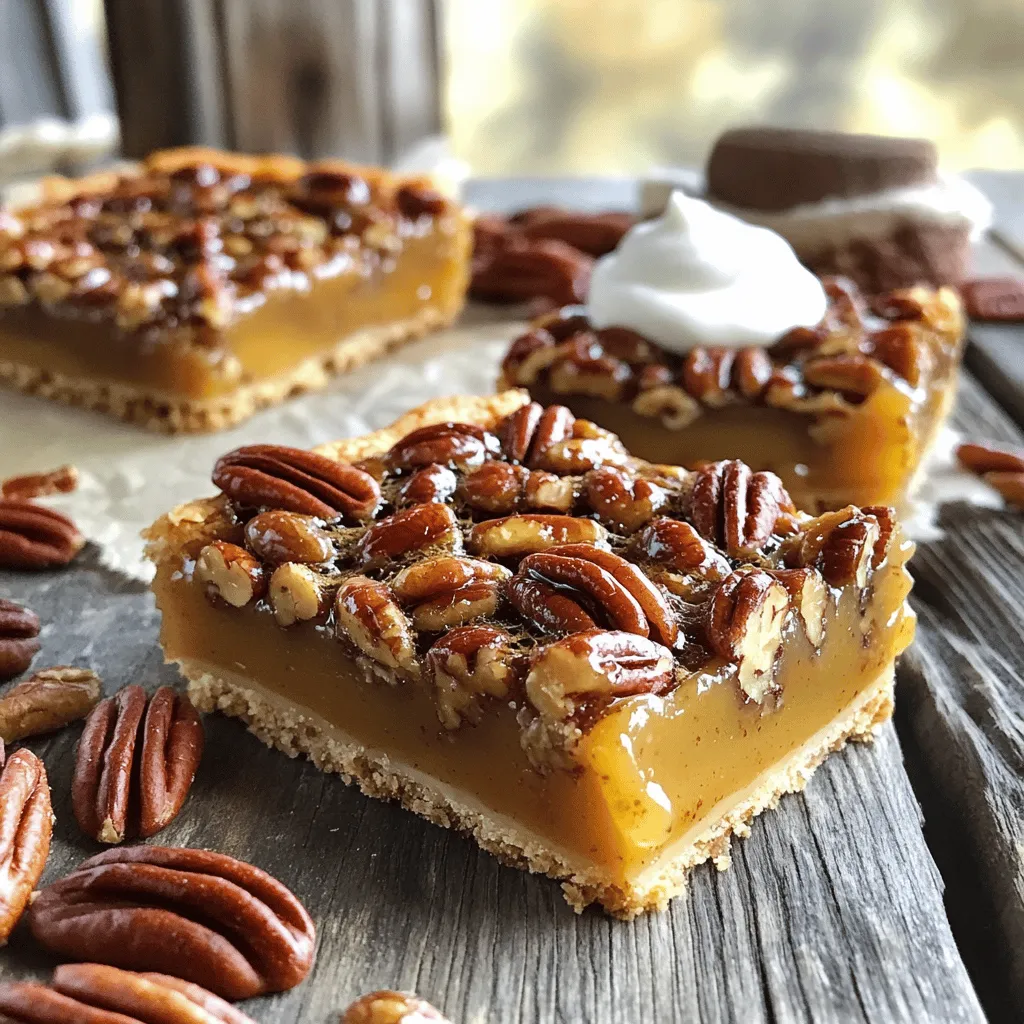
If you love sweet treats, these Brown Butter Pecan Pie Bars are a must-try! I promise, this rich dessert combines deep, nutty flavors with that classic pie taste. As you …

Looking for a simple yet delicious meal? Baked shrimp in garlic butter sauce is a treat you must try! You’ll find tender shrimp coated in rich garlic butter, ready to …