Skip to content
tossedflavors.com
  • Home
  • Appetizers
  • Desserts
  • Salads
  • Breakfast
  • Dinner
  • Privacy Policy
  • Contact
  • About

Chef Evan

Garlic Herb Sweet Potato Mash Creamy Flavor Boost

December 18, 2025May 9, 2025 by Chef Evan
- 4 medium sweet potatoes, peeled and cubed - 4 cloves garlic, minced - 1/4 cup unsalted butter - 1/2 cup milk (or plant-based alternative) - 2 tablespoons fresh parsley, chopped - 1 tablespoon fresh thyme, chopped - Salt and pepper to taste For a dairy-free option, swap the butter for olive oil. Use almond or oat milk instead of regular milk. For a vegan version, use plant-based butter and skip the dairy milk. This way, everyone can enjoy this creamy treat. Herbs can make a big difference. Try adding rosemary for a fragrant twist. A pinch of smoked paprika adds warmth and depth. If you like heat, a dash of cayenne pepper can spice things up. Experiment with different herbs to find your favorite combo. {{ingredient_image_1}} First, take four medium sweet potatoes. Peel them and cut them into cubes. Place the cubes in a large pot. Fill the pot with water until the sweet potatoes are covered. Turn the heat to medium-high and bring the water to a boil. Once it boils, reduce the heat to a simmer. Cook the sweet potatoes for about 15 to 20 minutes. They should be fork-tender when done. While the sweet potatoes cook, grab a small saucepan. Add a quarter cup of unsalted butter to the pan. Heat it over medium. Once the butter melts, add four cloves of minced garlic. Sauté the garlic for two to three minutes. You want it fragrant but not browned. Remove the pan from heat when done. When the sweet potatoes are tender, drain them well. Return the sweet potatoes to the pot. Pour in the garlic butter you just made. Add half a cup of milk, two tablespoons of chopped parsley, and one tablespoon of chopped thyme. Season with salt and pepper to taste. Use a potato masher or fork to mash everything together. Make it as smooth and creamy as you like. Taste the mash and adjust the seasoning if needed. Serve it warm for the best flavor! To get that creamy texture, mash the sweet potatoes while they are hot. Hot potatoes mash easier. Use a potato masher or fork for best results. You can adjust the milk as you mash. If you want it creamier, add more milk. If you like it thicker, use less. Cook the sweet potatoes for 15-20 minutes. Check them with a fork. They should be soft but not mushy. If they are still hard, cook for a few more minutes. Keep an eye on them to avoid overcooking. If you need a dairy-free option, try plant-based milk like almond or oat milk. For butter, you can use coconut oil or vegan butter. Both will add great flavor. These swaps make this dish fit many diets while keeping it rich and tasty. Pro Tips Use Fresh Herbs: Fresh parsley and thyme enhance the flavor significantly compared to dried herbs. Mash to Your Liking: Adjust the creaminess of your mash by adding milk gradually to reach your desired consistency. Flavor Boost: For an extra flavor kick, add a pinch of smoked paprika or cayenne pepper to the mash. Resting Time: Let the mash sit for a few minutes before serving to allow the flavors to meld together. {{image_2}} You can mix in other root veggies to switch up the flavor. Try adding carrots, parsnips, or even turnips. These roots bring different tastes and textures. To add these, chop them into small pieces. Boil them with your sweet potatoes until tender. Then mash them together for a colorful and tasty dish. If you love cheese, try adding some! Cream cheese or sharp cheddar can make this mash richer. Just mix it in while mashing for a creamy boost. You can also spice things up. Add a pinch of cayenne pepper for heat or smoked paprika for a smoky taste. These small changes can really change the dish! Garlic herb sweet potato mash goes well with many meals. Serve it with roasted chicken or grilled steak for a tasty combo. It also pairs nicely with sautéed greens or a fresh salad. For a fun twist, use it as a filling in savory pies or as a bed for your favorite protein. The mash's creaminess adds a great finish to any plate! Store leftover garlic herb sweet potato mash in an airtight container. This keeps the mash fresh. Make sure to let it cool to room temperature first. You can keep it in the fridge for up to five days. If you want to enjoy it later, consider portioning it out to make reheating easier. When reheating, use a microwave or stove. If using a microwave, heat in short bursts. Stir in between to avoid hot spots. If using the stove, add a splash of milk or butter to keep it creamy. Heat over low until warm. This helps retain the mash's rich flavor and smooth texture. You can freeze garlic herb sweet potato mash for up to three months. Use freezer-safe bags or containers. Leave some space for expansion when freezing. Thaw in the fridge overnight before reheating. For best results, reheat slowly on the stove or in the microwave, adding a bit of liquid if needed. Yes, you can make Garlic Herb Sweet Potato Mash ahead of time. Cook and mash the sweet potatoes as directed. Let the mash cool, then store it in a sealed container in the fridge. It will last for about three days. When you are ready to eat, reheat it gently on the stove or in the microwave. Add a bit of milk to keep it creamy. Garlic Herb Sweet Potato Mash pairs well with many dishes. Try it with roasted chicken or grilled fish. It also works great with a hearty veggie stew. For a complete meal, add a side salad or steamed greens. The mash adds a nice touch to any plate. To make Garlic Herb Sweet Potato Mash spicier, add a pinch of cayenne pepper or red pepper flakes. You could also mix in some chopped jalapeños for a fresh kick. If you like hot sauce, drizzle some in before serving. Adjust the spice to fit your taste, and enjoy the heat! This blog post detailed how to make Garlic Herb Sweet Potato Mash. We covered the key ingredients, steps, and tips to get creamy results. I shared variations to suit different diets and personal tastes, ensuring everyone can enjoy it. Remember, you can prep this dish ahead and store it for later use. Embrace your creativity with flavors and enjoy this tasty mash with many meals. It’s a simple, delicious side dish perfect for any occasion.

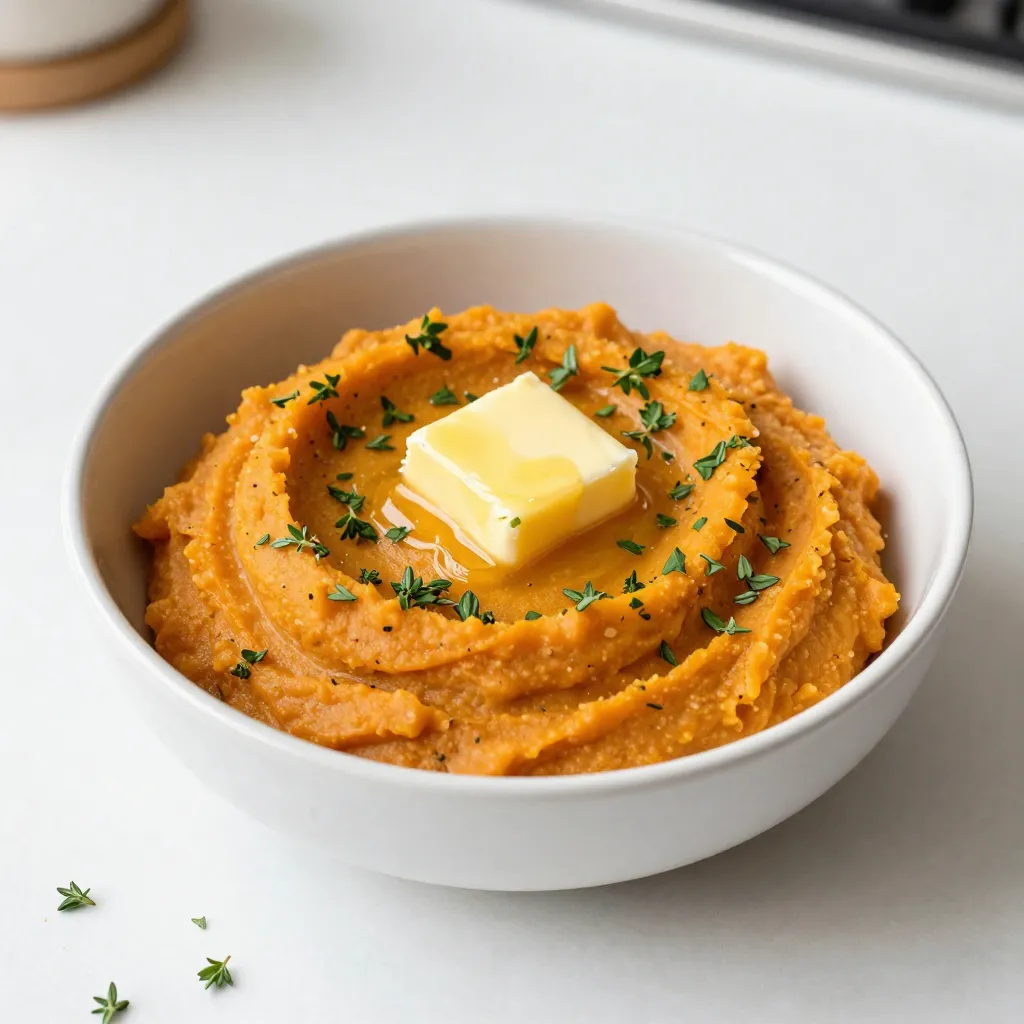
Are you ready to take your sweet potatoes to the next level? My Garlic Herb Sweet Potato Mash packs a creamy flavor punch that transforms a simple side into a …

Read more

Categories Dinner Leave a comment

Veggie Packed Egg Muffins Tasty and Easy Recipe

October 24, 2025May 9, 2025 by Chef Evan
To make these tasty muffins, gather these main ingredients: - 6 large eggs - 1 cup spinach, chopped - 1/2 cup bell peppers (any color), diced - 1/4 cup red onion, finely chopped - 1/2 cup cherry tomatoes, halved - 1/2 cup shredded cheese (cheddar or your choice) - 1/4 teaspoon garlic powder - 1/4 teaspoon onion powder - Salt and pepper to taste These ingredients bring color and flavor to your muffins. The eggs are the base, while the veggies add nutrition and taste. You can customize your muffins with these optional ingredients: - Cooked bacon or sausage - Fresh herbs like parsley or chives - Zucchini or mushrooms, diced Adding these options lets you experiment. You can make each batch unique. To make clean-up easy, use these cooking sprays or muffin liners: - Non-stick cooking spray - Paper muffin liners - Silicone muffin liners Using these will help your muffins pop out easily. It keeps your muffin tin clean and saves time. {{ingredient_image_1}} Start by turning on your oven to 350°F (175°C). This helps your muffins bake evenly. Next, grab a muffin tin. Lightly spray it with cooking spray or use muffin liners. This step keeps your muffins from sticking. Make sure each cup is coated well. You want easy removal later. In a big bowl, crack open 6 large eggs. Whisk them until they blend well. This makes your muffins fluffy. Now, it's time to add the veggies. Toss in 1 cup of chopped spinach, 1/2 cup of diced bell peppers, 1/4 cup of finely chopped red onion, and 1/2 cup of halved cherry tomatoes. Don’t forget the cheese! Add 1/2 cup of shredded cheese. It adds a nice creaminess. Now, season your mix. Sprinkle in 1/4 teaspoon of garlic powder, 1/4 teaspoon of onion powder, and some salt and pepper. Whisk everything together until it looks uniform. You want all the flavors to mix well. Pour the egg and veggie mix into the muffin tin. Fill each cup about 3/4 full. This gives them room to rise. Place the tin in the preheated oven. Bake for 20-25 minutes. Keep an eye on them. You want the muffins to be set and slightly golden on top. Once done, take them out and let them cool for a few minutes. Then, gently remove the muffins from the tin. They should pop out easily if you prepped well. Enjoy your tasty, veggie-packed muffins warm! To make your egg muffins fluffy, whisk the eggs well. Incorporate air into the mix. This air helps the muffins rise. Use fresh ingredients like spinach and bell peppers. They add moisture and flavor. Fill the muffin tin about three-quarters full. This allows room for them to puff up. Baking them at 350°F gives them a nice, gentle rise. Serve these egg muffins warm for the best taste. They work well for breakfast or a snack. Pair them with a slice of whole-grain toast. A side of fruit adds a nice touch. You can also enjoy them with a dollop of salsa on top. This adds a fresh kick to each bite. Garnishing is easy and fun! Fresh herbs like parsley or chives brighten up the muffins. A sprinkle of cheese on top before baking adds flavor. Try avocado slices on the side for creaminess. For a drink, a smoothie or juice pairs well. Enjoy experimenting with different garnishes! Pro Tips Customize Your Veggies: Feel free to swap in your favorite vegetables or whatever you have on hand to make these muffins your own. Meal Prep Magic: These muffins are great for meal prep! Make a large batch and store them in the fridge for quick breakfasts throughout the week. Cheese Variations: Experiment with different types of cheese like feta, mozzarella, or pepper jack for a unique flavor twist in your muffins. Storage Tips: Store leftovers in an airtight container in the fridge for up to 5 days, or freeze them for longer storage. {{image_2}} You can mix and match veggies based on what you like. Try using zucchini, mushrooms, or broccoli. They all add great flavor. You can also swap in kale for spinach. Just chop them fine so they cook well. If you want a kick, add jalapeños or hot peppers. These changes keep the muffins fresh and fun. For more protein, add cooked bacon, sausage, or ham. You can also use beans or lentils for a plant-based option. Just make sure to chop them small. This way, they blend well with the eggs. Adding protein makes these muffins more filling, perfect for breakfast or a snack. If you want dairy-free muffins, skip the cheese or use a dairy-free option. Nutritional yeast can give a cheesy flavor without dairy. For a vegan version, use flax eggs instead of chicken eggs. Mix one tablespoon of ground flaxseed with three tablespoons of water. Let it sit until it thickens. This keeps your muffins tasty and healthy for everyone. After you bake your veggie packed egg muffins, let them cool completely. Use an airtight container for storage. Place a piece of parchment paper between layers to keep them from sticking. Store in the fridge for up to five days. This keeps them fresh and ready for a quick meal. If you want to save some muffins for later, freezing is a great option. Wrap each muffin tightly in plastic wrap. Then, place them in a freezer bag or container. Label the bag with the date. They can stay in the freezer for up to three months. This way, you can enjoy them when you want! To reheat, simply take out a muffin from the fridge or freezer. If frozen, thaw it in the fridge overnight. For best results, warm the muffin in the oven at 350°F (175°C) for about 10-15 minutes. You can also use the microwave for 30-60 seconds. This will keep them soft and tasty, just like fresh! Yes, you can use any cheese you like. Cheddar works great, but you can try mozzarella, feta, or even pepper jack. Each cheese adds a unique flavor. Experiment to find your favorite mix! These muffins stay fresh for up to five days in the fridge. Store them in an airtight container to keep them moist. If you want to keep them longer, consider freezing some for later. You can! Use a mixture of mashed bananas or applesauce as a substitute. For a savory option, try silken tofu blended until smooth. These alternatives work well, but the texture may differ slightly from traditional muffins. These veggie-packed egg muffins are easy to make and fun to customize. We covered main ingredients, cooking tips, and storage info. You can mix and match veggies, proteins, and even make them dairy-free. With the right techniques, your muffins will be light and fluffy. Remember to store leftovers properly for the best taste later. Enjoy creating delicious meals with this simple recipe!

Are you looking for a quick and healthy breakfast option? These Veggie Packed Egg Muffins are easy to make and tasty too! With a mix of fresh veggies and eggs, …

Read more

Categories Breakfast Leave a comment

Garlic Herb Roasted Veggies Flavorful and Simple Dish

October 11, 2025May 9, 2025 by Chef Evan
For Garlic Herb Roasted Veggies, you will need: - 2 cups broccoli florets - 2 cups mixed bell peppers, sliced - 1 cup sliced carrots - 1 cup sliced zucchini - 1 cup halved cherry tomatoes - 4 cloves garlic, minced - 4 tablespoons olive oil - 1 tablespoon balsamic vinegar - 1 teaspoon dried oregano - 1 teaspoon dried thyme - Salt and pepper to taste You can add extra flavor with these optional ingredients: - Fresh basil or rosemary - A squeeze of lemon juice - Red pepper flakes for heat - Grated Parmesan cheese for a savory touch If you don’t have some ingredients, here are some swaps: - Use asparagus instead of broccoli for a different taste. - Swap bell peppers with any other colorful veggie. - Can replace olive oil with avocado oil or melted coconut oil. - Use fresh herbs instead of dried for a brighter flavor. These tips help you make this dish your own! {{ingredient_image_1}} Start by washing all your veggies well. You want them clean and fresh. For this dish, use 2 cups of broccoli florets, 2 cups of mixed bell peppers, 1 cup of sliced carrots, 1 cup of sliced zucchini, and 1 cup of halved cherry tomatoes. Cut each veggie into bite-sized pieces. This helps them cook evenly. Add all the chopped vegetables into a large mixing bowl. Make sure you have enough room to mix them well later. Next, grab a small bowl. In this bowl, mix 4 minced garlic cloves, 4 tablespoons of olive oil, and 1 tablespoon of balsamic vinegar. Then, add 1 teaspoon of dried oregano and 1 teaspoon of dried thyme. Sprinkle in some salt and pepper to taste. Whisk this mixture until it blends well. This garlic herb mixture adds a great flavor to the veggies, so take your time to make it smooth. Now, it’s time to roast! Preheat your oven to 425°F (220°C). This high heat helps the veggies get nice and crispy. Pour the garlic herb mixture over the vegetables in the large bowl. Toss everything together until the veggies are fully coated. Spread the veggies in a single layer on a baking sheet lined with parchment paper. Make sure they have space to roast. If they are too close, they may steam instead of roast. Place the baking sheet in your preheated oven. Roast the veggies for 20-25 minutes. Stir them halfway through to ensure they cook evenly. They should be tender and lightly browned when done. Once they are ready, take the baking sheet out of the oven. Let the veggies cool for a couple of minutes. If you like, garnish them with fresh chopped parsley before serving. Enjoy your delicious garlic herb roasted veggies! To get the best roast, choose fresh veggies. Fresh veggies taste great and hold their shape. Cut them into similar sizes. This helps them cook evenly. Spread the veggies in one layer on the baking sheet. If they are crowded, they will steam instead of roast. Stir them halfway through. This ensures all sides get that nice brown color. You can add more herbs for extra flavor. Try fresh rosemary or basil for a nice twist. If you have some parsley, chop it up and mix it in. You can also use herbs de Provence for a unique taste. Just remember to balance the flavors. Too many herbs can overpower the dish. Serve your roasted veggies in a shallow bowl. Drizzle extra balsamic vinegar on top for a tangy kick. Fresh parsley can add a pop of color. You could also pair these veggies with grilled chicken or fish. They make a great side for any meal. Enjoy them warm or at room temperature! Pro Tips Cut Veggies Evenly: Ensure that all vegetables are cut to a similar size for even roasting. Use Fresh Herbs: Fresh herbs can elevate the flavor profile, so consider adding fresh oregano or thyme. Experiment with Veggies: Feel free to swap in your favorite vegetables like asparagus or Brussels sprouts. Check for Doneness: Use a fork to check if the veggies are tender; they should have a slight char without being mushy. {{image_2}} You can change the vegetables based on the season. In spring, use fresh asparagus and peas. Summer is great for adding eggplant and squash. In fall, try sweet potatoes and Brussels sprouts. Winter brings hearty root veggies like parsnips and turnips. Mixing these will give you new flavors. Plus, it keeps the dish fresh and fun. Want to make this dish a full meal? You can add protein easily. Try adding chickpeas for a vegan option. If you eat meat, chicken or shrimp works well. Just toss them in with the veggies and roast together. This makes the dish hearty and satisfying. Protein adds flavor and keeps you full longer. This recipe is already vegan and gluten-free! Use olive oil and balsamic vinegar without worry. Always check labels to avoid hidden gluten. You can also add nuts or seeds for a crunch. Almonds or pumpkin seeds give extra texture and flavor. Enjoy this dish knowing it fits many diets! After you make Garlic Herb Roasted Veggies, store them in an airtight container. Let the veggies cool down first. Place them in the fridge for up to three days. If you want to keep them fresh, do not mix them with other foods. This helps them stay crisp. To reheat, use either the oven or a microwave. For the oven, preheat it to 350°F (175°C). Spread the veggies on a baking sheet. Heat for about 10 to 15 minutes. This keeps them crispy. If you use a microwave, place them in a bowl. Heat on high for about 1 to 2 minutes. Check to see if they are warm enough. You can freeze the roasted veggies too! Cool them completely before freezing. Place them in a freezer-safe bag. Remove as much air as possible to prevent freezer burn. They can last up to three months in the freezer. When you are ready to eat them, thaw in the fridge. Reheat in the oven for best results. Yes, you can use frozen vegetables. Frozen veggies are convenient and quick. However, they may release extra water. This can make them a bit soggy. To avoid this, thaw them first. Pat them dry with a towel before roasting. This will help them roast better and stay crisp. To keep your veggies crisp, follow these tips: - Use fresh vegetables when possible. - Cut them into uniform pieces for even cooking. - Avoid overcrowding the baking sheet. This lets hot air circulate. - Roast them at a high temperature, like 425°F (220°C). - Stir them halfway through to ensure even roasting. These steps will give you tasty, crunchy veggies every time. Many herbs pair well with garlic and roasted veggies. Here are some great options: - Rosemary adds a woodsy flavor. - Basil gives a sweet, fresh taste. - Sage brings warmth and depth. - Dill offers a bright and tangy note. Feel free to mix and match. Find your favorite flavor combos! You learned about the key ingredients, step-by-step instructions, and helpful tips for roasting veggies. Each section offered options to make the dish your own. From substitutions to serving ideas, I wanted to equip you with all the info you need. Remember, the right herbs can make a big difference. Enjoy your cooking and experiment with flavors. This dish is tasty, easy, and fun to prepare. You now have what it takes to impress anyone with your garlic herb roasted veggies.

Looking for an easy and tasty way to enjoy veggies? Garlic Herb Roasted Veggies are your answer! This dish bursts with flavor and can be made in just a few …

Read more

Categories Dinner Leave a comment

Easy Fried Cheesecake Bites Tasty Dessert Delight

May 8, 2025 by Chef Evan
- 1 block (8 oz) cream cheese, softened to room temperature - 1/2 cup powdered sugar (plus extra for dusting, if desired) - 1 package of spring roll wrappers or wonton wrappers - Toppings like whipped cream, chocolate sauce, and fresh berries - Ingredients for cinnamon-sugar coating Fried cheesecake bites need a few simple, tasty ingredients. The main star is cream cheese. It gives the bites that rich, creamy taste. The powdered sugar adds sweetness and helps the filling stay smooth. Use wonton or spring roll wrappers for wrapping the filling. They fry up crispy and golden. You can make the bites even better with toppings. Whipped cream is light and fluffy. Chocolate sauce adds a sweet touch. Fresh berries bring a burst of flavor. You can also mix sugar and cinnamon for a sweet coating. For the full recipe, you can check the detailed steps to bring these bites to life. Enjoy experimenting with toppings and flavors! To start, grab a mixing bowl. Place one block of softened cream cheese inside. Add half a cup of powdered sugar and one teaspoon of vanilla extract. Use a hand mixer or spatula to blend well. Aim for a smooth and creamy mix, with no lumps left. This filling will be the heart of your bites. Next, lay out your spring roll or wonton wrappers on a flat surface. If they are too big, cut them into quarters for bite-sized squares. Scoop about one teaspoon of the creamy filling and put it in the center of each wrapper. Fold the corners over the filling, creating a sealed pocket. If you need help sealing, dampen the edges with a little water. Now, it’s time to fry! In a deep pan, pour enough oil to fill about two inches deep. Heat the oil over medium heat until it reaches 350°F (175°C). You can test the oil by dropping in a small piece of dough; it should sizzle right away. Carefully add the filled wrappers to the hot oil, frying a few at a time to avoid crowding. Fry until they’re golden brown on all sides, which takes about 2-3 minutes. Use a slotted spoon to remove the bites and place them on a plate lined with paper towels to drain excess oil. To get the best fried cheesecake bites, the oil temperature is key. Heat the oil to 350°F (175°C). Use a thermometer to check. If you don’t have one, drop in a small piece of dough. If it sizzles, it’s ready. Fry the bites for 2-3 minutes. They should turn a lovely golden brown. Frying in small batches helps keep the oil hot. To prevent leaks while frying, sealing is crucial. When you fill the wrappers, use just enough filling. Too much can make them burst. Moisten the edges with a bit of water. This helps the wrapper stick together. Press the edges firmly to seal well. Check for any openings before frying. Make your fried cheesecake bites look extra special. Arrange them on a colorful plate. Drizzle chocolate sauce over them for a fun touch. Add a dollop of whipped cream on the side. Fresh berries add color and freshness. Finish with a light dusting of powdered sugar. This makes your dessert look fancy and inviting. For the full recipe, click [Full Recipe]. {{image_4}} You can make your fried cheesecake bites even more fun! Adding chocolate chips gives a sweet twist. Try mixing in fruit purees, like strawberry or raspberry, for a fruity flavor. You can also add spices like cinnamon or nutmeg to the cream cheese filling. These small changes can create big flavors. Get creative with your coatings! Instead of just graham cracker crumbs, try using crushed nuts like almonds or pecans. You can also use cereals, like cornflakes or Rice Krispies, for a crunchy texture. These options add a new layer of taste and crunch to your bites. If you prefer baking, you can skip the frying step. Preheat your oven to 350°F (175°C). Place the filled wrappers on a baking sheet lined with parchment paper. Bake them for about 15-20 minutes, or until they turn golden brown. This method gives a lighter version of these tasty bites. This way, you can enjoy them without the extra oil. For the full recipe, check out the details above. Store your fried cheesecake bites in an airtight container. Place a paper towel at the bottom to absorb moisture. This helps keep them crispy. You can keep them in the fridge for up to three days. If you want to store them longer, freezing is an option. To reheat, use the oven or an air fryer. Preheat the oven to 350°F (175°C). Place the bites on a baking sheet for 10 minutes. This method helps regain crispiness. If you use an air fryer, set it to 350°F (175°C) and heat for about 5 minutes. Avoid microwaving, as it makes them soggy. To freeze, let the bites cool completely. Place them in a single layer on a baking sheet. Freeze until solid, then transfer them to a freezer bag. Remove excess air and seal tightly. They can last up to two months. To thaw, put them in the fridge overnight before reheating. You can use low-fat cream cheese, but it changes the taste and texture. Low-fat cream cheese has less fat, which makes it less creamy. Your bites may not be as rich or smooth. If you want the best flavor, stick to full-fat cream cheese for these bites. For frying these bites, I recommend vegetable or canola oil. Both oils have a high smoke point, which means they heat well without burning. This helps create a crispy outer layer. You can also use peanut oil for a unique flavor. Just make sure to avoid olive oil, as it smokes at lower temperatures. To check if your bites are done, look for a golden brown color. This usually takes about 2-3 minutes per batch. You can also use a slotted spoon to lift one out and check the color. If it’s golden and crispy, your bites are ready! We explored how to make delicious fried cheesecake bites using simple ingredients like cream cheese and powdered sugar. You learned step-by-step instructions, tips for perfect frying, and variations for added flavor. These bites are easy to store, reheat, and freeze. You can impress friends and family with these treats. Enjoy creating and sharing your fried cheesecake bites! Get ready to make dessert time the best part of your day.

Craving a sweet treat that’s both easy and delicious? You’re in for a treat with these Easy Fried Cheesecake Bites! Imagine creamy cheesecake wrapped in crispy goodness. In just a …

Read more

Categories Desserts Leave a comment

Mini Cheesecakes Topped with Chocolate Delightful Treat

May 8, 2025 by Chef Evan
Mini cheesecakes topped with chocolate-covered strawberries are a delightful treat. They look fancy but are simple to make. You can impress your friends and family with these little desserts. The creamy filling and sweet strawberries make them a winner at any event. To make these tasty mini cheesecakes, gather these ingredients: - 1 cup graham cracker crumbs - 2 tablespoons granulated sugar - 1/4 cup unsalted butter, melted - 16 oz cream cheese, softened - 1 cup powdered sugar - 1 teaspoon vanilla extract - 2 large eggs at room temperature - 1 cup fresh strawberries, hulled and dried - 1 cup semisweet chocolate chips - 1 tablespoon coconut oil (optional) You will need some basic tools to create these mini cheesecakes: - Muffin tin - Cupcake liners - Mixing bowls - Electric mixer - Microwave-safe bowl - Parchment paper - Spatula Using the right tools makes the process easier and more fun. Enjoy creating these mini cheesecakes! For the full recipe, check the above section. Start by preheating your oven to 325°F (160°C). This step is key for even baking. While the oven heats, take a standard muffin tin and line it with cupcake liners. This will help you easily remove the mini cheesecakes later. In a medium bowl, combine graham cracker crumbs and granulated sugar. Then, pour in the melted butter. Mix until it looks like damp sand. Next, take about one tablespoon of this mixture and press it into the bottom of each cupcake liner. Make sure it's firm and even. Bake this crust for 5-7 minutes. It should turn a light golden color. Remove it and let it cool as you prepare the filling. In a large bowl, beat the softened cream cheese until it’s smooth. This should take a few minutes. Gradually add the powdered sugar, mixing well. Then, stir in the vanilla extract until combined. Now, crack the eggs into a small bowl. Add them to the cream cheese mixture one at a time. Mix on low speed until just combined to keep the texture light and fluffy. Carefully pour the cheesecake batter into each cooled crust. Fill them about three-quarters full. This allows room for rising during baking. Place the muffin tin in the oven and bake for 18-20 minutes. The centers should be set but still have a slight jiggle. After baking, turn off the oven and crack the door. Leave the cheesecakes to cool gently for about 30 minutes. After that, transfer the pan to the fridge for at least 3 hours, or overnight for the best results. While the cheesecakes chill, melt the semisweet chocolate chips. Use a microwave-safe bowl and heat them in 30-second intervals. Stir between each interval until smooth. If you want a shiny coat, add coconut oil to the melted chocolate. Dip each hulled strawberry into the chocolate, letting any excess drip off. Place them on a parchment-lined baking sheet to set. Once the cheesecakes are cool, gently peel them from the muffin tin and remove the liners. Top each mini cheesecake with a chocolate-covered strawberry. This adds a pop of color and flavor. For an added touch, serve them on a decorative platter with mint leaves. Drizzle any leftover melted chocolate around the plate for a fancy finish. For the complete recipe, you can refer to the Full Recipe section. For the best cheesecake, start with room-temperature ingredients. This helps mix them smoothly. Beat the cream cheese until it's creamy and free of lumps. Adding eggs one at a time is key. Mix gently to keep a light texture. Overmixing can make your cheesecake dense. Bake until the edges are set but the center still jiggles slightly. This ensures a creamy and soft bite. When melting chocolate, use short bursts in the microwave. Heat for 30 seconds, then stir. If you want a smooth finish, add coconut oil. It helps the chocolate flow better. Dip each strawberry straight down into the chocolate. Let excess chocolate drip off. Place them on parchment paper to cool. This way, they won’t stick. For fun, try adding sprinkles or crushed nuts to the chocolate before it sets. You can make these mini cheesecakes a day ahead. Chill them in the fridge until serving. This improves the flavor and texture. Store the cheesecakes in an airtight container to keep them fresh. For the chocolate strawberries, dip them on the same day you serve. They taste best fresh. If you need to store them, keep them in the fridge, but try to eat them within a day. For a special touch, drizzle leftover chocolate on the plate when serving. {{image_4}} You can dress up your mini cheesecakes in many fun ways. Try using fresh fruit like blueberries or raspberries for a tart kick. You can also drizzle caramel sauce or add whipped cream for extra sweetness. If you want something crunchy, crushed nuts or toffee bits work well too. Each topping adds a unique flavor and makes your dessert look even more tempting. The filling is where you can get creative. For a chocolate cheesecake, add cocoa powder to the cream cheese mixture. You can also mix in flavored extracts like almond or lemon for a twist. If you enjoy spices, pumpkin pie spice or cinnamon can add warmth and depth. Don't hesitate to experiment with different flavors to find your favorite. While graham crackers are classic, you can change the crust too. Try using crushed Oreos for a chocolatey base. Nut-based crusts, like almond or pecan, can add a unique taste and texture. If you want a gluten-free option, look for gluten-free cookie crumbs. Each crust type will change the flavor and feel of your mini cheesecakes, making them special every time. For the full recipe, check out the details above. Store your mini cheesecakes in the fridge. Use an airtight container to keep them fresh. They can last about 3 to 5 days. Make sure they are well-covered to avoid drying out. If you want to keep them longer, consider freezing them. To freeze mini cheesecakes, let them cool completely first. Then, wrap each one in plastic wrap. Place them in a freezer-safe container or bag. They can stay frozen for up to 2 months. When ready to eat, thaw them in the fridge overnight. Avoid thawing at room temperature to keep them creamy. Chocolate covered strawberries are best eaten fresh. However, you can store them in the fridge for up to 24 hours. Place them on a paper towel in a container. This helps absorb moisture and keeps them from getting soggy. Avoid stacking them to prevent damage to the chocolate coating. Enjoy your mini cheesecakes topped with chocolate covered strawberries for a delightful treat! For the full recipe, check out the detailed cooking guide. To prevent cracks, avoid overmixing the batter. Mix just until smooth. Also, bake them at a low temperature. Let them cool in the oven with the door ajar for 30 minutes. This slow cooling helps keep the texture even. Yes, you can use ricotta or mascarpone for a different taste. Each cheese adds its own flavor and texture. Just remember, cream cheese gives a classic cheesecake taste. If you switch, adjust the sugar to taste. If fresh strawberries are not available, use frozen ones. Just thaw and drain them well. You can also use other fruits like raspberries or blueberries. These fruits pair well with chocolate too. Mini cheesecakes last about 5 days in the fridge. Store them in an airtight container to keep them fresh. If you want to keep them longer, consider freezing them. They can last about 2 months in the freezer. You now have a clear path to making tasty mini cheesecakes. We covered the key ingredients, helpful tools, and step-by-step instructions. I shared tips for texture, dipping, and storage, plus fun variations to try. With this guide, you can make these treats your own and wow your friends. Don't worry about mistakes; just have fun. Enjoy your baking and the sweet results!

Get ready to impress with these Mini Cheesecakes Topped with Chocolate Covered Strawberries! These little treats pack a big flavor punch. Perfect for parties or a sweet snack at home, …

Read more

Categories Desserts Leave a comment

Cherry Cheesecake Puppy Chow Irresistible Treat Recipe

May 8, 2025 by Chef Evan
- 9 cups rice Chex cereal - 1 cup cherry-flavored candy melts - 1 cup cream cheese-flavored candy melts - 1/2 cup unsalted butter - 1 teaspoon vanilla extract - 1/2 cup powdered sugar - 1/2 cup crushed graham crackers - 1/2 cup dried cherries, finely chopped - 1 cup mini chocolate chips - Prep time: 15 minutes - Total time: 30 minutes - Servings: 8-10 When I think about Cherry Cheesecake Puppy Chow, I get excited! This treat blends sweet and creamy flavors. It’s a fun snack for kids and adults alike. You start with rice Chex cereal as your base. It gives a nice crunch. The cherry and cream cheese candy melts add sweetness. The butter adds richness, while vanilla brings warmth. Powdered sugar coats everything in sweetness. Crushed graham crackers add a cheesecake vibe. Dried cherries give a fruity burst. Finally, mini chocolate chips are the perfect touch on top. This recipe is easy to follow and quick to make. In just 30 minutes, you can have a delicious snack ready to enjoy. You can find the Full Recipe to guide you through each step. - Measure 9 cups of rice Chex cereal. - Set the cereal aside in a large bowl. - In a microwave-safe bowl, combine 1 cup of cherry candy melts and 1/2 cup of unsalted butter. - Heat this mix in the microwave for 30 seconds. Stir well and repeat until melted. - After it melts, add 1 teaspoon of vanilla extract to enhance the flavor. - Carefully pour the melted mixture over the rice Chex cereal. - Use a spatula to fold gently, ensuring each piece gets coated. - In another bowl, melt 1 cup of cream cheese candy melts, using the same microwave method. - Once melted, drizzle this over the coated cereal and fold gently again. - Take a gallon-sized resealable bag. Add 1/2 cup of powdered sugar, 1/2 cup of crushed graham crackers, and 1/2 cup of dried cherries. - Transfer the coated cereal into the bag. Seal it tightly and shake vigorously until fully coated. - Spread the puppy chow on a large baking sheet in an even layer. - Let it cool at room temperature for about 10 minutes. - Once cooled, sprinkle 1 cup of mini chocolate chips on top for a tasty garnish. You can find the Full Recipe for more details. Enjoy making this delightful treat! To get a great texture for your Cherry Cheesecake Puppy Chow, make sure you coat the cereal evenly. Pour the melted candy mix over the cereal slowly. Use a spatula to gently fold it. This helps each piece get a nice coat. After mixing, let it cool on a baking sheet. Cooling it helps the candy set better and keeps it crunchy. Want to boost the flavor? Try adding a pinch of salt for balance. You can also mix in some crushed nuts for a crunchy twist. If you love chocolate, swap in chocolate candy melts instead of cherry. Adding sprinkles or mini marshmallows can also change the taste and make it fun. For a pretty display, use a clear bowl lined with parchment paper. It shows off the bright colors. If you’re gifting it, fill small bags with puppy chow. Tie them with ribbon for a cute touch. You can also place the puppy chow in jars. This makes it look fancy and perfect for parties. Check out the Full Recipe for more ways to enjoy your treat! {{image_4}} You can make Cherry Cheesecake Puppy Chow even more fun! Try adding seasonal fruits like strawberries or blueberries. These fruits will give a fresh twist. For holidays, think about red and green candy melts for Christmas. You could also use pumpkin spice in the fall to make a seasonal treat. Just mix and match your flavors to fit the season! If you need a gluten-free version, use gluten-free rice Chex cereal. Many brands offer this option. For a vegan treat, swap out candy melts with vegan chocolate. There are many great brands that make plant-based candy melts. This way, everyone can enjoy the deliciousness of Cherry Cheesecake Puppy Chow! Cherry Cheesecake Puppy Chow pairs well with many flavors. You can mix in some crushed Oreos for a chocolatey crunch. Or, try adding a touch of almond extract for a nutty flavor. For toppings, sprinkle some coconut flakes or mini marshmallows on top. These extra touches will make your treat even more exciting! For the full recipe, check out the Cherry Cheesecake Puppy Chow recipe. To keep your Cherry Cheesecake Puppy Chow fresh, use an airtight container. This helps prevent moisture and keeps it crunchy. Glass or plastic containers work well. If you want to pack it for gifts, use cute jars or snack bags. Make sure they are sealed tight to lock in flavor. Can you freeze Puppy Chow? Yes, you can! To freeze it, place it in a freezer-safe bag or container. Remove as much air as possible to avoid freezer burn. When you want to enjoy it, take it out and let it thaw at room temperature. Avoid microwaving, as it can change the texture. How long does it last? When stored properly, Cherry Cheesecake Puppy Chow lasts about two weeks. Look for signs of spoilage, such as an off smell or a change in texture. If it becomes soft or sticky, it’s best to toss it. Enjoy your sweet treat while it's fresh! Puppy chow is a classic snack mix. It combines cereal, chocolate, and powdered sugar. People love it because it’s sweet and crunchy. This treat is fun to eat and easy to make. Cherry cheesecake puppy chow adds a fruity twist. You get the flavors of cherry and cream cheese in each bite. Yes, you can use different cereals. While Rice Chex works great, other options are fun, too. You can try Corn Chex or even Cheerios. Each type of cereal gives a different taste and texture. Just remember to choose a cereal that has a good shape for coating. To reduce sweetness, use less powdered sugar. You can also skip the chocolate chips on top. If you want a fruity flavor without the sugar, use fresh fruit instead of dried cherries. Adjusting the candy melts can also help. Choose less sweet flavors or use a smaller amount. Yes, this recipe is very kid-friendly. It’s easy to make with adult help. Kids can help mix and shake the puppy chow. Just be careful with the melted candy. It can be hot, so supervise them during this step. The sweet taste makes it a hit with children. Absolutely! You can personalize the flavors and textures. Try adding nuts or using different candies. You can even use different fruits, like strawberries or blueberries. Mixing in sprinkles can add fun colors. Get creative and make it your own! For the full recipe, check out the details above. This blog post walks you through making a tasty Puppy Chow. You learned about key ingredients like Rice Chex and candy melts. I provided easy steps, tips for perfecting texture, and fun variations. Remember, you can customize flavors and make seasonal treats. Enjoy storing it right and sharing with others to keep it fresh. Puppy Chow is a delightful snack that's simple to make and hard to resist. Get ready to impress friends and family with your homemade treat!

Do you crave a sweet snack that’s easy to make? Look no further! This Cherry Cheesecake Puppy Chow recipe blends chewy, fruity flavors with a creamy twist. In just 30 …

Read more

Categories Desserts Leave a comment

Churros Poppers Irresistible Fried Treats Recipe

May 8, 2025 by Chef Evan
To make delicious churros poppers, gather these key ingredients: - 1 cup all-purpose flour - 1/4 cup granulated sugar - 1/2 teaspoon baking powder - 1/4 teaspoon salt - 1/2 cup water - 2 tablespoons unsalted butter - 1/2 teaspoon vanilla extract - 2 large eggs - Oil for frying - Cinnamon sugar mixture (1/2 cup sugar mixed with 2 teaspoons cinnamon) These ingredients create a tasty dough that puffs up beautifully when fried. The combination of flour, sugar, and baking powder gives the poppers their light and airy texture. The butter and vanilla add richness and flavor. While churros poppers are great on their own, you can add fun toppings: - Chocolate dipping sauce - Caramel sauce - Whipped cream - Sprinkles These toppings enhance the sweet experience and let you get creative. Dipping in chocolate sauce adds a rich flavor that pairs perfectly with the cinnamon. For this recipe, make sure you have these tools ready: - Medium saucepan - Piping bag with a large star tip - Deep fryer or heavy-bottomed pot - Slotted spoon - Plate lined with paper towels Having the right tools helps to ensure a smooth cooking process. The piping bag is key for shaping those perfect poppers. A deep fryer or pot will give you even heat for frying. To start, grab a medium saucepan. Pour in the water, unsalted butter, and vanilla extract. Heat this mixture over medium heat. Watch closely as it begins to boil gently. This is the key to creating a rich dough base. Once boiling, you’re ready to move on. Remove the saucepan from heat. Quickly add the all-purpose flour, baking powder, and salt. Stir it all together until a dough ball forms. This dough should look smooth and feel soft. Let it cool for about five minutes. Then, beat in the eggs one by one. Mix well after each egg. The final batter should be smooth and slightly sticky. Now it’s time to heat the oil. Use a deep fryer or a heavy pot. Heat the oil to 360°F (182°C). This temperature is perfect for frying. Carefully pipe small balls or swirls of batter into the hot oil. Use scissors to cut the batter as it drops. Fry in small batches to keep the oil hot. Cook them for about 2-3 minutes. Turn them with a slotted spoon. They should puff up and turn golden brown. Once cooked, remove the poppers with the slotted spoon. Let them drain on a paper towel-lined plate. While they are warm, toss them in the cinnamon sugar mixture until they are covered. Finally, serve them warm with chocolate dipping sauce. Enjoy your delicious churros poppers! For more details, check the Full Recipe. To get the best texture for your churros poppers, focus on the dough. When you mix the flour, baking powder, and salt with the hot butter mixture, do it quickly. This helps form a smooth dough. It should feel slightly sticky but should not stick to your hands. Fry the poppers at the right oil temperature, around 360°F. This heat gives them a crispy outside while keeping the inside soft. One common mistake is not allowing the dough to cool. If you add eggs to hot dough, it can scramble. Always let the dough cool for at least five minutes. Another mistake is overcrowding the fryer. Fry in small batches so the oil stays hot. If the temperature drops, the churros poppers can turn out oily instead of crispy. Serve your churros poppers warm for the best taste. You can sprinkle extra cinnamon sugar on top for added sweetness. Pair them with chocolate dipping sauce for a fun treat. If you want to impress guests, arrange them on a bright plate. Add a small bowl of chocolate sauce in the center. This makes the dish look inviting and delicious. You can find the full recipe to guide you through these steps. {{image_4}} You can play with flavors to make churros poppers even more fun. One easy option is to fill them with chocolate or Nutella. Just pipe the dough, and then inject the filling after frying. Another sweet idea is to top them with caramel sauce or a sprinkle of powdered sugar. These treats can also be rolled in crushed cookies for a crunchy twist. Churros poppers don’t have to be sweet. You can make them savory by filling them with cheese. Mozzarella or cream cheese work well. Simply pipe the dough, fry them, and enjoy the gooey cheese inside. You can also add herbs or spices to the dough for extra flavor. Think garlic powder or fresh chives mixed in. If you need a gluten-free option, it's simple to adapt the recipe. Swap all-purpose flour with gluten-free flour blends. Just make sure the blend has a good mix of starches and proteins for best results. You can also try using almond flour. This adds a nutty flavor and keeps the texture light. Enjoy these tasty twists, and impress your friends and family! For the full recipe, be sure to check out the entire guide. To keep your churros poppers fresh, place them in an airtight container. Make sure they cool completely before sealing. Store them at room temperature for up to two days. If you want them to last longer, refrigeration is a good option. Just keep in mind that they may lose some crispiness. When it’s time to enjoy your leftovers, reheating is key. For the best results, use an oven or air fryer. Preheat your oven to 350°F (175°C). Place the churros on a baking sheet and heat for about 5-7 minutes. This will help restore their crispy texture. Avoid microwaving, as this can make them soggy. Freezing churros poppers is easy and a great way to save some for later. First, let them cool completely. Then, arrange them in a single layer on a baking sheet and freeze for about one hour. Once frozen, transfer them to a freezer bag or container. They can last in the freezer for up to three months. To reheat, follow the same oven method for best results. For the full recipe on making churros poppers, refer to the earlier sections. Churros Poppers are made from simple ingredients. You need: - 1 cup all-purpose flour - 1/4 cup granulated sugar - 1/2 teaspoon baking powder - 1/4 teaspoon salt - 1/2 cup water - 2 tablespoons unsalted butter - 1/2 teaspoon vanilla extract - 2 large eggs - Oil for frying - Cinnamon sugar mixture (1/2 cup sugar mixed with 2 teaspoons cinnamon) - Chocolate dipping sauce (for serving) These ingredients work together to create a sweet, crispy treat. The dough is rich and fluffy, making each bite a delight. You can bake Churros Poppers, but they won’t be the same. Baking reduces the crunch and makes them softer. If you want to bake, preheat your oven to 400°F (200°C). Pipe the dough onto a lined baking sheet and bake for 12-15 minutes. Keep an eye on them to ensure they don’t burn. They will still taste good, but frying gives that classic churro crunch. You can find pre-made Churros Poppers at some grocery stores or bakeries. Look in the frozen section or the bakery aisle. Many food trucks and dessert shops also offer them fresh. If you want the best flavor, I recommend making them at home. The recipe is easy and fun! The nutritional info for Churros Poppers varies based on serving size and cooking method. On average, one popper has about: - Calories: 80-100 - Total Fat: 5g - Carbohydrates: 10g - Sugar: 4g - Protein: 1g For more precise information, consider calculating based on your specific ingredients. This treat is best enjoyed in moderation, especially with the sweet dipping sauce! You learned how to make churros poppers from scratch, from ingredients to variations. We covered essential tools, step-by-step frying, and tips for the best texture. Toppings like chocolate or cheese add fun. You can store extras or freeze them for later. Churros poppers are a tasty treat for all occasions. Enjoy creating these delights, and don’t be afraid to get creative with flavors. Your kitchen adventures await, and the results are sure to please!

If you’re craving a fun and tasty treat, you’ve found it! Churros Poppers are little bites of joy that are easy to make and hard to resist. In this guide, …

Read more

Categories Desserts Leave a comment

Quick and Easy Oreo Balls Irresistible No-Bake Treat

May 8, 2025 by Chef Evan
- 1 package (14.3 oz) Oreo cookies - 8 oz cream cheese, softened - 1 cup semi-sweet chocolate chips - 1 tablespoon vegetable oil - Optional toppings: crushed Oreos, mini chocolate chips, or colorful sprinkles For these Oreo balls, you need just a few simple items. First, grab a package of Oreo cookies; they give the sweet flavor. Next, cream cheese adds a rich, creamy texture. You'll also need semi-sweet chocolate chips for the coating. A bit of vegetable oil helps to make the chocolate shiny. Lastly, you can pick some optional toppings, like crushed Oreos or colorful sprinkles, to add fun and flair. Using quality ingredients really makes a difference. I always recommend using fresh cream cheese for the best taste. Now, once you have all your ingredients ready, you’re on your way to making these delightful no-bake treats. If you want to see the complete process, check out the Full Recipe. Start by crushing the Oreo cookies in a food processor. Place the whole package in and pulse until you get fine crumbs. This only takes a minute or two. Make sure there are no big chunks left. Next, transfer the crushed cookies to a large bowl. Add in the softened cream cheese. Use a spatula or your hands to mix them together. Keep mixing until the mixture is smooth and well combined. It should feel like a dough. Now it's time to form the Oreo balls. Take small portions of the mixture and roll them into 1-inch balls. Aim for uniform size so they look great. Place each ball on a parchment-lined baking sheet. Once you have rolled all the balls, put the baking sheet in the refrigerator. Let them chill for about 30 minutes. This helps them hold their shape when you coat them in chocolate. While the Oreo balls chill, prepare the chocolate coating. In a microwave-safe bowl, add the semi-sweet chocolate chips. Heat them in the microwave in 30-second intervals. Stir well between each interval until the chocolate is melted and smooth. To give the chocolate a nice shine, mix in the vegetable oil. This will make your coating look glossy and appealing. When the Oreo balls are firm, take them out of the fridge. Dip each ball into the melted chocolate, making sure it is fully coated. Use a fork to lift the balls, letting excess chocolate drip off. Place them back on the lined sheet. Feel free to get creative! While the chocolate is still wet, sprinkle your choice of toppings on each ball. This adds fun and flavor. After coating is done, return the baking sheet to the fridge. Let the chocolate set for about 15 minutes. The result will be a delicious, no-bake treat that's sure to impress! For the full recipe, check out the details above. To make your Oreo balls just right, focus on the texture. Start by crushing the Oreo cookies finely. This helps the balls hold together well. You want a powdery base for easy mixing with the cream cheese. When you mix the crushed Oreos with softened cream cheese, aim for a dough-like consistency. If it feels too dry, add a tiny bit more cream cheese. This will help you roll them into perfect balls. For the chocolate coating, ensure it’s smooth and glossy. Melt the chocolate chips slowly in the microwave, stirring often. This way, the chocolate won’t burn. Mixing in a bit of vegetable oil gives it a nice shine. Get creative with toppings! After coating the Oreo balls in chocolate, sprinkle crushed Oreos, mini chocolate chips, or colorful sprinkles on top. This adds fun colors and flavors. For serving, consider using mini cupcake liners. They make your treats look fancy and are easy to grab. You can also drizzle extra melted chocolate over the truffles for an eye-catching finish. These simple tips will help you create delicious, beautiful Oreo balls that everyone will love. For the full recipe, check out the earlier section! {{image_4}} You can change the flavor of your Oreo balls by using different cookies. Try peanut butter or mint Oreos for a twist. Each cookie brings a new taste that can surprise your friends and family. You can also try using graham crackers for a more classic dessert flavor. For the coating, consider using white chocolate or colored chocolate. This adds a fun and festive touch. Simply melt the chocolate of your choice, and dip the chilled Oreo balls as you would with semi-sweet chocolate. You can even mix flavors, like dark chocolate and white chocolate swirls, for a stunning look. If you need gluten-free options, use gluten-free Oreos. They taste just as good and work perfectly in this recipe. For a vegan version, replace cream cheese with a plant-based cream cheese. You can use dairy-free chocolate chips too. These modifications make it easy for everyone to enjoy Oreo balls. No matter your diet, you can still create this tasty treat. To keep your Oreo balls fresh, store them in the refrigerator. Place them in an airtight container. This will help them hold their taste and texture. They can last up to one week in the fridge. If you want to keep them longer, freezing is a great option. Place the Oreo balls in a single layer on a baking sheet. Freeze them for about two hours. Once they are solid, move them to a freezer-safe bag. They can stay fresh in the freezer for about three months. To maintain flavor and texture, don’t leave the Oreo balls out too long. Always return them to the fridge after serving. If they become too soft, chill them for a bit before serving again. Avoid stacking them too tightly. This can cause them to lose shape or stick together. If you notice any moisture, dry the container before adding the Oreo balls back in. For best results, enjoy them within a week for optimal taste and texture. For the full recipe, check out the detailed instructions above. Oreo balls stay fresh for about one week in the fridge. To store them, place the truffles in an airtight container. This keeps them moist and tasty. If you want to keep them longer, consider freezing them. They can last up to three months in the freezer. Just make sure to wrap them well. When you're ready to eat them, thaw them in the fridge for a few hours. Yes, you can make Oreo balls ahead of time. They are perfect for parties or special events. You can prepare them a day or two in advance. Just follow the Full Recipe steps, then chill them until serving time. This makes your event stress-free. Plus, the flavors can meld together for an even tastier treat! There are many fun ingredients to mix into your Oreo balls. Here are some ideas: - Peanut butter: Swirl in some peanut butter for a nutty taste. - Mint extract: Add a few drops for a fresh minty flavor. - Crushed nuts: Mix in chopped almonds or walnuts for crunch. - Coconut flakes: Stir in shredded coconut for a tropical twist. - Flavor extracts: Try vanilla or almond for added depth. Feel free to experiment and find your favorite combinations! In this post, we explored how to make delicious Oreo balls. You learned about the key ingredients and the simple steps needed for perfect treats. We discussed tips for texture, decoration ideas, and fun variations. In my experience, these treats are easy to customize and great for sharing. Whether you make them gluten-free or vegan, they remain a hit. Store them correctly, and they stay fresh for days. Enjoy making your own Oreo balls!

Love chocolate and Oreos? Then you’re in for a treat! My Quick and Easy Oreo Balls are the perfect no-bake delight that anyone can make. With just a few simple …

Read more

Categories Desserts Leave a comment

Peach Upside Down Mini Cakes Delightful and Easy Recipe

May 8, 2025 by Chef Evan
- Fresh ripe peaches: Use sweet, juicy peaches for the best flavor. They are the star of this dish and add a lovely sweetness. - All-purpose flour and sugars: These provide the base for the mini cakes. The blend of granulated and brown sugar gives a nice balance of sweetness and depth. - Dairy components: Buttermilk and butter make the cakes moist and rich. They also help create a tender crumb in each bite. - Flavor add-ins: A splash of pure vanilla extract can enhance the overall taste. It adds a warm, sweet note that pairs well with peaches. - Cinnamon for topping: A sprinkle of ground cinnamon adds warmth and flavor. It complements the sweetness of the peaches nicely. - Possible substitutions: If you don’t have buttermilk, you can mix milk with a bit of vinegar or lemon juice. This will mimic the tangy flavor needed for the recipe. - Preheating the oven: Start by preheating your oven to 350°F (175°C). This step is key for even baking. - Lining or greasing muffin cups: Line each cup with cupcake liners or grease them with butter or cooking spray. This helps the mini cakes pop out easily after baking. - Melting the butter: In a small microwave-safe bowl, melt 2 tablespoons of softened butter. This adds richness to the brown sugar layer. - Mixing with brown sugar: Stir the melted butter into 1/4 cup of brown sugar until well combined. Spoon this sweet mixture evenly into the bottom of each muffin cup. - Arranging peaches: Take your ripe peaches, slice them, and arrange them on top of the brown sugar mixture in each cup. Make them look pretty! - Mixing dry and wet ingredients: In a large bowl, whisk together 1 cup of flour, 1/2 cup granulated sugar, 1/2 teaspoon baking powder, 1/4 teaspoon baking soda, and 1/4 teaspoon salt. In a separate bowl, cream 1/3 cup of softened butter, add in one egg, and 1/2 teaspoon of vanilla extract. Mix well. - Filling muffin cups: Gradually add the dry mixture to the wet mixture, alternating with 1/4 cup of buttermilk. Stir gently until combined. Fill each muffin cup about 2/3 full with the batter. This allows space for the cakes to rise. Follow these steps closely, and you will create delightful peach upside down mini cakes. For more details on the process, check out the Full Recipe. To bake peach upside down mini cakes perfectly, start with your oven temperature. Preheat your oven to 350°F (175°C). This temperature helps the cakes rise nicely and brown evenly. Next, checking for doneness is key. Insert a toothpick into the center of a cake. If it comes out clean, the cakes are done. If there is batter on the toothpick, give them a few more minutes. One of the most important steps is to avoid overmixing. When you combine the wet and dry ingredients, mix gently. Overmixing can turn fluffy cakes into dense ones. Using room temperature ingredients helps too. Butter, eggs, and buttermilk mix better when they are not cold. This leads to a smooth batter and light cakes. When serving these mini cakes, toppings elevate them even more. Try adding a dollop of whipped cream or a scoop of vanilla ice cream. They add creaminess and flavor. For presentation, place the mini cakes on a colorful plate. Garnish with a sprig of mint or a slice of peach. This adds a touch of beauty and makes them look professional. {{image_4}} You can change the fruit in these mini cakes. Try using pineapple or cherries instead of peaches. Both fruits add a sweet and tangy flavor. Pineapples give a tropical twist, while cherries add a burst of color. You can also use seasonal fruits. Think about strawberries in spring or apples in fall. Each fruit brings its unique taste and style to the cake. Adding spices can enhance the flavor of your mini cakes. A sprinkle of nutmeg or cardamom can bring warmth and depth. These spices pair well with fruits and add a cozy touch. You can also try unique twists. Adding coconut or nut extracts can create a fun flavor profile. Coconut adds a hint of the tropics, while nuts bring a rich, earthy taste. Experiment to find your favorite combination! For the full recipe, check out Peach Paradise Upside Down Mini Cakes. To keep your peach upside down mini cakes fresh, store them in the fridge. Place the cooled cakes in airtight containers. This keeps the moisture in and prevents them from drying out. If you leave them uncovered, they may become hard and lose their taste. You can enjoy them for up to three days in the fridge. You can freeze these mini cakes if you want to save some for later. First, let them cool completely. Wrap each cake tightly in plastic wrap. Then, place the wrapped cakes in a freezer-safe bag or container. They will stay fresh for up to three months. When you are ready to eat them, take them out of the freezer. Let them thaw in the fridge overnight. This helps keep their flavor. If you're in a hurry, you can thaw them at room temperature for about an hour. Enjoy your peach upside down mini cakes even after freezing! If you don’t have buttermilk, don’t worry! Here are some easy options: - Milk and Vinegar: Mix 1 cup of milk with 1 tablespoon of white vinegar. Let it sit for 5 minutes. - Milk and Yogurt: Combine 3/4 cup of yogurt with 1/4 cup of milk to thin it out. - Soy Milk and Vinegar: For a non-dairy version, mix 1 cup of soy milk with 1 tablespoon of vinegar. These substitutes will give your mini cakes the right tangy flavor. Yes, you can make these mini cakes ahead of time. Here are some tips: - Bake and Cool: After baking, let them cool completely. - Store: Place them in an airtight container. They stay fresh for up to 3 days at room temperature. - Freeze: You can freeze them for up to a month. Just wrap each cake in plastic wrap before freezing. When you're ready to enjoy them, thaw at room temperature or warm them in the oven. Check for these signs to know your cakes are done baking: - Golden Brown Color: The tops should be a light golden brown. - Toothpick Test: Insert a toothpick into the center. If it comes out clean, they are ready. - Spring Back: Gently press the top. If it springs back, it’s done. These tips will help you bake perfect peach upside down mini cakes every time! You now have all the steps to make delicious mini peach cakes. We covered the key ingredients, including peaches and sugars, and how to prepare your muffin tin. You learned tips for baking and achieving the perfect texture. Don’t forget the fun variations you can try with other fruits and flavors. These mini cakes are not just tasty but also easy to store for later. Enjoy experimenting in your kitchen and share your creations with others. Happy baking!

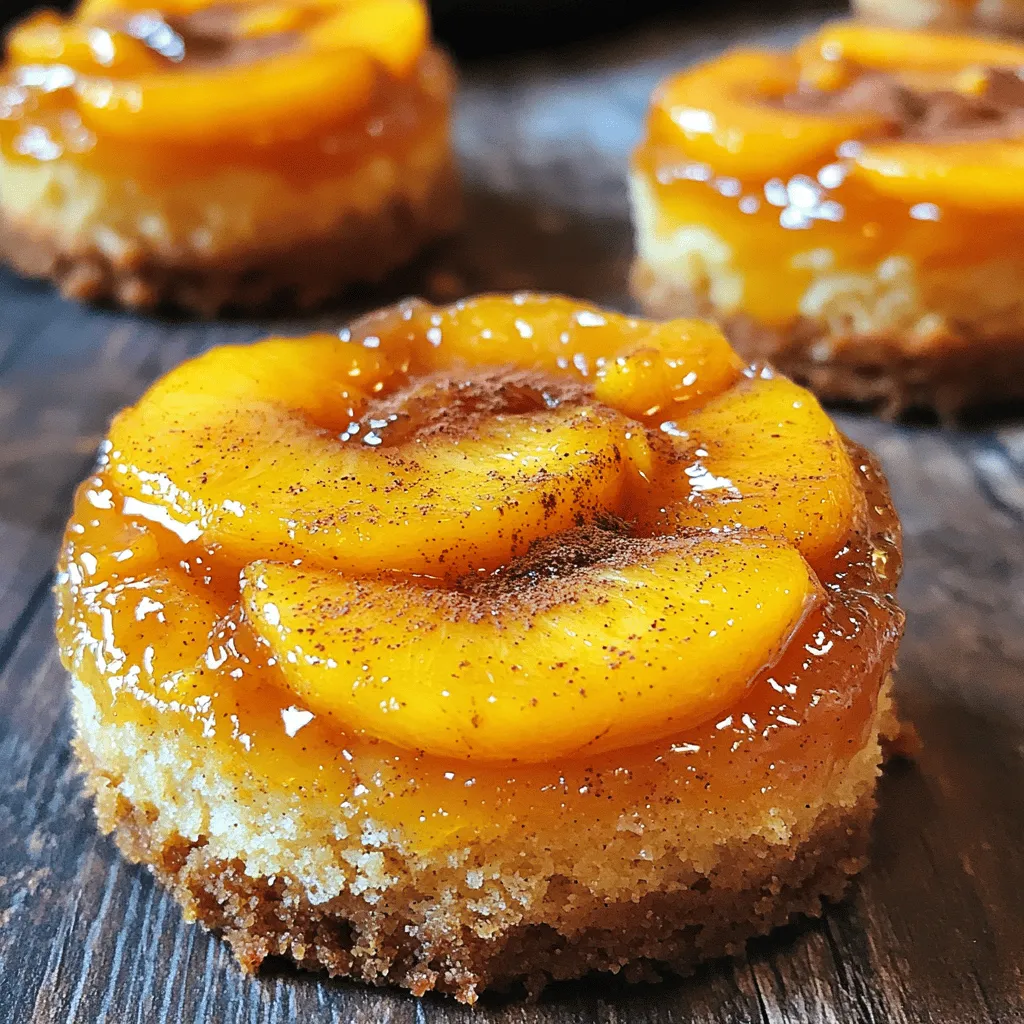
Love the sweet, juicy taste of peaches? You’re in for a real treat! My Peach Upside Down Mini Cakes are simple and delightful, bringing a burst of flavor to your …

Read more

Categories Desserts Leave a comment

No Bake Orange Creamsicle Truffles Easy and Fun Recipe

May 8, 2025 by Chef Evan
- 1 cup vanilla Oreo cookies, finely crushed - ½ cup cream cheese, softened to room temperature - 1 tablespoon freshly grated orange zest - 2 tablespoons freshly squeezed orange juice - 1 teaspoon pure vanilla extract - 1 cup white chocolate chips - 1 tablespoon coconut oil - Optional: additional orange zest for garnish To make these no bake orange creamsicle truffles, gather your ingredients first. Start with vanilla Oreo cookies. They give a great base flavor. You will also need cream cheese. This helps make the truffles rich and creamy. Next, get some fresh orange zest. It adds a bright taste. Fresh orange juice is also key for that refreshing citrus flavor. Pure vanilla extract rounds out the mix nicely. Don't forget the white chocolate chips. They provide a sweet, smooth coating. Use coconut oil to help melt the chocolate and keep it shiny. If you want, add extra orange zest on top for a fun garnish. This recipe is simple and lets you enjoy the flavors of summer anytime. For the complete details, check the Full Recipe. First, grab a large mixing bowl. Combine 1 cup of finely crushed vanilla Oreo cookies with ½ cup of softened cream cheese. Mix until it becomes smooth and creamy. Make sure there are no lumps left. Next, add 1 tablespoon of freshly grated orange zest, 2 tablespoons of freshly squeezed orange juice, and 1 teaspoon of pure vanilla extract. Stir well until everything blends together nicely. The mix should now have a bright orange flavor and a creamy texture. Cover the bowl with plastic wrap. Place it in the fridge for about 15 minutes. Chilling the mixture helps it firm up, making it easier to handle. After chilling, take the bowl out and use your hands to roll the mixture into small balls. Aim for about 1 inch in diameter for each truffle. Place them on a baking sheet lined with parchment paper. Once you have shaped all the truffles, pop them back into the fridge for another 30 minutes to set up firm. Now it's time to coat your truffles. Melt 1 cup of white chocolate chips with 1 tablespoon of coconut oil. Use a microwave-safe bowl for this. Heat in 30-second intervals, stirring well between each session. Continue until the chocolate is smooth and glossy. Remove the chilled truffles from the fridge. Dip each one into the melted chocolate, making sure it’s fully covered. Let any extra chocolate drip off before placing them back on the parchment paper. If you like, sprinkle some extra orange zest on top as a garnish right away. Once all the truffles are coated, return them to the fridge for at least 30 minutes. This will help the chocolate harden and keep everything together. For the full recipe, check out the details provided above. To get a smooth chocolate coating, you must melt the chocolate well. Use a microwave-safe bowl. Heat the white chocolate chips and coconut oil in short bursts of 30 seconds. Stir after each burst. This helps avoid burning and keeps the chocolate glossy. If you see clumps in the chocolate, it may have overheated. Add a small splash of coconut oil and stir to fix it. The cream cheese is key for a creamy texture. If you want it creamier, use more cream cheese. Just make sure it is softened for easy mixing. Chilling times also matter. After mixing, chill the truffle base for about 15 minutes. This helps it firm up and makes rolling easier. After shaping the truffles, chill them again for 30 minutes before coating. This ensures they hold their shape when dipped in chocolate. {{image_4}} You can make these truffles even more fun by changing the flavors. Try adding different citrus zests. Lemon or lime zest gives a fresh twist. You can mix in a little grapefruit zest for a tangy note. Each zest brings a new taste to your truffles. You can also incorporate various flavor extracts. Swap vanilla extract for orange or almond extract. This simple change makes your truffles unique. Just remember to keep the amounts small. A little goes a long way in flavor. The chocolate coating is where you can get creative. While white chocolate is great, you can use dark or milk chocolate instead. Each type gives a different taste and look. Dark chocolate adds a rich, bold flavor, while milk chocolate offers a sweeter option. Sprinkles or chopped nuts are great for extra texture. You can roll the truffles in colorful sprinkles for a fun look. Chopped nuts, like almonds or walnuts, add crunch and flavor. Experiment with your favorite toppings to make the truffles your own. For the full recipe, check the link above! To keep your truffles fresh, store them in the fridge. Place them in an airtight container. This helps maintain their creamy texture. Try to keep them away from strong-smelling foods. If you want to store the truffles for a longer time, freezing works well too. To freeze, put the truffles in a single layer on a baking sheet. Once frozen, transfer them to a freezer-safe bag. When you're ready to enjoy them, thaw the truffles in the fridge overnight. This keeps them from getting soggy. For the best quality, enjoy your truffles within a week when stored in the fridge. If you freeze them, they can last for two to three months. Watch for signs of spoilage. If the truffles look dry or have an off smell, it’s best to toss them. Always trust your senses to ensure your treats stay tasty! Yes, you can use low-fat cream cheese. It may change the flavor and texture. You might find the truffles a bit less creamy. The taste may also be slightly tangier. For best results, stick with full-fat cream cheese. After coating, chill the truffles for at least 30 minutes. This helps the chocolate harden well. If you want a firmer texture, chill them longer. The longer they chill, the better they set. You can make these truffles ahead of time. They store well in the fridge for up to one week. Just place them in an airtight container. For longer storage, freeze them for up to three months. You can use butter instead of coconut oil. It will change the taste a bit. You can also try vegetable oil, but it may not set as firm. Coconut oil helps give a nice finish to the truffles. To keep truffles uniform, use a small cookie scoop. This helps measure each truffle the same. You can also roll them between your palms gently. Practice makes perfect with the shaping process. These truffles combine simple ingredients to create a tasty treat. Start with Vanilla Oreo cookies, cream cheese, and fresh orange juice to mix a creamy base. Chill, shape, and coat your truffles with white chocolate for a delicious finish. You can change flavors or coatings for some fun twists. Remember to store them right for freshness. Making these truffles is an enjoyable process, and I hope you try making them yourself!

Are you ready to whip up a sweet treat that’s easy and fun? These No Bake Orange Creamsicle Truffles combine the bright flavors of orange with creamy goodness, all without …

Read more

Categories Desserts Leave a comment
Older posts
Newer posts
← Previous Page1 … Page101 Page102 Page103 … Page124 Next →

TOSSED FLAVORS

Where flavors are fresh, vibrant, and ready to toss! 🥗

PAGES

Home About Contact Privacy Policy Terms & Conditions Cookie Policy GDPR Policy Copyright Policy Disclaimer

CATEGORIES

Appetizers Desserts Salads Breakfast Dinner

Contact

  • Pinterest
  • Mail
Copyright © 2026 Tossed Flavors. All rights reserved.