Savory Chicken Parmesan Pillows Easy and Flavorful Dish

If you crave a dish that’s easy and full of flavor, you’ve got to try Chicken Parmesan Pillows! These delightful pockets of goodness combine tender chicken, creamy cheeses, and savory …

![To make these delicious fudgy cookies, gather these ingredients: - 1/2 cup unsalted butter, melted - 1 cup packed brown sugar - 1/4 cup granulated sugar - 2 large eggs - 1 teaspoon pure vanilla extract - 1/2 cup all-purpose flour - 1/3 cup unsweetened cocoa powder - 1/2 teaspoon baking powder - 1/4 teaspoon fine sea salt - 1 cup semi-sweet chocolate chips - 1/2 cup chopped walnuts (optional for added crunch) Measuring ingredients accurately is key to great cookies. Use dry measuring cups for flour and cocoa powder. For sticky items like butter or sugar, a liquid measuring cup works better. Always level off dry ingredients with a knife for precision. This helps ensure every bite is fudgy and chocolatey. Quality matters when picking ingredients. Use real unsalted butter for the best flavor. Choose high-quality cocoa powder for a rich taste. Semi-sweet chocolate chips add sweetness and texture, but you can swap them for dark chocolate if you prefer. If you have allergies, swap all-purpose flour with gluten-free flour. Just check the package for the right ratio. The walnuts give a nice crunch, but you can skip them if you want. Feel free to explore the [Full Recipe] for more details on making these tasty treats! Before you start, get your baking space ready. First, gather your tools. You need a mixing bowl, a spatula, a whisk, and a baking sheet. Line the baking sheet with parchment paper. This helps the cookies not stick. Preheat your oven to 350°F (175°C). This step is key to baking perfect cookies. In a large mixing bowl, pour in the melted butter. Add the brown sugar and granulated sugar. Mix these together until smooth. Next, crack in the eggs, one at a time. Stir well after each egg. This helps make your cookies rich. Finally, add the vanilla extract and mix until everything is combined. In another bowl, sift together the flour, cocoa powder, baking powder, and salt. Sifting removes lumps and blends the flavors. Gradually add this dry mix to your wet ingredients. Use a spatula to fold them together gently. Be careful not to overmix; this can make the cookies tough. Once mixed, fold in the chocolate chips and walnuts, if you’re using them. Using a tablespoon or cookie scoop, drop the dough onto your lined baking sheet. Leave about 2 inches between each cookie. This gives them room to spread. Bake in the preheated oven for 10-12 minutes. Look for slightly set edges and soft centers. This means they will stay fudgy. After baking, let them cool on the sheet for about 5 minutes. Then, transfer them to a wire rack to cool completely. For the full recipe, check out the details provided. To get that fudgy texture, you need to focus on the baking time. Bake your cookies for just 10 to 12 minutes. They should look set on the edges but soft in the middle. This slight underbaking helps keep them chewy and rich. Using a mix of brown sugar and granulated sugar also adds to that fudgy feel. Brown sugar keeps moisture, making your cookies softer. One common mistake is overmixing the dough. Mix only until the ingredients blend. Overmixing adds air, making cookies cakier. Another mistake is not measuring ingredients correctly. Use measuring cups and spoons for accuracy. Too much flour can lead to dry cookies. Also, don’t skip chilling the dough if it gets too soft. Chilling helps the cookies hold their shape while baking. Having the right tools makes baking easier. Here are a few must-haves: - Mixing bowls for wet and dry ingredients - A whisk or spatula for mixing - Measuring cups and spoons for accuracy - Cookie scoop for uniform cookie sizes - Parchment paper for easy cleanup and to prevent sticking These tools help you create perfect fudgy chocolate brownie cookies every time. For the full recipe, check out the details above. {{image_4}} I love adding walnuts to my brownie cookies. The nuts give a nice crunch and rich flavor. They also add healthy fats and protein. To make nutty brownie cookies, simply mix in 1/2 cup of chopped walnuts into the dough. This addition turns a great cookie into an even better one. You can toast the walnuts first for extra flavor. Just bake them at 350°F (175°C) for about 5-7 minutes. You can switch up the chocolate chips for fun. I often use dark chocolate chips for a richer taste. Milk chocolate chips are sweeter and great for kids. If you want something unique, try white chocolate chips. They add a creamy flavor that pairs well with the fudgy texture. Mix and match these chips to create your perfect cookie. You could even use a mix of all three for a fun surprise in every bite! Making these cookies gluten-free is easy. Just use a gluten-free flour blend instead of all-purpose flour. Make sure the blend has a good mix of starches and proteins for the best results. If you need a vegan version, swap the eggs for flax eggs. Mix 1 tablespoon of ground flaxseed with 2.5 tablespoons of water for each egg. This will help bind your cookies without eggs. Both adjustments will keep your cookies delicious and fudgy. For the full recipe, check out the details above! To keep your fudgy chocolate brownie cookies fresh, use a few simple tips. First, let them cool completely before storing. If you store warm cookies, they can become soggy. Next, place the cookies in an airtight container. This keeps them soft and prevents them from drying out. If you have many cookies, separate layers with parchment paper. This will stop them from sticking together. Freezing is a great way to save your cookies for later. To freeze, first make sure the cookies are fully cool. Then, place them in a single layer on a baking sheet. Freeze them for about an hour. Once frozen, transfer the cookies to a freezer-safe bag. Remove as much air as possible before sealing. They will stay fresh for up to three months. When you want a treat, just take out as many as you need. To enjoy your cookies warm, reheat them in the oven. Preheat the oven to 350°F (175°C). Place the cookies on a baking sheet and heat for about 5 minutes. This helps them regain their fudgy texture. You can also use the microwave. Heat them for about 10-15 seconds. This will warm them up, but be careful not to overdo it. Enjoy your fudgy chocolate brownie cookies right after reheating for the best taste! For the full recipe, check out the details above. The ideal baking time for fudgy chocolate brownie cookies is 10-12 minutes. I like to watch for signs. The edges should look set, but the center may still seem soft. This is a good sign! When you take them out, they will continue to bake a bit on the sheet. Yes, you can use margarine instead of butter. However, I recommend using unsalted margarine for the best taste. Margarine can affect the texture and flavor slightly. Butter gives a richer taste and a better chew. To tell if your cookies are done, look at the edges. They should look firm and almost set. The center may look a little underbaked. This is perfect for a fudgy texture! Let them cool for a few minutes on the baking sheet before moving them to a wire rack. This helps them firm up nicely. For the complete recipe, check the [Full Recipe]. In this blog post, we explored how to make fudgy chocolate brownie cookies. We discussed key ingredients, measurements, and even substitutions for quality. The step-by-step instructions showed how to mix, prepare, and bake perfectly chewy cookies. I shared tips for achieving that fudgy texture and common mistakes to avoid. Don’t forget the fun variations to try! Finally, I provided the best storage methods to keep your cookies fresh. Enjoy baking these cookies and impress everyone with your skills!](https://tossedflavors.com/wp-content/uploads/2025/05/c8c6e1d2-ec04-4bb6-b551-08c30524a79a.webp)

![- 1 sheet of puff pastry, fully thawed - 1 cup fresh strawberries, hulled and sliced - 1/4 cup granulated sugar (plus extra for topping) - 1 tablespoon cornstarch - 1 teaspoon fresh lemon juice To make a great Strawberry Danish, start with puff pastry. This flaky dough gives a nice crunch. Use fresh strawberries for a sweet and juicy filling. The sugar helps bring out their natural flavor. Cornstarch thickens the filling, making it less runny. A bit of lemon juice adds brightness and balances the sweetness. - 4 oz cream cheese, softened to room temperature - 2 tablespoons powdered sugar - 1 teaspoon almond extract - 1 tablespoon milk The cream cheese filling makes the Danish rich and creamy. Soften the cream cheese to help mix it well. Powdered sugar adds sweetness without graininess. Almond extract gives a lovely nutty flavor, enhancing the cream cheese. A splash of milk helps make the filling smooth and easy to spread. - 1 large egg - Extra granulated sugar An egg wash gives the Danish a golden color. Whisk the egg until well mixed. Brush it on the pastry edges before baking. This step adds shine and a beautiful look. Sprinkling extra sugar on top adds a sweet crunch that contrasts with the soft filling. For the full recipe, check the [Full Recipe]. 1. Preheat your oven to 400°F (200°C). This step warms your oven and helps the pastry rise. 2. Prepare a baking sheet. Line it with parchment paper. This keeps the Danish from sticking. 3. Roll out the puff pastry. Use a lightly floured surface to avoid sticking. 4. Cut the pastry into rectangles. Aim for four equal pieces. Lay them on the baking sheet. 5. Make the strawberry filling mixture. In a bowl, mix sliced strawberries, granulated sugar, cornstarch, lemon juice, and vanilla extract. Toss well. Let it sit for about 10 minutes. This helps the strawberries release juice. 1. Mix the cream cheese filling. In a new bowl, blend softened cream cheese with powdered sugar, almond extract, and milk. 2. Stir until smooth. Ensure there are no lumps. A creamy texture works best for spreading. 1. Score the puff pastry. Carefully cut a 1/2 inch border around each rectangle. This creates a puffy edge. 2. Add the cream cheese mixture. Spoon some into the center of each pastry rectangle. 3. Top with strawberry mixture. Distribute the strawberries evenly on top of the cream cheese. 4. Apply the egg wash. Whisk the egg and brush it around the edges. This gives a golden color. 5. Sprinkle extra sugar. Add a little sugar on top for a sweet crunch. 1. Bake the pastries. Place them in the oven for 18-20 minutes. They should puff and turn golden brown. 2. Cool slightly. Once baked, let them cool on the sheet for a bit before moving them. Enjoy your Strawberry Danish Delight! For a full recipe, check out the details above. To get the best puff pastry, thaw it properly. Leave it in the fridge overnight for great results. If you need it fast, place it on the counter for about 30 minutes. Avoid letting it get too warm. When rolling out the pastry, keep it on a floured surface. Roll it gently to avoid tearing. Aim for a rectangle about 1/8 inch thick. This thickness helps it puff nicely when baked. Choosing the right strawberries is key. Look for bright red berries that feel firm. Avoid any that are soft or have bruises. Fresh strawberries taste best and add great color. To boost the flavor, mix your sliced strawberries with a little lemon juice and sugar. Let them sit for about 10 minutes. This enhances their sweetness and creates a nice syrup. For a lovely presentation, dust the Danish with powdered sugar before serving. You can also add a mint sprig on top. This adds a pop of color and freshness. Pair your Strawberry Danish with a hot cup of coffee or tea. The warmth of the drink complements the cold cream cheese filling. Enjoy it as a breakfast treat or a sweet snack. For the complete recipe, check out the Full Recipe. {{image_4}} You can swap strawberries for other fruits. Blueberries and raspberries work great. They add a nice tartness. You can also use fruit preserves or jams. They give a sweet and rich flavor. Just spread a layer before the cream cheese. Mix and match fruits for fun, unique flavors! Toppings can change the look and taste of your Danish. Consider a simple icing made from powdered sugar and milk. Drizzle it on top for a sweet finish. You can also use a glaze with lemon or vanilla. Fresh herbs like mint or basil can add a pop of color and flavor. Just sprinkle them on before serving. If you want to make a vegan Danish, try plant-based cream cheese. Many brands offer good options. For a gluten-free version, look for gluten-free puff pastry. These swaps keep the delight while meeting your dietary needs. You can enjoy a tasty treat that fits your lifestyle! For the full recipe, check out the Strawberry Bliss Danish . After enjoying your Strawberry Danish, store any leftovers in an airtight container. This helps keep them fresh. I recommend using a glass or plastic container with a tight lid. You can also wrap each Danish in plastic wrap for extra protection. They will stay fresh for about 2-3 days at room temperature. For longer storage, consider refrigerating them. To bring back the flaky texture of your Danish, reheat them in the oven. Preheat your oven to 350°F (175°C). Place the pastries on a baking sheet and heat for about 10 minutes. This method keeps the pastry crispy. You can also use a toaster oven for similar results. Avoid using the microwave, as it can make the pastry soft and chewy. You can freeze your Danish before or after baking. If freezing before baking, assemble the Danish and place them on a baking sheet. Cover them with plastic wrap and freeze for up to 3 months. When ready to bake, bake them straight from the freezer, adding a few extra minutes to the baking time. If you freeze baked Danish, let them cool completely first. Wrap each pastry in plastic wrap, then place them in a freezer bag. To thaw, place them in the fridge overnight. Reheat in the oven as mentioned above. To make Strawberry Danish from scratch, start with puff pastry. You will need: - 1 sheet of puff pastry, fully thawed - 1 cup fresh strawberries, hulled and sliced - 1/4 cup granulated sugar (plus extra for topping) - 1 tablespoon cornstarch - 1 teaspoon fresh lemon juice - 1/2 teaspoon vanilla extract - 1 large egg (for egg wash) - 4 oz cream cheese, softened to room temperature - 2 tablespoons powdered sugar - 1 teaspoon almond extract - 1 tablespoon milk First, preheat your oven to 400°F (200°C). Roll out the pastry on a floured surface. Cut it into rectangles and place them on a baking sheet. Mix the strawberries with sugar, cornstarch, lemon juice, and vanilla in a bowl. Let it sit for ten minutes. In another bowl, mix cream cheese, powdered sugar, almond extract, and milk until smooth. Score the pastry edges, add cream cheese, and top with strawberries. Brush the edges with egg wash. Bake for 18-20 minutes until golden. Yes, you can use frozen strawberries. However, they may change the texture. Frozen berries can be mushy after thawing. They also lose some flavor compared to fresh strawberries. If using frozen, let them thaw completely and drain excess juice. This will help keep your Danish from becoming soggy. If you don’t have puff pastry, you can use phyllo dough or biscuit dough. Phyllo gives a crispy texture, but it requires more layers. Biscuit dough is thicker and may not have the same flaky quality. Each option offers a unique taste, but puff pastry is best for that light, flaky texture. Strawberry Danish lasts about 2-3 days at room temperature. Store it in an airtight container to keep it fresh. If it looks dry or has an off smell, it is best to throw it away. For longer storage, you can refrigerate it for up to a week. Yes, you can make Strawberry Danish ahead of time. Prepare the filling and pastry, then assemble them. Cover and store in the fridge for up to 24 hours before baking. When ready, bake them straight from the fridge. They will taste fresh and delicious! For the full recipe, check out the Strawberry Bliss Danish. Making Strawberry Danish is easy and fun. You learned about the key ingredients, from fresh strawberries to cream cheese filling. I provided step-by-step instructions to help you bake a perfect treat. You also discovered tips for selecting fruit and making it shine. Variations show you can switch up flavors. Plus, storage tips ensure your Danish stays fresh. With this guide, you have all you need to create a delicious Strawberry Danish at home. Enjoy sharing your tasty results with family and friends!](https://tossedflavors.com/wp-content/uploads/2025/05/8611ec45-d55d-4371-b3e4-50c0ebfe6d1c.webp)
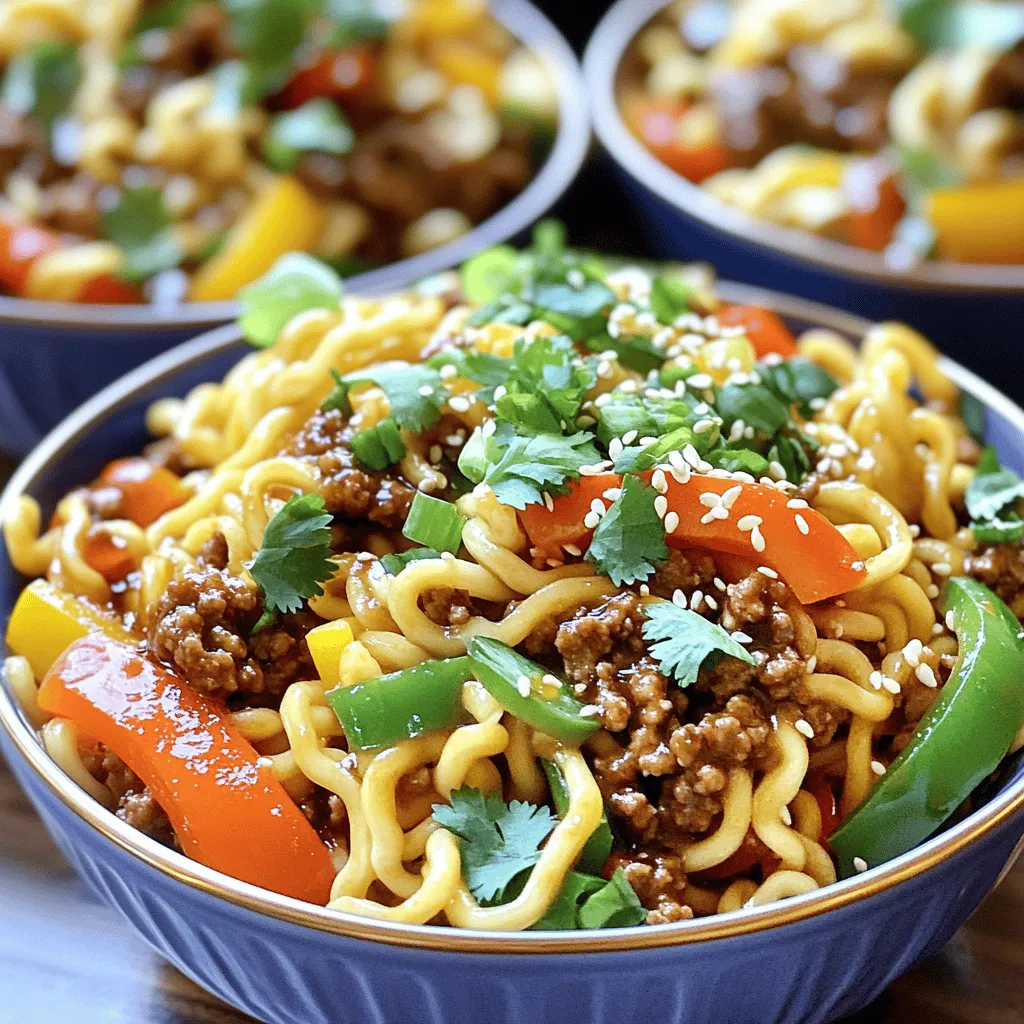
![- 1 pound ground beef - 1 cup orzo pasta - 1 medium onion, finely chopped - 2 cloves garlic, minced - 1 bell pepper (any color), diced - 1 cup diced tomatoes (canned or fresh) - 2 cups beef broth - 1 teaspoon dried oregano - 1 teaspoon paprika - Salt and pepper to taste - 1 tablespoon olive oil - Fresh parsley, finely chopped, for garnish - Grated Parmesan cheese, for serving (optional) Each ingredient plays a key role in the dish’s flavor and texture. Ground beef adds heartiness and protein. Orzo pasta brings a lovely bite and absorbs all the rich flavors. Fresh vegetables like onion, garlic, and bell pepper provide depth and sweetness. The diced tomatoes add moisture and acidity, balancing the dish. Spices like oregano and paprika give the dish warmth and complexity. Beef broth enhances the savory taste, making every spoonful satisfying. Lastly, the olive oil helps to sauté the veggies and beef, creating a base of flavor. Using fresh parsley as a garnish brightens the dish. If you enjoy cheese, adding Parmesan brings a creamy finish. This ingredient list sets you up for a delicious and easy meal. For the full recipe, make sure to check the instructions. - Chopping Vegetables Start by finely chopping one medium onion and dicing one bell pepper. You want these pieces small for even cooking. Next, mince two cloves of garlic. These fresh ingredients will add great flavor to your dish. - Preparing Ground Beef Measure out one pound of ground beef. If you prefer leaner meat, choose a lower-fat option. This will help reduce any excess grease in your dish. - Measuring Orzo and Broth Next, measure one cup of orzo pasta and two cups of beef broth. These are key components that will bring the dish together. Make sure you have everything ready before you start cooking. - Sautéing the Aromatics Heat one tablespoon of olive oil in a large skillet over medium heat. Once hot, add the chopped onion and diced bell pepper. Sauté for about 4-5 minutes until they soften and smell great. - Browning the Ground Beef Add the minced garlic and the ground beef to the skillet. Cook for about 6-7 minutes. Break the meat into smaller pieces as it cooks. When it’s brown and no longer pink, drain any extra fat if needed. - Adding Tomatoes and Seasonings Stir in one cup of diced tomatoes, two cups of beef broth, one teaspoon of dried oregano, and one teaspoon of paprika. Season with salt and pepper to taste. Bring this mix to a gentle simmer. - Incorporating Orzo Once your mixture simmers, add the orzo pasta to the pot. Stir well to combine all the ingredients evenly. - Covering and Reducing Heat Cover the pot with a lid and reduce the heat to low. Let it simmer for 10-12 minutes. Stir occasionally to prevent the orzo from sticking to the bottom. - Final Touches After the orzo is tender and most of the liquid is absorbed, take the pot off the heat. Let it sit for a few minutes. For a fresh touch, sprinkle finely chopped parsley on top. If you like, serve with grated Parmesan cheese for extra flavor. For the full recipe, check out the complete instructions and enjoy this savory Ground Beef Orzo Delight! - Suggested Seasoning Adjustments: Start with salt and pepper. If you want more depth, try adding red pepper flakes for heat or Italian seasoning for a twist. A splash of soy sauce can also boost umami flavors. - Using Fresh Herbs: Fresh herbs brighten the dish. Add chopped parsley, basil, or oregano just before serving. They add color and a fresh taste. - Recommended Cooking Techniques: Searing your beef well creates a nice crust. It adds flavor to the dish. Make sure not to rush this step; it’s worth the wait. - Preparing Ingredients in Advance: Chop your vegetables and measure the spices ahead of time. This saves time and keeps the cooking process smooth. - Multitasking During Cooking: As your beef cooks, you can prep the orzo. This keeps everything on track. Always have a timer handy to avoid overcooking. - Essential Cooking Utensils: A large skillet or pot works best for this dish. Use a wooden spoon to break up the beef and stir the ingredients well. - Pan Selection: Choose a heavy-bottomed pan. It heats evenly and prevents sticking. A non-stick option is great if you want easy cleanup. For the full recipe, check out the detailed instructions above! {{image_4}} - Ground Beef Alternatives You can swap ground beef for ground turkey or chicken. Both options lower fat while keeping flavor. If you want a richer taste, use lamb or pork. For a vegetarian twist, try crumbled tempeh or mushrooms. - Pasta Variations If you want to change up the pasta, use any small pasta shape. Try ditalini or small shells instead of orzo. Gluten-free pasta works well too. Quinoa pasta is a great choice for a healthy swap. - Vegetable Swaps Feel free to mix in your favorite veggies. Zucchini, spinach, or carrots add color and texture. Frozen peas or corn can work too, giving a sweet touch to the dish. - Adding Cheese or Cream For a creamy experience, stir in some cream cheese or sour cream at the end. This adds a nice richness. Grated cheese, like cheddar or mozzarella, can also melt into the dish for added flavor. - Spice Variations Spice it up by adding red pepper flakes or cayenne for heat. For a smoky taste, try smoked paprika. Experiment with Italian herbs like basil or thyme to change the flavor profile. - Gluten-Free Options Use gluten-free orzo or other gluten-free pasta. Always check labels to ensure they meet your needs. You can also use brown rice instead of orzo for a hearty base. - Vegetarian Adaptations To make this dish vegetarian, skip the meat and double the veggies. Add lentils for protein and fiber. You can also use plant-based ground beef to keep the texture similar to the original recipe. This Ground Beef Orzo recipe is flexible, allowing you to create your own delicious version! For the complete recipe, check out the [Full Recipe]. To keep your Ground Beef Orzo fresh, follow these steps: - Allow the dish to cool completely before storing. - Use airtight containers to prevent moisture loss. - Store in the fridge for up to three days. Using proper storage techniques helps maintain flavor and texture. Glass or plastic containers with tight seals work best. Avoid using metal containers, as they can react with the food. You can easily reheat Ground Beef Orzo using these methods: - Best Practices for Microwave: Place the orzo in a microwave-safe bowl. Add a splash of broth or water to keep it moist. Cover with a microwave-safe lid or wrap. Heat in 1-minute intervals, stirring in between, until hot. - Oven Reheating Tips: Preheat your oven to 350°F (175°C). Place the orzo in an oven-safe dish. Add a bit of broth or water, then cover with foil. Heat for about 15-20 minutes, or until warmed through. You can freeze Ground Beef Orzo to enjoy later. Here's how: - How to Freeze Ground Beef Orzo: First, let the dish cool down completely. Then, portion it into airtight freezer bags or containers. Remove as much air as possible to avoid freezer burn. Label each bag with the date. - Defrosting Tips: When ready to eat, move the orzo from the freezer to the fridge the night before. This method allows safe, slow thawing. If you're short on time, you can defrost it in the microwave on the defrost setting. Cook immediately after thawing to ensure food safety. For the full recipe, check out the detailed steps above. Ground Beef Orzo takes about 25 minutes to cook. This includes 10 minutes to prep and 15 minutes to cook. You will have a tasty meal in no time. Yes, you can make Ground Beef Orzo ahead of time. Cook it and store it in the fridge. It will taste great for up to three days when stored properly. You can use turkey, chicken, or lamb instead of ground beef. Each meat adds a unique flavor to your dish. Just make sure to adjust cooking times as needed. Absolutely! Ground Beef Orzo is perfect for meal prep. It stores well and reheats nicely. You can pack it in individual containers for easy lunches or dinners. You can definitely add more vegetables! Consider adding spinach, zucchini, or carrots. This not only boosts nutrition but also makes the dish more colorful and fun. For the full recipe, check [Full Recipe]. In this article, I shared a clear guide to making Ground Beef Orzo. We covered ingredients, preparation, cooking steps, and tips for flavor. I also discussed variations and storage methods to help you enjoy this dish longer. Simply put, these steps and ideas make cooking easy and fun. You can impress your family with a tasty meal. Trust me, with these tips, you’ll be ready to whip up delicious Ground Beef Orzo every time.](https://tossedflavors.com/wp-content/uploads/2025/05/d5aac6c6-924f-40ca-a0dd-a48f6c331b2b.webp)

![To make Korean BBQ meatballs, you will need: - 1 lb ground beef - 1/2 lb ground pork (optional for added flavor) - 1/4 cup Panko breadcrumbs - 1/4 cup green onions, finely chopped - 2 garlic cloves, minced - 1 large egg - 1 tablespoon sesame oil - 2 tablespoons soy sauce - 1 tablespoon gochujang (Korean chili paste) - 1 teaspoon fresh ginger, grated - Salt and black pepper, to taste These ingredients blend to create juicy meatballs with a rich taste. The mixture of beef and pork gives depth. Panko breadcrumbs keep them light and fluffy. For the spicy mayo dip, gather: - 1/2 cup mayonnaise - 2 tablespoons gochujang - 1 tablespoon fresh lime juice - 1 teaspoon sesame oil - 1 teaspoon honey (adjust to taste) - Optional: extra Sriracha for an additional kick This dip adds a creamy, spicy kick. Gochujang is the star, giving heat and depth. Adjust the honey to balance the spice. You can add more fun with these optional ingredients: - Chopped cilantro for freshness - Chopped bell peppers for crunch - Sesame seeds for garnish These extras boost the flavor and presentation. Feel free to mix and match to suit your taste. For the full recipe, check out [Full Recipe]. Start by gathering your ingredients. You need one pound of ground beef and half a pound of ground pork if you want extra flavor. In a big bowl, mix the ground meats with: - 1/4 cup Panko breadcrumbs - 1/4 cup green onions, finely chopped - 2 garlic cloves, minced - 1 large egg - 1 tablespoon sesame oil - 2 tablespoons soy sauce - 1 tablespoon gochujang - 1 teaspoon fresh ginger, grated - Salt and black pepper to taste Make sure to mix everything well. You can use your hands or a spoon. The goal is to blend the flavors nicely. Next, preheat your oven to 400°F (200°C). While waiting, shape the meat mixture into small balls, about one inch in diameter. This size helps them cook evenly. Place the meatballs on a baking sheet lined with parchment paper. This makes cleanup a breeze. Bake the meatballs for 20 to 25 minutes. They should be cooked through and have a nice golden-brown crust. You can check if they are done by cutting one open to see if it's no longer pink inside. While the meatballs bake, you can prepare the spicy mayo dip. In a small bowl, whisk together: - 1/2 cup mayonnaise - 2 tablespoons gochujang - 1 tablespoon fresh lime juice - 1 teaspoon sesame oil - 1 teaspoon honey Make sure the mixture is smooth. If you like it spicier, add some extra Sriracha. This dip adds a creamy and zesty touch to your meatballs. Once everything is ready, allow the meatballs to cool for a bit. Serve them on a platter and drizzle some spicy mayo over the top. Keep some extra dip on the side for dipping. Enjoy your Korean BBQ meatballs with spicy mayo dip! For the full recipe, refer to the earlier sections. To make the best Korean BBQ meatballs, focus on mixing. Start by combining the ground meats gently. If you mix too hard, the meatballs can become tough. Use your hands or a spoon. Make sure all the ingredients blend well for great flavor. When shaping the meatballs, keep them about 1 inch wide. This size cooks evenly and stays juicy. Baking is key for a crispy outside. Preheat your oven to 400°F (200°C) before you start. This helps the meatballs brown nicely. Arrange them on a lined baking sheet. This makes cleanup easy and helps with even cooking. Bake for 20-25 minutes. Use a meat thermometer to check for doneness; they should reach 160°F (71°C). Presentation matters! Serve your meatballs on a large platter. Drizzle spicy mayo dip over the meatballs before serving. This adds color and flavor. You can also use wooden skewers for easy serving. Sprinkle chopped green onions or sesame seeds on top for a fresh look. For a fun twist, serve the meatballs in lettuce wraps. This makes a great low-carb option. Provide extra spicy mayo on the side for dipping. Your guests can control the heat level. When it comes to drinks, light beers pair well with Korean BBQ flavors. You might also enjoy a fruity white wine or a refreshing iced tea. For sides, consider serving rice or quinoa. These grains soak up the tasty sauce. Kimchi is a classic side dish that adds tang and crunch. You can also serve pickled veggies to balance the rich meatballs. For a heartier meal, try a simple salad with sesame dressing. This gives freshness alongside the savory meatballs. For the complete recipe, check out the Full Recipe section. {{image_4}} You can switch up the meat in your Korean BBQ meatballs. Ground chicken or turkey works great. These meats keep the dish light and juicy. You can also use plant-based meat for a vegan option. It gives you a tasty choice while keeping it healthy. While spicy mayo is a star, you can try other dips. A sweet soy glaze adds a nice flavor. You can also use a peanut sauce for a nutty twist. If you want something creamy, try ranch dressing with a hint of gochujang. Each option brings a fun new taste. Feel free to make your meatballs unique. You can add shredded carrots for crunch. Chopped bell peppers give a sweet touch. For a spicy kick, mix in more gochujang or red pepper flakes. You can even add herbs like cilantro or basil for a fresh flavor. Each of these additions makes the dish more exciting. Explore the Full Recipe to see how these variations can fit into your cooking! After your feast, cool the leftover meatballs to room temperature. Gather a clean, airtight container for storage. Place the meatballs in the container, ensuring they fit snugly. Cover the lid tightly. Store them in the fridge for up to four days. If you want to keep them longer, freezing is a great option. To freeze meatballs, follow a simple process. First, let them cool completely. Then, arrange the meatballs in a single layer on a baking sheet. Place the sheet in the freezer for about an hour. This step helps them firm up. Once frozen, transfer them into a freezer-safe bag. Remove as much air as possible before sealing. Label the bag with the date. You can freeze them for up to three months. Reheating meatballs is easy. For the best taste, use the oven. Preheat your oven to 350°F (175°C). Spread the meatballs on a baking sheet. If they seem dry, drizzle a little broth over them. Bake for about 15 minutes or until hot. You can also reheat meatballs in the microwave. Place them on a microwave-safe plate and cover with a damp paper towel. Heat for 1-2 minutes, checking often. Enjoy your Korean BBQ meatballs with spicy mayo dip again! For the full recipe, see above. Korean BBQ meatballs are bite-sized treats packed with flavor. They mix ground beef and pork, along with fresh herbs and spices. The star ingredient is gochujang, a Korean chili paste that gives them a spicy and sweet kick. These meatballs are often served with a creamy spicy mayo dip for added richness. They are perfect for parties or a fun family meal. Yes, you can prepare these meatballs ahead of time. Mix the meatball ingredients in the morning and shape them into balls. Cover them and store them in the fridge until you are ready to bake. You can also freeze the raw meatballs. Just place them on a baking sheet, freeze until firm, then transfer them to a bag. Bake them straight from the freezer when you're ready. To adjust the spice level of the dip, change the amount of gochujang. Start with less if you prefer a milder flavor. You can also add more honey to balance the heat. For an extra kick, mix in some Sriracha. Taste as you go, and find the heat that suits your palate best. You can find the full recipe in the earlier sections. Korean BBQ meatballs are a fun way to enjoy a classic dish. This post covered key ingredients, easy steps, and helpful tips. You can customize flavors and try different proteins for variety. Storing leftovers and reheating them is simple. In short, making these meatballs is easy and rewarding. Enjoy them with your favorite drinks or sides. You’ll impress your friends and family with this tasty treat. I hope you try this recipe soon!](https://tossedflavors.com/wp-content/uploads/2025/05/598aba45-0438-44ce-8981-7d7e0f9aefc4.webp)
![This recipe needs just three main items: - 1 lb boneless chicken thighs, cut into bite-sized pieces - 1 cup orange marmalade (preferably with a bit of zest) - 2 tablespoons low-sodium soy sauce These ingredients blend to create a sweet and savory dish. The chicken thighs keep the meal juicy and tender. The orange marmalade adds a bright flavor, while soy sauce gives it depth. If you don’t have chicken thighs, you can use chicken breast. Just remember, breasts may dry out faster. For a different flavor, try apricot or peach preserves in place of marmalade. You can also use coconut aminos instead of soy sauce for a soy-free option. Choose fresh chicken that has no off smell. Look for marmalade with real orange peel for extra zest. When picking soy sauce, low-sodium options are best for controlling saltiness. Always check the labels for the best quality and flavor. ``` To start, you need to make the orange sauce. Grab a medium mixing bowl. In the bowl, combine one cup of orange marmalade and two tablespoons of low-sodium soy sauce. Stir this mix until it is smooth and well blended. The sweet taste of the marmalade joins nicely with the salty soy sauce. This sauce will give your chicken flavor and shine. Next, it’s time to cook the chicken. Take one pound of boneless chicken thighs and cut them into bite-sized pieces. Heat a large skillet or wok over medium-high heat. Add the chicken pieces in a single layer. Make sure not to crowd the pan. Cook the chicken for about 6-8 minutes. Turn the pieces occasionally. You want them to be golden brown and safe to eat. Check for an internal temperature of 165°F (75°C). Now, it's time to glaze the chicken with the sauce. Once the chicken is cooked through, pour the orange sauce over it. Gently stir to coat each piece in the glossy sauce. Lower the heat to medium and let it simmer for 3-5 minutes. This step helps the sauce thicken a bit. It also allows the sauce to stick to the chicken for extra flavor. After simmering, take the skillet off the heat. Let it rest for one minute. This resting time helps the sauce cling to the chicken even more. Enjoy your meal! For the full recipe, check out the detailed instructions above. When making 3 Ingredient Orange Chicken, avoid overcrowding your pan. This can cause the chicken to steam instead of sear. Always cook in a single layer for best results. Another mistake is not checking the chicken's internal temperature. Undercooked chicken can lead to foodborne illness. Use a meat thermometer to ensure it reaches 165°F (75°C). Lastly, don't rush the sauce. Let it simmer long enough to thicken. This step is key to achieving the right glaze. To keep your chicken tender, start with boneless thighs. They have more fat than breasts, which helps with moisture. Always cut the chicken into even, small pieces for uniform cooking. Searing the chicken over medium-high heat locks in the juices. This technique helps you create a nice golden crust. Letting the chicken rest for a minute after cooking allows the juices to redistribute. This step makes every bite juicy and flavorful. While the 3 main ingredients shine, you can boost flavor easily. Try adding minced garlic or ginger to the sauce for a zing. You can also toss in some crushed red pepper flakes for heat. A sprinkle of sesame seeds or sliced green onions adds a nice crunch. Consider serving the chicken with steamed broccoli or snap peas. This adds color and nutrients to your plate. For the full recipe, check out the [Full Recipe]. {{image_4}} You can add a kick to your orange chicken easily. Just mix in some chili flakes or sriracha to the orange sauce. Start with a teaspoon and taste as you go. This gives you control over the heat level. It adds a nice zest that pairs well with the sweet orange flavor. If you need a gluten-free version, swap the soy sauce. Use tamari instead. It has a similar taste but is made without wheat. You can also find gluten-free soy sauce in stores. This change keeps the flavor while making the dish safe for everyone. Adding veggies is a great way to boost nutrition. Bell peppers, carrots, and snap peas work well. Just chop them into bite-sized pieces. Sauté them in the skillet before you add the chicken. This way, they become tender but still crisp. You get a colorful, tasty dish with more textures and flavors. For the full recipe, check out the detailed instructions provided. To store your leftover orange chicken, place it in an airtight container. Let it cool first, then cover it tightly. This way, it stays fresh in the fridge for up to three days. If you want to keep it longer, you can freeze it. Just make sure to use a freezer-safe container. When you are ready to enjoy your leftovers, reheat them gently. You can use a skillet or microwave. If using a skillet, add a splash of water or broth to keep it moist. Heat it on low until warm, stirring often. If using a microwave, cover it with a lid or microwave-safe wrap to prevent drying out. Heat it in short bursts and check often. To freeze orange chicken, make sure it is cool first. Portion it into smaller containers or bags. Remove as much air as you can to prevent freezer burn. You can store it for up to three months. When you’re ready to eat it, thaw it overnight in the fridge. Then, reheat it as mentioned above. This will help keep all the flavors intact. Yes, you can use chicken breast. Chicken breast is leaner than thighs. It cooks faster, so be careful not to overcook it. Cut the breast into small pieces like you would the thighs. This helps it cook evenly. The flavor will be slightly different, but still tasty! To thicken the sauce, you can cook it longer. Let it simmer gently after adding the orange marmalade and soy sauce. This reduces the liquid and makes it stick better to the chicken. You can also mix 1 tablespoon of cornstarch with 2 tablespoons of water. Stir this mix into the sauce while it simmers. The sauce will thicken nicely. Serve this chicken over steamed rice or fluffy quinoa. Both absorb the sauce well. You can also add some fresh veggies on the side. Broccoli or snap peas work great. For a nice touch, sprinkle some chopped green onions or sesame seeds on top. This adds color and crunch to your meal. If you want more ideas, check out the Full Recipe for serving suggestions! This blog showed you how to make a delicious three-ingredient orange chicken. We discussed key ingredients, step-by-step cooking, and helpful tips. You learned about tasty variations and how to store leftovers. Now, you can enjoy a quick, easy meal that’s also full of flavor. Try these ideas and make the dish your own. You’ll impress your family with every bite. Happy cooking!](https://tossedflavors.com/wp-content/uploads/2025/05/fdd76d89-23f9-4a78-ad90-9e809dc5fb1d.webp)