Skip to content
tossedflavors.com
  • Home
  • Appetizers
  • Desserts
  • Salads
  • Breakfast
  • Dinner
  • Privacy Policy
  • Contact
  • About

Chef Evan

Almond Cranberry Energy Bites Quick and Tasty Snack

December 7, 2025August 14, 2025 by Chef Evan
To make Almond Cranberry Energy Bites, you need: - 1 cup almond butter - 1 cup rolled oats - 1/2 cup dried cranberries, chopped - 1/2 cup honey or maple syrup - 1/4 cup unsweetened coconut flakes - 1/4 cup chia seeds - 1 teaspoon vanilla extract - 1/4 teaspoon sea salt When measuring sticky ingredients like almond butter or honey, use a liquid measuring cup. This makes it easier to pour. For dry ingredients, use a dry measuring cup and level off with a knife for accuracy. Chia seeds can be measured with a teaspoon or tablespoon, depending on how many you want to add. If you don’t have almond butter, you can use peanut butter or sunflower seed butter. For the sweetener, maple syrup works well, but agave syrup is also a great choice. If you want to skip coconut, you can replace it with crushed nuts. Instead of chia seeds, you can use flax seeds for a similar texture. {{ingredient_image_1}} Making Almond Cranberry Energy Bites is simple and quick. You will need just 15 minutes of prep time. This recipe yields about 12 to 15 bites. Gather all your ingredients first. It makes the process smooth and fun. 1. Mix the Wet Ingredients: In a large bowl, combine 1 cup of almond butter and 1/2 cup of honey or maple syrup. Stir until smooth. 2. Add Flavor: Pour in 1 teaspoon of vanilla extract and sprinkle in 1/4 teaspoon of sea salt. Mix these in well. 3. Incorporate Dry Ingredients: Gradually add 1 cup of rolled oats, 1/4 cup of chia seeds, and 1/4 cup of unsweetened coconut flakes. Stir until everything blends nicely. 4. Fold in Cranberries: Gently fold in 1/2 cup of chopped dried cranberries. Make sure they spread evenly throughout the mixture. 5. Chill the Mixture: Cover the bowl with plastic wrap. Place it in the fridge for 30 minutes. This step helps firm up the mixture. 6. Shape the Bites: After chilling, scoop the mixture with your hands. Roll it into small balls, about 1 inch wide. 7. Set the Bites: Place the balls on a baking sheet lined with parchment paper. Chill again for at least 1 hour. 8. Store: Once set, keep the energy bites in an airtight container in the fridge for up to a week. You can also freeze them for longer storage. To get the best texture, ensure your almond butter is creamy. If it's too thick, it won't mix well. Also, let the mixture chill properly. This helps your bites hold their shape. If you want a chewier bite, add a bit more honey or maple syrup. Enjoy your tasty and healthy snack! You can personalize your almond cranberry energy bites easily. Try different nut butters like peanut or cashew for a new taste. You can swap dried cranberries for cherries or raisins. Add nuts like walnuts or pecans for crunch. If you want a sweeter bite, mix in chocolate chips or maple syrup. You can even add a pinch of cinnamon for warmth. To keep your energy bites fresh, store them in an airtight container. They last up to a week in the fridge. If you want to save them longer, freeze them. Place the bites in a single layer on a baking sheet first. Once frozen, transfer them to a freezer bag. They can last for up to three months in the freezer. These energy bites are great for any time of day. Serve them as a quick breakfast on busy mornings. They also make a perfect snack for kids after school. You can offer them at parties as healthy treats. For a fancy touch, arrange them on a plate with extra cranberries and coconut flakes around them. Pro Tips Chill for Easier Rolling: Make sure to refrigerate the mixture for at least 30 minutes before rolling. This will make it firmer and easier to shape into bite-sized balls. Customize Your Mix-ins: Feel free to swap out dried cranberries for other dried fruits like apricots or raisins, or add nuts and seeds for extra crunch and nutrition. Storage Tips: These energy bites can be stored in an airtight container in the refrigerator for up to a week, or you can freeze them for up to three months for a quick snack. Perfect Portioning: Use a cookie scoop for uniform size and shape, ensuring that each energy bite is consistent and easy to grab on the go. {{image_2}} You can swap almond butter for other nut butters. Try peanut butter for a classic taste. Cashew butter adds a mild, creamy flavor. Sunflower seed butter works well for nut-free diets. Each option gives a unique twist to the bites. Feel free to change up the mix-ins. Add sunflower seeds for extra crunch. Pumpkin seeds boost nutrition and flavor too. You can use different dried fruits like apricots or raisins. Each fruit adds its own sweetness and texture. Spices and extracts can enhance the flavor. A dash of cinnamon gives warmth and depth. Try adding a pinch of nutmeg for a festive touch. You can also use almond or coconut extract for added taste. These small changes make each bite special. To keep your almond cranberry energy bites fresh, store them in an airtight container. This will stop air from getting in and drying them out. You can keep them in the fridge or freezer, depending on how soon you will eat them. If you choose the fridge, they will last for a week. For longer storage, freezing is best. In the refrigerator, your energy bites will stay fresh for up to one week. They taste best within this time. If you freeze them, they can last for about three months. Just remember to label your container with the date. This way, you will know when you made them. Check your energy bites for any signs of spoilage. If you see mold, do not eat them. A bad smell or a change in texture is also a red flag. If they feel hard or dry instead of chewy, it’s time to toss them. Always trust your senses when it comes to food safety. Almond Cranberry Energy Bites are small snacks packed with energy. They combine almond butter, oats, and dried cranberries. These bites are tasty and easy to make. They are perfect for a quick snack or pre-workout boost. You can make them in about 15 minutes, plus chilling time. Yes, you can make these energy bites vegan. Simply swap honey for maple syrup. Both options add sweetness, but maple syrup is plant-based. The rest of the ingredients are vegan-friendly. This makes the recipe suitable for everyone. Yes, these energy bites can be gluten-free. Just ensure you use certified gluten-free oats. This way, you avoid any gluten contamination. All other ingredients in the recipe are naturally gluten-free. So, you can enjoy these bites without worry. One energy bite contains about 100 calories. This can vary based on the exact size and ingredients used. If you make about 15 bites, you get a tasty snack without too many calories. They are great for a quick energy boost. Using fresh cranberries is not recommended. Fresh cranberries are too tart and can make the bites soggy. Dried cranberries add sweetness and chewiness. Stick with dried cranberries for the best flavor and texture in your energy bites. You learned how to make tasty almond cranberry energy bites. We covered important ingredients, measuring tips, and substitutions. You now know step-by-step instructions to get the best texture. Customization options let you create your own bites. We discussed storage tips to keep them fresh and safe. Lastly, I answered common questions about the recipe. With this knowledge, you can make energy bites that fit your needs. Enjoy creating and sharing them!

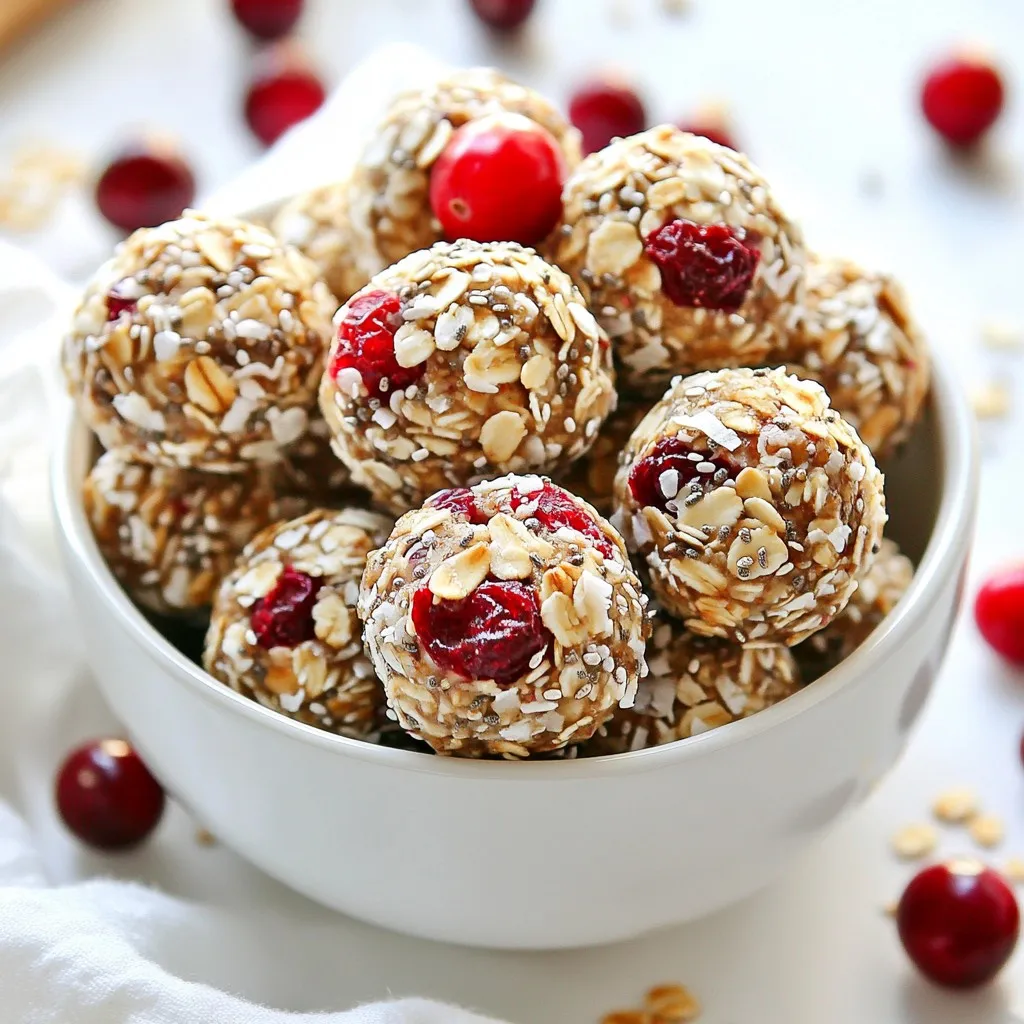
If you’re on the hunt for a quick and tasty snack, Almond Cranberry Energy Bites are your answer. These easy-to-make bites pack a punch of flavor and nutrition. You’ll love …

Read more

Categories Desserts Leave a comment

Buffalo Chicken Stuffed Zucchini Boats Flavor Boost

October 8, 2025August 11, 2025 by Chef Evan
To make Buffalo Chicken Stuffed Zucchini Boats, you will need: - 4 medium zucchinis - 2 cups shredded cooked chicken - 1/2 cup buffalo sauce (adjust to taste) - 1/2 cup cream cheese, softened - 1 cup shredded cheddar cheese, divided - 1/4 cup green onions, sliced - 1 tsp garlic powder - 1/2 tsp onion powder - Salt and pepper to taste - Fresh parsley for garnish (optional) You can easily swap some ingredients if needed: - Use Greek yogurt instead of cream cheese for a lighter option. - Swap buffalo sauce for barbecue sauce for a milder flavor. - Try different cheeses, like mozzarella or pepper jack, for a unique taste. - If you don’t have green onions, use chives or regular onions instead. For the best results, consider these brands: - For buffalo sauce, Frank's RedHot is a classic choice. - Use Philadelphia cream cheese for its rich and creamy texture. - Kraft shredded cheddar cheese melts perfectly and adds great flavor. - For fresh produce, choose organic zucchinis when possible for the best taste. {{ingredient_image_1}} To start, gather your ingredients. You will need zucchinis, chicken, buffalo sauce, cream cheese, and cheese. Prepare your zucchinis first. - Cut each zucchini in half lengthwise. - Scoop out the seeds and some flesh to make space for the filling. This step makes your zucchini a boat for flavors. Next, mix your filling. In a bowl, combine: - 2 cups shredded cooked chicken - 1/2 cup buffalo sauce - 1/2 cup cream cheese - 1 tsp garlic powder - 1/2 tsp onion powder - Salt and pepper Stir until well mixed. This is where the magic begins! Now it’s time to bake. Preheat your oven to 375°F (190°C). Place the filled zucchini boats on a baking sheet lined with parchment paper. Spoon the buffalo chicken mixture into each boat. Be sure to fill them well but not too tight. Top each boat with: - 1/2 cup shredded cheddar cheese This will melt beautifully and create a delicious topping. Bake for 25-30 minutes. Look for tender zucchinis and bubbly, golden cheese on top. It’s hard to beat that sight! Layering flavors is key to a great dish. Start with the buffalo sauce. Add more if you like heat. Cream cheese brings creaminess and balances the spice. Don’t forget the garlic and onion powders; they add depth. For a fresh kick, sprinkle green onions on top after baking. If you want, add fresh parsley for color. These simple tips make each bite a burst of flavor! When picking zucchini, look for firm ones. They should feel heavy for their size. Choose ones with smooth skin and bright color. Avoid zucchinis that have soft spots or wrinkles. Fresh zucchini adds great texture to your dish. One common mistake is not scooping out enough flesh. Make sure to remove enough to hold the filling but leave enough for flavor. Another mistake is overcooking the zucchini. You want it tender, not mushy. Lastly, don't skip on seasonings. They enhance the taste and make your dish pop. To boost flavor, consider adding spices. A pinch of cayenne or smoked paprika adds warmth. You can also mix in diced jalapeños for heat. Fresh herbs like basil or cilantro give a nice touch. Lastly, try drizzling a bit of ranch dressing on top before serving for a creamy finish. Pro Tips Choose Firm Zucchini: Select firm zucchinis that are free of blemishes for the best texture and flavor in your stuffed boats. Adjust Spice Level: Modify the amount of buffalo sauce to suit your heat preference. You can also mix in some ranch seasoning for a milder taste. Extra Cheese: If you're a cheese lover, feel free to add more cheddar on top before baking for an even cheesier experience. Garnish for Freshness: Don't skip the green onions and parsley; they add a fresh flavor contrast that enhances the dish beautifully. {{image_2}} You can swap out chicken for other proteins. Ground turkey works well too. You can also use shredded beef for a richer taste. If you love seafood, shredded cooked shrimp adds a fun twist. Just ensure the protein is cooked before mixing. Each option brings a new flavor to the dish. If you want a meatless meal, try black beans or lentils. They add protein and fiber. Mix in some diced bell peppers for crunch. You can also use tofu for a soft texture. Don't forget to adjust the spices, using a bit more buffalo sauce for that kick! Want to make your zucchini boats even more tasty? Consider adding chopped jalapeños for heat. You can also add diced celery for a fresh crunch. Mixing in some ranch dressing with the buffalo sauce brings a creamy touch. For extra flavor, sprinkle in some smoked paprika or Italian herbs. Each enhancement lets you craft your perfect dish! Store your leftover Buffalo Chicken Stuffed Zucchini Boats in an airtight container. Keep them in the fridge. They will stay fresh for up to three days. If you want to keep them longer, freezing is a good option. To freeze these boats, wrap each one tightly in plastic wrap. Place them in a freezer-safe bag or container. Label the bags with the date. You can freeze them for up to three months. When you want to eat them, just take them out of the freezer. Reheat the stuffed zucchini boats in the oven for best results. Preheat your oven to 350°F (175°C). Place the boats on a baking sheet. Bake for about 15 to 20 minutes until heated through. You can also use the microwave, but the oven keeps them crispy. Enjoy your tasty leftovers! Yes, you can use raw zucchini. However, I recommend pre-baking them for a short time. This softens the zucchini and helps the filling cook evenly. Slice the zucchini in half and scoop out the center. Bake them for about 10 minutes before stuffing. This step enhances the texture and flavor. To amp up the heat, add more buffalo sauce. Start with an extra tablespoon or two. You can also mix in diced jalapeños or crushed red pepper flakes. These ingredients bring a nice kick. For an even bolder flavor, consider using spicy cream cheese instead of regular cream cheese. Stuffed zucchini boats pair well with several sides. A fresh salad with crisp greens complements the dish nicely. Roasted vegetables add extra nutrients and flavor. You could also serve it with garlic bread for a heartier meal. These options balance the spicy filling and enhance your dining experience. We explored the key ingredients, step-by-step instructions, and helpful tips for your zucchini dish. I shared ways to enhance flavors and avoid common mistakes. We also discussed storage and variations to fit your taste. Zucchini boats are versatile and easy to make. With the right ingredients and methods, you can create a meal your family will love. Enjoy experimenting with flavors and sharing your tasty creations!

Are you ready to take your weeknight dinners to the next level? My Buffalo Chicken Stuffed Zucchini Boats are not just a tasty meal; they pack a serious flavor punch! …

Read more

Categories Dinner Leave a comment

Apple Pie Overnight Oats Flavorful Breakfast Delight

November 16, 2025August 11, 2025 by Chef Evan
To make apple pie overnight oats, you need: - 1 cup rolled oats - 1 ¼ cups almond milk (or any milk of your choice) - 1 medium apple, diced (preferably a tart variety) - 1 tablespoon maple syrup (or honey) - 1 teaspoon ground cinnamon - ½ teaspoon nutmeg - 1 tablespoon chia seeds - ¼ cup Greek yogurt (or dairy-free yogurt) These ingredients create a creamy and flavorful base. The rolled oats soak up the milk and flavors overnight. The apple adds sweetness and crunch. Cinnamon and nutmeg give it that classic apple pie taste. You can add more flavor and texture to your oats with: - 2 tablespoons walnuts (chopped, for crunch) - 1 tablespoon raisins (for sweetness) These add-ins enhance the dish. Walnuts give a nice crunch. Raisins add a chewy texture and extra sweetness. You can mix and match based on what you like. If you want to switch the milk, try these options: - Soy milk - Oat milk - Coconut milk Each of these choices brings a unique flavor. Almond milk gives a nutty taste. Soy milk is creamy and rich. Oat milk is smooth and slightly sweet. Choose what you enjoy or what you have at home. {{ingredient_image_1}} Start by gathering your ingredients. You need rolled oats, almond milk, and chia seeds. In a medium bowl, mix together 1 cup of rolled oats and 1 ¼ cups of almond milk. Add 1 tablespoon of maple syrup for sweetness. Sprinkle in 1 teaspoon of ground cinnamon and ½ teaspoon of nutmeg for that warm, cozy flavor. Finally, stir in 1 tablespoon of chia seeds. Make sure everything blends well. Now, it’s time for the apple! Dice 1 medium tart apple into small pieces. Fold these apple pieces into your oat mixture. This step adds fresh flavor and texture. Make sure the apple is evenly spread throughout. Next, divide the mixture into two jars or containers. Fill each jar about three-quarters full. Top each jar with a dollop of Greek yogurt. You can use dairy-free yogurt if you prefer. For a nice crunch, sprinkle 2 tablespoons of chopped walnuts on top. If you like a bit more sweetness, add 1 tablespoon of raisins. Seal the jars with lids and place them in the fridge. Let them sit overnight, or for at least 5 hours. In the morning, your oats will be ready! Stir gently and enjoy them cold, or warm them in the microwave for one minute if you like. To make your Apple Pie Overnight Oats just right, focus on the oats. Use rolled oats for a creamy texture. Steel-cut oats are too chewy for this recipe. The chia seeds help thicken the mixture, adding a nice bite. The key is to let it sit overnight. This gives the oats time to soak up the milk and flavors. Making these oats ahead saves you time. Mix up your base the night before. You can even prep a few jars for the week. Store them in the fridge for up to five days. Just remember to add toppings like yogurt and nuts right before eating. This keeps them fresh and crunchy. Serving is fun with these oats. Use clear jars to show the layers. Top with a sprinkle of cinnamon for a warm touch. You can add a slice of fresh apple for extra flair. Try warming them up in the microwave for a cozy breakfast. Enjoy these oats cold or warm, depending on your mood! Pro Tips Use Tart Apples: Choose tart apple varieties like Granny Smith for a perfect balance of sweetness and acidity in your oats. Chia Seed Benefits: Chia seeds not only help thicken the mixture but also add a boost of fiber and omega-3 fatty acids. Customize Sweetness: Adjust the maple syrup or honey according to your taste preference; you can always add more sweetness in the morning if desired. Prep Ahead: Make several jars at once for a quick breakfast option throughout the week; just keep them sealed in the fridge for freshness. {{image_2}} You can switch up the fruit based on the season. In fall, use pears or cranberries. Both add a unique twist. In summer, try peaches or berries for a fresh taste. Each fruit pairs well with oats. This keeps your breakfast exciting and new. To make this recipe vegan, replace Greek yogurt with dairy-free yogurt. Almond milk works great, but try oat or coconut milk too. Maple syrup is already vegan, so you’re set there. These swaps keep the creamy texture without dairy. Want to boost the flavor? Add ginger for a warm kick. A dash of vanilla extract can make it sweeter. You could also sprinkle in some cardamom for a unique twist. More spices equal more fun in your breakfast! Store your apple pie overnight oats in the fridge. Use a sealed jar or container. They stay fresh for up to five days. This makes them perfect for meal prep. Each morning, just grab a jar and enjoy! You can freeze the overnight oats if you want to save some for later. Use freezer-safe containers. They can last for up to three months. When ready to eat, thaw them in the fridge overnight. Heat them in the microwave, if you like them warm. Keep an eye on the ingredients. Fresh fruit like apples can change flavors over time. Make your oats without apples if you plan to store them longer. Add the apples right before you eat. This keeps the oats tasting fresh and delicious! Yes, you can use steel-cut oats, but they need more time to soak. Steel-cut oats are chewier and heartier than rolled oats. If using them, soak overnight for at least 12 hours. You might need to add more liquid, too, since they absorb more than rolled oats. To make this recipe gluten-free, simply use certified gluten-free oats. Regular oats may contain gluten from cross-contamination. Always read labels to make sure. The other ingredients in this recipe are naturally gluten-free. This recipe has about 300-350 calories per serving. It also provides protein, fiber, and healthy fats. Here’s a rough breakdown per serving: - Calories: 300-350 - Protein: 10-12 grams - Carbohydrates: 50-55 grams - Fiber: 8-10 grams - Fat: 8-10 grams These numbers can vary based on the milk and add-ins you choose. Enjoy this tasty and nutritious breakfast! In this blog post, we explored how to make Apple Pie Overnight Oats. We covered key ingredients, preparation steps, and helpful tips. You learned about optional add-ins and seasonal fruit choices to enhance flavor. We also discussed storage options to keep your oats fresh. Remember, experimenting with spices and different textures can make your oats special. Use these ideas to create your perfect dish. Enjoy your food and the fun of making it!

Ready for a breakfast that tastes like dessert? Apple Pie Overnight Oats are here to delight your mornings. With warm cinnamon, sweet apples, and creamy oats, this easy recipe is …

Read more

Categories Breakfast Leave a comment

Creamy Tomato Basil Tortellini Flavorful Dinner Idea

October 11, 2025August 9, 2025 by Chef Evan
To make creamy tomato basil tortellini, gather these key ingredients: - 12 oz cheese tortellini - 2 tablespoons olive oil - 3 cloves garlic, minced - 1 can (15 oz) crushed tomatoes - 1 teaspoon sugar - 1 teaspoon dried oregano - Salt and pepper to taste - 1 cup heavy cream - 1 cup fresh basil, chopped - 1/2 cup grated Parmesan cheese - Optional: extra basil leaves for garnish You can swap some ingredients if needed. If you want a lighter dish, use half-and-half instead of heavy cream. For a dairy-free version, try using coconut cream. If you don't have cheese tortellini, any pasta shape works well. Use canned diced tomatoes if crushed tomatoes are not available. Fresh herbs are best, but dried basil can work in a pinch. This recipe contains dairy and gluten. For gluten-free options, choose gluten-free tortellini. If you’re lactose intolerant, use dairy-free cheese and cream. Always check labels for allergens. This dish can also be made vegan by using plant-based tortellini and omitting cheese. {{ingredient_image_1}} Start by boiling salted water in a large pot. Once boiling, add 12 oz of cheese tortellini. Cook them according to the package instructions until they are al dente. This usually takes about 3 to 5 minutes. After they are cooked, drain the tortellini and set them aside. Make sure not to rinse them. This keeps the flavor intact. In the same pot, heat 2 tablespoons of olive oil over medium heat. Add 3 cloves of minced garlic and sauté for about 1 minute. Watch closely to avoid burning the garlic. Once fragrant, add 1 can of crushed tomatoes, 1 teaspoon of sugar, and 1 teaspoon of dried oregano. Stir well to mix everything. Let the sauce simmer for 5 to 7 minutes. Season it with salt and pepper to your taste. Lower the heat and pour in 1 cup of heavy cream. Stir until the sauce becomes creamy. Now, mix in 1 cup of fresh chopped basil and 1/2 cup of grated Parmesan cheese. Stir until the cheese melts and the sauce thickens slightly. Gently fold the cooked tortellini into the sauce, ensuring they are well coated. Let it simmer for another 2 to 3 minutes to heat through. Adjust seasoning if needed. Serve hot, garnished with extra basil leaves and a sprinkle of Parmesan cheese if you like. To get the sauce just right, focus on the cream. Start with medium heat to avoid burning. Stir in the heavy cream slowly. This helps the sauce thicken smoothly. If it's too thick, add a splash of pasta water. This water has starch and will help blend the sauce better. Fresh herbs make a big difference. I love using fresh basil in this dish. It adds a bright taste. You can also add a pinch of red pepper flakes for heat or more oregano for depth. Don't forget to taste as you go. Adjust the salt and pepper for the best flavor. Cook the tortellini in boiling salted water. This adds flavor to the pasta. Follow package instructions for timing. Drain the tortellini but save some cooking water. This water helps the sauce stick to the pasta. Mix the tortellini gently into the sauce for even coating. Enjoy every bite! Pro Tips Use Fresh Ingredients: Opt for fresh basil instead of dried for a more vibrant flavor in your creamy sauce. Adjust the Thickness: If the sauce is too thick, add a splash of pasta water to reach your desired consistency. Enhance the Flavor: Add a pinch of red pepper flakes for a spicy kick that complements the creaminess. Perfect Cheese Combination: Mix different types of cheese like mozzarella or Gruyère with Parmesan for a deeper flavor profile. {{image_2}} You can make creamy tomato basil tortellini vegetarian by skipping the meat. This dish shines with its creamy tomato sauce and fresh basil. You can add extra veggies for texture and flavor. Consider adding spinach, zucchini, or bell peppers. These choices boost nutrition and add color. They blend well with the sauce and tortellini. If you want to add protein, chicken or shrimp works great. For chicken, use cooked, shredded meat. Stir it into the sauce just before adding the tortellini. If you like shrimp, sauté them in olive oil until pink. Then, add them to the sauce. The protein makes the dish heartier and more filling. To make this dish gluten-free, you can swap regular tortellini for gluten-free pasta. Many brands offer tasty gluten-free options. Just follow cooking instructions on the package. Ensure all other ingredients, like sauces and seasonings, are gluten-free too. This way, you can enjoy creamy tomato basil tortellini without worry. To keep your creamy tomato basil tortellini fresh, store it in an airtight container. Make sure it cools down before sealing. Place it in the fridge if you plan to eat it within three days. The cream sauce can thicken, but it will still taste great. When you want to enjoy the leftovers, reheat them gently. Use a pot on low heat. Add a splash of water or more cream to loosen the sauce. Stir often until it’s hot. You can also use the microwave. Heat in short bursts, stirring in between to prevent hot spots. You can freeze this dish if you want to save some for later. First, let it cool completely. Then, place it in a freezer-safe container. It can last up to three months in the freezer. When ready to eat, thaw it in the fridge overnight. Reheat as described earlier for the best taste. Yes, you can use fresh tortellini. Fresh tortellini cooks faster than frozen. Check the package for cooking time. Generally, fresh tortellini takes about 3-5 minutes to cook. Just keep an eye on it to avoid overcooking. Toss it gently with the creamy sauce when ready. Absolutely! You can use half-and-half or whole milk. Both will create a lighter sauce. Keep in mind the sauce may not be as thick or rich. You can also add a bit of cream cheese for creaminess. This way, you maintain that lovely texture without too many calories. To spice it up, try adding red pepper flakes. Start with a pinch and taste. Adjust it to your heat preference. You can also use a spicy tomato sauce. Another option is to add diced jalapeños during cooking for a fresh kick. These tweaks will add flavor and heat to your dish. This article covered how to make a delicious tortellini dish. We explored key ingredients and great substitutions for diets. I shared step-by-step instructions for cooking and blending flavors. You learned tips to perfect the sauce and enhance taste. I also gave you variations for different diets and protein options. Lastly, I discussed the best ways to store and reheat. Remember, cooking is fun and can be adjusted for your taste. Enjoy your culinary journey with tortellini!

Looking for a tasty dinner idea that’s quick and easy? You’re in the right spot! My Creamy Tomato Basil Tortellini is packed with flavor and comfort. With simple ingredients and …

Read more

Categories Dinner Leave a comment

Creamy Mushroom Marsala Chicken Delightful Dinner Meal

October 10, 2025August 9, 2025 by Chef Evan
- 4 boneless, skinless chicken breasts - 2 cups sliced cremini or button mushrooms - 1 medium onion, finely chopped - 3 cloves garlic, minced - 1 cup chicken broth - 1 cup heavy cream - 2 tablespoons olive oil - 1 tablespoon balsamic vinegar - 1 teaspoon dried thyme - 1 teaspoon dried rosemary - Salt and pepper to taste - Fresh parsley for garnish - Suggested sides such as garlic mashed potatoes or steamed green beans Gathering the right ingredients is key. You want fresh chicken and mushrooms. I recommend using cremini mushrooms for a deep flavor. They pair well with the cream and herbs. A medium onion and garlic add a sweet aroma. For the sauce, chicken broth and heavy cream create a rich base. Olive oil helps cook the chicken to a golden brown. Balsamic vinegar adds a tangy touch that balances the dish. When it comes to seasoning, thyme and rosemary bring warmth and depth. Don’t forget salt and pepper to enhance all the flavors. A sprinkle of fresh parsley at the end adds a pop of color and freshness. If you're looking for sides, garlic mashed potatoes or steamed green beans work wonders. They complement the creamy sauce and make the meal feel complete. {{ingredient_image_1}} First, season the chicken breasts with salt and pepper. Make sure to coat both sides. Next, heat the olive oil in a large skillet over medium-high heat. Add the seasoned chicken breasts to the skillet. Cook them for about 5 to 7 minutes on each side. You want them golden brown and cooked through. Once done, remove the chicken from the skillet and set it aside. In the same skillet, add the chopped onion and minced garlic. Sauté these for about 2 to 3 minutes. You want the onion to be soft and fragrant. Then, add the sliced mushrooms to the skillet. Cook them for about 5 minutes, until they are soft and releasing their moisture. This step adds a deep, earthy flavor to your dish. Pour in the chicken broth and balsamic vinegar. Make sure to scrape up any brown bits stuck to the bottom of the skillet. This adds extra flavor. Bring the mixture to a simmer and let it reduce for about 3 to 5 minutes. After that, stir in the heavy cream, dried thyme, and rosemary. Allow the sauce to thicken slightly. This creamy sauce is what makes the dish special. Now, return the cooked chicken to the skillet. Make sure to coat it well in the creamy mushroom sauce. Let it simmer for an additional 3 to 4 minutes to warm through. Taste the sauce and adjust the seasoning with salt and pepper if needed. Finally, remove the skillet from heat and garnish with chopped fresh parsley. This adds a nice pop of color and flavor before serving. - Ensuring chicken is fully cooked: Cook the chicken until it reaches 165°F. Use a meat thermometer for precise results. This keeps your chicken safe and juicy. - Tips for achieving a creamy sauce: Stir the cream gently into the pan. Let it simmer to thicken. Avoid boiling to keep the sauce smooth and rich. - Serving suggestions for plating: Place the chicken on a large platter. Spoon sauce over the chicken for a nice look. Pair it with garlic mashed potatoes or green beans for color. - Importance of garnishing with parsley: Fresh parsley adds a pop of color. It also gives a fresh taste that brightens the dish. - Overcooking the chicken: Watch the cooking time closely. Overcooked chicken can become dry. Aim for a golden brown color on both sides. - Using too much salt: Season carefully. Taste as you cook to avoid a salty dish. You can always add more salt later, but it’s hard to fix if you add too much. Pro Tips Use Fresh Herbs: Fresh thyme and rosemary will enhance the flavor of the sauce compared to dried herbs. Deglaze the Pan: Scrape up the brown bits from the skillet after adding the chicken broth for added depth of flavor. Control the Creaminess: Adjust the amount of heavy cream to your preference for a lighter or richer sauce. Perfectly Cooked Chicken: Ensure the chicken is cooked to an internal temperature of 165°F (75°C) for safe consumption. {{image_2}} You can swap the chicken for turkey or pork, and it works well. Turkey breasts will give a leaner taste. Pork adds a nice sweetness to the dish. Both options cook similarly, so follow the same steps. If you want a vegetarian dish, use hearty mushrooms or tofu. Both can soak up the sauce well. For a tasty twist, try using tempeh or seitan as your base. Adding white wine boosts the flavor of the sauce. Choose a dry variety for best results. You can also mix in fresh herbs like basil or sage for a new twist. Experiment with veggies too! Spinach or asparagus can add color and nutrition. Just toss them in when you add the mushrooms. To make a low-fat version, use half-and-half instead of heavy cream. This keeps the dish creamy while cutting fat. For gluten-free options, ensure your broth and any added sauces are gluten-free. You can use cornstarch to thicken the sauce if needed. Adjust the cooking time as necessary to ensure a perfect dish. To keep your Creamy Mushroom Marsala Chicken fresh, place it in airtight containers. This helps prevent odors from mixing. Store it in the fridge within two hours of cooking. For best taste, eat leftovers within three days. If you want to keep it longer, freeze the chicken. Wrap it tightly in plastic wrap, then place it in a freezer-safe bag. This method prevents freezer burn and keeps the meal tasty. When reheating, aim for gentle heat to avoid dry chicken. The best way is to use a skillet over low heat. Add a splash of chicken broth or cream to keep it moist. Heat for about 5-10 minutes, stirring often. If you use a microwave, cover the dish and set it to medium power for 2-3 minutes. Check to ensure it’s warm throughout. Creamy Mushroom Marsala Chicken lasts about three days in the fridge. After that, the quality may decline. Look for signs of spoilage, like off smells or discoloration. If you see any mold, throw it away right away. Trust your senses; they are your best guide for food safety. You can use several lighter options. Some great choices include: - Half-and-half - Coconut milk - Greek yogurt - Silken tofu These options will create a creamy texture while cutting down on fat. For half-and-half, use the same amount as heavy cream. Coconut milk gives a nice flavor. If you use Greek yogurt, mix it with a bit of broth to avoid lumps. Silken tofu can be blended until smooth for a vegan option. To add heat, try these tips: - Add crushed red pepper flakes - Use a dash of cayenne pepper - Include chopped jalapeños Start with a small amount and taste as you go. Red pepper flakes add warmth and flavor without overwhelming the dish. Cayenne pepper is strong, so use it sparingly. If you want fresh heat, add jalapeños while cooking the onions and garlic. Yes, you can make the sauce ahead. Here’s how: 1. Follow the steps to make the sauce. 2. Let it cool completely. 3. Store it in an airtight container in the fridge. You can keep it for up to three days. When you’re ready to use it, just reheat in a pan. Add a splash of broth if it thickens too much. Then, return the chicken to the skillet, and enjoy! In this blog post, we explored how to make Creamy Mushroom Marsala Chicken. We discussed key ingredients, cooking steps, and tips for a perfect dish. Remember to avoid common mistakes like overcooking the chicken. This meal is versatile; you can swap proteins or adapt it for dietary needs. With easy storage tips, you can enjoy leftovers later. Cooking this dish will impress your family and friends every time. Enjoy your culinary adventure and create delicious moments!

Welcome to a delightful dinner that transforms your weeknight meal! This Creamy Mushroom Marsala Chicken is not just a dish; it’s an experience. Tender chicken breasts simmer in a rich, …

Read more

Categories Dinner Leave a comment

Savory Sesame Ginger Noodle Stir Fry Recipe Guide

October 17, 2025August 8, 2025 by Chef Evan
To make a tasty Sesame Ginger Noodle Stir Fry, gather these key ingredients: - 8 ounces rice noodles - 2 tablespoons sesame oil - 1 bell pepper (any color), julienned - 1 cup snap peas, trimmed - 1 large carrot, cut into thin strips - 3 green onions, chopped - 1 tablespoon fresh ginger, grated - 2 cloves garlic, minced - 3 tablespoons soy sauce (or tamari for gluten-free) - 1 tablespoon rice vinegar - 1 tablespoon honey or maple syrup - 2 tablespoons sesame seeds, toasted - Fresh cilantro for garnish Here are some handy conversions for your ingredients: - 1 tablespoon = 3 teaspoons - 1 cup = 8 fluid ounces - 8 ounces of rice noodles is about 227 grams - 2 tablespoons of sesame oil equals about 30 milliliters You can add a few fun garnishes for extra flavor and color: - Chopped peanuts for crunch - Red pepper flakes for heat - Lime wedges for a zesty kick With these ingredients and tips, you're all set to whip up a delightful Sesame Ginger Noodle Stir Fry! {{ingredient_image_1}} First, boil water in a large pot. Once it's boiling, add the rice noodles. Cook them as the package says, usually around 4 to 6 minutes. After they are soft, drain the noodles. Rinse them under cold water. This step keeps the noodles from sticking together. Next, take a large skillet or wok. Heat 2 tablespoons of sesame oil over medium-high heat. Once the oil is hot, add 1 tablespoon of grated ginger and 2 minced garlic cloves. Sauté these for about 30 seconds. You want to smell that lovely aroma! Now, toss in the julienned bell pepper, trimmed snap peas, and thin carrot strips. Stir-fry these colorful veggies for about 3 to 4 minutes. They should be tender but still crisp. This keeps the dish fresh and crunchy. After the veggies are ready, add the cooked rice noodles to the skillet. Pour in 3 tablespoons of soy sauce, 1 tablespoon of rice vinegar, and 1 tablespoon of honey or maple syrup. Toss everything together. Ensure the noodles and veggies are coated well with the sauce. Then, add in the chopped green onions. Cook for another 1 to 2 minutes. Finally, sprinkle 2 tablespoons of toasted sesame seeds on top. Serve it hot and enjoy! To stop your noodles from sticking, rinse them well with cold water after cooking. This helps remove extra starch. You can also toss them in a bit of sesame oil. This adds flavor and keeps them loose. Make sure to stir them often while cooking. If they start to stick, add a splash of water or oil. Stir-frying needs high heat. Use a large skillet or wok for best results. Heat your pan before adding oil. This helps cook the food quickly and keeps it crisp. Cut your veggies into uniform sizes. This ensures even cooking. Use a spatula to keep the food moving. This way, everything cooks evenly and doesn’t burn. You can change the flavors to fit your likes. If you want it sweeter, add more honey or maple syrup. For more heat, try adding red pepper flakes or sriracha. If you like it saltier, add more soy sauce. Taste as you go. This helps you find the perfect balance for your dish. Don't be afraid to experiment! Pro Tips Use Soaked Noodles: For an even better texture, soak the rice noodles in hot water for 15 minutes instead of boiling them. This prevents them from getting too soft. Customize Your Vegetables: Feel free to swap in your favorite vegetables such as broccoli, zucchini, or bok choy. Just ensure they are cut into similar sizes for even cooking. Get Creative with Proteins: Add protein like tofu, chicken, or shrimp to make it a more filling meal. Just cook the protein first before adding the vegetables. Perfect Your Sauce: Adjust the soy sauce and honey to your taste. If you like it spicier, add a dash of chili sauce or sprinkle some red pepper flakes. {{image_2}} You can boost your stir fry with protein. Tofu is a great choice for vegans. Use firm tofu for a nice texture. Press it to remove extra water. Cut it into cubes and sauté until golden. Chicken adds flavor and heartiness. Slice chicken breasts thinly to cook fast. Add the chicken right after the ginger and garlic. Shrimp is another quick option. Just toss in peeled shrimp after the veggies. Cook until they turn pink. Feel free to play with your veggies. Broccoli adds crunch and goes well with soy sauce. You can use zucchini for a fresh taste. Baby corn gives a nice pop of sweetness. Snow peas work great too, just like snap peas. If you love greens, throw in some spinach or bok choy. Use what you have on hand for a fun twist! To make this dish gluten-free, swap regular soy sauce for tamari. This will keep the flavor strong without gluten. For a vegan option, use maple syrup instead of honey. This keeps it sweet and plant-based. You can also check your noodles. Some rice noodles are gluten-free, but always read the label. Enjoy this dish without worry, making it fit your diet! To store your Sesame Ginger Noodle Stir Fry, let it cool first. Place the leftovers in an airtight container. Make sure to seal it well. Store it in the fridge for up to three days. This keeps the flavors fresh and tasty. When you're ready to eat, you can reheat it easily. Use a skillet over medium heat. Add a splash of water or oil to help it warm up. Stir it well until hot, about five minutes. You can also use a microwave. Heat in short bursts, stirring in between. This keeps the noodles from drying out. If you want to freeze your stir fry, it’s simple. Use a freezer-safe container. Make sure to leave some space at the top for expansion. Label the container with the date. It can last for up to three months. When you are ready to eat, thaw it overnight in the fridge. Reheat it in a skillet or microwave as mentioned earlier. Yes, you can prep the ingredients ahead of time. Chop the veggies, grate the ginger, and mince the garlic. Store them in separate containers in the fridge. This way, you save time when you cook. Just remember to keep the noodles and sauce ready too. To add spice, you can use red pepper flakes or sriracha. Mix these in with the soy sauce. Start with a small amount, then taste and adjust. You can also add chopped fresh chili peppers for extra heat. This will kick up the flavor and make it exciting. Rice noodles are great for this dish. They soak up flavors well and cook fast. You can also try soba or udon noodles for a different texture. Make sure to follow the cooking instructions on the package for best results. Choose what you enjoy most! In this post, I covered essential ingredients, step-by-step cooking, and storage tips. You learned how to cook perfect rice noodles and stir-fry fresh veggies. Remember to adjust flavors to suit your taste. Feel free to explore different proteins and veggies for variety. Keeping leftovers is easy, and reheating them is a breeze. Use this guide to make a tasty dish that fits your needs. Your kitchen can be a fun place for creativity! Enjoy every bite.

Ready to whip up a delicious meal in just a few steps? My Savory Sesame Ginger Noodle Stir Fry is a quick and tasty option. With fresh veggies, flavorful ginger, …

Read more

Categories Dinner Leave a comment

Pumpkin Chocolate Mousse Cake Irresistible Dessert Recipe

August 8, 2025 by Chef Evan
To make the pumpkin chocolate mousse cake, you will need: - 1 cup pumpkin puree - 1/2 cup dark or semi-sweet chocolate chips - 1/2 cup heavy cream - 1/2 cup powdered sugar - 2 large eggs - 1/2 cup all-purpose flour - 1 teaspoon baking powder - 1/2 teaspoon vanilla extract - 1/4 teaspoon ground cinnamon - 1/4 teaspoon ground nutmeg - Pinch of salt For the best results, I recommend using high-quality chocolate chips. Brands like Ghirardelli or Guittard offer rich flavors that really shine in the dessert. When it comes to pumpkin puree, look for pure pumpkin, not the spiced pie filling. If you have dietary preferences, you can make some swaps. For a gluten-free option, use almond flour or a gluten-free blend. To make it dairy-free, substitute coconut cream for heavy cream and use dairy-free chocolate chips. You can also replace eggs with flax eggs or applesauce for a vegan version. These ingredients come together to create a deliciously rich and fluffy dessert. Enjoy the process, and don’t be afraid to make it your own! For the full recipe, check out the [Full Recipe]. Preheat your oven to 350°F (175°C). This temperature is key for a great bake. While the oven heats, prepare your 9-inch round cake pan. Lightly grease it with butter or oil. Then, line the bottom with parchment paper. This will help the cake come out easily after baking. Place your oven rack in the middle. This ensures even heat around the cake. To melt the chocolate, use a small saucepan. Place the chocolate chips inside and set the heat to low. Stir constantly until the chocolate is smooth. Once melted, remove it from heat and let it cool for a few minutes. In a mixing bowl, combine the pumpkin puree, eggs, and vanilla extract. Whisk these together until smooth. Now, pour the cooled chocolate into the pumpkin mix. Stir gently to combine them well. This step is crucial for a uniform batter. Pour the batter into your prepared pan. Smooth the top with a spatula. Place the pan in your preheated oven and bake for 25-30 minutes. Watch for visual cues; the cake will rise and the edges will pull away slightly. Use a toothpick to test doneness. Insert it into the center; if it comes out clean, your cake is ready. Let it cool in the pan for about 10 minutes before moving it to a wire rack. This cooling step prevents sogginess and keeps your cake light and fluffy. To get the perfect fluffy mousse, start by whipping the cream. Use a cold bowl and cold beaters. This helps the cream whip better. Whip until you see soft peaks, which means it holds shape but is still creamy. Avoid over-whipping, as this can turn it grainy. Common mistakes include mixing too fast or too slow. If you mix too fast, you incorporate too much air. This can lead to a dry mousse. If you mix too slow, you might not get enough volume. Aim for a steady, medium speed. When you fold in the whipped cream, do it gently. Use a spatula and scoop from the bottom to the top. This keeps the air in the cream. Be careful not to stir too much. Over-mixing can deflate your mousse and make it less light. To enhance the flavor of your cake, consider adding spices. Ground ginger or cloves can bring warmth. These spices work well with pumpkin. A splash of maple extract or almond extract adds an interesting twist. Using high-quality chocolate makes a big difference. Choose chocolate with at least 60% cocoa. The richer taste will elevate your mousse. It melts better and blends smoothly with pumpkin. For optional toppings, think about sprinkling cocoa powder or adding chocolate shavings on top. Whipped cream with a dash of cinnamon gives a nice finish. A drizzle of caramel sauce adds sweetness and looks beautiful. Check the [Full Recipe] for more details on making this delightful cake! {{image_4}} You can easily adjust this recipe for different diets. For a gluten-free version, swap all-purpose flour with a gluten-free blend. Many brands offer great mixes that work well in baking. If you need a dairy-free option, use coconut cream instead of heavy cream. It whips up nicely and adds a light coconut flavor. For eggs, try using flaxseed meal. Mix one tablespoon of flaxseed with three tablespoons of water. Let it sit for a few minutes to thicken. You can keep the flavors but change the ingredients. For example, use almond milk instead of regular milk. This will change the taste a bit but keep it delicious. Boost the flavor of your cake with spices. Add a pinch of ginger or cloves for warmth. You can also use different types of chocolate. Dark chocolate gives a rich taste, while milk chocolate adds sweetness. For a twist, incorporate fruits like mashed bananas or applesauce. This will add moisture and sweetness. Chopped nuts like walnuts or pecans can give a nice crunch. You can even create seasonal variations. In fall, add some apple cider to the batter. In spring, mix in lemon zest for a fresh taste. These small changes can make your cake unique and fun! For the full recipe, check out the detailed instructions and tips. To store your pumpkin chocolate mousse cake in the refrigerator, cover it well. You can use plastic wrap or an airtight container. This keeps the cake fresh for about 3 to 5 days. To maintain the cake's texture, avoid stacking it with other foods. This prevents moisture from affecting the cake. If you want to serve it after a few days, let it sit at room temperature for about 30 minutes before slicing. This brings back some of the fluffiness. If you want to save the cake for a longer time, freezing is a great option. First, slice the cake into individual pieces. Wrap each piece tightly in plastic wrap. After that, place the wrapped pieces in a freezer-safe bag or container. This helps prevent freezer burn and keeps the cake tasty for up to 3 months. To thaw the cake, transfer the pieces from the freezer to the fridge. Let them thaw overnight for the best texture and taste. You can also leave them out at room temperature for about 2 hours if you're in a hurry. Just remember, avoid using a microwave. It can change the cake’s texture and make it soggy. For the full recipe, check out the guidelines earlier in this article. You can use butternut squash puree or sweet potato puree. Both offer a similar taste and texture. If you want to make homemade pumpkin puree, bake a sugar pumpkin. Cut it in half, remove the seeds, and roast it in the oven at 350°F (175°C) for about 45 minutes. Once soft, scoop out the flesh and blend it until smooth. Yes! You can bake this recipe as cupcakes. Fill cupcake liners about two-thirds full with the batter. Bake for 18-20 minutes at 350°F (175°C). Keep an eye on them, as they bake faster than a whole cake. When frosting, use the mousse as a delicious topping. It adds a rich, creamy layer that makes each bite special. The pumpkin chocolate mousse cake lasts about 3-5 days in the fridge. Store it in an airtight container to keep it fresh. Look for signs that the cake has gone bad, like a sour smell or mold. If it looks dry or has lost its shine, it’s time to toss it. Enjoy your cake while it’s still fresh! In this article, we explored how to make a delicious pumpkin chocolate mousse cake. You learned about the key ingredients and how to prep your oven and pan. We discussed tips for a smooth batter and how to bake the cake perfectly. Plus, I shared ways to enhance flavor and offered variations for different diets. Remember to store your cake properly to keep it fresh and tasty. Try adding your own twist to this recipe, and enjoy every bite!

Get ready to delight your taste buds with my Pumpkin Chocolate Mousse Cake! This dessert combines warm pumpkin flavors with luscious chocolate for a truly irresistible treat. Whether you’re hosting …

Read more

Categories Desserts Leave a comment

Homemade Pumpkin Spice Syrup Flavorful and Easy Recipe

August 8, 2025 by Chef Evan
To make homemade pumpkin spice syrup, you need a few basic ingredients. Here’s what you should gather: - 1 cup water - 1 cup granulated sugar - ½ cup pure pumpkin puree - 1 teaspoon ground cinnamon - ½ teaspoon ground nutmeg - ½ teaspoon ground ginger - ¼ teaspoon ground cloves - 1 teaspoon vanilla extract - Pinch of salt These ingredients create a delicious and cozy syrup. The pumpkin puree gives it a rich flavor, while the spices add warmth. You can make this syrup even better with some optional add-ins. Here are a few ideas: - 1 tablespoon maple syrup for sweetness - A splash of bourbon for a kick - A pinch of cayenne for heat These add-ins can give your syrup a unique twist. Try them out and see what you like best! You don’t need fancy tools to whip up this syrup. Here’s what you will need: - A medium saucepan - A whisk for mixing - A fine mesh sieve for straining - A clean bottle or jar for storage With these simple tools, you can easily prepare your homemade pumpkin spice syrup. Just follow the steps in the Full Recipe and enjoy! Start by gathering all your ingredients. You will need: - 1 cup water - 1 cup granulated sugar - ½ cup pure pumpkin puree - 1 teaspoon ground cinnamon - ½ teaspoon ground nutmeg - ½ teaspoon ground ginger - ¼ teaspoon ground cloves - 1 teaspoon vanilla extract - Pinch of salt In a medium saucepan, mix 1 cup of water and 1 cup of sugar. Heat this over medium heat. Stir until the sugar dissolves completely. This should take just a few minutes. Once you see a clear mixture, add in ½ cup of pure pumpkin puree. Whisk it well until it blends smoothly. Now, add your spices. Sprinkle in 1 teaspoon of cinnamon, ½ teaspoon of nutmeg, ½ teaspoon of ginger, and ¼ teaspoon of cloves. Mix it all together to avoid lumps. Let this mixture simmer gently. Cook it for about 5 to 7 minutes, stirring every so often. This simmering will help the flavors come together beautifully. For the best taste, use fresh spices when possible. Fresh spices enhance the flavor of your syrup. If you want a richer taste, you can simmer the syrup longer. Just keep an eye on it to avoid burning. When you finish cooking, add 1 teaspoon of vanilla extract and a pinch of salt. This will balance the sweetness with a nice depth of flavor. After cooking, let the syrup cool to room temperature. You want it to be safe to handle. Then, strain the syrup through a fine mesh sieve. This will remove any solids and give you a smooth texture. Pour the strained syrup into a clean bottle or jar. Seal it tightly. Store your homemade pumpkin spice syrup in the refrigerator. It should last for up to two weeks. Enjoy it in your favorite drinks or dishes. To get the right syrup texture, focus on simmering. After mixing the water and sugar, let it simmer gently. This process helps thicken the syrup. If your syrup is too thin, cook it a bit longer. If it's too thick, add a splash of water and stir well. Watch for these errors when making syrup: - Using too much heat: High heat can burn the sugar. - Skipping the straining step: Always strain to remove solids. - Not measuring ingredients: Accurate amounts ensure great flavor. This syrup is versatile! Here are some fun ways to use it: - Drizzle over pancakes or waffles for a sweet twist. - Stir into coffee or lattes for a warm drink. - Mix with yogurt or oatmeal for a cozy breakfast. Explore the full recipe for more detailed steps and tips! {{image_4}} You can change the taste of your pumpkin spice syrup with different flavors and sweeteners. Try using maple syrup instead of granulated sugar. This adds a rich, earthy note. You can also use honey for a more floral flavor. If you want a fruity twist, add some vanilla bean or almond extract. For a spicier kick, consider adding a dash of cayenne pepper or cardamom. These swaps keep your syrup fresh and fun! As the seasons change, so can your syrup! For Halloween, add a hint of blackstrap molasses for a deeper color and flavor. In winter, mix in some peppermint extract to create a festive peppermint pumpkin spice syrup. For Thanksgiving, you can sprinkle in some allspice along with your usual spices. This gives your syrup a warm, cozy vibe. Each holiday brings a chance to make your syrup special! If you want a non-dairy syrup, use coconut milk instead of water. This adds a creamy texture and a slight coconut taste. You can also try almond milk or oat milk. These are great choices for those who prefer plant-based options. Just remember to adjust the sugar if your milk is sweetened. With these non-dairy choices, everyone can enjoy your syrup! To keep your homemade pumpkin spice syrup fresh, store it in a clean glass bottle. Glass helps keep flavors intact and prevents any unwanted tastes. Make sure to seal the bottle tightly. Always place the syrup in the fridge right after it cools. This will keep it tasty and safe to use. Your pumpkin spice syrup will last for about two weeks in the fridge. Look for changes in color or smell. If it smells sour or has an off-color, it’s time to toss it. Also, check for mold. If you see any, do not use the syrup. Freezing is a great way to save syrup for later. Use ice cube trays to freeze small portions. Once frozen, transfer the cubes to a freezer bag. This way, you can use just what you need. To thaw, simply leave the cubes in the fridge overnight. You can also heat them in a saucepan over low heat. You can use homemade pumpkin spice syrup in many ways. Drizzle it over pancakes or waffles for a sweet touch. Stir it into your morning coffee or hot chocolate for warmth and flavor. You can also add it to smoothies or yogurt for a seasonal twist. It’s great in baked goods too, like muffins or cakes. The syrup adds a cozy feel to any dish. Yes, you can make this syrup without pumpkin puree. If you want a lighter flavor, you can skip it. You can use more spices to keep the pumpkin spice taste. Ground cinnamon, nutmeg, and ginger will still give you that warm flavor. However, you will miss the rich texture that pumpkin adds. If you want a thinner syrup, try using just the spices with sugar and water. To adjust the sweetness, you can add more or less sugar. If you like it sweeter, add an extra tablespoon of sugar while cooking. For less sweetness, reduce the sugar by a tablespoon. You can also use a sugar substitute if you prefer. Just make sure it dissolves well in water. Taste the syrup as it cooks to find your perfect balance. Homemade pumpkin spice syrup is simple and fun to make. We covered key ingredients and steps to help you prepare delicious syrup. I shared tips for perfecting the consistency and avoiding common mistakes. You can also explore fun flavor variations and non-dairy options. Remember to store your syrup correctly for freshness. Enjoy your syrup in drinks and desserts. Making this syrup can add warmth to your fall season. Try it today and enjoy the rich flavors!

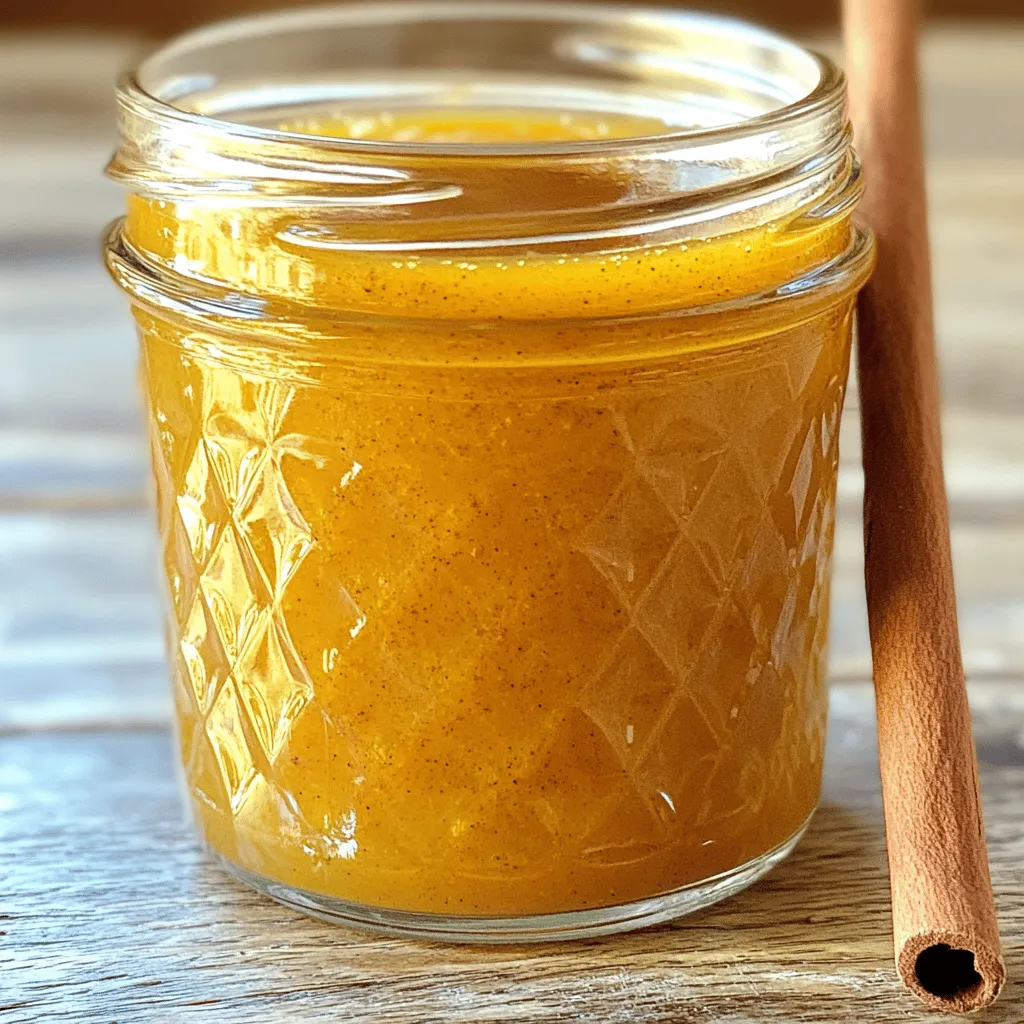
Ready to bring fall flavors to your kitchen? Making your own Homemade Pumpkin Spice Syrup is simple and fun! This easy recipe will help you add that cozy pumpkin spice …

Read more

Categories Desserts Leave a comment

Cranberry Pecan Pumpkin Bread Simple and Tasty Recipe

August 8, 2025 by Chef Evan
To make Cranberry Pecan Pumpkin Bread, you will need the following ingredients: - 1 cup canned pumpkin puree - 1/2 cup vegetable oil - 3/4 cup packed brown sugar - 1/2 cup granulated sugar - 3 large eggs - 2 cups all-purpose flour - 1 teaspoon baking soda - 1/2 teaspoon baking powder - 1 teaspoon ground cinnamon - 1/2 teaspoon ground nutmeg - 1/2 teaspoon salt - 1 cup fresh or dried cranberries - 1 cup pecans, chopped These ingredients combine to create a moist, flavorful bread. The pumpkin gives it a rich texture, while the cranberries add tartness. Pecans bring a nice crunch, making every slice a treat. When choosing your ingredients, opt for high-quality canned pumpkin. It has a deep, sweet flavor that shines in the bread. Fresh cranberries can also work well if you prefer a pop of tartness. Don't forget to chop your pecans for even distribution in the batter. If you want to make this bread even more special, look for organic or locally sourced ingredients. This not only enhances the taste but also supports sustainable farming practices. You can find the full recipe to guide you through the steps. Set your oven to 350°F (175°C). This temperature helps the bread bake evenly. Prepare a 9x5-inch loaf pan by greasing it lightly with butter or oil. This prevents sticking and makes it easy to remove the bread later. In a large bowl, combine 1 cup of canned pumpkin puree, 1/2 cup of vegetable oil, 3/4 cup of brown sugar, and 1/2 cup of granulated sugar. Use a whisk to blend these until smooth. Mixing well ensures all flavors come together nicely. Add 3 large eggs one at a time to the pumpkin mixture. Whisk thoroughly after each egg. This step helps create a fluffy texture in the bread. In a separate bowl, whisk together 2 cups of all-purpose flour, 1 teaspoon of baking soda, 1/2 teaspoon of baking powder, 1 teaspoon of ground cinnamon, 1/2 teaspoon of ground nutmeg, and 1/2 teaspoon of salt. Mixing these dry ingredients well is key to a great rise. Gradually add the dry mixture to the wet mixture. Stir gently with a spatula or wooden spoon until just combined. Be careful not to overmix, as this can make the bread dense. Gently fold in 1 cup of cranberries and 1 cup of chopped pecans. This adds texture and flavor to each slice. Ensure they are evenly distributed throughout the batter. Pour the batter into the prepared loaf pan. Use a spatula to smooth the top. This helps the bread bake evenly and look nice when it’s done. Place the loaf pan in the preheated oven. Bake for about 60 to 70 minutes. To check if it's done, insert a toothpick into the center. It should come out clean. If the top browns too quickly, cover it loosely with aluminum foil for the last 15 minutes. Once baked, remove the bread from the oven. Let it cool in the pan for about 10 minutes. Then, transfer it to a wire rack to cool completely before slicing. Enjoy your Cranberry Pecan Pumpkin Bread! For the full recipe, refer back to the ingredients section. To bake the best Cranberry Pecan Pumpkin Bread, preheat your oven to 350°F (175°C). This ensures even cooking. Use a 9x5-inch loaf pan and grease it well. This helps the bread come out cleanly. Always measure your ingredients accurately. This step is key for great texture. To keep your bread light, mix your wet and dry ingredients gently. Overmixing can lead to a heavy loaf. Also, make sure to check your baking soda and powder for freshness. Old leavening agents can cause dense bread. Lastly, let your batter rest for a few minutes before baking. This helps the flavors meld. Enjoy your bread warm from the oven. A pat of butter adds richness. You can also dust it with powdered sugar for a sweet touch. For a fun twist, serve it with cream cheese. It pairs well with coffee or tea. You could slice it for breakfast or as a snack. For a special occasion, add a side of cranberry sauce. For the full recipe, check out the detailed instructions above. {{image_4}} You can change this recipe by adding different nuts or fruits. Try walnuts or almonds for a new flavor. You can also use chocolate chips for a sweet twist. If you prefer, swap cranberries for raisins or dried cherries. You can even add spices like ginger or cloves for extra warmth. If you want to use less sugar, try honey or maple syrup. These sweeteners add flavor and moisture. You can also use coconut sugar for a lower glycemic index. Just remember, using liquid sweeteners may require less oil in your mix. For a gluten-free version, use almond flour or coconut flour. These flours give the bread a unique texture. You may need to add extra eggs or a binding agent like flaxseed meal. Ensure your baking powder is gluten-free, too. This way, everyone can enjoy a slice of this tasty bread. For the full recipe, check out the detailed instructions above. To keep your cranberry pecan pumpkin bread fresh, store it in an airtight container. You can also wrap it in plastic wrap. This helps prevent the bread from drying out. Place it in a cool, dry spot in your kitchen. If you have sliced the bread, make sure to separate the slices with parchment paper. This will keep them from sticking together. Freezing is a great way to save your bread for later. Start by letting the bread cool completely. Once cool, wrap it tightly in plastic wrap. Then, place it in a freezer-safe bag or container. Be sure to remove as much air as possible before sealing. You can freeze the bread for up to three months. To enjoy, simply thaw it in the fridge overnight or at room temperature for a few hours. Homemade cranberry pecan pumpkin bread lasts about 5 days at room temperature. If you store it in the fridge, it can last up to a week. Keep an eye out for any signs of mold or unusual smells. If the bread starts to feel dry, slice and toast it. This can bring back some moisture and flavor. For the best taste, enjoy it fresh or within a few days of baking. For the full recipe, check back to create this delicious treat! You can use walnuts or almonds instead of pecans. Both nuts add crunch. If you want a nut-free option, you can skip the nuts altogether. Sunflower seeds are a great alternative too. They bring a nice texture without nuts. Yes, you can make this recipe vegan! Replace the eggs with flax eggs. To make one flax egg, mix one tablespoon of ground flaxseed with three tablespoons of water. Let it sit for five minutes to thicken. You can also use vegetable oil instead of eggs for moisture. To check if your bread is done, insert a toothpick into the center. If it comes out clean, the bread is ready. If there's batter on it, let it bake for a few more minutes. The top should be golden brown and spring back when touched. Yes, you can use fresh cranberries! Fresh cranberries will add a tart flavor. If you use them, you might want to add a little extra sugar to balance the tartness. Just chop them coarsely and fold them into the batter like dried ones. You can serve this bread warm or at room temperature. Slice it and add a pat of butter for a warm, rich taste. For a fun twist, dust the top with powdered sugar. This bread is perfect for breakfast, snacks, or gatherings. Enjoy every bite! For the full recipe, check out the details above. This blog post covered how to make delicious Cranberry Pecan Pumpkin Bread. You learned about the ingredients, steps, and baking tips for great results. I shared storage methods and answered common questions about the recipe. With these tips, baking this bread will be easy and fun. Enjoy it fresh or share it with friends. Happy baking!

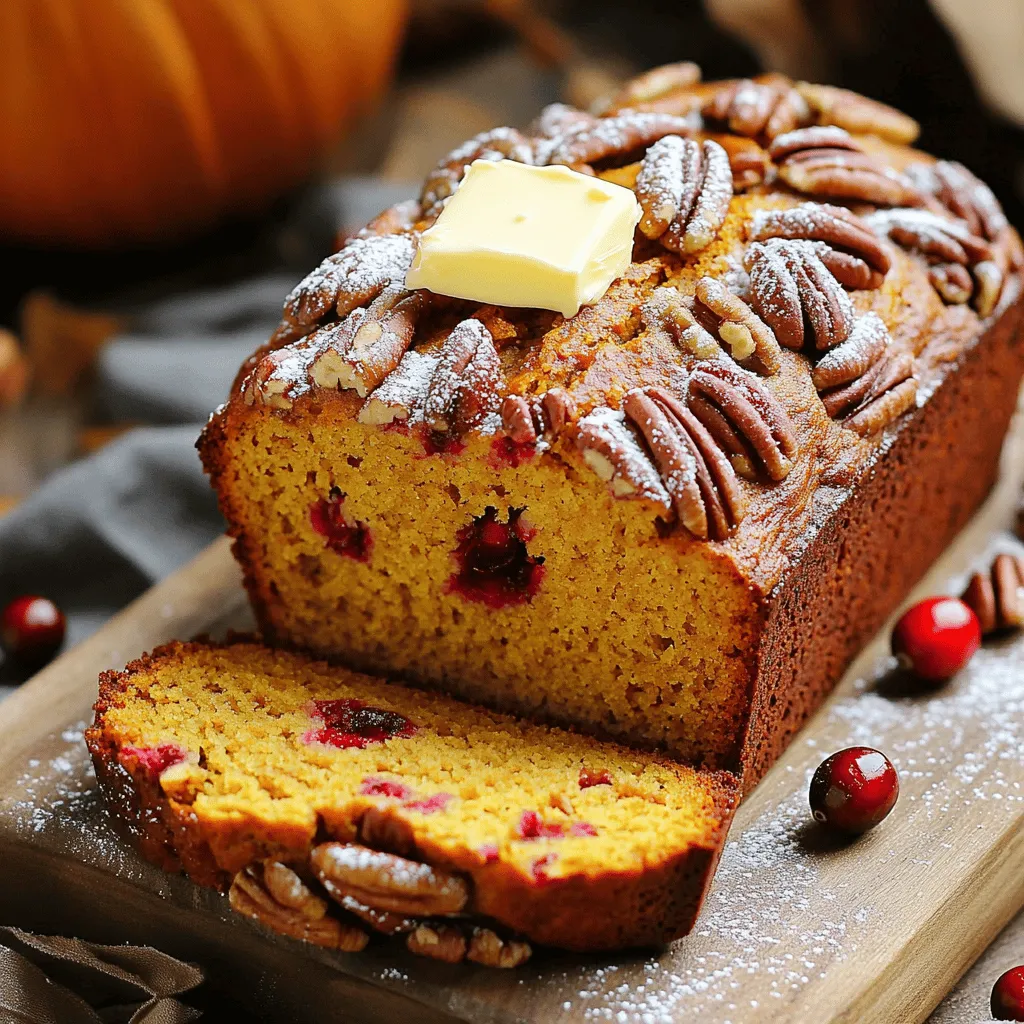
Looking for a tasty fall treat? Look no further! My Cranberry Pecan Pumpkin Bread is simple to make and full of flavor. It’s perfect for cozy mornings or sharing with …

Read more

Categories Desserts Leave a comment

Autumn Sausage Tortellini Soup Flavorful Comfort Meal

August 8, 2025 by Chef Evan
- 1 tablespoon extra virgin olive oil Use this for a light flavor. You can swap it with any cooking oil. - 1 pound Italian sausage Choose mild for a soft taste or spicy for a bold kick. Turkey or chicken sausage works too. - 1 medium onion, finely diced This adds sweetness. Shallots can be a nice swap if you want a milder taste. - 3 cloves garlic, minced Garlic gives warmth. You can use garlic powder in a pinch. - 2 medium carrots, peeled and chopped Carrots bring sweetness and color. Parsnips can be a fun alternative. - 2 celery stalks, chopped Celery adds crunch. Fennel can replace it for a more unique flavor. - 4 cups vegetable broth This is the soup's base. Chicken broth is also great if you want meat flavor. - 1 can (14.5 oz) diced tomatoes These add acidity and depth. Fresh tomatoes can be used if you have them. - 1 teaspoon dried basil Basil gives a lovely aroma. Try oregano if you want a different herb. - 1 teaspoon dried oregano Oregano pairs well with the sausage. Thyme is another good choice. - 1/2 teaspoon red pepper flakes (optional) Add this for heat. Paprika can be a milder option. - 9 oz cheese tortellini This is the heart of the soup. Use spinach or mushroom tortellini for a twist. - 2 cups fresh spinach or kale Greens add nutrients and color. Swiss chard is a suitable substitute. - Salt and black pepper, to taste Season to your liking. Lemon juice can brighten the flavors instead. - Grated Parmesan cheese, for garnishing This adds richness. Try pecorino cheese for a different flavor. Each serving of this soup roughly contains: - Calories: 320 - Protein: 20g - Carbohydrates: 36g - Fat: 12g This soup is filling and warm. It provides good energy for chilly days. Using fresh autumn produce makes this soup special. Seasonal veggies taste better and are often cheaper. Carrots, celery, and greens are in season during this time. They are packed with vitamins and minerals. Fresh ingredients not only boost flavor, but they also support local farmers. Eating what's in season connects you with nature and its cycles. Embrace the rich colors and flavors of autumn in your cooking! To make Autumn Sausage Tortellini Soup, you will cook sausage and veggies. Then, you will add broth and tortellini. Finally, you finish with greens and seasonings. This process takes about 35 minutes, making it quick and easy. 1. Heat 1 tablespoon of olive oil in a large stockpot over medium heat. 2. Add 1 pound of Italian sausage. Break it into small pieces while cooking. Cook it until browned, about 5-7 minutes. 3. Stir in 1 medium diced onion, 3 minced garlic cloves, 2 chopped carrots, and 2 chopped celery stalks. Cook for 5-6 minutes until the veggies soften. 4. Pour in 4 cups of vegetable broth and 1 can of diced tomatoes with juices. Add 1 teaspoon of dried basil and 1 teaspoon of dried oregano. If desired, add 1/2 teaspoon of red pepper flakes. Bring to a boil. 5. Reduce heat and let it simmer for 10 minutes to blend the flavors. 6. Add 9 oz of cheese tortellini to the pot. Cook according to the package instructions: 3-5 minutes for fresh or 8-10 minutes for frozen tortellini. 7. After the tortellini is cooked, stir in 2 cups of chopped spinach or kale. Cook for 2-3 minutes until the greens wilt. 8. Taste the soup and season with salt and black pepper as needed. Serve hot, topped with grated Parmesan cheese. - Don’t rush the browning. This step adds flavor. - Don’t skip the simmering. It helps the flavors mix well. - Avoid overcooking the tortellini. This keeps them from becoming mushy. - Taste and adjust seasoning. Each broth has a different salt level. Sautéing is key to flavor. Start with good oil in a hot pot. Cook the sausage first until it’s nice and brown. This step gives the soup a rich taste. Next, add onion, garlic, carrots, and celery. Sauté until the veggies soften. This usually takes about six minutes. Simmer the soup on low heat after adding broth and tomatoes. Let it cook gently for ten minutes. This allows the flavors to mix well. Always taste before serving. Adjust seasoning with salt and pepper as needed. Want to boost the flavor? Try adding a splash of balsamic vinegar. It brings a sweet tang. You can also add a bay leaf while the soup simmers. Just remember to take it out before serving. For a creamy texture, stir in a bit of heavy cream just before serving. Fresh herbs like basil or parsley can make a big difference too. Adding them at the end keeps their bright taste. Presentation matters! Serve the soup in deep bowls. Top each serving with grated Parmesan cheese. This adds flavor and looks nice. A sprinkle of fresh herbs also brightens the dish. For sides, crusty bread is a great choice. Garlic bread is even better. This soup is warm and inviting, perfect for autumn nights. For the full recipe, check the link above. {{image_4}} You can customize your soup with different ingredients. If you want a lighter option, swap the Italian sausage for ground turkey or chicken. For a vegetarian twist, use mushrooms or lentils instead. You can try different tortellini too. Look for spinach or mushroom-filled varieties. If you don’t have spinach, kale or Swiss chard work well. If you need gluten-free options, choose gluten-free tortellini. You can also use rice or quinoa as a base. For a vegetarian version, skip the sausage and add more veggies. To make it vegan, replace the cheese tortellini with a plant-based option and skip the Parmesan. Use vegetable broth to keep it fully vegan. Add a global flair to your soup. For Italian vibes, try fresh basil or rosemary. If you want a Mexican twist, add cumin and cilantro. For an Asian touch, use ginger and sesame oil. Spice it up with curry powder for an Indian flavor. These additions change the taste and make it unique. To store your Autumn Sausage Tortellini Soup, let it cool first. Use an airtight container to keep it fresh. Place the soup in the fridge within two hours of cooking. It can stay good for about 3 to 4 days. When you want to enjoy it again, just scoop out what you need. If you want to freeze the soup, use freezer-safe containers. Make sure to leave some space at the top for expansion. The soup can last for about 3 months in the freezer. When you’re ready to eat, thaw it overnight in the fridge. This helps keep the flavors intact. To reheat, you can use a pot on low heat. Stir the soup often to avoid burning. You can also use the microwave. Heat it in 1-minute bursts, stirring in between. This ensures even warming. Always check the temperature before serving. It should be hot throughout to keep the flavors fresh. For the full recipe, check out the complete guide to making this delicious soup. You can meal prep Autumn Sausage Tortellini Soup easily. First, cook the soup as you normally would. Let it cool completely after cooking. Then, store it in airtight containers. You can keep it in the fridge for up to three days. For longer storage, freeze the soup. Just remember to leave out the tortellini if you plan to freeze. You can add it when you reheat the soup. This keeps the pasta from getting mushy. Yes, using homemade broth adds a great touch. Just make sure it is well-seasoned. If your broth is low in salt, add a pinch more when cooking. The flavor of your broth will shine through. Homemade broth can enhance the soup's warmth and comfort. It's perfect for a cozy autumn meal. You can serve this soup with a variety of sides. Crusty bread is a favorite. It’s perfect for dipping. Garlic bread adds a nice kick too. A fresh green salad also works well. It balances the hearty soup. Lastly, consider serving with some grated Parmesan on top. It adds a creamy finish that you will love. For more ideas, check out the Full Recipe for extra tips! This blog covered how to make Autumn Sausage Tortellini Soup. You learned about key ingredients and their substitutes. Nutritional information helps you track calories and nutrients. We discussed cooking steps and shared common mistakes to avoid. In the tips section, I offered ways to enhance flavor and serve your soup. Variations cater to different diets and global tastes. Finally, the storage section ensures your leftovers stay fresh. With these insights, you can make a delicious soup that delights everyone.

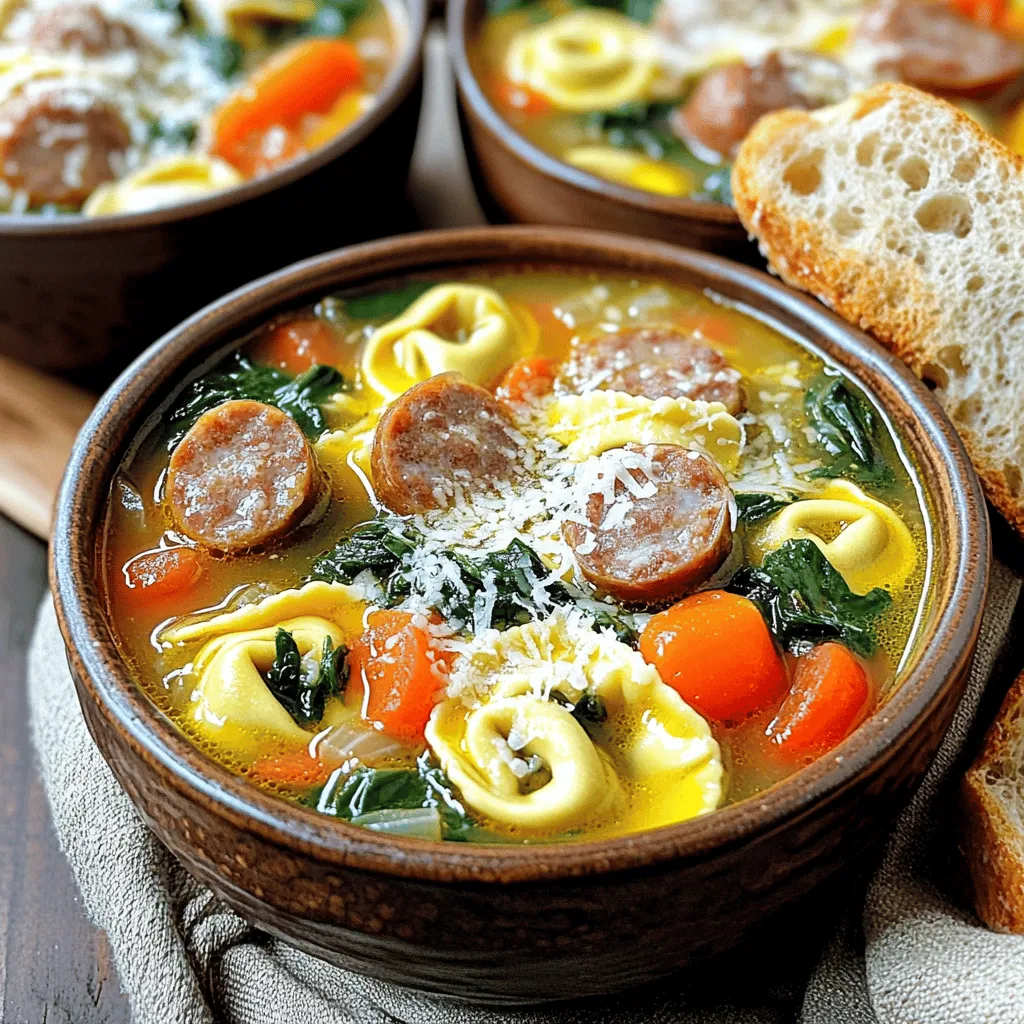
As the leaves change and the air turns crisp, nothing warms the soul like a bowl of Autumn Sausage Tortellini Soup. This dish combines hearty sausage and tender tortellini, making …

Read more

Categories Dinner Leave a comment
Older posts
Newer posts
← Previous Page1 … Page9 Page10 Page11 … Page124 Next →

TOSSED FLAVORS

Where flavors are fresh, vibrant, and ready to toss! 🥗

PAGES

Home About Contact Privacy Policy Terms & Conditions Cookie Policy GDPR Policy Copyright Policy Disclaimer

CATEGORIES

Appetizers Desserts Salads Breakfast Dinner

Contact

  • Pinterest
  • Mail
Copyright © 2026 Tossed Flavors. All rights reserved.