If you’re looking for a sweet treat that’s easy to make and as delicious as it sounds, you’re in the right place. These Easy No-Bake Pumpkin Cheesecake Balls are as simple as they are tasty. With a few basic ingredients and straightforward steps, you can whip up these delightful bites in no time. Let’s dive into the fun and tasty world of pumpkin cheesecake goodness!
Ingredients
List of Required Ingredients
To make Easy No-Bake Pumpkin Cheesecake Balls, gather these ingredients:
– 1 cup cream cheese, softened
– 1 cup pumpkin puree
– 1 cup powdered sugar
– 1 teaspoon vanilla extract
– 1 teaspoon pumpkin pie spice
– 1 cup crushed graham crackers
– 1/2 cup white chocolate chips (for optional coating)
– 1/4 cup finely chopped pecans or walnuts (for optional coating)
Ingredient Substitutions
If you need to change some ingredients, here are options:
– Use Greek yogurt instead of cream cheese for a lighter flavor.
– Swap pumpkin puree with butternut squash puree for a different taste.
– Replace powdered sugar with coconut sugar for a less sweet option.
– Use almond extract if you prefer a different flavor over vanilla.
– For a gluten-free version, buy gluten-free graham crackers.
Measurement Tips
Accurate measurements help your recipe turn out great. Here’s how:
– Use a dry measuring cup for solid ingredients like graham crackers.
– Pack the cream cheese into the measuring cup for a precise amount.
– Level off the powdered sugar with a straight edge for accuracy.
– If using pumpkin puree from a can, make sure it’s pure pumpkin, not pie filling.
– Always have a kitchen scale handy for exact measurements, especially for baking.
You can find the full recipe for Easy No-Bake Pumpkin Cheesecake Balls by visiting the recipe link.
Step-by-Step Instructions
Preparation Steps Overview
First, gather all your ingredients. You will need cream cheese, pumpkin puree, powdered sugar, vanilla extract, pumpkin pie spice, and crushed graham crackers. For optional coatings, have white chocolate chips and chopped nuts ready.
Begin by softening the cream cheese. This step is key for a smooth mix. Use a large mixing bowl to help with space.
Mixing and Rolling Techniques
Start mixing with a hand mixer. Beat the softened cream cheese for about 1-2 minutes until it looks creamy. Next, add the pumpkin puree, powdered sugar, vanilla extract, and pumpkin pie spice. Keep mixing until everything is silky smooth, which should take another 1-2 minutes.
Gradually fold in the crushed graham crackers. Use a spatula if needed. The mix should hold together well.
Now, scoop out small amounts of the mixture, about 1-2 inches wide. Roll these portions into balls with clean hands. Place them on a baking sheet lined with parchment paper. This keeps them from sticking.
Coating Options and Techniques
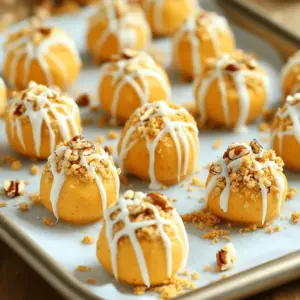
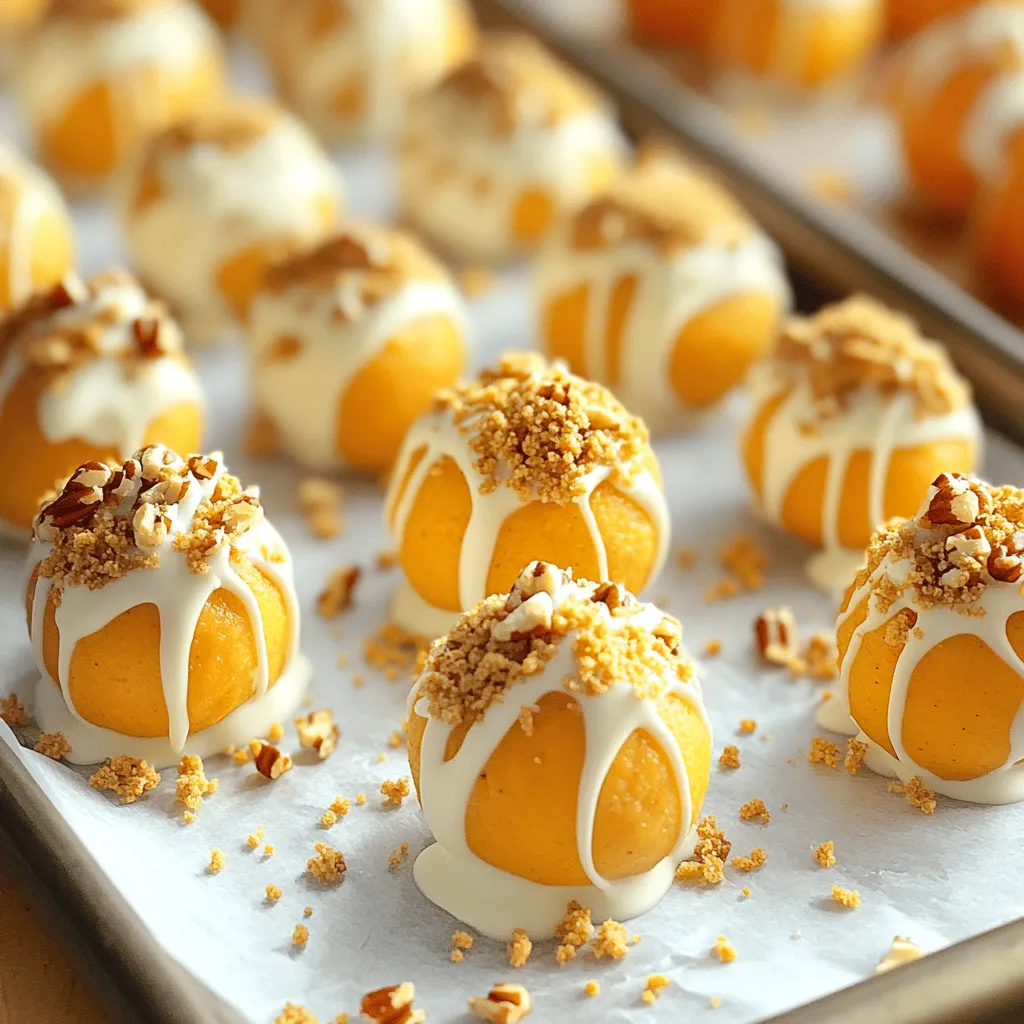
If you want to coat the balls, melt white chocolate chips in a microwave-safe bowl. Heat them in 30-second bursts, stirring well each time. Once smooth, dip each ball into the melted chocolate. Make sure it is fully coated.
For extra crunch, roll the chocolate-covered balls in finely chopped nuts. This adds a nice texture.
Once you finish coating, return the balls to the baking sheet. Chill them in the fridge for at least 1 hour. This helps them firm up perfectly.
For the full recipe, check the main section. Enjoy your delightful pumpkin cheesecake balls!
Tips & Tricks
How to Achieve the Perfect Texture
To get the best texture, start with softened cream cheese. This makes it easier to blend. Mix the cream cheese until it is smooth and creamy. Then, add pumpkin puree and other ingredients slowly. This helps keep everything well combined. When adding the crushed graham crackers, do it gradually. Stir gently until the mixture holds together well. If it feels too soft, add a bit more graham crackers. You want a texture that is easy to roll into balls but not too dry.
Serving Suggestions and Presentation Ideas
For a fun presentation, arrange the pumpkin cheesecake balls on a festive platter. Use a sprinkle of extra pumpkin pie spice on top for a seasonal touch. You can also use colorful cupcake liners for individual servings. This adds charm and makes them easy to grab. Try serving them with a side of whipped cream or a drizzle of caramel sauce for extra flavor. These ideas make your treat look great and taste even better.
Common Mistakes to Avoid
One common mistake is not softening the cream cheese enough. This can make it hard to mix. Another mistake is adding all the ingredients at once. This can lead to lumps. Make sure to blend each ingredient well before adding the next. Also, avoid rolling the balls too big. They should be about 1-2 inches in diameter for the best bite. Lastly, don’t skip the chilling step. Refrigerating them helps firm up the texture and enhances the flavor.
Variations
Flavor Variations
You can change the taste of these pumpkin cheesecake balls easily. Add different flavors to keep things fun. For a chocolate twist, mix in cocoa powder with the cream cheese. You can also dip the balls in melted chocolate instead of white chocolate. Want something sweeter? Try caramel sauce drizzled on top. Each option brings a new delight to your palate.
Dietary Adjustments
Many people have special diets. Luckily, these cheesecake balls can fit right in. To make them gluten-free, swap out regular graham crackers for gluten-free ones. If you’re looking for a vegan option, use vegan cream cheese and coconut milk instead of regular cream. This way, everyone can enjoy these tasty treats!
Seasonal Add-ins
The seasons bring great flavors, and you can add them too! In fall, try mixing in chopped pecans or walnuts for a nutty crunch. Dried cranberries can add a sweet and tangy twist. In winter, consider a sprinkle of cinnamon or nutmeg for warmth. These seasonal add-ins keep your pumpkin cheesecake balls exciting and fresh.
For the full recipe, check out Easy No-Bake Pumpkin Cheesecake Balls.
Storage Info
Best Storage Practices
To keep your Easy No-Bake Pumpkin Cheesecake Balls fresh, store them in an airtight container. This way, they won’t dry out or absorb other smells from your fridge. I recommend separating layers with parchment paper. This keeps them from sticking together. If you have a lot, you can use a larger container with dividers.
Freezing Pumpkin Cheesecake Balls
You can freeze these cheesecake balls for later enjoyment. First, place them on a baking sheet lined with parchment paper. Let them freeze for about an hour until firm. After that, transfer them to a freezer-safe bag or container. They will keep well for up to three months. When you’re ready to eat them, just thaw them in the fridge overnight.
How Long They Last in the Fridge
In the fridge, these delightful treats last about five to seven days. Make sure to check for any signs of spoilage before serving. If they start to look or smell off, it’s best to toss them. Enjoy your pumpkin cheesecake balls while they’re fresh for the best taste! For the full recipe, check the entire article.
FAQs
Can I make these cheesecake balls ahead of time?
Yes, you can make these cheesecake balls a day or two in advance. Just store them in an airtight container in the fridge. This allows the flavors to blend nicely. It also gives you a stress-free treat to enjoy later.
What can I substitute for cream cheese?
You can use mascarpone cheese or Greek yogurt as a substitute for cream cheese. Both options work well, but they will change the flavor slightly. Mascarpone will give a rich taste, while Greek yogurt will add a tangy note.
How do I make these cheesecake balls more festive?
To add a festive touch, try rolling the balls in colorful sprinkles or crushed candy canes. You can also use seasonal spices like nutmeg or add a drizzle of caramel on top. Present them on a pretty platter to make them pop at your next gathering. For the full recipe, check out the detailed guide above.
In this article, we covered all you need to know to make delicious cheesecake balls. We discussed the key ingredients and helpful substitutions. You learned the step-by-step process from preparation to coating. I shared tips to ensure the perfect texture and common mistakes to avoid. We explored different flavor variations and storage tips to keep them fresh.
Now, with this knowledge, you can create tasty treats that impress! Enjoy making these cheesecake balls your own and happy baking!